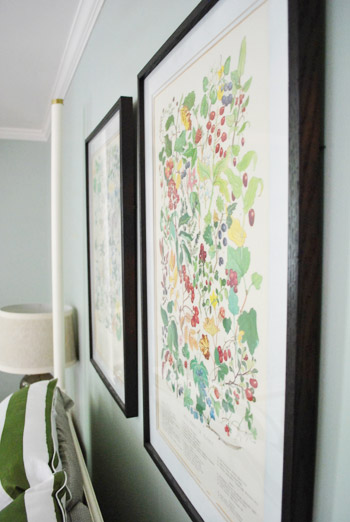
Do you remember these puppies that we picked up at a yard sale last year for $10 a pop? They’re old professionally framed prints of the berries and wildflowers of Alaska, which we thought were sweet since we honeymooned there.
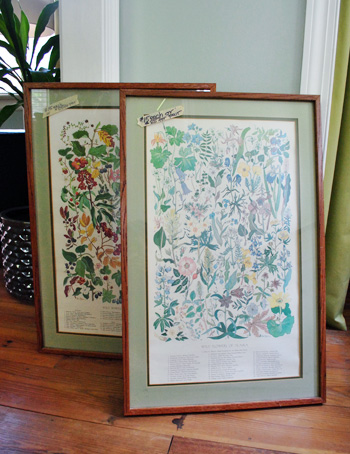
So we spray-painted the frames (and mats!) and hung them on either side of our bed. If that doesn’t jog your memory, perhaps this old pic from that post shall will.

Well, recently they’ve – say it with me now – come together.
Here’s how it all went down. Actually, speaking of going down – it kinda started when a certain ram went down during our book shoots.
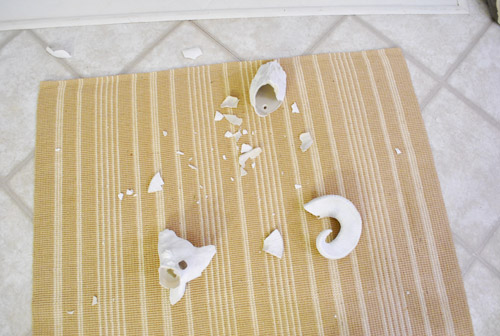
Since neither all the king’s horses nor all the king’s men could put Ramsey back together again, the space above our bed has been a devoid of anything for a couple of months. We’ve contemplated tracking down a similar animal head (an idea Sherry practically salivated over) but you know we like to use what we have, so we decided we should just try rehanging the prints we already had there. Before making any unnecessary holes, we took them down and just propped them up like this to try to visualize them there.

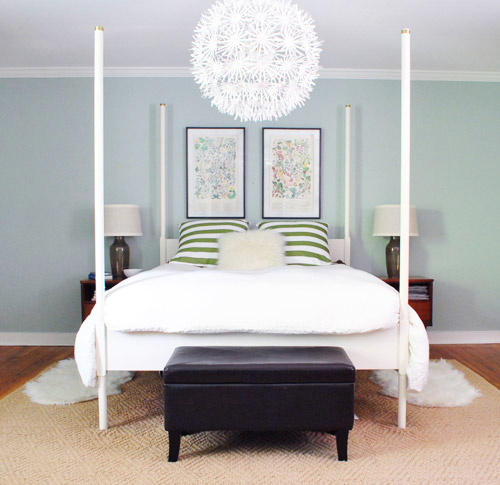
We originally thought the chandelier might block too much of them, but it looked promising so we decided to just got for it. But this was no easy task because those heavy suckers need two anchored screws to keep ’em in place. Plus we had to be careful to get them centered within the bed and level with one another, all while not putting too many holes in the wall.
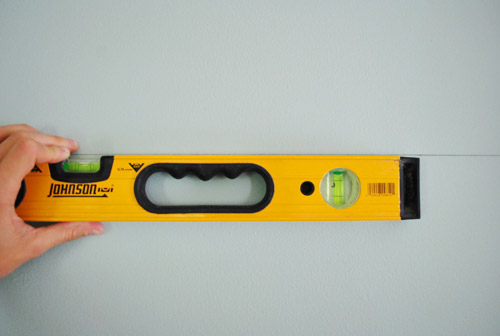
Thus began our not-so-scientific, but no-less-intricate system of rehanging them. It started by connecting my existing holes (which I had meticulously measured the first time) with a piece of sewing thread taped to the wall to create a nice level guide.
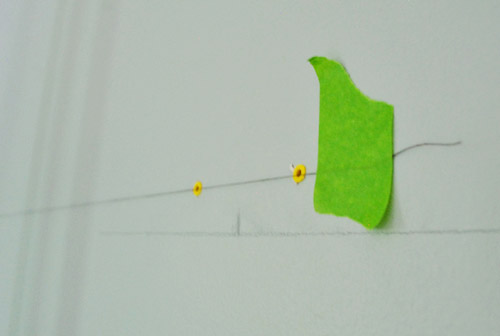
Just to be sure, I checked that it was level before basing all of my marks on it. Phew. Level it was!
Now that we had the height marked, we had to figure out where the holes needed to go side-to-side so that the frames were roughly equidistant from each other and the bed posts. So I drew a sketch and unleashed my inner math geek. Yep, I think that what I did qualifies as Algebra. Well, except for the part where I solved “X” to equal “7-ish.” Sorry Mrs. Montgomery.
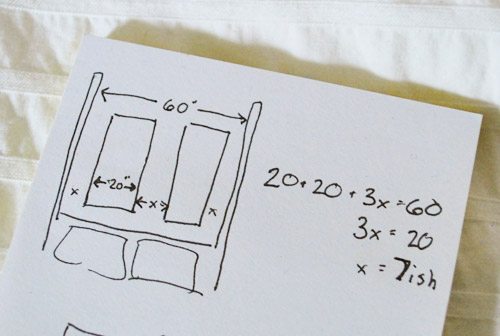
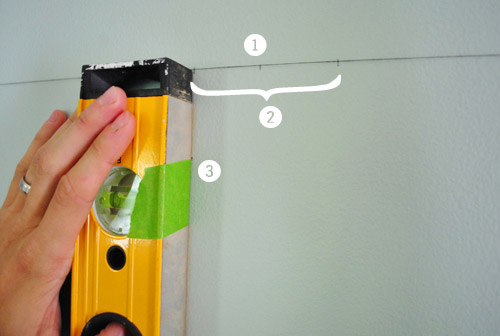
Knowing how far apart everything should be allowed me to start marking. The hole that the ram hung from was my center guide, so I measured out 13.5″ (half of 7 + half of 20) on either side to mark the center of each frame (#1 in the pic below). And since we hang these guys by two screws (it not only supports the weight more, but keeps it from hanging crooked) I made marks a couple of inches out on either side (#2). Sherry wanted the frames to hang slightly lower than they did before (since we no longer had to clear the table lamps and didn’t want them to be blocked too much by the chandelier) so I also marked down a bit using a taped guide on my level (#3).
Confused yet? Me too. So let’s just skip ahead to the after pictures. Okay? Okay. We ended up tweaking things a bit so the frames were a smidge closer to each other, so the space between them is about 5″ and the space on either side is almost 8″.
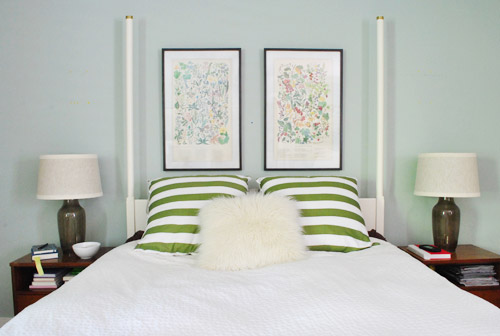
We’re digging the change so far. We feel like they fill up the space nicely – much more so than the ram ever did (not to speak ill of the dead or anything).
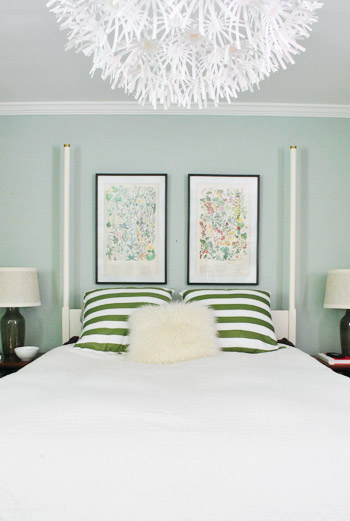
Although the chandelier does overlap them when you face the bed at normal height (these pics were taken with our tripod, which is only about four feet tall) it’s a nice layered look. Nothing too crazy or cramped looking.
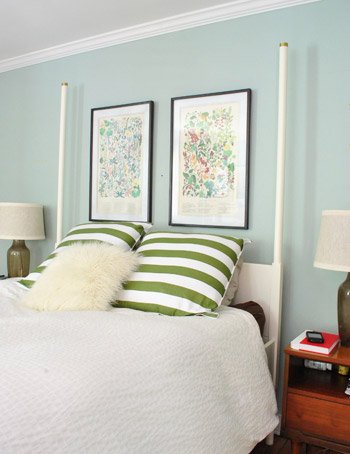
Wish we had thought to snap a pic at our height for ya from head-on. We did get this guy from the side though. And there’s always next time.
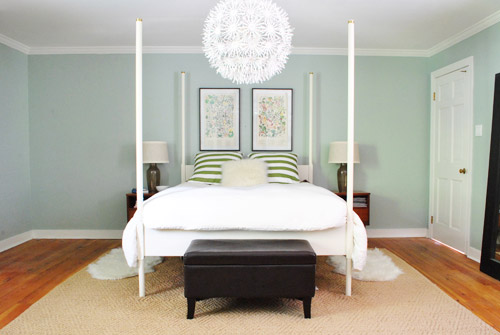
But yeah, this room is so not done. Look at it wide. Um… we have a lot to do before it makes any sense. Seriously, I know you guys are staring at this bed in a sea of emptiness and wondering what the heck we’re doing. But in the words of $herdog: we got planz for dayz.
In fact, we have a few other things planned this weekend- and you know we’ll keep you posted! What do you guys have going on this weekend? Any house stuff on the agenda? Have you ever had to do math to hang pictures? Or tried using string to keep a level line on the wall? It actually worked surprisingly well.
Psst- We announced this week’s giveaway winner, click here to see if it’s you.

ingenuitygirl says
Love the rug – great layering of pattern, along with the pillows. But since you are asking . . . I can see a longer bench at the end of the bed, and a white parsons table console in the niche on the left (maybe with storage baskets underneath) I bet you could even build it yourself!
YoungHouseLove says
Oh yes, we’d love a larger bench and something in that nook! It’s all in the long-term plan for sure!
xo,
s
Sarah says
How do you cover the holes left from where your prints hung before? I always worry that touch-up paint will be glaringly obvious. BTW, the new locations look awesome.
YoungHouseLove says
We didn’t even do that yet, haha. But spackle, sanding, and painting (thinly, while feathering out) works for us!
xo,
s
natalie says
Looking good….. i don’t know if this was suggested already, since i haven’t scrolled through all 5 pages of comments, but do you all need think they need to be closer together (in the middle). usually the rule is 2″ apart max. and maybe push them up 2″ also, a little higher (gives pillows room to breathe) and then closer in the center and you’re golden!
YoungHouseLove says
Thanks for the tip! Might tweak them someday. We just didnt want them looking too close in the middle and too far from the sides- tried to balance it all.
xo,
s
laura joyce says
I had a tiny guest room with a huge bed in it so I sold the bed, bought a white day bed, bought a black and white striped crate and barrell rug, lugged a white distressed with mirrors sort of armoire/chest up the stairs from homegoods, and cleaned the whole room out! WHEW! just need a comforter, curtains, and desk to finish the room off!!
YoungHouseLove says
Sounds like you were busy! Love it!
xo,
s
beth says
HI….love the color on the wall, would you mind sharing the name?
Thanks!
YoungHouseLove says
Thanks! It’s Carolina Inn Club Aqua by Valspar!
xo,
s