We got this rocking chair for $25 thanks to craigslist, because we loved the simple shape and the low back and the rich chunky wood. Plus I’ve been dying to add a rocker to the new house’s living area (since I feed Clara all the time while hanging out in the public part of the house, as opposed to retreating to the nursery or the bedroom). Plus she loves rocking at John’s mom’s house, so we thought it would contribute to good quality time with the bean. But this rocker is obviously lacking a bit in the seat and back cushion area. No worries, we just figured we’ll reupholster it.

Until we realized that we had no earthly idea how to attack the double sided back cushion. As for the seat, we’re planning to remove the boards that make up the bottom, add a foam cushion, staple batting around the back to hold it down/smooth it out, and reupholster that the same way we’d do any removable chair seat (and then screw it back in from the bottom). But the back has us stumped with a capital um.
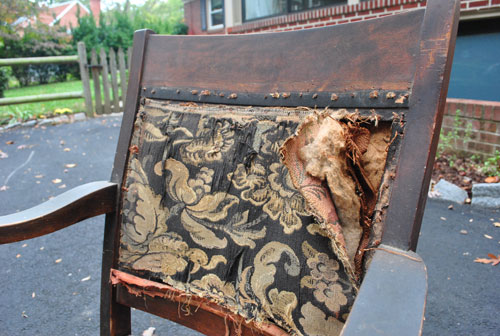
If you remove the fabric you can see right through the chair. In other words there are two upholstered panels on each side that were probably stapled and then trim was used to cover the staples, but we’re not sure if we should add some structure so it’s not just fabric that supports a person’s weight against the back. That seems like it could sag over time, right? Any ideas? We’ve seen that seat-belt looking stuff that you can weave to create support and we’re wondering if we need to do something like that for the back (so people can lean on the chair without feeling like they’re falling into a hole) and then somehow attach two more fabric panels on either side of it (you know, for a seat-belt sandwich?). Can you tell we have no idea what we’re doing?
Somebody help us!

Adam says
What a beautiful rocker! I am excited to see it recovered! What a coincidence, really, as I recently picked up a few bargain chairs myself. Check ’em out at Up and Adam!
Marcia S. says
I had some old dining chairs without seats once and upholstered plywood forms with foam/batting/fabric as you are thinking of doing. They were still pretty hard. The webbing someone else suggests in place of the plywood would make the seat more comfortable. Although if that’s too much to tackle, upholstering the plywood would work. You could always make a thick cushion in the same fabric as the seat to make it more comfortable. I wouldn’t just put fabric in the back without webbing for plywood — it probably wouldn’t hold up well. Good luck!
Natalie says
I’m not upholstery expert but I just had to mention how much I love that you shared that song/video! lol
Chelsea says
Nancy above is exactly right. I reupholstered two chairs last year with double sided back and when I removed the old fabric there was a thin foam cushion (you could use batting but the foam holds it’s shape nicely) then that thick seat belt material then the back fabric which was stapled to the wood frame from the inside. It worked really well, I would suggest though not to use a pattern with stripes because it made stretching and stapling tough.
I also filled in old holes in the frame (where it wouldn’t show) with wood putty and let it dry before adding new staples.
sonya says
I know you probably want to save some cash by doing a DIY job on the back of it, but IMHO, I think you’d be better off taking it to an upholstery shop and getting an estimate… it may be worth it in the end after the time/effort/money for materials you may spend trying to figure it out. I think some things are better left to the experts! The only thing I’d be brave enough to attempt would be the seat. That being said, there has got to be some sort of DIY upholstery guide on the web that you could consult.
Kendra says
So I haven’t read through all 160+ comments so I am not sure if this has been suggested. But you could do the seat belt idea but instead of the middle, put it on the back. So you would have the fabric in the front, the cushion in the middle followed by the seat belt weave thing and then to hide it put matching fabric on the very back.
And also an idea instead of staples, use upholstery nails to attach the fabric. That kind of chair could totally rock some gold nail heads!
Michelle says
I actually have a similar backed chair. You’ll need webbing and a webbing stretcher (upholstery tool). Then, upholstery quality foam, batting and dacron before fabric is applied. Check out the book Step-by-Step Upholstery by David Sowle. It is a great resource.
I have been lucky enough to find a wonderful lady who is a reupholsterer for our local design shops. She has taught me alot over the summer months. It is so fun to see how something so old and worn can turn into this beautiful new piece with your own style. Good luck and have fun:)
StephanieK says
Hi there! I recently (this past weekend) was introduced to your blog by my best friend (also named Stephanie). I have spent the entire week reading all your posts (and sneak-reading during work – eep! don’t tell anyone!). I just saw this and it caught my eye – I have been just DYING to figure out a similar upholstery project of my own! I have a very old and thick-wood rocking chair like yours, with a front/back material situation. I am thinking the key will be the criss/cross webbing in the middle, with thin foam on either side, followed by the material piece, which will have to be stapled/nailed/tacked/decorative stud-ed into place. Lucky for you, there is at least some semblance of pre-existing structure to review – I only have an empty chair frame! I can’t wait to see what you guys decide because googling is NOT helping me – I hope you can! GOOD LUCK!
Kylee says
I agree with everything Nancy Shirley recommends. I have reupholstered quite a bit and you should definitely use webbing. It will be a pain to have a piece of cardboard cut to fit and it degrades over time. You can usually buy the thick webbing strips by the yard. Tack them down in a woven pattern really tightly with upholstery tacks. You can use the old foam if it still has a good shape and new batting. Ribbon or gimp can be glued over the staples. One tip would be to fold the fabric over so there is a half inch hem and then staple. Not having a frayed edge there to worry about will make your life easier when you glue on your trim. As far as leaving it the professionals, this is such an easy project and a great way to learn upholstery basics!
Marianne@Songbird says
Hi John and Sherry,
It can be done, I have recently reupholstered a similar chair from scratch. For the back staple in a sturdy cardboard, cover with thin foam (spray glue) and then staple your fabric in the right order.
For a tutorial you could check out my post :-)
http://www.songbirdisnesting.com/2010/10/how-to-reupholster-chair-while-trying.html
I used postal sacks for material by the way. Sturdy, cheap and great looking.
Good luck! Marianne
Trinh says
This made me think of this DIY upholstery site I stumbled on from another blog. Here’s a link to the ‘seat belt’ stuff which is called webbing. I’d love to see what you guys end up doing. :)
http://www.diyupholsterysupply.com/Upholstery-webbing.html
Hope that was helpful!
Esther says
I am missing reading two new posts everyday… :-(
but if this silence means great posts once you move in, then I’m all in! :-)
YoungHouseLove says
Hey Esther,
As we mentioned in this post, we’re actually moving away from a super regimented schedule of two posts a day just to keep things fresh, real-time, and not too predictable (we’ve also eliminated all winner follow up posts and now just announce the lucky lad or lady’s name on the original giveaway post). But we have been adding random evening and weekend posts (like we did this past Sunday) to make up for the days that we just post once. We’re crazy like that!
xo,
s
Rebecca says
I know nothing about upholstery, but I’ve always wanted to do something with Shaker Chair Tape, meant for making woven seats and backs on Shaker furniture. This site sells some lovely tape, and I think they tell you how to go about weaving it, too.
http://www.shakerworkshops.com/catalog/shaker_chair_tape.php/tape
Kate says
What a great rocking chair! I picked up a little chair from a thrift store a while ago and had the same issue with the back. I’m self-taught and just figured it out as I went. I wrote a tutorial on my blog: http://oh-write.blogspot.com/2010/09/yellow-cane-chair-tutorial.html. It’s so simple…I know you can do it! Looking forward to seeing the finished product!
Sammy says
I just remembered this post and thought of you:
http://www.centsationalgirl.com/2009/04/diy-chair-recovered-cinderella-story/
She has upholstered several chairs, so you might look at some of her other posts as well – but this chair is two-sided and the result is fantastic!
Pamela says
Nancy Shirley is exactly right, although you don’t have to use gimp to finish. You could use the trendy-again nailhead tacks, or upholstery tack strips you fold inside your fabric. Also, feel free to use foam under batting for a cushier seat (but definitely stretched webbing instead of plywood for the seat base).
Heather Beals says
The first thing that popped into my head was chicken wire, is that weird? Or pegboard? I would definitely put something up to sturdy it up. Or possibly upholster two pieces of fiber board and then tack those up on either side with a filling in the center? Good luck!
Laura@Silver Celtic Knot says
hello
I am in love with the brown sofa in the Chase commercial, anyone know where I can find one just like that?
YoungHouseLove says
Hey Laura,
Maybe try Room & Board? They have some things that look similar. Hope it helps!
xo,
s
Navy Bean says
Hi Sherry and John,
I just reupholstered a chair this past summer and it was the same as your rocking chair. (Which is an amazing find by the way!) It was my first reupholstery project so I started off by buying a pneumatic stapler on ebay for $25. It was the most important piece of equipment because the staples hold the fabric taut enough so that you only need foam in between the fabric to support it. You can see the step by step process as well as the resources I used in my blog post:
http://navybeanonline.blogspot.com/2010/07/chair-project-done.html
Good luck! I know it will turn out wonderfully!
Kristin says
Hi y’all. I was reading the comments on Friday and ran across the exchange about U-Fab. I had never heard of it, but since there are curtains on exactly 3 of my 12 windows, I knew I must go. Immediately. And happy dance – open ’til 6! Two quick things to tell you, besides (of course) that I loved it:
(1) I started oohing and aahing as soon as I walked in the door, and the woman at the register said, “Are you having a fabric seizure?” I was indeed. (Love that expression.)
(2) The guy helping me asked how I had heard about them. I still wasn’t fully coherent (see #1), but I think I said something like “From the web blog.” Him: “Oh…Facebook?” Me: “No, Young House Love. John and Sherry sent me. Sort of.” (He nodded as if he knew you. And knew I didn’t.) How silly, that he would think Facebook, rather than YHL, would be considered THE blog. :-)
YoungHouseLove says
Hahah, that’s so funny! We love U-Fab. So glad you had fun!
xo,
s
Deborah says
I have done my share of upholstering…..I was taught by a professional. I would actually suggest you consider refinishing or painting the wood part yourself. Then find a professional to do the upholstery. The prices are usually very fair. Upholstery labor is based on yards of fabric not time. The fee for my upholsterer is currently $35.00 a yard if you purchase the fabric from him. If you bring in your fabric he charges $50.00 a yard. To me it is well worth his price because it is so much tighter and smoother than I could do. They know all the tricks and have all the tools and supplies to do the job.
Melissa says
Hi Sherry and John! I love what you have done with all the fireplaces I see in your “afters” I basically just bought a house with your exact dining room “before” pic. Is that fireplace gas? Or do you not use it? I am doing a color called sandstone, so a white-ish beigey color. And my husband does not want me to paint the brick because he says it will just look terrible from smoke markings. Please help me come up with a good rebuttal, so I can get rid of the dark, awful brick wall/fireplace ;)
Thanks so much!
Melissa
YoungHouseLove says
Hey Melissa,
We actually have a fireplace painting tutorial on our Projects page (see it under the header) in the Painting Project category. One fireplace is a woodburning fireplace and one is a gas fireplace and they both will be 100% functional if painted according to the tutorial. You might have to touch up the paint every few years or so if it gets a bit smoky in a few areas, but that’s a quick 1 hour project every few years. Plenty of people have painted fireplaces! Hope it helps!
xo,
s
Julie says
I reupholstered a round back chair…you can see it here http://www.jpaigeart.com under furniture, I am fairly new to all my painting, crafting, recovering. It was double sided, I stapled the back fabric on first (from the front because it looked neater to me)added the foam then the front layer of fabric, and then finally the trim to hide the staples, it was very firm, cushy and supportive. Yours looks like a larger surface area so I would staple a couple rows of the stuff that looks sort of like seat belts (a little thinner)that you find at the fabric store in the upholstery section, stapled down before adding the foam and last layer of fabric for a little extra support. A board would make it a little hard I would think. I love all you guys do!!! Good luck on the new house, can’t wait to see your ideas and how it all comes together (love the new color scheme)!! xoxo Julie
Bryanna S says
I recommend that you use natural latex foam rather than regular foam. Just like your old mattress, that stuff off gasses all sorts of nasty and eventually Clara is going to have her face in all your furniture when she discovers pulling up and walking. If she is anything like my kid, she will especially love the rocking chair so she’ll have lots of face time with the seat of it.
It’ll probably cost more, but it’ll be natural and more healthy which ultimately supports the green home you generally try to go for.
Of course, your couch is filled with the foam and glues too… but its nice to start somewhere :D
Suzanne says
You mentioned in a comment here that you don’t do the big announcement posts for winners anymore. But do you let the winner know personally via email? Or do they lose out if they don’t go back and check for themselves?
YoungHouseLove says
Hey Suzanne,
Yup, we always email our winners to make sure they’re in the know! And we also post a little p.s. note on our Thursday post to remind everyone to go back to the original giveaways post and see if they’re the lucky winner.
xo,
s
Mrs.Kaye says
Oh Goody,I love revitalizing cast-off furniture!!Here’s what I would do: I’d have a piece of plywood cut to fit the size of that hole,run a bead of wood glue around the edge of said wood and fit it into the hole. Then I would secure it on both sides with metal plates that are made to join 2 pieces of wood together(they look like a door hinge,only sans the middle pin/hinge thingy). The Idea here is to create a fully upholstered back with just the wood on the sides exposed.I would get a 1″-1 1/2″ foam cut a 1/4″ smaller on each side (to allow for nailhead trim)for the inside back and just a thin-comes-on-a-roll type foam found at most joanne’s for the outside back and then roll batting over the entire area(use spray adhesive to secure the batting to the foam on both sides–very important step!)then as far as upholstering goes you could a)secure the fabric to the underside of that horizontal piece of wood,pull the fabric taught up and over the top and secure the rest, and for the sides-nailhead trim!you can get easy to install nailhead trim that you only have to hammer an upholstery tack every 4-5th one.or b) what I would do: I would use 2 piecs of fabric for front and back and connected to a 3rd for the top(a gusset)and slip it over the top of the chair like a slipcover and again,staple it to the underside of that bottom wood ‘rung’. To keep continuity I’d fully upholster the seat in the same manner alos instead of a plain drop-in seat.
Shelley @ Green Eggs & Hamlet says
I’m no upholstery expert but Oh Brooke does awesome work. Check out this tutorial that she did on cane chairs with a double-sided back: http://ohbrooke.com/2010/07/28/before-and-after-cane-chairs/
Elizabeth Nixon says
I can’t wait to see what you guys end up doing! I just picked up a similar chair and am reupholstering it too!
Fun stuff.
Misty says
Sherry & John:
I know this might be lame, but…Im sad about the Burger Blog thing! My son,9, and I check it every few days and he loves it! He asks for a Burger dog all the time (and is hoping he gets one for Xmas – which isnt happening, lol). He will be so sad!
YoungHouseLove says
Hey Misty,
Alas, the pooch calls the shots and after over a year he was kind of burned out. Here’s hoping he returns to blogdom in a few months – and until then you can always catch him on Clara’s flickr page (in fact he was the star of a video that we uploaded just last night). He’ll also be dropping in over here on YHL too, so stay tuned for little Burger cameos as always.
xoxo,
s (& b)
Katherine says
Love the bones of the chair, it is one of those items that passes from home to home and it never gets left behind. I refinished two 60 yr old cane chairs this past year and recovered them in vintage fabric. I could almost hear the chairs sigh with relief when it was complete. There is a lot of soul in aged furniture.
Melissa Bufford says
Thanks Sherry! I did read that tutorial (and read it again) it just seems so easy! :) I am very excited about this!
Thank you for the quick response!
Courtney says
My Mom has the same complex, accept she’s scared of craigslist. She’ll generally just pick stuff up off the side of the road. When my sister and I were younger she was looking for a hobby to get away from her bratty girls. Upholstering won! I can’t tell you how many pieces we have in our attic that are on her “list.” The picture of the chair got me to thinking. My family and I are from the Strafford Hills area in RIC. In the Strafford Hills shopping center is a really cool Antique store- not sure if you’ve been. But my favorite place to find old pieces like this is in Lancaster County in Kilmarnock, the Kilmarnock Antique Mall. If you’ve never been to that area it’s beautiful- GO! BTW and I’ve been wanting to ask you- before I moved to Northern Virginia I worked at Joe’s Inn at Bon Air for 8 years- through high school and college. Have you all ever eaten there?
YoungHouseLove says
We love Joes Inn! So funny. It’s such a small world. And we’ll have to check out the antique mall you recommended!
xo,
s
Twila says
Is this project still in the works?? I can’t wait to see the results !!
YoungHouseLove says
Yes- we’re slowly but surely working up the guts!
xo,
s
Chelsea @ Adorning Alabama says
I recovered a FreeCycle rocker TWICE. (First I was hoping for a boy, second we found out it was a girl!)
http://adorningalabama.blogspot.com/2009/12/rocker-re-do-part-two.html
It’s pretty easy, you guys can totally do it!
YoungHouseLove says
Haha, too funny! Love both versions. So cute.
xo,
s
Rena says
Does anyone know what kind of chair this is? What century it is and what, if any, the value is for it.
Thank You
YoungHouseLove says
Anyone know?
xo,
s
Kim Schoenherr says
What did you end up doing?
YoungHouseLove says
Haha, nothing major yet. Hoping to get the nerve up to tackle it this coming week…
xo,
s
Dara says
Ok, I didn’t read all 200 comments, so someone might have already mentioned this. I found a blog recently (cant remember which one it was), where they used cardboard as a backing. They just wrapped that up with some foam, batting and then stapled to the chair, and then used some kind of cording on the edges. They did this on the front and back of the chair. Or like you said, something like this : http://pinterest.com/pin/45171458/, Can’t wait to see what you guys decide.
YoungHouseLove says
Thanks for the tip! More folks have recommended cardboard so it definitely makes me want to try it!
xo,
s