We got this rocking chair for $25 thanks to craigslist, because we loved the simple shape and the low back and the rich chunky wood. Plus I’ve been dying to add a rocker to the new house’s living area (since I feed Clara all the time while hanging out in the public part of the house, as opposed to retreating to the nursery or the bedroom). Plus she loves rocking at John’s mom’s house, so we thought it would contribute to good quality time with the bean. But this rocker is obviously lacking a bit in the seat and back cushion area. No worries, we just figured we’ll reupholster it.

Until we realized that we had no earthly idea how to attack the double sided back cushion. As for the seat, we’re planning to remove the boards that make up the bottom, add a foam cushion, staple batting around the back to hold it down/smooth it out, and reupholster that the same way we’d do any removable chair seat (and then screw it back in from the bottom). But the back has us stumped with a capital um.
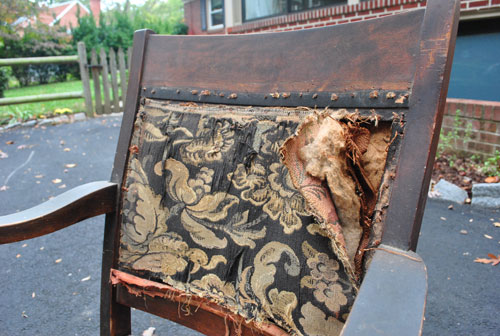
If you remove the fabric you can see right through the chair. In other words there are two upholstered panels on each side that were probably stapled and then trim was used to cover the staples, but we’re not sure if we should add some structure so it’s not just fabric that supports a person’s weight against the back. That seems like it could sag over time, right? Any ideas? We’ve seen that seat-belt looking stuff that you can weave to create support and we’re wondering if we need to do something like that for the back (so people can lean on the chair without feeling like they’re falling into a hole) and then somehow attach two more fabric panels on either side of it (you know, for a seat-belt sandwich?). Can you tell we have no idea what we’re doing?
Somebody help us!

Rachel P says
You should head to U-fab in Carytown and bring pictures. They have super affordable fabric and are SO helpful in helping tackle your projects from pillows to upholstery. They also have an upholstery service. http://www.ufabstore.com/u-fab/u-fab_-_discount_fabric_outlet.html
Julie says
Could you add a really thin piece of plywood and attach foam to the front and back and cover with fabric? You probably have to do the front side like you would the bottom of the seat, then turn around and attach some foam after it’s attached to the chair, then add the back fabric and then add the trim to the front and back? It’s hard to tell what you can do without being there. Can you do a fake caning of the chair? You can drill little holes around the frame and thread some tough string through like the cane chairs (doesn’t have to be perfect or pretty since you aren’t going to see it), then add the foam or batting and staple the fabric just above the small holes?
Kristi @ Addicted 2 Decorating says
I just did a chair like this recently, and yes, it needs structure. An upholstery shop should have what you need. It’s basically a piece of cardboard (non-corrugated) that you cut to the shape you need with scissors or a utility knife, and then sandwich between the layers of fabric and staple into place. Pretty easy! I had to purchase a piece much larger than I needed, and it cost about $4.
Katrina says
No advice here yet, but we’ll be tuning in for your success (and we know you’ll keep trying until you’re successful!) because we have some dining room chairs we want to recover soon and are a little daunted at the task too!
L says
Our public library has this book, that I couldn’t resist checking out http://www.amazon.com/Complete-Guide-Upholstery-Step—Step/dp/0312383274/ref=sr_1_1?s=books&ie=UTF8&qid=1290185743&sr=1-1
It looked fantastic–you might want to see if it’s in your library
Laura says
Check these out…
http://www.centsationalgirl.com/2009/04/diy-chair-recovered-cinderella-story/
http://www.centsationalgirl.com/2009/04/diy-chair-recovered-from-bleak-to-tres-chic/
Hope this helps!
YoungHouseLove says
Holy amazingness. Thanks so much for the advice everyone!
xo,
s
erin m. says
I don’t have any advice, but I can’t wait to see the finished product! That is a great chair.
Sandy says
Laminate the fabric. I know what your thinking, shiny, 1950’s Donna Reed, gradma couch. But trust me. Laminate has come a looooong way. I sent mine off to get laminated, and honestly, the fabric looks exactly the same and feels soft, I dont know how they do it, but it is magic. And then you can get something awesome and not worry about dog and baby craziness ending up on it. I send mine to Dallas, but I live in TX, so I am sure there is something closer to yall.
Anna says
Here’s a fun etsy video you should check out:
http://www.etsy.com/storque/handmade-life/process-upholstery-with-spruce-home-7978/
The girls at spruce do great work. It’s not really a how-to but just a look at how professionals do it :)
Julie Anne says
Kristi @ Addicted to Decorating has the essential key: you need a piece of standard cardboard cut to the size of the cushion to keep everything stable and supported.
Hilary says
I have somehting just like this I want to recover – but just so you know it feels just fine to sit in as is.
Laura says
I bought a very cool 1920s parlor chair on craigslist and discovered the same problem with the double-sided upholstered back, so it’s been sitting in the spare bedroom, stripped of its fabric (which tore to shreds when I removed it). I can’t wait for the follow-up to this post so that I can try to apply the Petersik method to my project. My search for a good how-to online back when I bought the chair is actually what first led me to your blog! Good luck John & Sherry!
Kirsten says
I’ve done some upholstery. You need webbing and a staple gun. You will stretch the webbing with a webbing stretcher and attach it to the frame with staples. Then it is just covered with batting and fabric.
I learned most of my upholstery skills from books at a local library. There were a few dozen books available and many of them were very helpful with lots of pictures.
Lesley says
No idea how to work on the chair. I just want to let you know how wonderful it is that you are nursing!! I nursed over a year and my little Camden is wonderful and healthy; Clara will be too!
kathy says
My .02…Nail Head Trim doesn’t sound very comfortable. Maybe a nice soft cording instead.
Donna says
I would use a piece of webbing like I used in http://driftlesshomeandgarden.blogspot.com/2010/10/reupholstering-antique-winged-chair.html. I used a heavy one piece webbing to tie my springs too but it should work fine on your back. Charlotte Fabrics has a collection of recycled leather fabric which would look great on your chair. Barrow Industries also has a nice selection of fabrics. Jo Ann fabric does carry some of Barrow Fabric and they have 1/2 price sales, where you can get it for $15/yd. If you fabric cover the raw edges and staples with matching gimp. You will also find an Arts & Crafts chair I covered with the recycle leather. Good Luck, it is a beautiful piece.
Jen @ Canadian Rhapsody says
Check out when Thrifty Decor Chick redid her dining room chairs: http://thriftydecorchick.blogspot.com/2009/10/how-to-reupholster-dining-room-chairs.html
Rebecca says
I know you have a ton of comments, but this is a good site for help too:
http://www.allthingsthrifty.com/
They just did a wing back chair with the same “seat-belt” strapping woven for support for the back. It basically follows your general idea.
Renee Smith says
I have seen my idea in a couple suggestions, but really have no clue, so I’ll just cheer you on and look forward to the follow up, because I have a rocker with a similar situation, and I’ve been too chicken to do anything with it. I’m hiding behind the guise of “it was my great grandma’s so the fabric is ‘sentimental'”… SO NOT THE CASE! She would want me to recover it, too!
Jyl says
*Warning: I have very little upholstery experience*
Can you drill a series of holes along the top and bottom of the cut out and weave 1/8″ round elastic through them in a criss cross? It would give support on the back without needing the cardboard (which looks tricky to me, since it looks concave and to me that means compromised structural integrity, but see my disclaimer above) Then you can tuft the two fabric panels together between the elastic criss crosses with fabric covered buttons, and then cover the edges with nail head.
Good luck! Excited to see how it turns out!
Lauren says
Do as the rest do – outsource to China. (Though it makes quite a statement as is?)
Ella says
Can’t wait to see the finished product, I’m sure it’ll be fabulous!
nuha says
what if you add a piece of wood and covered it with batting on both sides ( or at least the front) and then covered it with staples and trim? Its such a cute rocking chair, can’t wait to see how it turns out!
Sheila says
Off topic, but still DIY. This is a great Inspiration-Folder idea. I’m sure it can be done with a scaner and photoshop. Could also be another idea for the weekly fabric shoot. Anyway, I just thought it was a cool way to collect lots of small things into a large masterpiece.
http://www.janeleni.com/ (if it didn’t take you there, go to ‘collages’ to see what I’m talking about.)
YoungHouseLove says
Love it! SO cool.
xo,
s
heidi @ wonder woman wannabe says
Here’s a few fabulous links!
http://www.songbirdisnesting.com/2010/10/how-to-reupholster-chair-while-trying.html
&
http://livingwithlindsay.com/2009/05/teach-me-tuesday-recovering-a-thrift-store-chair.html
The chair is just darling – I’m sure you’ll do a wonderful job with it!
~h
Brianna says
Thanks for posting this and thanks to so many of the commenters having such great tips. I have two rocking chairs with a different but similar issue. I’ve been waiting to tackle them hoping for divine inspiration. Now I don’t have an excuse!
Annalea says
There are styles of chairs that have huge “holes” in the back (like Victorian Ballon-Back chairs, like these here). I don’t think you need any reinforcement at all. But, try sitting in it as-is first, and see what you think . . .
Kim Leggett says
This chair is a turn-of-century Empire Rocking Chair. It should have webbing, then the batting then the fabric. As antique dealers we have sold chairs such as this one. David (my make it work like I want it, husband) used thin plywood instead of the webbing. It’s much easier. I recommend that you take it to a shop. This is a minor project for a trained professionl and won’t cost much money at all. By the time you buy all the materials needed to do this properly, you will come out about the same. You will, of course, have to take the fabric that you want to use. The seat you can easily do yourself. The Empire style is a very nice form and, due to its simple lines, blends easliy into most styles.
Soul pretty says
Thanks for the blast to the past with that video…too funny…it’s easy to see now that the lead singer was lip syncing…
There’s a giveaway on my blog http://www.soulpretty.blogspot.com
Thanks.
Centsational Girl says
Hey John and Sherry! I see my ‘how tos’ have already been linked to up above (Thanks Laura!) but basically you start with the back panel, wrap fabric around cardboard (glue or staple) then secure it to the back of your chair with glue, upholstery tacks, nailhead trim, or tacking strips like these:
http://www.beaconfabric.com/vindex.html?cat148.htm
Repeat in the front!
Good luck, write me if you get stumped!
Kate
http://www.CentsationalGirl.com
YoungHouseLove says
Thanks so much Kate!
xo,
s
Jamie says
You could weave some support,then upholster 2 thin sheets of plywood that have been predrilled with holes, then use upholstry buttons to sandwich them to the weaved supports by going through the holes. Perfecto!
Haley says
Cool classic curves!
Abigail says
so are you guys going to pay someone $25 for help, since that’s what you charge for your mood boards? only seems fair.
YoungHouseLove says
Hey Abigail,
We actually don’t sell mood boards anymore, but we’re thinking with all this amazing advice we should be able to DIY our little chair project – and share our step by step process afterwards on the ol’ blog of course! I guess we have the mindset that if we can gut a bathroom down to the studs and rebuild it, we can hopefully figure out our $25 rocking chair! Especially thanks to all the awesome suggestions here in the comment section. Thanks again everyone!
xo,
s
Kara says
I just finished taking an upholstery class and I think I may be able to help a bit. The “seatbelt” stuff you are talking about is called jute webbing. If you put it down in the front, before you put in any foam or batting, that will be enough to support someone. You make a weaving pattern, it looks like you can probably get away with two or three going horizontal and two going vertical. That will be all you need. Then put the fabric along both sides to cover it up. One easy way will be to staple the fabric to the wood and then cover those staples and rough edges with single or double welting.
Rose says
Yeah, it needs structure. And, it’s usually one side bigger than the other. To cover up the staples of one side, use welting or trim (glued or tacked). My bf and I are working on a chair with a double-sided back, but we haven’t come to the upholstering stage yet. It’s already been a lot of work for us. Good luck!
Porter Jane says
I agree with Kim Leggett. Take it to a shop! I just recovered a chair in giraffe beige print/four yards and it cost me $145. It is a beautiful chair and needs attention. Good luck.
erikam says
Here are a couple online tut’s:
http://www.diyonlinemag.com/diy-upholstery-1.html
http://www.apartmenttherapy.com/chicago/good-questions/good-questions-diy-chair-makeover-upholstery-advice-084248
Great chair, good luck!
Erika
Kristen says
I know this wasn’t the question, but may I suggest (and as an alternative to laminate) a great outdoor fabric? Companies like Sunbrella or Duralee make great saturated colors–or even something fancy like linen-look–that wipe right off. Definitely kid, dog, spill friendly.
Amy says
Hi guys. I have been wanting to do some thrift shop hunting and painting but I’m fearful of bedbugs. What do you recommend for cleaning/preventing them from coming into your home with thrifted goods?
YoungHouseLove says
John actually dealt with them in a rental apartment in NY and it was a nightmare so we’re super careful! We always check the item up and down (in cracks of wood, fabric seams, etc). You should see little black spots around those creases if they’re there. So if you see anything like that, DO NOT buy the item. They also don’t like cold temps, so leaving the piece you purchased in some sort of non-heated holding area (like a garage or a back porch) before bringing it inside (and again checking seams for any sign of them beforehand) is another step we like to take- just to be sure. So far so good, and we frequent thrift stores all the time!
xo,
s
Amy Button says
I’m not a professional but I’d hire one for this job. If you make it work then you guys are truly the masters of DIY :)
Hally says
Fabric glue around the edges then use nailhead trim. Super cheap, and always always always looks good.
Stephanie B says
Love the chair – the lines are great.
This Sunbrella fabric is fantastic… http://www.ballarddesigns.com/webapp/wcs/stores/servlet/ProductDetailView?storeId=10052&catalogId=10551&categoryId=10175&productId=13546&langId=-1&SourceCode=BDSBT1. It’s go the nice warm hues…
andrea p says
I would love to see a YHL christmas wishlist post (realistic or the sky’s the limit)!
even better would be one for sherry, john, burger, and clara separately!
YoungHouseLove says
We’ll definitely be doing some holiday window shopping- stay tuned!
xo,
s
Jessica says
I know this isn’t related to the post (I know nothing about upholstery!) but I absolutely LOVE and admire the ways you all decorate. My fiance and I just bought a house and we are soooo confused on the shade of green to choose for our family room. The only thing we have to go by is our navy blue leather couch…(we’re also deciding on what color wood floors to put in and what to paint the fireplace)
We love light, fresh and soothing greens and I’ve checked out the mood boards and “Pick the Perfect Paint Color” section…but I still don’t know if a warmer or cooler green be paired with a navy couch? If you could recommend ANYTHING, I would be so appreciative! :)
Thanks!! <3
YoungHouseLove says
Hey Jessica,
We would recommend Nantucket Breeze or Dune Grass by Benjamin Moore. Both should look lovely with your navy couch.
xo,
s
Jessica says
Thanks so much!! :)
Lauren Ashley says
You should try caning! You can make a small frame with holes that you can fit into the chair and weave the caning into it. You can do simple patterns or more complex ones! My Dad bought a book for me about it online. It would have that natural element look you like so much!
Nancy Shirley says
The back should be done with webbing, woven and tacked into place. Actually the seat was originally webbing and upholstery also. You should remove the plywoood and use the same webbing on the seat and then add layers of batting, and then the upholstery. Usually gimp, a form of braided trim would be put on top of the fabric and that is held in place with small tacks also. Stretch everything as tight as you can! The ends of the webbing stay in place better if you fold the ends over before tacking in place. My husband does upholsering and this is what he recommends.
Nancy Shirley says
Sorry I meant “upholstering”! lol
Carolyn says
I’ve got a similar project that I’ve been sitting on (pun intended) for months now. I really just need to refinish the wood, paint it…just do something with our rocking chair. I’m looking forward to a tutorial from you guys. I need some inspiration!
Deanna says
I thought of this chair makeover immediately. Might give you an idea of how the back could be dealt with.
http://ohbrooke.com/2010/07/28/before-and-after-cane-chairs/