We could not be more thrilled to introduce Ana from Ana-White.com who’s swinging by with an amazing build-it-yourself project for anyone who’s ever wanted to DIY floating shelves. For those who don’t already know about Knock-Off Wood, it’s a site full of amazing designer-lookalike furniture plans that will save you hundreds- even thousands- if you’re willing to break a sweat and put in a little elbow grease to whip things up on your own.
And you know we love that Ana proves that woodworking isn’t only about guys in overalls. Ladies can totally make the sawdust fly just as well. So without further ado, let’s get down to business with the first project that Ana is exclusively bringing to all of our lovely readers. And don’t worry, she promises it’s a super easy and affordable undertaking, which is why we thought it would be right up your alley. Let the fun begin…
Sidenote: If you’re looking for additional shelving projects and ideas, this post is one big roundup of easy shelving ideas.
YHL: Hey Ana, so happy to have you dropping in to share a project with us. What are we building today?
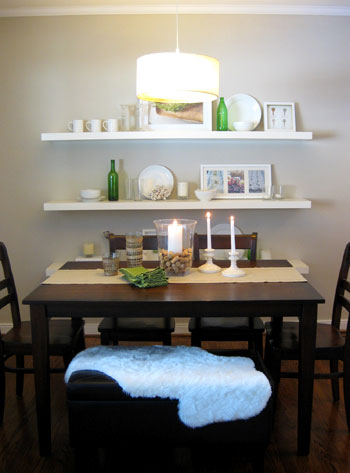
Ana: Youngsters, I want to hack your entire house. Everything. From Burger’s closet to the bean’s crib. If I could, I would write a blog called Young House Love HACKED. So the stalking starts today with my favorite feature in your home, those floating shelves in your dining area.
YHL: Sounds like fun. What level of difficulty would you say this project is?
Ana: Beginner. You, yes YOU, can do this project! No, not the Youngsters, they already have shelves. YOU at home.
YHL: And how much money should someone expect to spend to build all three 72″ long shelves?
Ana: For three 6′ long shelves, it will cost about $50-$60, less if you have some basic supplies like paint, screws, sandpaper and wood filler. In fact, the lumber is only going to run you about $30 (which means you’ll save around $60 as opposed to buying them). Bonus: You’ll have enough leftover scraps to make three 24″ shelves for free!
YHL: And about how long should this project take?
Ana: It will take a couple of hours to construct all three shelves, and then you’ll need to paint ’em. If you start in the morning, you can have these hung by night. I did!
YHL: Nice. What would our shopping list look like?
Ana: Here’s all you’d need to get ‘er done:
- 1 sheet of 1/4 plywood, sanded on one side or lauan ($15)
- 10 1×2 pine boards ($1 Each)
- 1″ brad nails (think the little tack nails that you use to put the back on an IKEA bookcase)
- 2″ screws
- 3″ screws (for mounting to the wall, you will only need about 10 of these)
- wood filler
- sand paper
- paint (I used high gloss white)
YHL: And what tools would we need?
Ana: Nothing too complicated. Here’s the list:
- measuring tape
- drill with countersink and drill bits
- saw (or get the hardware store to cut your boards for you)
- hammer
- sander
- paint brushes
- stud finder
- level
YHL: Sounds simple enough. What would our cut list look like?
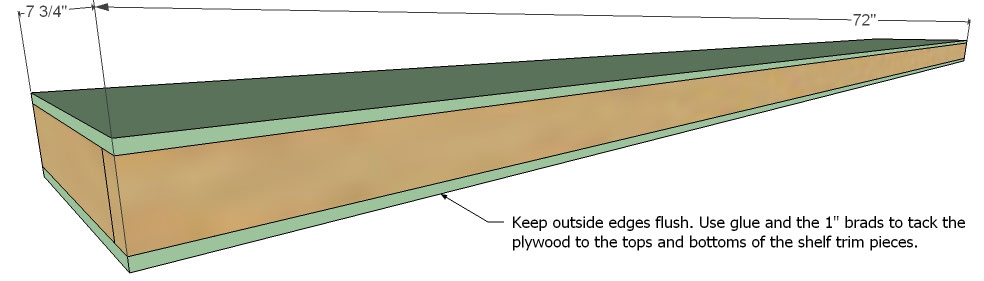
Ana: When you buy your plywood, have Blue or Orange cut it into strips that are 7 3/4″ wide, and 8′ long. I will refer to these as “plywood strips.” By having the store cut your plywood into strips, you can haul it in just about any car and it will be easier to work with to create the exact cut list below when you get home. And you may even be able to get the store to make the exact cuts in the list below, which will save you from any at-home sawing! Here’s that exact cut list for ya:
6 – Plywood strips @ 72″ (tops and bottoms of shelves)
3 – 1×2 @ 72″ (fronts of shelves)
6 – 1×2 @ 69″ (shelf frame)
12 – 1×2 @ 7″ (ends of shelf frame and shelf)
21 – 1×2 @ 5 1/2″ (shelf frame studs)
YHL: Ok, we’re ready. Hit us with your plans.
Ana: Alright. Let’s get down to business.
1. General Instructions. Work on a clean level surface. Have your plywood cut into 7 3/4″ strips by the hardware store. Then make all of your cuts as directed in the cut list. Always use glue and countersink your screws. Keep outside edges flush unless otherwise directed. Use proper safety precautions and equipment. Click plan to enlarge.

2. Frame. Set aside the frame, now let’s drill the sleeve. Predrill with a countersink bit pilot holes for your screws in the frame sides. Then use glue and the 2″ screws to fasten the frame supports to the frame sides. Keep edges flush. Click plan to enlarge.

3. Shelf Trim. Build the trim for the shelf by screwing the trim ends to the trim face. Click plan to enlarge.
4. Shelf Surfaces. Just like you would add a back to an IKEA bookcase, tack the plywood to the tops and bottoms of the shelf. Keep your outside edges flush. The better job you do, the less sanding later!
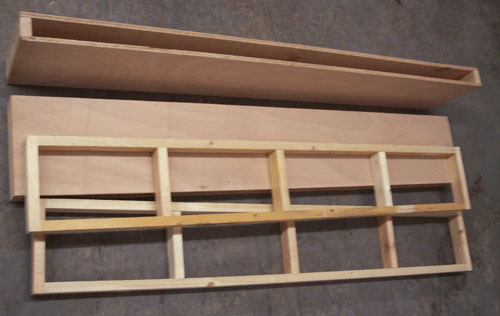
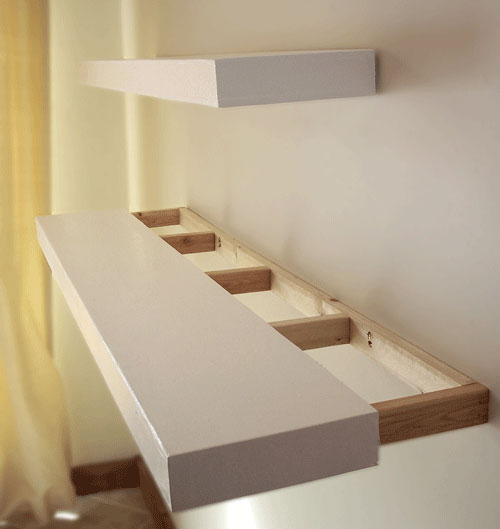
5. Test Fit. Your DIY floating shelves should look like the above photo (except I made two that are 48″ long, and you’ll probably be making three that are 72″). Dryfit your frames with the sleeves to ensure the frame fits into the sleeve. You may need to sand the frame in areas to get a better fit. You do want the sleeve to fit tightly on the frame to keep it in place.
6. Wood Filler. Fill all holes on the sides and face with wood filler. Fill any and every hole if you want that shiny finish! Overfill your holes and let dry.

7. Sand. Sand extremely well, making all edges flush and even. If you need to, add more wood filler, let dry and sand again. The better you do at sanding, the shinier & smoother your finish will be.
8. Painting. Vacuum your shelves with a soft bristled brush. If you are using paint with primer, you can skip the primer. Otherwise, apply a coat of primer first. Let dry, and begin adding coats of high gloss white paint. I used three coats.
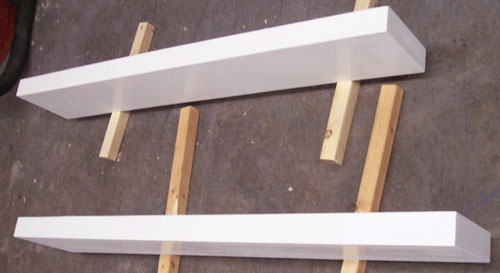
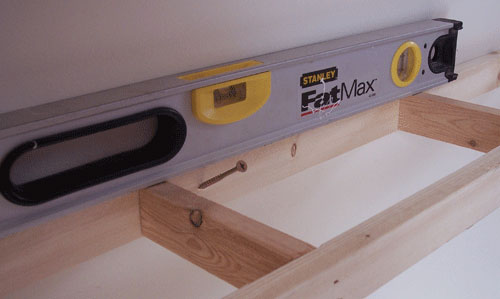
9. Hanging On The Wall. Locate the studs in your wall and mark where your shelf will be placed. If you cannot locate a stud, then you will need to use drywall anchors to hang your shelves. Then fasten with 3″ screws as shown above into the stud or anchor in the wall. Screw in a downward direction, as shown above. This will not just give you room for your drill, but it will also create a hook, or a stronger joint. Use at least 6 screws, in at least 3 different locations or studs. Use a level as shown below to keep things looking straight.
10. Shelf Sleeve. Slide the shelf sleeve over the frame, as shown below. The sleeve will fit snugly. If it’s too snug, you can sand down the frame a little – just a bit will make a big difference. You want the sleeve to fit tightly, as we will not be screwing the sleeve to the frame.
*And now for the Ana-White.com disclaimer: This plan has not been tested for weight or safety. Build at your own risk. Ana-White.com (or Young House Love) are in no way responsible for any loss, damages or injury resulting from this post.
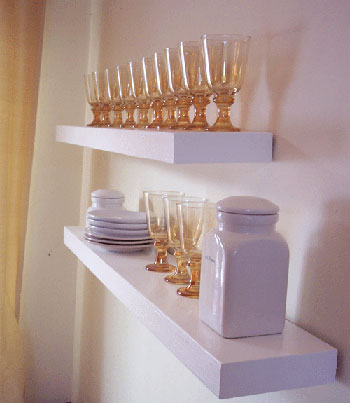
Onward to the after picture. Check out Ana’s amazing shelves. We can’t believe that she actually whipped up a pair for herself (she wanted to be sure that the plans that she provided were as accurate and detailed as possible). And we also can’t believe how great they look in her home.
So a big thank you to the amazing Ana for whipping up such a fantastic make-it-yourself shelf tutorial. What do you guys think? Will any of you be creating some sleek DIY floating shelves anytime soon? Let’s shower Ana with praise for stopping in. And of course, we’d love to see photos from anyone and everyone who decides to take these babies on. Happy building to one and all!
Update – Wanna know where we got something in our house or what paint colors we used? Just click on this button:


stephanie says
i was so excited when i saw this project. i’d had my eyes on the floating shelves at contemporary design stores and didn’t want to foot the bill for just one shelf. I am hoping to makes these bad boys next weekend. hello lowes, here i come!
Betsy Wilson says
Very Contemporary they look beautiful. Without taking up floor space like a bookcase does! Perfect for a small room, dorm, apartment or loft! Thanks for sharing Ana
Jacqueline Roark says
I am a BIG fan of both YHL and Knock-off Wood. I love the idea of being able to customize these floating shelfs to fit my space. I plan on starting the project this weekend. This will be my very first project.
However, I am a bit confused on the measurements. I am probably just missing something, but I don’t understand how the frame fits inside the sleeve. Is a 1×2 actually 3/4″ wide? Otherwise, at 1″ the frame would be 71″ (69″+1″+1″) and the interior of the sleeve would be 70″ (72″-1″-1″). Please tell me what I am missing….
YoungHouseLove says
Good question! Here’s hoping Ana drops in to clarify soon. Stay tuned…
xo,
s
Rae says
HI, i’m not Ana, but a standard 1×2 is 3/4″ x 1 1/2″. The name of the wood size is just because of how it is when it’s rough cut – but once it’s planed down to size, that’s when you get the true measurement. Here’s a link that explains the different sizes: http://mistupid.com/homeimpr/lumber.htm
YoungHouseLove says
Thanks so much for the tip Rae! That should answer Jacqueline’s question!
xo,
s
Suzanne@babeigotanidea.com says
I found this post today and I went out and bought this materials I needed, my husband has a bunch of tools already, but I am so excited about building these myself, mine will end up black to hold all the picture books on our picture wall, I hope I can get them done in a timely manner to send a pic of the finished product, maybe that can be a goal, to actually get it done and share on the brag wall (:
Thanks for the lovely tute!
Jeanine says
My dh has been wanting to try his hand at woodworking. I printed off the plans for your shelves and he made them for our daughter today! (She’s an art major in college and NEEDS more storage/organization space for her supplies!) Can’t wait to get them painted and hung up! Thanks for sharing your plans and giving such wonderful directions!
Adam says
There hasn’t been any activity on this for several months so hopefully some one is out there to answer. I am working on putting these shelves together and just finished my first one of 4′. With the support and outer box, it all just seems pretty heavy to me. Mine are about an inch or so deeper than yours but that still isn’t a significant amount of more wood. This particular shelf will span 2 studs but I’m worried about the shelf holding itself up without sagging or falling off, and then of course even more worried about putting much of anything on it. Any suggestions or am I just being paranoid about this? How heavy were yours?
YoungHouseLove says
Hey Adam,
Here’s hoping Ana drops in with that info for you! You can also follow the link over to her blog and see if you can post your question over there. I do know that our Ikea shelves aren’t light at all, but they hold a ton without sagging, so hopefully the DIY versions are the same way! Good luck!
xo,
s
Albert Jordan Jr. says
I have a question about the screws. I’m that guy in the hardware store lost in the screw aisle because there are so many choices. The screws I’ve bought are splitting the wood when I use them. You say use 2″ & 3″ but what about the diameter of the screws. I’m lost & frustrated.
YoungHouseLove says
Hey Albert,
Maybe try following the link over to Ana’s blog for her advice! You’ll probably get a faster response that way (instead of waiting for her to pop back over here with an answer). Hope it helps!
xo,
s
Jenny V says
This is great. I have been wanting to make floating shelves just like these. Thanks!
Leslie M says
I’m building these today!! I’m a little nervous, but these instructions are super easy to follow, so hopefully even a DIY illiterate like me can figure this out. :)
Ann M says
I absolutely love this concept! My hubby and I built these to fill the wall above our couch. We couldn’t find any wall art large enough to fill the space and the shelves fit perfectly! We like the idea that we can switch out the frames and the accessories so the shelf can change with our personality.
Kelli says
Another great plan from Ana! I just have to say that I bought floating shelves from Ikea and the veneer on one of them is already curling up on the sides! So to me, making these is worth the $60 savings, the diy satisfaction, and the fact that they won’t fall apart in 3 months!
Nate says
Thanks Y’all! Super easy method for making these.
lorene says
I read 3 or 4 directions on other sites, but this is the only one that sunk in! The pictures really help! Thanks!
Courtney says
oh man. We also live in an old house with wood paneling and whatnot…I am LOVING your blog…I have been emailing my hubby all morning with links to projects from here saying, “I want to do this! And look how they did that!” hehe. I have added this to my honey-do list. Even though I will most likely be the one to actually do it! *So excited!!*
Helen O says
Thank you! Just made the shelves for the living room! They are awesome! We made them 3 inches thick painted them expresso brown, too cool. If you want me to send a picture let me know of an e-mail address. Thanks! Love your site!!!
YoungHouseLove says
So glad! Congrats on your amazing build!
xo,
s
Nicholin says
I am so thrilled to find this nice do-it-yourself for floating shelves on YHL! My next project is my husband’s office and I want to replace the awful bracket shelves with this nice looking alternative.
Adele says
Hi Ana,
I love your floating shelves. I was searching on the internet for floating bookshelves and I found your page. I need to make some floating shelves for my books that are a lot and some quite have as well. I was wondering whether the shelves will be strong enough for the books.
YoungHouseLove says
Hmm, I would imagine that it matters what sort of anchors you use (ex: heavy duty anchors) and what sort of walls you have (ex: crumbly plaster, new drywall). Maybe you can pop over to Ana’s blog directly and ask for her advice?
xo,
s
Adele says
Hi there,
Many thanks for your reply.
The wall is concrete. I want to put the floating shelves b/w to walls.
YoungHouseLove says
I would head over to a home improvement store and explain that you have concrete walls and see what they recommend. Good luck!
xo,
s
Adele says
thanks
Dona says
I just love this. I have a huge blank wall in my bedroom which I have been struggling with ideas to fill. I can’t really afford the size of art piece it would take to give the wall balance. So, I am thinking some of these shelves staggered on the wall will give me an excellent place to show off my favorite photographs and some smaller pieces of art that I enjoy.
Thanks, Ana. Girl, I just love you!
Jeanne says
I am so excited to find the selves to make, I have everything to do it and have been looking for just the right ones, and here they are, they will hold part of my doll collection. I have made the farmers bed and is so nice and sturdy, easy to do too. I will be following you from now on, guess I will be very busy too. I love to do wood work so much fun.
thanks for your expertize, your the best
Jeanne
kris murthy says
Hi,
I am planning on building this shelf for my daughter. She would like the shelves to be 10in wide. it will be 6 feet long. I plan to use rails separated by 8 inch to give the shelf more rigidity? Under the above scenarion any thoughts on how much weight I can put on the shelves? before it starts to sag??
YoungHouseLove says
Hmm, not sure about either question. Maybe click over to ana-white.com to ask Ana?
xo,
s
kris murthy says
Hi,
A follow up question, the 1×2 pine boards your list specifies 10, what is the lenght of each pine board? is it 8 feet?
Krish
Karen says
My father-in-law has a bunch of walnut….would I be able to use that for this project? Or do I have to use plywood? This will be my first woodworking project, so I’m a bit nervous!
YoungHouseLove says
Oh yes, walnut will look awesome!
xo,
s
Rad Designing says
Hey guys! I know you posted this a while ago but i finally got around to making them. Everything went really well except when i put them up and put some weight on them. I know i cant put a lot on them but i didnt put very much and they are sagging! yuck! The front is about 1/2 and inch lower than where its attached to the wall… they are only 4 feet long and i only put a few books and vases on them… any suggestions?! I bet no one notices but me… have you had an issue with that?
YoungHouseLove says
Aw man, so sorry about that! We haven’t made them ourselves, but maybe if you hop over to ana-white.com you can ask Ana if she has any ideas/suggestions!
xo,
s
Jennifer Hutchinson says
Love these shelves!
We just made them for my Master (although we didnt use the screws in the frame- it looked better with the same small nails from the nail gun!
So glad to have found your site, (form ana white)
~Jen @ hutchinsonherd.blogspot.com
Janie says
Great project! My fiance and I are really glad we were able to do this on our own because we love making things but live in the city and don’t really have many opportunities for such things. I do have to say, it gost us about $110 for everything. We didn’t have any supplies but the measuring tape and had to purchase all of it. We had Home Depot cut our wood and that cost some money too. On top of that they did a poor job at measuring and cutting. Some of the pieces that were supposed to be the same turned out different sizes and it was really frustrating. I think next time we’ll try to cut as much wood as possible ourselves… or find a friend with a circular saw!
Jane says
I know I’m like 2 years late on this post, but here’s my question anyway:
A friend of mine just had custom built floating shelves installed that fell off the wall 5 days later. The carpenter used dry wall anchors, and they pulled right out. I’m wondering if there’s a maximum depth you would recommend for the floating shelves to keep them from pulling out, or if you think we just need better anchors.
YoungHouseLove says
I think I’d try to go into at least one or two studs if at all possible! And the heavy duty anchors (the metal ones) worked best for us when we had floating shelves for 4+ years in our first house (they never fell out!). Whew.
xo,
s
Ellen says
This is fantastic! Thank you for the instructions. I love these kinds of shelves but they cost a FORTUNE in the stores!
Lauren says
Hi S&J,
Were you at all worried about the weight that you put on the shelves? I’d like to use them in my dining area for serving pieces and dishes but I’m nervous that the weight might not hold.
Do you know about how much you put on them? Any recommendations for making them a bit sturdier? I always see photos with floating shelves loaded up with dishware. But I have to wonder about the longevity of the shelf if you load it up. Wouldn’t the screws begin to bend and the shelf begin to point downward?
I really want floating shelves but I may just bite the bullet and get brackets.
What do you guys think?
YoungHouseLove says
We had the Ikea shelves (Ana made these plans for anyone who wanted to DIY them, but we sadly haven’t tried them yet!) but ours were great for 4+ years while loaded up with big frames, stacks of dishes and mugs, heavy candlesticks, books, etc. I would guess they each would hold 30 lbs maybe? We used heavy duty metal anchors to hang them which seemed to help. Maybe start small with things on them to see that they can handle it? Good luck!
xo,
s
Nikki says
Instead of making the shelves from scratch hollow core doors would work just the same. You can usually pick them up used for cheap. Love the Ikea look have knocked off a bunch of their designs myself!
YoungHouseLove says
Great tip!
xo
s
Adam says
Ok let me start by saying I’m currently in the process of making these shelves and for me it is in NO way a 1 day project. Maybe if you have ALL the tools necessary from the beginning and laid out before you start. I am on day 6 now (off and on at 3 hours a session) and am currently painting. My shelves are 8 feet long and I have 4 of them.
Now first of all, I got all the stuff it said to get and it costed me $130 total. The pine boards for $1 don’t exists if u want non-warped ones and the plywood was 19.95 not $15.
I’m working on a back porch and not a work bench of any sort so cutting and nailing stuff together isn’t that easy if you don’t have the proper equipment which for me as a beginner do not.
I recommend to all u people attempting this to buy an electric sander and don’t cheap out on wood. Get the $5 pine boards that are actually straight which will make your life soooo much easier. If you expect to put 3 coats of paint on do not expect this project to be done in 1 day. It’s impossible without help! Drying time between coats and primer is a free hours at least and not to mention you’ll still have to hang them after.
I’ll post my final project when I’m done so you guys can see it. Overall it’s looking great but this was not a simple 1 day project for the average person.
YoungHouseLove says
Thanks for all the tips Adam! We haven’t attempted it ourselves (and Ana is definitely a pro) so we love hearing how it’s going and all of your tips are great! Good luck and we’d love to see pics!
xo,
s
mari says
Nice idea. You could also use a hollow core door cut to size for the shelf. That way you dont have to nali on the plywood skin. Just fill in the ends with 2x4s and use your same frame.
Love your ideas!
YoungHouseLove says
Fun!
xo,
s
Jennifer says
I was wondering if these could be altered a little into squares. I like the idea of a box shelf instead of just the straight shelf, but I was wondering how to do it and maintain stability. I don’t want the top to pull away from the wall.
YoungHouseLove says
Hmm, maybe use metal L brackets on all corners to add stability? Anyone else have ideas?
xo,
s
katie says
This is just what I have been looking for, I need to build just one long one for decorative storage across a long wall in my bedroom above the fireplace. I definitely love the satisfaction of a homemade project I can tell everyone I made! And also, Ikea, sigh, is almost 2 hours away.
StephT says
I am absolutely horrible with math. What would the cut list be if I wanted to make 2 36″ shelves?
I am trying to figure it all out, but I have a very difficult time with numbers!
YoungHouseLove says
We’re no Ana White, but try this instead:
– 4 plywood strips at 36″
– 2 1x2s at 36″
– 4 1×2 at 33″
– 8 1×2 at 7″
– 6 1×2 at 5.5″
Good luck!
-John
Mary says
Great shelves, I will be making these. I love your blog, found it from
Ana-white.com which is a MUST VISIT website. I can’t wait to explore yours.
YoungHouseLove says
Thanks Mary!
xo,
s
JANINE says
can i make these shelves deeper then 7-8 inches more like 12-15 inches deep for hanging under the wall mounted tv??
YoungHouseLove says
Sure, I would imagine if you make the inside part that you slide it over longer it would support a wider shelf. Here’s hoping Ana drops in to confirm!
xo
s
Sarah says
My husband and I built two of these at 47 inches long to flank our fireplace. This was our first wood working project. They turned out beautifully! They are by no means perfect but they look incredible for our purpose and we learned a ton.
YoungHouseLove says
Aw, so glad! Congrats!
xo
s
jtcdesigns says
This is an awesome idea.. and actually similar to a permanent design I’ve made for a floating computer desk… which is extremely destructive and permanent.. but worth it 100%.
I was wondering though since its only a 1×2 support.. how much weight can go on it? I’ll be making 2 or 3 48″ long shelves. My plan is to put books on them, preferably all of my computer and photography books and possibly light picture frames.
I’d probably rip down a 2 x 4 to a 1 x 3 making the shelves a bit thicker but offering a little more support and I can stuff 3 screws into each stud which should be a total of 3 studs.
What are your thoughts as far as its strength and it sagging?
YoungHouseLove says
Hmm, I’m not sure since I’m not much of a builder, but maybe hopping over to Ana’s site and asking her directly would help?
xo
s
jtcdesigns says
I’ll give that a shot. thanks
Emma Green says
Amazing! Thank you so much for sharing this! I have ebeen considering buying some small floating shelves for our nursery for awhile now, but I think that this looks totally manageable! I’m way excited to try it out!
Ellen says
I was skeptical when Ana said this project could be started and finished in one day, especially since my husband is not that handy. But my husband made these floating shelves yesterday – they were easier than he expected and they turned out great! Thanks so much.
YoungHouseLove says
Wahoo! So glad!
xo
s
Shia Simone says
The floating shelf concept will be perfect for a pelment board I’m doing. I was trying to decide how to attache the upholstered board to the wall or ceiling. This is great!
Hanna says
I know this is a VEERY old post and I’m terribly hoping that someone would answer my question:
How much weight do you thing this can carry?
Ex.) Would it be fine if a shelf is filled with ONLY books?
YoungHouseLove says
Maybe email Anna for that info? Good luck!
xo
s
Leslie says
If this has been answered yet (or in the past) I apologize, but I would love to know what your favorite or go-to high gloss white paint? I am about to do a few projects (this one included) and I want to make the right choice on the paint.
Thanks in advance. Love the tutorial!
YoungHouseLove says
Benjamin Moore’s Decorators White in high gloss = awesome.
xo
s
Kirk says
On bare untreated wood like this, you really should use an actual primer first and not trust in the paint and primer in one stuff. The paint and primer in one does not seal bare wood like is being used here. It is really only meant to be a primer in the sense of going over an already painted item/wall/whatever and hiding that previous paint. On untreated wood like this, for the best possible results get one coat of actual primer, then paint with regular paint. Probably cheaper that way too.
Rex says
Many thanks for this project. A number of commentators have noted that invisible shelves are available from IKEA and other manufacturers. Quite true, but I imagine that Ana’s shelves would be much more secure and able to carry greater weight safely. The IKEA shelves have two hidden brackets that are attached to the wall and that slot into pre-defined holes in the back of the shelf. If those brackets do not align with the studs in your wall, then the shelf will be much less secure. With Ana’s method, however, you can attach the frame anywhere along the wall (and at multiple points), securing it to the studs–a far superior design! (In fact, I am surprised IKEA does not adopt it!)