We could not be more thrilled to introduce Ana from Ana-White.com who’s swinging by with an amazing build-it-yourself project for anyone who’s ever wanted to DIY floating shelves. For those who don’t already know about Knock-Off Wood, it’s a site full of amazing designer-lookalike furniture plans that will save you hundreds- even thousands- if you’re willing to break a sweat and put in a little elbow grease to whip things up on your own.
And you know we love that Ana proves that woodworking isn’t only about guys in overalls. Ladies can totally make the sawdust fly just as well. So without further ado, let’s get down to business with the first project that Ana is exclusively bringing to all of our lovely readers. And don’t worry, she promises it’s a super easy and affordable undertaking, which is why we thought it would be right up your alley. Let the fun begin…
Sidenote: If you’re looking for additional shelving projects and ideas, this post is one big roundup of easy shelving ideas.
YHL: Hey Ana, so happy to have you dropping in to share a project with us. What are we building today?
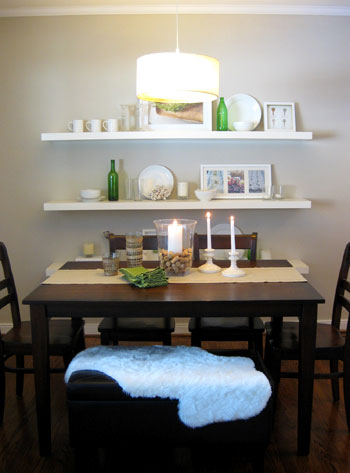
Ana: Youngsters, I want to hack your entire house. Everything. From Burger’s closet to the bean’s crib. If I could, I would write a blog called Young House Love HACKED. So the stalking starts today with my favorite feature in your home, those floating shelves in your dining area.
YHL: Sounds like fun. What level of difficulty would you say this project is?
Ana: Beginner. You, yes YOU, can do this project! No, not the Youngsters, they already have shelves. YOU at home.
YHL: And how much money should someone expect to spend to build all three 72″ long shelves?
Ana: For three 6′ long shelves, it will cost about $50-$60, less if you have some basic supplies like paint, screws, sandpaper and wood filler. In fact, the lumber is only going to run you about $30 (which means you’ll save around $60 as opposed to buying them). Bonus: You’ll have enough leftover scraps to make three 24″ shelves for free!
YHL: And about how long should this project take?
Ana: It will take a couple of hours to construct all three shelves, and then you’ll need to paint ’em. If you start in the morning, you can have these hung by night. I did!
YHL: Nice. What would our shopping list look like?
Ana: Here’s all you’d need to get ‘er done:
- 1 sheet of 1/4 plywood, sanded on one side or lauan ($15)
- 10 1×2 pine boards ($1 Each)
- 1″ brad nails (think the little tack nails that you use to put the back on an IKEA bookcase)
- 2″ screws
- 3″ screws (for mounting to the wall, you will only need about 10 of these)
- wood filler
- sand paper
- paint (I used high gloss white)
YHL: And what tools would we need?
Ana: Nothing too complicated. Here’s the list:
- measuring tape
- drill with countersink and drill bits
- saw (or get the hardware store to cut your boards for you)
- hammer
- sander
- paint brushes
- stud finder
- level
YHL: Sounds simple enough. What would our cut list look like?
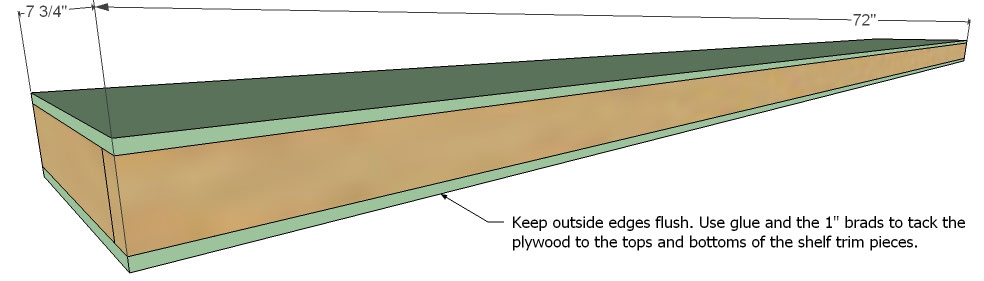
Ana: When you buy your plywood, have Blue or Orange cut it into strips that are 7 3/4″ wide, and 8′ long. I will refer to these as “plywood strips.” By having the store cut your plywood into strips, you can haul it in just about any car and it will be easier to work with to create the exact cut list below when you get home. And you may even be able to get the store to make the exact cuts in the list below, which will save you from any at-home sawing! Here’s that exact cut list for ya:
6 – Plywood strips @ 72″ (tops and bottoms of shelves)
3 – 1×2 @ 72″ (fronts of shelves)
6 – 1×2 @ 69″ (shelf frame)
12 – 1×2 @ 7″ (ends of shelf frame and shelf)
21 – 1×2 @ 5 1/2″ (shelf frame studs)
YHL: Ok, we’re ready. Hit us with your plans.
Ana: Alright. Let’s get down to business.
1. General Instructions. Work on a clean level surface. Have your plywood cut into 7 3/4″ strips by the hardware store. Then make all of your cuts as directed in the cut list. Always use glue and countersink your screws. Keep outside edges flush unless otherwise directed. Use proper safety precautions and equipment. Click plan to enlarge.

2. Frame. Set aside the frame, now let’s drill the sleeve. Predrill with a countersink bit pilot holes for your screws in the frame sides. Then use glue and the 2″ screws to fasten the frame supports to the frame sides. Keep edges flush. Click plan to enlarge.

3. Shelf Trim. Build the trim for the shelf by screwing the trim ends to the trim face. Click plan to enlarge.
4. Shelf Surfaces. Just like you would add a back to an IKEA bookcase, tack the plywood to the tops and bottoms of the shelf. Keep your outside edges flush. The better job you do, the less sanding later!
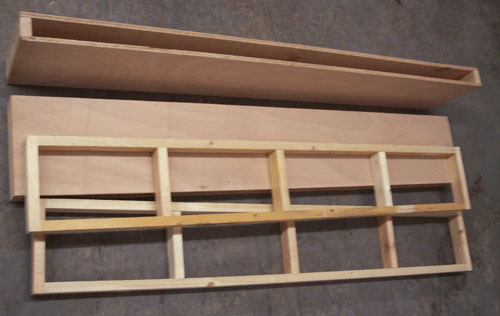
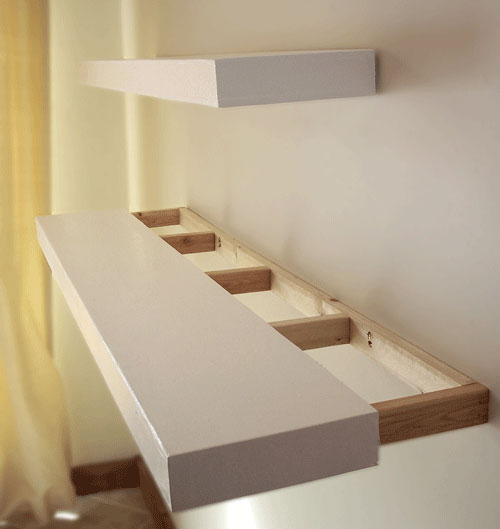
5. Test Fit. Your DIY floating shelves should look like the above photo (except I made two that are 48″ long, and you’ll probably be making three that are 72″). Dryfit your frames with the sleeves to ensure the frame fits into the sleeve. You may need to sand the frame in areas to get a better fit. You do want the sleeve to fit tightly on the frame to keep it in place.
6. Wood Filler. Fill all holes on the sides and face with wood filler. Fill any and every hole if you want that shiny finish! Overfill your holes and let dry.

7. Sand. Sand extremely well, making all edges flush and even. If you need to, add more wood filler, let dry and sand again. The better you do at sanding, the shinier & smoother your finish will be.
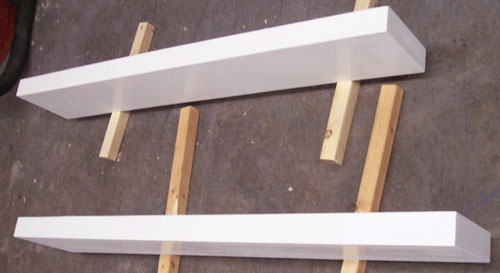
8. Painting. Vacuum your shelves with a soft bristled brush. If you are using paint with primer, you can skip the primer. Otherwise, apply a coat of primer first. Let dry, and begin adding coats of high gloss white paint. I used three coats.
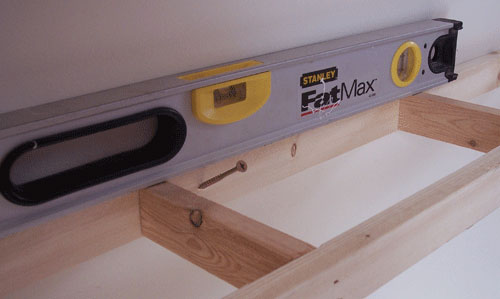
9. Hanging On The Wall. Locate the studs in your wall and mark where your shelf will be placed. If you cannot locate a stud, then you will need to use drywall anchors to hang your shelves. Then fasten with 3″ screws as shown above into the stud or anchor in the wall. Screw in a downward direction, as shown above. This will not just give you room for your drill, but it will also create a hook, or a stronger joint. Use at least 6 screws, in at least 3 different locations or studs. Use a level as shown below to keep things looking straight.
10. Shelf Sleeve. Slide the shelf sleeve over the frame, as shown below. The sleeve will fit snugly. If it’s too snug, you can sand down the frame a little – just a bit will make a big difference. You want the sleeve to fit tightly, as we will not be screwing the sleeve to the frame.
*And now for the Ana-White.com disclaimer: This plan has not been tested for weight or safety. Build at your own risk. Ana-White.com (or Young House Love) are in no way responsible for any loss, damages or injury resulting from this post.
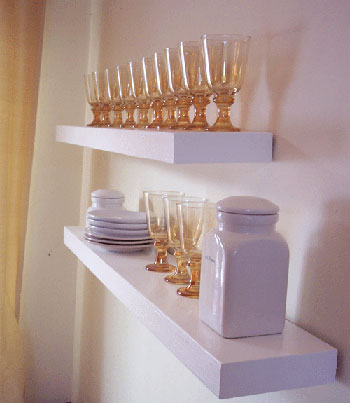
Onward to the after picture. Check out Ana’s amazing shelves. We can’t believe that she actually whipped up a pair for herself (she wanted to be sure that the plans that she provided were as accurate and detailed as possible). And we also can’t believe how great they look in her home.
So a big thank you to the amazing Ana for whipping up such a fantastic make-it-yourself shelf tutorial. What do you guys think? Will any of you be creating some sleek DIY floating shelves anytime soon? Let’s shower Ana with praise for stopping in. And of course, we’d love to see photos from anyone and everyone who decides to take these babies on. Happy building to one and all!
Update – Wanna know where we got something in our house or what paint colors we used? Just click on this button:


Jennifer says
I had never heard of Knock Off Wood until this post. I have 3 of those Ikea shelves (two hung to make an L, one yet to find its home) and am nervous about putting anything on them. I have bookmarked SEVERAL of Ana’s projects already. Kitchen table? Craft closet? Headboard? Check, check, check! Thanks for the introduction to her blog.
Lise says
Wow, so cool. Regular feature please!
Ana White says
Allison, the beauty of these shelves is that you can make them sturdier to fit your needs. How you build is going to greatly affect how much weight. The easiest way to beef up your shelves will be to use good screws and glue when build the frame, and then attach the frame to the wall using lag screws (also referred to as lag bolts). Make sure you get into the meat of the stud.
My shelves were attached with regular ole wood screws (because I live 100 miles from the hardware store) and I just put 40 pounds on mine without issue. Since my shelves are 4′ long, that about 10 pounds per square foot. With the 6′ long shelves, you should be able to put 60 pounds up without issue.
YoungHouseLove says
Thanks for stopping in with even more info Ana! Helpful as always!
xo,
s
Laura says
Oh, so awesome! Two of my favorite blogs come together in one post? SWEET! Our new granite counters are going in today, and I think we will be putting in new shelves next!
Briana Easter says
I know this wasn’t the point of this tutorial, but the gold glasses in the last picture are GORGEOUS (and I’m in the middle of building my wedding registry). Where can I find them? Thanks!
Becky G says
I’m so glad you posted these. I love the look of these shelves, but the Ikea versions not only don’t come in the size I need, but are a 3 hr. drive from my house. :(
I love that two of my favorite blogs have joined forces!
keri says
could my day get any better?! I’ve been studying KOW and have been wanting to try my hand at something…this may be it! I’m a little intimidated, don’t want to mess it up…
being a copycat and doing three long shelves over my dining room table (which is pushed up against the wall as well, except we have a cathedral ceiling…) would look awesome!
Sunny's Life in Rehab says
AWESOME new segment, guys! I blogstalk Ana as well; finding the two together is like chocolate and peanut butter.
Lauren McCormick says
This was ingenious! Thank you for doing this!! :)
Brianne Buskey says
I’m wondering if there is a way to make the shelves a little more flush with the way, they seem to be sitting away from the wall a little bit. Either way they’re gorgeous!
Emily says
I LOVE THIS IDEA! These shelves were on my to do list already! I had just not found a way to make them yet! THANKS!
Kimba says
I adore Ana! Thanks for featuring her! I have no less than 4 of her projects bookmarked for our basement finishing project.
Hannah says
This is a fantastic DIY – How to. Love it, would love to see more “instructables” from Ana and I will check our her site. This is a great post, I am off to build.
Amy says
This was my first time being introduced to Ana – thank you YHL!!!
Sheela says
Talk about timing! I love both your and Ana’s blogs, and I already have several projects in mind from Ana’s blog.
I was actually at Ikea last week (I made a special trip there while visiting my mom, since my closest Ikea is about 3 hours away). While there, I was going to purchase some Lack shelves, but learned that they are being discontinued for a while until Ikea switches to a new manufacturer. So finding those shelves in stores now is nearly impossible. I left without any shelves, but I then decided I would build my own. After all, my husband has a garage full of tools. So I googled “floating shelves” and found a tutorial that I liked. But they attached the shelves to the wall with a French cleat, which I suppose is sturdy, but I really wanted something with more middle support.
Then today I see this! This looks like a fantastic plan, and I love that there are no external screw holes to fill in! (The other plan had you drill the screws into the shelf into the cleat, so you would most likely need to putty external holes and paint over it.) And I also love the idea of solid wood shelves that can be finished however you want.
I love this plan, and I’m so glad on the timing. I’m literally planning to go to a big box store this weekend to get the materials; I’m so happy to have this plan now to follow! Thanks to Ana and John and Sherry for posting this!
Jennae @ Green Your Decor says
I’ve been looking for some floating shelves, though not quite as long as yours, and this tutorial actually gives me some hope that I could make them myself! Seems pretty simple, actually. I’ve been tackling some sewing projects by the seat of my pants lately, and they’ve turned out pretty well, so imagine what I could accomplish if I actually had instructions, right? Thanks, as usual, for being such an inspiration :)
Brandi says
Great shelves.. Unfortunately, I don’t have any tools that cannot neatly be stored in a small craft box.. :)
Also, where I live now, there’s an entire wall of exposed brick, which is great, but it is difficult to hang shelves (or anything else really).. do you have any ideas or suggestions for hanging some from the ceiling? It’s an idea I’ve thought of several times, but I’ve been brainstorming the best way, without the use of many tools..and on the DIY/cheap..
thanks
Brandi
YoungHouseLove says
Hey Brandi,
Good question. Here’s hoping Ana has some ideas for your brick wall!
xo,
s
Heathyr says
I had to rub my eyes when I read the title of this post in my Google Reader this morning- I was just thinking last week about making these myself and had no idea where to start. The support needed?! Would have never known and would’ve failed miserably had I done these myself by cutting a piece of plywood and then wondering how I stick it in the wall without a bracket.
Some people are wondering why you would feature this when you can so easily go to IKEA and buy them without the hassle- for me IKEA isn’t too far and we get to visit once a year (the nearest is Chicago which is about 2 hrs and 45 minutes away) but my issue with the IKEA shelves is that I wanted to adjust the length and DEFINITELY need to adjust the width to a smaller size than 10 1/4″ to fit in our own dining room. There would not have been SPACE TO MOVE in our dining room (which is open to our kitchen) had we gone with the IKEA shelves.
THIS.IS.A.LIFESAVER.
Thank you a million times over.
Mandy says
This is great, I can’t wait to do this project over the summer! I’m going to make some for my office, and stain cherry to match my bookcases and desk (once I find the right desk!) and also some for the living room or dining room. Will defintely send pics once they are done, and thanks so much for introducing me to yet another budget friendly blog. I love yours, so I’m sure I will love Ana’s as well! :)
Lizzy from Lizzy Designs says
They look great! :)
Ana White says
Hi Brandi,
If you can get the hardware store to cut your boards for you, you only need a drill (which you would need anyway if you bought the shelves) and finishing supplies like brushes and a sanding block (if you don’t have a sander). And a drill is a good investment for lots of other uses, like repairing things, putting together toys, or home projects like hanging curtains.
As far as a brick wall, if it’s solid brick, you will need to drill with a masonry bit and anchor with masonry anchors. Totally do able. I love what John and Sherry did here with their brick wall in their den https://www.younghouselove.com/2009/01/how-to-paint-a-brick-fireplace/ (second photo). This is a great article to help you better understand how to secure things on brick: http://www.acehardware.com/info/index.jsp?categoryId=1283458
YoungHouseLove says
You are a wealth of info Ana. Thanks again for dropping in with your expertise!
xo,
s
Chantalle says
Thank you!! I am glad Ana responded about an idea for the weight they hold. I have been looking at IKEA but they don’t have them there and the size I want doesn’t ship. We have been looking for months and have everything I want ON the shelves in two bins that need to be put away! Perfect timing as I spent a while yesterday trying to find some online. Thank you!! With tax season ending we will actually get our Saturdays back, I think this would be an awesome first project…
Amber says
Yes! You featured Ana! She is the motha lickin bomb. Thanks for sharing her awesome ideas with everyone!
Jessi Harri says
I am so excited to see these!! Thank you YHL and Ana! I cannot wait to build these!
Laura says
These are a great idea and can be painted/decorated to match any style! What other types of materials have you used?
Brandi says
Ana.. Hey, thanks for responding and all the information. I’ll keep it in mind for next time.
I am renting, so painting is not really an option, and since it is a carriage house (and the brick serves as a wall in between the other apartment), I am a little worried about drilling. There are already cracks in the mortar. I would just be paranoid…but I saw some suspended shelves one time and thought they were very cute; however, no idea on how to make the shelves ‘less industrial’. I thought this might be a better idea and give the brick wall (which extends from the living room all the way through the kitchen) a little something without having to deal with drilling through the brick. I could also use a little shelving space in the kitchen area, which is where I would want them. There were already pre-drilled holes with screws, which is what I used to hang pictures on that wall in the living room (although not perfectly spaced, given that I won’t be there for the rest of my life, I was willing to deal).
Thanks again, and let me know if you have any other ideas!
Brandi
Carol H. says
Yes, please make having Ana on your blog a regular feature!
Robert Schriner says
Ana:
To make it much easier and quicker you could use kreg pocket hole screws for the floating shelfs. That means no counter sinking or filling or capping or showing.
Keren says
By happenstance I found the YHL blog about a month ago. So far I’ve painted a piece of furniture after being inspired by this blog and have been inspired to do more when the funds allow. After this post, I am now hooked on Ana’s blog too(these are the first 2 blogs I’ve ever read!) I’m super excited about having my hubby make some of the furniture from her site…since we can’t afford to buy the type of furniture I like, we’ll make it!
jessica says
Thanks, Ana! You’re definitely amazing.
One word of caution; if you get Blue or Orange to cut your wood, make sure your get someone that knows what he/she is doing and what a straight line is. The last time we got something cut at Blue/Orange, it was a piece of plywood backing for bookshelves. We couldn’t figure out why the bookshelf wouldn’t line up straight to the backing, until we realized the plywood cut was crooked, and not even just a little bit!
Jenny says
We made our own floating shelf in my kitchen, and instead of creating our own “shelf sleeve” from plywood, we just used a hollow core door that we got on Craigslist and split it down the middle. Saved us a step!
Toni @ Hemp & High Heels says
LOVE Ana’s blog!! It is awesome to see my top two (three) favorite bloggers linking up and working together!
sarah says
Yay! Love Ana and her blog. Really want to make myself a desk one of these days. These look great… but I’ve got plaster walls and have had difficulty finding studs in these ancient houses. I wanted to hang a mirror, but ended up not due to not being able to secure it properly.
Heidi says
Hey Youngsters, your house is totally beautiful, you guys did an amazing job! I was just curious if you ever get bored of your decor. I always find myself bored of a room a couple months after decorating and I get the itch to switch it up and go for a new look. Does this ever happen to you? If so, how do change things up without going bankrupt? Congrats your baby bean. Thanks and god bless!
YoungHouseLove says
Hey Heidi,
Here’s a post all about how we approach money and budgets when it comes to our ever-evolving home improvement and decor projects: https://www.younghouselove.com/2010/03/email-answer-money-management/
As for if we ever get sick of things, we like to keep the accessories fresh (so switching out things like runners, pillows, art, and other affordable accessories- some that we even DIY) keeps the whole house feeling new and lively with the changing seasons. And because we rely on many neutral items of furniture, we find that those classic “foundation pieces” are things that go with everything, so we never get sick of them (like we might be if we selected a bright red sofa). Hope it helps!
xo,
s
Katherine says
Wow! I was just eyeing some floating shelves in a catalogue earlier today…and it looks like I’m not the only one! Thanks for this! Not sure if I’m brave enough to take this one on yet though…
Lisa says
If only our landlord would let us put shelves on the wall. These would be perfect. Sleek, stylish and so simple.
katie says
I have already told my husband that this is a project on my list for this spring! I have wanted something EXACTLY like this for above our bed and in our office!!!! Love it! Thanks!
Rachel says
Go Ana! I love these shelves! Thanks so much to all of you for posting this. I’ll be linking.
JoDi says
Wow, the timing on this couldn’t have been better! I’ve been searching for a shelf in the size I need for SO long with no luck that I finally decided we just have to make one, and here is everything we need to do it! Thank you so much Ana and YHL!
I’ve been to Ana’s site before, and I do love it although I doubt I’m handy enough to do any of the projects. I just may tackle this one myself instead of having hubby do it!
Paula says
Thank you for the very detailed step by step directions! This really helps those of us who are completely clueless!
http://killemdirty.blogspot.com
<3
Paula
Nancy says
How great! I have wanted shelves like this and keep denying myself bc of the $$. I think this will be a great project. I love Ana’s blog and dream of making some of her projects one day!
~Nancy
Shellee says
I’m a complete moron (never even attempted!) when it comes to building things, so this will be my first attempt! As I was studying the plans, I noticed Ana says to get 6-69″ 1×2’s cut for the frames. Then, the diagram shows 70 1/2 ” on the frame. Am I missing something? (Remember: I’m a moron!!)
YoungHouseLove says
Good question Shellee! We’ll defer to Ana on this, so hopefully she’ll pop in soon to clarify for ya. Stay tuned…
xo,
s
Ana White says
Shellee, you are actually quite sharp and I’m the moron. The cutting list is correct and I sent Sherry the original diagram. I ended up changing the original diagram because I felt we could create a stronger shelf by having the ends of the frame fully extend the length of the frame. The cut list is correct, diagram is on it’s way!
YoungHouseLove says
Thanks for the clarification Ana! A moron you’re definitely not. Genius, yes. Moron, no. And thanks for catching that Shellee! We’ve updated the diagram so it should be smooth sailing from here on out. Happy shelf building!
xo,
s
Raquel says
Thank you, thank you, thank you for this post! I have been wanting glossy white floating shelves exactly like these in my bedroom! I am definitely on a budget and everything I saw was uber expensive (that whole Crate and Barrel taste on an Ikea budget thing). This post gave me the confidence I needed to take matters into my own hands and build them myself. Woodworking is not just for the boys!
JoDi says
The last item on the cut list is still in error. There should only be 15 – 1×2 @ 5 1/2? (shelf frame studs)instead of 21 after changing the end pieces of the frame to 7″ pieces.
YoungHouseLove says
Thanks for the heads up JoDi! Here’s hoping Ana drops in to clarify soon.
xo,
s
Ana White says
Hi Jodi, you are correct, but as far as supports go, you are not going to have too many, so if each shelf ended up with a couple more, you you are not going to go wrong – You are just going to get a stronger shelf! So yes, you only need 5 shelf frame studs for each one, for a total of 15. Thanks so much for making note of this. Ana
Joanna says
Ana, help!
So I made three custom length shelves today! They are awesome! I will be ready to sand and paint them tomorrow. I was wondering if you had advice on what to do on the gaps between the plywood and pine. If it makes any sense at all.. it looks like there are “seams” inside the plywood and also a tiny gap between the plywood and frame. Will the primer/paint cover those gaps up? Your finish looked beautiful and I just want to make sure mine will look the same!!
Thamks,
Joanna
YoungHouseLove says
Here’s hoping she stops in to help you soon! Stay tuned…
xo,
s
Ana White says
Hi Joanna, thanks for asking questions on both blogs, and I’m always happy to stop on over and say hello! Awesome that you already have custom length shelves built! What I did with my shelves is use wood filler (mine fav is PL Stainable in a tub) and overfill the gaps with wood filler. Let dry, sand with a coarse sandpaper. If you are not satisifed with the fill, repeat. When no holes are visible, sand with a medium grit, then a fine grit sandpaper. Everything should be super smooth. Then use a primer, and a nice thick paint, I personally used Behr High Gloss White. I used three coats of paint, and it’s beautiful! Can’t wait to see yours! :)
kimm S. says
I have a question about the shelves. My husband and I attempted to make them this weekend and we altered the plans a bit to make four 24″ shelves and two 72″ shelves. The construction portion went fine, but when we hung the 24″ shelves on the wall, they dip downward in the front fairly badly despite being screwed into two studs (with four screws total) and having a drywall anchor on the frame. We didn’t glue the frames as we screwed them togther, as I totally forgot to tel him to do that, but that can’t be our only issue. Now we’re a bit fearful of hanging the 72″ shelves. Any suggestions on what we did wrong or how to fix it?
YoungHouseLove says
Good question Kimm! Here’s hoping Ana stops in with some tips for ya. Stay tuned…
xo,
s
Ana White says
Hi Kimm, congrats on the shelf! Way to go! I think the first thing I would do is check and make sure that when the shelf is hanging, what part is causing the dip. Is the frame separating where it was screwed or is the shelf creating a gap between the shelf and the wall? If it’s the frame, than it could possibly be the glue, but since you screwed it all together, no probs, just unscrew a little, add some good glue, and rescrew.
If it’s the shelf separating from the wall it could be because there is the tiniest bit of space behind the shelf frame, and when weight is placed on the outside of the shelf, this gap appears much larger. Make sure you screwed the shelf securely to the wall at a downward angle. You can also minimize this gap by placing a small shim (maybe a scrap from the plywood or even a thin strip of dense cardboard) on the bottom edge of the shelf frame, but not on the top.
Also, in my experience, my longer shelves hung better because there was more screws into the wall than the shorter one. With a 24″ shelf, sometimes wall studs are 24″ apart, so make sure to check and be sure you are into the studs.
Hope this helps! Ana