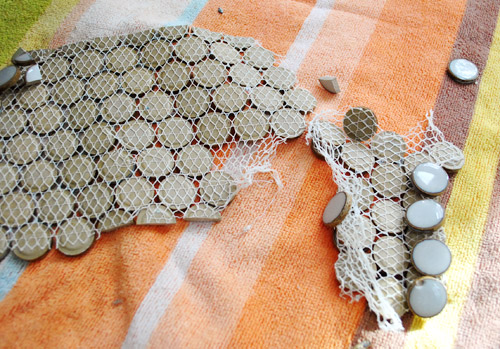
Oh man, backsplash-ing is 50% scary and 50% suuuuuper excitiiiiiiiiinnnnnggg! Sorry, got carried away there. Maybe it’s 90% super exciting and 10% eeeks. Anyway, we began wrestling with it a few days ago and it’s taking a bit longer than expected (we spent nearly three hours just figuring out how to cut it, prepping our work space, and mixing up thinset before ever getting started). But by the end of the day (after Clara had gone to bed) we had accomplished this:
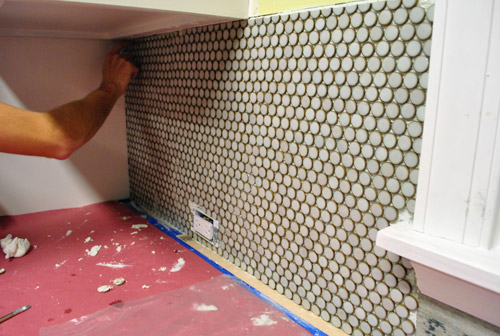
Isn’t it awesome? Well, at least the beginning of awesome. I keep doing awkward things like stroking it and saying “oh yeah” and then blushing and backing away slowly. There’s plenty about the process to share, but for now we’ll just give you a look at our preferred cutting method and how we got there and elaborate about what we learn as we go (since we have the rest of this wall and the entire oven wall – all the way to the ceiling – to do).
First we tried some tile nippers at Home Depot that worked great on our test tile sheet (we brought one with us to try things out in the store). But once we got home with it, it was giving us results like this when trying to cut each penny tile in half:
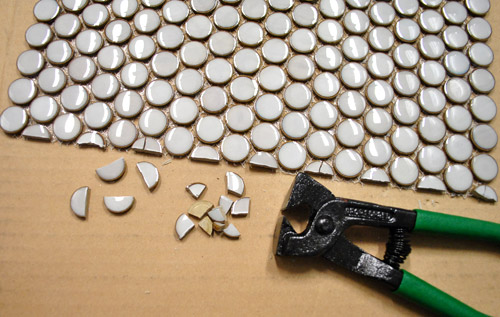
Ugh. See all the cracked and uneven tiles still on the sheet? Not good.
Since that didn’t seem to be working, we turned to the wet saw. John is usually a big fan of the wet saw, but the wet saw wasn’t a fan of the penny tile. Specifically the mesh that held the penny tile together in a big sheet.
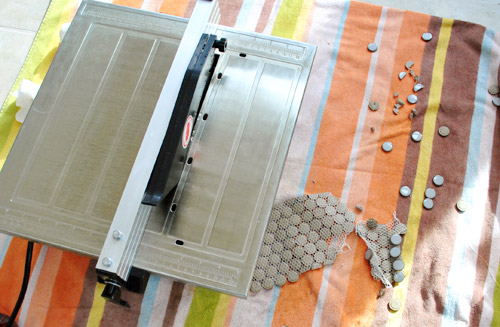
The water from the wet saw (even without using much water at all) caused the mesh to break apart, so it wasn’t working for us (even though we’d heard others have success with this method – so maybe it depends on the type of mesh that the tile manufacturer uses).
So we decided to give the nippers another shot (at least the sheets were staying intact when using them). After some trial and error, we landed on this pretty reliable technique for our tiles (though it may not work for other types of penny tile since things like thickness probably vary):
For those who can’t watch the video, here are the highlights (although seeing it in action whenever you can will probably paint the best picture):
- We used a piece of blue painter’s tape to mark our cut line, which seemed to also discourage the tile from cracking when snipped
- We made sure the nippers were as centered as possible on the tile to be cut (if they’re too close to one edge of the tile it had a much stronger chance of shattering)
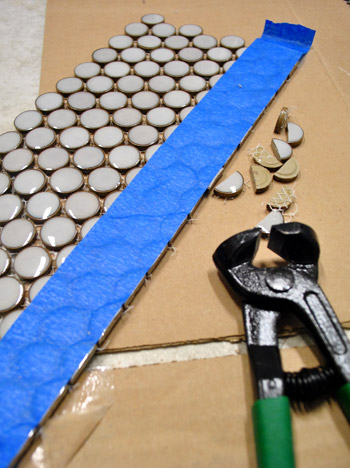
- We squeezed gently with the nippers at first (sort of like flexing your hand a few times) and gradually squeezed harder and harder until it broke. This seemed to score things or somehow prep them for a cleaner cut.
- It wasn’t a flawless method, but it had a MUCH higher success rate than anything else.
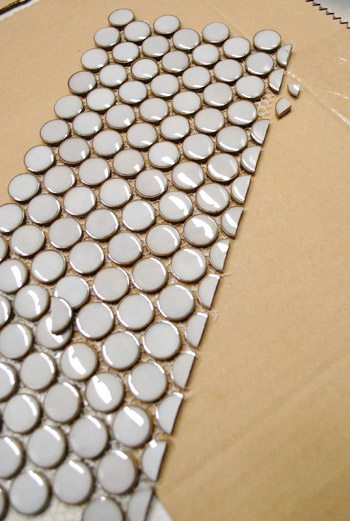
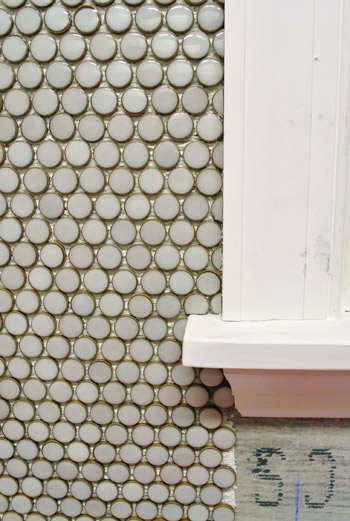
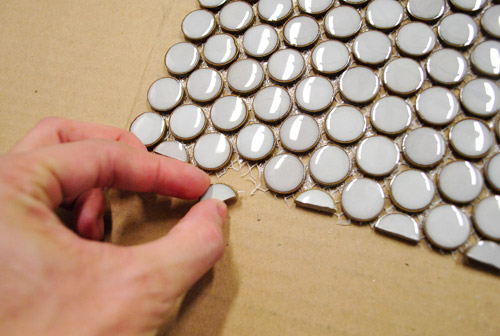
- When one tile shatters, you can just pull it off the mesh and replace it with a non-shattered one, so we did a lot of this (we called it back-filling). Once you add thinset you can stick missing tiles back into those spots and it looks great (obviously you have to pay attention to spacing them to make sure they fit in without being too close or too far from the surrounding tiles but it’s not too hard and you can step back a few feet to check your work).
- The thinset is “open” for about 30 minutes, which means you can tweak things for a fair amount of time if you notice anything that doesn’t line up, needs to be shifted, etc. Then it starts to harden and things are pretty much set for the long haul.
- It took us about 2 hours to do this much of the wall (after spending around 3 hours refining our cutting method, pre-cutting all the squares to fit this section of the wall, prepping our workspace, etc).
So that’s what we’ve learned so far. We’ll be back with more thinset info like step by step pics of us spreading it and fitting the tiles together in a staggered pattern to avoid seams (just wanted to be sure we had our method down before pausing to take photos of that stuff). But now that we’re straight we’ll get that done during our next tile sesh. This is definitely going to be one of those we’ll-share-photos-and-more-details-as-we-go-and-it’ll-be-real-time-so-it-won’t-be-in-30-minutes-like-on-HGTV things, but we can’t wait to make our way around the room and share all the pics (and more videos) as we go! Here’s hoping that big wall o’ tile over the stove isn’t too much of a doozy…
Psst- Check out another adventure in tiling from our first house’s bathroom here.

Aurora says
I am thoroughly impressed. My husband and I just remodeled our guest bath and mid-way through he says, “I want to add a tile backsplash.” Enter new adventure HERE. I purposely avoided penny and mosaic tile because I feared the tile cutting problems that you two so cleverly thwarted! I can’t wait to see the whole wall. I’m gonna melt over it, I just know it!
amanda says
It’s looking great already! I’m so glad you went with penny tile, it’s lovely. I’m excited to see how it looks when you’re done and even more importantly how the tiles and grout/thinset(?) hold up to daily wear and tear. I’ve never had a true tile backsplash and they look lovely, but I wonder if the grout gets dingy or is hard to clean, etc.
YoungHouseLove says
We had great luck sealing our last house’s bathroom with something that made it 100% maintenance free for the year+ we lived there! Seriously, I didn’t scrub it once! Here’s hoping we have the same luck in the kitchen- I’ll definitely keep you posted!
xo,
s
Margie Lou says
Ooh, I’m so excited to see how this turns out! We tiled our backspash on our last house and I know how much work it is and it wasn’t even penny tile! You guys are my super heroes! Keep up the good work!
Victoria says
thank you!!
Laura says
I can’t wait to see the kitchen when its finished!
Linda @ It All Started with Paint says
I just have to comment on this. I had a dear friend (and contractor) install my tile back splash. I thought I was doing him a favor getting the 1 x 1 glass tiles on the 12 x 12 mesh. He cursed me out for32 days! Me: “But Ed, they’re on 12 x 12 meshed backs…” Him: “Grrrr….”
And now I’m going in for some shameless bloggy self-promotion …
I joined up with 5 amazing bloggers (some new, some not as new) to launch an “Imagine the Impossibilities” challenge. It’s all about tackling your most daunting task now … as a way to kick off the new year …
Here’s the link to my post about it …
http://itallstartedwithpaint.blogspot.com/2012/01/mission-impossibilities.html
So, we would love for you to participate … but realize that may not be realistic. But a “shout out” would be cool …
Thanks!
Linda
YoungHouseLove says
Haha- we’ve heard about the challenge a lot in the last few hours! Sounds like so much fun! Can’t wait to see what you guys come up with! We have book stuff and kitchen stuff and Clara stuff to juggle, but we can’t wait to see what you guys do! Good luck with everything, we’ll be reading!
xo,
s
Linda @ It All Started with Paint says
.. so sorry … have we crossed the line?
… my former pre-mommy professional life was in public relations .. and I still freelance …
I may have had a bad influence on some of my new blogger friends :). I suggested some ideas to get our “Imagine the Impossibilities” challenge and link party out there and they have stepped up to the task … and beyond …
Linda
YoungHouseLove says
Haha- no worries! We can’t wait to see how you guys do and will definitely be checking in!
xo
s
Melanie says
Love your ideas, I can not believe I just discovered your site and I live right here in Richmond. We are currently building a house and I have been very creative and cost conscious.
Shawna says
Can’t wait to see the finished product. We’ve lived in our house almost 10 years and every year we say we’re going to add a back splash and haven’t because of the eek factor. I’m doing it this year!!!
Erin @ NonShrinking Violets says
I have the same penny tile on the floor and up the sink wall in my powder room and my installer had similar issues. I love it though!
Amandine says
Just about to order some penny tile for the bathroom floor and shower surround and wondering where these are from. Is this the milk color from the Tile Shop? or the white?
Thanks,
Amandine
YoungHouseLove says
It’s actually the moss stuff. No idea why it’s called that, it’s 100% gray!
xo,
s
vtgdonna says
Just wanted to tell you both thanks for the hint on cutting small tile using painters tape and nippers-I was having the same issue with the mesh/wet saw not working great so it was a great help! Doing bathroom tiling so done with all tile up…now onto grouting! By the way…love your blog!
YoungHouseLove says
Aw, you’re welcome! Glad to help!
xo,
s
Megan says
I am obsessed with your backsplash- and I want to use the gray penny tile in our upcoming bathroom redo! I see the picture of the label says “moss” for the color— is that really moss? Because it certainly looks gray to me! I don’t want any green surprises!
YoungHouseLove says
Yes, isn’t that weird. It’s 100% gray (no green) but for some reason it’s called Moss.
xo,
s
Megan says
Thanks so much!!
jan says
Where is the best place to purchase these tiles?
YoungHouseLove says
They’re from The Tile Shop. Maybe call them to order or visit their store in person?
xo
s
stephenie says
Hey There – we are about to start a similar project using the penny tile as well. Wondering how much overage or additional tile (if any) you ordered for your installation? Thanks!
YoungHouseLove says
We ordered 10% I think and ended up having more we could return but it was better to have more than less (and The Tile Shop took it back).
xo
s
Penny Smith says
I am in the middle of putting up the same color and material tiles but the hex… Did you used a sanded grout? Because I got the impression I was to use a sandless grout with these. And since I didn’t order it from The Tile Shop when I ordered the tile, I am having a heck of a time finding good information about what my grout possibilities are (some are pre-mixed, some have sealant in them. some you can add sealant) if you have a post on the grout itself, could you direct me? Thanks!! And congrats on the new/old house!
YoungHouseLove says
Glad you found the grout post, Penny. We’ve answered your question over there.
-John
Joel says
I’ve been reading your blog for a while, and just coincidentally found you guys on tileshop’s website yesterday. We went there today and ended up buying the same 3/4″ penny rounds (in white though, not moss) and I have the long side of our L shaped kitchen done already. Just doing the backsplash though, not the huge job you guys did. Thanks for the inspiration!
YoungHouseLove says
Sounds awesome Joel! Good luck with everything!
xo
s