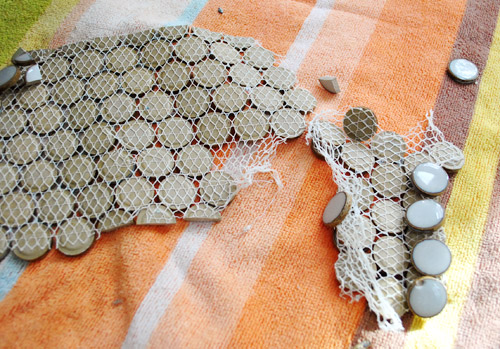
Oh man, backsplash-ing is 50% scary and 50% suuuuuper excitiiiiiiiiinnnnnggg! Sorry, got carried away there. Maybe it’s 90% super exciting and 10% eeeks. Anyway, we began wrestling with it a few days ago and it’s taking a bit longer than expected (we spent nearly three hours just figuring out how to cut it, prepping our work space, and mixing up thinset before ever getting started). But by the end of the day (after Clara had gone to bed) we had accomplished this:
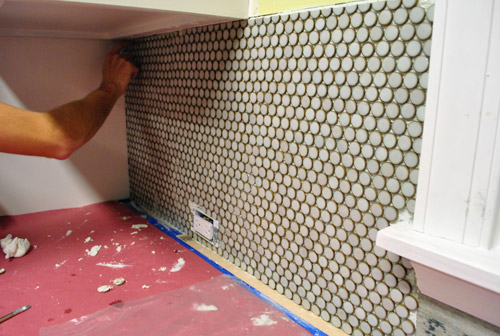
Isn’t it awesome? Well, at least the beginning of awesome. I keep doing awkward things like stroking it and saying “oh yeah” and then blushing and backing away slowly. There’s plenty about the process to share, but for now we’ll just give you a look at our preferred cutting method and how we got there and elaborate about what we learn as we go (since we have the rest of this wall and the entire oven wall – all the way to the ceiling – to do).
First we tried some tile nippers at Home Depot that worked great on our test tile sheet (we brought one with us to try things out in the store). But once we got home with it, it was giving us results like this when trying to cut each penny tile in half:
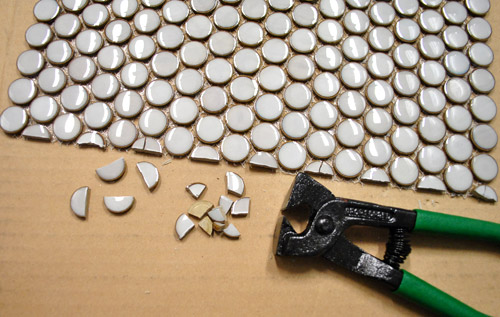
Ugh. See all the cracked and uneven tiles still on the sheet? Not good.
Since that didn’t seem to be working, we turned to the wet saw. John is usually a big fan of the wet saw, but the wet saw wasn’t a fan of the penny tile. Specifically the mesh that held the penny tile together in a big sheet.
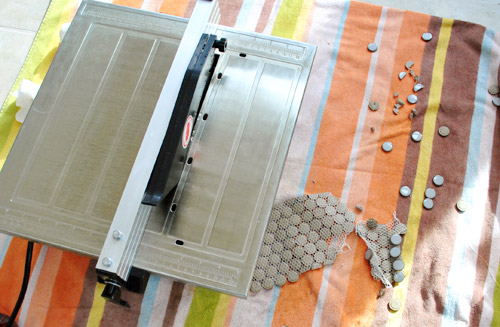
The water from the wet saw (even without using much water at all) caused the mesh to break apart, so it wasn’t working for us (even though we’d heard others have success with this method – so maybe it depends on the type of mesh that the tile manufacturer uses).
So we decided to give the nippers another shot (at least the sheets were staying intact when using them). After some trial and error, we landed on this pretty reliable technique for our tiles (though it may not work for other types of penny tile since things like thickness probably vary):
For those who can’t watch the video, here are the highlights (although seeing it in action whenever you can will probably paint the best picture):
- We used a piece of blue painter’s tape to mark our cut line, which seemed to also discourage the tile from cracking when snipped
- We made sure the nippers were as centered as possible on the tile to be cut (if they’re too close to one edge of the tile it had a much stronger chance of shattering)
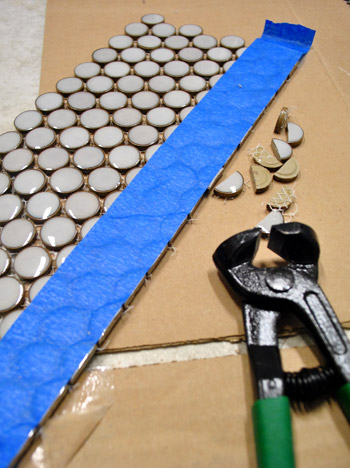
- We squeezed gently with the nippers at first (sort of like flexing your hand a few times) and gradually squeezed harder and harder until it broke. This seemed to score things or somehow prep them for a cleaner cut.
- It wasn’t a flawless method, but it had a MUCH higher success rate than anything else.
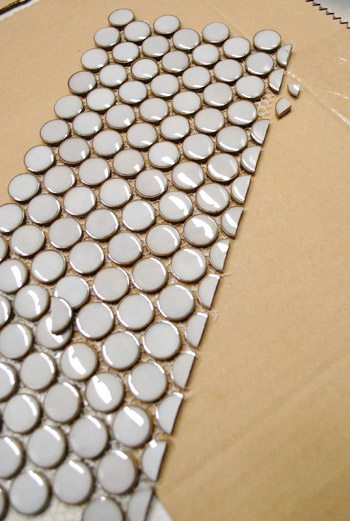
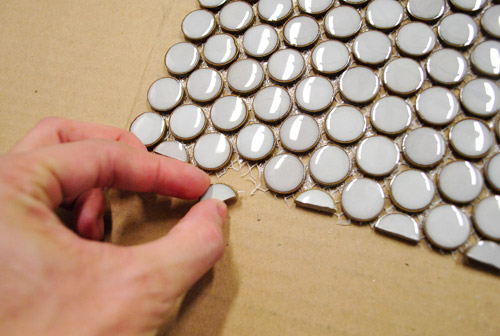
- When one tile shatters, you can just pull it off the mesh and replace it with a non-shattered one, so we did a lot of this (we called it back-filling). Once you add thinset you can stick missing tiles back into those spots and it looks great (obviously you have to pay attention to spacing them to make sure they fit in without being too close or too far from the surrounding tiles but it’s not too hard and you can step back a few feet to check your work).
- The thinset is “open” for about 30 minutes, which means you can tweak things for a fair amount of time if you notice anything that doesn’t line up, needs to be shifted, etc. Then it starts to harden and things are pretty much set for the long haul.
- It took us about 2 hours to do this much of the wall (after spending around 3 hours refining our cutting method, pre-cutting all the squares to fit this section of the wall, prepping our workspace, etc).
So that’s what we’ve learned so far. We’ll be back with more thinset info like step by step pics of us spreading it and fitting the tiles together in a staggered pattern to avoid seams (just wanted to be sure we had our method down before pausing to take photos of that stuff). But now that we’re straight we’ll get that done during our next tile sesh. This is definitely going to be one of those we’ll-share-photos-and-more-details-as-we-go-and-it’ll-be-real-time-so-it-won’t-be-in-30-minutes-like-on-HGTV things, but we can’t wait to make our way around the room and share all the pics (and more videos) as we go! Here’s hoping that big wall o’ tile over the stove isn’t too much of a doozy…
Psst- Check out another adventure in tiling from our first house’s bathroom here.

Jessica@VintageMauve.com says
You can tell this is going to look absolutely amazing when all said and done! I was wondering how you were going to cut the tile, because we’ve talked to a few people at Home Depot in regards to it, and they basically say that if you want penny tile, have a professional lay it. That completely defeats the point of DIY, right? But the video was really helpful, and will definitely keep me from shying away from penny tile. It just looks too good to pass up and if it’s good enough for you guys, and Sarah Richardson too…well, it’s good enough for me!
YoungHouseLove says
No way- they said only pros can do it? That’s too funny! We would have been so intimidated if we heard that so thank goodness we didn’t! John did say there’s not a single post out there with a DIY about it so we hope to fill in those blanks for other people since we sort of went into it blind! Haha. But it’s not too bad now that we have the hang of it!
xo,
s
Sabrina says
My sister in-law and I tiled their backsplash and around a window to the ceiling over xmas. We spent the first 8hrs planning, neither of us had tiled before. Then stayed up until 1:30am getting the tile on the wall since I was visiting and my time was limited. The transformation was amazing though and we were so thrilled with ourselves!! We used 6×3 white subway tile with a grey/kahki glass accent tile, all open stock at Home Depot. Put new wrought iron handles on their white cabinets and found an amazing milk glass hanging light for over their sink. The kitchen looks practically brand new. Thanks for the inspiration and can-do attitude!!
YoungHouseLove says
Ooh that sounds gorgeous! Congrats!
xo,
s
Diana @ Boy + Girl says
Looks great so far! Can’t wait to see the oven wall! It will be stunning I’m sure!
-Diana
Jodie Kirk says
“thank youuuu…” :) John cracked me up at the end of the video!
I love seeing the progress of your kitchen and house!! Keep up the awesome job you guys are doing!!!
Kellie says
Hey, we spent our weekend doing backsplash as well! Our kitchen renovation seems quite similar to yours; we’ve already knocked out a wall, put in some new cabinets, a new faucet, sink, and disposal, and put in new counters. Still on the list: paint (walls & cabinets), tile the floors, and install new hardware. WHEW! I’ll have to send you some photos when we’re all done, since you inspire me so!
YoungHouseLove says
We’d love to see pics when you’re done! Good luck!
xo,
s
Karissa says
Great start!
We started our marble tile backplash Fri night (measuring everything) and did all of the cuts on Sat. It took so much longer than we anticipated, argh. Luckily we could use the wet saw since our mesh was sturdy. We finished setting everything with thin set yesterday and total labor hours so far for both us working probably totaled 35. But it was worth it! We still have to grout. Are you planning to use caulk around the perimeter of the backsplash or just grout?
YoungHouseLove says
Yup, I think we’ll have some caulk where the counter meets the tile and up the sides and grout and topper-stuff everywhere else. More on that as we go for sure!
xo,
s
samantha says
I love that backsplash! I love all your ideas for decor too, I wish I was more creative. I just don’t know where to start!
Reenie says
Oh that looks tedious….but will be worth all your hard work and patience =)
Ali says
This is the kind of work that I don’t have the patience to figure out myself, so it’s fun just to watch someone else do it. :) Looks good so far!
angie says
Looks great! Can’t wait to see it finished. On another note I saw this and it made me think of you…
http://www.etsy.com/listing/88606009/placemats-paint-chip-placemats-set-of-6.
Happy New Year! angie
YoungHouseLove says
Those are adorable! I love them!
xo,
s
LARY says
How cool! Can’t wait to see the finish product.
Lilly says
Im so happy u guys are getting things done quickly you know not quickly but one thing right aftter the other instead of having to wait like a month after painting to tile. u must be so excited with each project going into the next Love it love it. I hope this turns out to be the next kitchen of ur dreams u know like in ur first house. Congrats! It looks beautiful so far n its only gonna look better. U guys have my dream job.
Debra @ Styled Haven says
Looking good so far! Was hoping today we’d see some backsplash action. Cutting doesn’t look all that fun, but it will be a thing of the past when you’re admiring the final result!
Can’t wait to see it complete!
Erika says
I got my copy of Coastal Living this weekend and penny tile appears in the mag several times. Looks like you’ve hit on a trend. It looks great so far…I wasn’t a fan of it at first, but I like it on your wall. I think you (and the amazing pics in Coastal Living) have won me over…
YoungHouseLove says
No way – that’s too funny! It’s been around a looong time (houses from the 50s and the turn of the century have it sometimes) so it was due for a comeback! Haha.
xo,
s
Kim Westling says
It looks great guys! I can’t believe your resolve and patience. I can’t wait to see the final product! I do have an unrelated question. You had a post around Christmas time about some of your favorite things. I used the calk that you suggested to redo my tub surround. I let it sit for the recommended 36 hours but it didn’t dry for some reason, and now the stuff is coming off in chunks! Have you had this problem before? Any suggestions?
YoungHouseLove says
Hmm, that’s so odd. It sounds like it didn’t set correctly. Maybe it got humid in there and needed more time to set? Or it was a bad tube of caulk? That can happen sometimes!
xo,
s
Pat E. says
ha! I spent the weekend tiling as well. Also a mosaic style, but on my tiny (less than 25 sq ft) bathroom floor. I found that one of the score-and-snap thingys (I’m sure there is a better name for this tool) that I got at Home Depot for about $15 worked well.
Friday and prep and layout day, Saturday was tile day and Sunday was grout day. (Tomorrow will be seal grout day.) John: I printed out and used your “how to replace a toilet” post from awhile ago. It was so helpful! Thanks for the inspiration and the tips.
YoungHouseLove says
Sounds like you’ve been busy. Glad to help!
-John
Ana says
Hi, Sherry,
I’m a big fan of your blog! Keep it up.
About the backsplash, wouldn’t it be a little hard to clean? I mean, with all those gaps? I’ve just noticed they are like little coins and inbetween them dirt/grease can accumulate.
XOXO
Ana
Amman, Jordan
YoungHouseLove says
You add grout into those gaps so that’s flush to the front of the tile and then seal the grout and tile so it doesn’t stain! Hope it helps!
xo,
s
mp says
Y’all are doing a great job. You’ve also reinforced my determination to hire a contractor to do this when I renovate my kitchen. (I don’t have y’all’s skills — my best are writing the check and ending up in the ER.)
Amy says
I just had to cut a small amount of handmade tile, and I ended up using a Dremel with a diamond blade. Worked great! I bet it would work well for this too, especially if you keep using the tape. I didn’t need any water either, just a steady hand.
YoungHouseLove says
Great tip! We don’t have a Dremel Max (and our Dremel Trio makes us want to chuck it out the window) but it sounds awesome for those who have one that would work!
xo,
s
Vonda says
AH! Perfect Timing since I’m picking up our tile from The Tile Shop this evening and probably won’t start it til the weekend. They suggested a wet saw but seeing your trouble with the mesh, I’m thinking we can use the technique you used on our 1×1 glass tiles (and save the money on renting a wet saw). Can’t wait to read more of your process to aid us in getting this task done right. [Read that as ‘hopefully we’ll have a whole box to return at the end of this adventure’.]
candace says
Weeeeee, the penny tile looks absolutely beautiful! Be sure to give yourself a break, you two are hardest workers I’ve ever seen!
Jenna at Homeslice says
wow- looks great! You guys have great stamina, this kitchen’s going to be done in no time!
mp says
Also, congrats on all the attention Clara’s play kitchen has been getting on other blogs! It’s shown up in my Trove newsletter three times and was picked up by the mothership — Apartment Therapy!
YoungHouseLove says
Aw thanks! We can’t believe it!
xo,
s
heather c. says
anyone else want to scream “penny-TIIIILE” like “penny-CAAAAAN” on cougar town? every time I see this amazing backs splash, I say it that way in my head. Great job guys – it is looking ah-mazing!
YoungHouseLove says
Haha someone else said that too! I definitely did some of that while we tiled!
xo,
s
Gabbi says
I cannot wait to see the final results! Your kitchen is going to be beautiful!
Our kitchen is finally finished…woohoooo!
http://retroranchrenovation.blogspot.com/2012/01/shes-ready-for-her-close-up.html
YoungHouseLove says
That’s amazing! It doesn’t even look like the same room! Love the pops of blue too!
xo,
s
Anika says
Wow, sounds like this beautiful tile is really making you work for the end result, but I’m sure it will be amazing once it’s finished. Can’t wait to see it complete with grout – good luck finishing!
Ann says
meow!
Priscilla says
it’s so purdy!
i am just a little jealous ;)
Natalie says
I love tile work! I worked as a mason’s helper for awhile and picked up so many good tips. He went on vacation for a couple weeks and since he’d taken the time to teach me everything (rather than just getting me to hand him tools and mix mortar and thinset) they got me to tile and grout an entire public washroom floor to ceiling by myself while he was away. They were just 4″ tiles but I got a ton of practice!
YoungHouseLove says
Wow – that sounds like a huge job! I bet you learned so much!
xo,
s
Gerardo says
Love those tiles, but truly complicated. I had a similar problem with some tiles and I ended up with a similar solution, but before using the tile nippers I marked the tiles with a glass cutter. That way, the tile keep the straight line and it’s harder to brake the tile. Hope to be helpfull!
YoungHouseLove says
So smart! We didn’t even think of that!
xo,
s
purejuice says
oy! how completely frustrating.
you two have many sekrits, one of which as i’ve mentioned is your kindness to whose of us who order you to do it our way (the noive!). your measure 40 times cut once ethos. the upcycling thing, which really is one of the secrets of the new economy (and the old one my depression-era parents grew up in). and here, your perseverance. proud of you and so impressed. never say die!
YoungHouseLove says
Aw thanks!
xo,
s
Jackie says
The tiles are gorgeous! I hope I am not too late, but there is another tips of tile cutter that I had great success with on glass mosaic tiles. It has to round blades that squeeze together to cut the tile. Here is a link to them at Home Depot: http://www.homedepot.com/h_d1/N-5yc1v/R-202205643/h_d2/ProductDisplay?langId=-1&storeId=10051&catalogId=10053
Good luck! I can’t wait to see the finished result.
YoungHouseLove says
Thanks for the tip! So good to know if ours turns on us!
xo,
s
Sarah @ Redhead in Ruffled Flats says
Wow! That’s a lot of work! Kudos to you two! It’s going to look so good when you are finished! Question – are you going to tile the stove wall before you hang the floating shelves? Are you going to leave room for the shelves or are you going to hang them over the tile somehow?
P.S. – my hubby is working out to a workout video while I’m in the same room reading blogs (it’s been a long day, so no workout for me), and when I played the video which he can’t see he said, “Is that John?” like we are all personal friends. So funny how much we talk about you two and we’re many miles away!
YoungHouseLove says
Haha, so funny about the John thing! We’ll tile the whole wall and then use a bit that drills through tile to hang the shelves. Since the tile is so small, we don’t have a risk of them cracking in a 6″ diameter or anything (even if the tile we drill cracks, it’s only the size of a penny and the shelf or bracket will hide that. Here’s hoping it works out the way it seems to in my head! Haha.
xo,
s
Nicole says
Yay, I’ve been waiting for the penny tile to go up since you bought it… I really think it will pull everything together and take it to that custom finished level!
Mike says
Looks great. If you don’t mind I will offer some advice when you begin to grout. As you know when grout hardens it is not very flexible, therefore whenever you change surface planes (where two walls meet or wall and countertop) it is recommended that you use a flexible caulk. The obvious trick is to find one that matches your grout color. If you do grout the corners then you run the risk of cracks. Happy tiling.
YoungHouseLove says
Thanks for the tip!
xo,
s
Mina says
I just did glass subway tile for my backsplash. I could have used a wet saw but didn’t have one. I had success scoring with a tile cutter then nipping. Might work for you too! Good luck!!
YoungHouseLove says
Thanks for the tip Mina!
xo,
s
Haley says
You guys are so inspiring! I love all the different tones of grey going on in the penny tile. On a totally different note… Have you guys ever though of DiYing a tufted ottoman? I’d love to hear your thoughts/tips? I’m in the process of debating to DiY a tufted ottoman or go with a more practical storage ottoman. Ooo maybe a hybrid of the two?
YoungHouseLove says
We shared this amazing one a while back! I love it! It doesn’t have storage but it’s so pretty!
xo,
s
Mike Grant says
Hi Haley,
Here is my version of an ottoman with storage. I didn’t tuft the top but very easily could have. Hope it provides some inspiration.
http://www.mikegrant.com/2011/10/11/how-to-build-a-storage-ottoman/
YoungHouseLove says
So cool!
xo,
s
jessica@fourgenerationsoneroof says
Oh my, I don’t think I have ever seen so many comments on a blog that wasn’t a giveaway! Holy smokes 230! I get excited over 4! :) I love the style backsplash you choose, it’s going to look fab when you are done!
YoungHouseLove says
Aw thanks! The funny thing is that our first 100 posts or so had zero comments! We were talking to no one! But we kept on chatting and slowly things started growing! So all of that is to say: happy blogging! I’m sure that 4 will grow and grow as you go!
xo,
s
Elizabeth says
Sooo exciting! I can’t wait to see a wider shot!
Tonya@mycozylittlefarmhouse says
Looks great so far!
Victoria says
Hi John and Sherry,
I continue to be inspired by your DIY-ness and all your lovely home improvements. My hubby and I are about to redo our dining room. Unlike the bravey-braveness of you guys – I drag my feet and procrastinate w/ DIY home projects as I’m often nervous to take the big step and commit to painting, etc… however, we are starting…um…soon :) Anyways, I know you guys are super busy and I don’t know if I’m using poor blogging etiquette by asking for advice so, please, forgive me. We are going for a “Farm House” look in the dining room. We have a rectangle farm house table (my dining room table growing up) w/ benches (amazing road side find) on each side. There is a big built in along one whole wall that we’ll be painting (a white color) and then we’re painting the walls a light grayish white…can you help suggest a rug scheme/color/pattern to capture the farm house feel and not break the bank? I don’t want to over do it w/ neutrals. Should I pick the rug first, then the curtains? Thanks a ton for reading my wordy-ness all about a rug :/ I’m wondering if you reply to this on the blog or email?? Either way, thanks a million. Last advice I asked you guys for what to keep frames hanging straight. You recommended the velcro patches and they work like a charm! You guys rock. Ok, bye for reals :o)
YoungHouseLove says
I would go with a jute rug or some other neutral rug- then add pattern and color with the pillows on the sofa, some accessories, art, and even curtains! You can also post a pic on our Facebook page and ask for advice and hopefully people will chime in! Good luck with everything.
xo,
s
Annie says
See, if you hadn’t showed the subsequent pictures, I actually would have believed that you stuck each individual little circle on one by one!
YoungHouseLove says
Haha- we probably would have cried!
xo,
s
Alison Shuman says
Don’t despair – even a REALLY experienced tile guy was flummoxed by these penny tiles. I bought the same ones, same source, different color, after reading one of your posts. He was NOT happy with me and had a not-fun time cutting them, too. I ended up with a lot of ratty ones, and we’re planning to encase the one ugly outer corner in wood trim, to avoid the cut edges.
Your photos and videos on this are AWESOME, as usual.
We spent a LOT of time lining up rows – well, really, adjusting individual pennies just enough to not annoy the crap out of me. Then I decided the semi-irregularity of it would just have to be considered “handmade”, as opposed to “uneven”. That designation helped, a lot.
I’d send pix, or link in one, but I dont know how!
YoungHouseLove says
Ooh we’d love to see pics! If you have them on a blog or a site like flickr.com you can leave the link here in the comment section or can submit them on our Facebook page!
xo,
s
Evan says
This made me laugh today: the John & Sherry of the 1950s?
http://gothamist.com/2012/01/09/video_1950s_couple_goes_diy_on_thei.php
YoungHouseLove says
Haha- hilarious! I love it!
xo,
s
Sunita says
Hi Guys, When I first saw the penny tile, I totally loved it. But when I saw the closeup of how this tile is today with the mesh behind and the spacing between the tiles…it makes me wonder if this wouldn’t be a cleaning nightmare. Wouldn’t dirt be caught between the circular tiles and would that not be difficult to clean.
YoungHouseLove says
Oh no, it’s not done! We still have to grout it! Then the grout will be flush with the tile and nothing will get in there! You can even seal the grout so it’s stain-proof!
xo,
s
KarenH. says
It looks realky nice so far and I’m sure will be awesome once completed. But you have absolutely sold me on the idea of larger tiles for my backsplash when the time comes!! I’d be certifiable if I tried to install any tiles that needed that much fussing :D. I salute your patience!
amanda j says
Have you thought of using a Dremel? They have a small circular attachment that works well foe these kind of cuts.
Kitchen is looking great!
YoungHouseLove says
We have heard that a Dremel Max would work but we only have a Dremel Trio that won’t. Boo! We bought the wrong Dremel. Haha.
xo
s
Ally says
Looks awesome already! Just reading about your hard work made me tired. Thanks for posting this about your process. I’m so glad to see that even pros like you guys learn as you go. Can’t wait to see the finished tiled walls. Great job!
kerry says
I’m like 90% certain that I’m just copying major elements of your kitchen when you’re done. I love that tile, and I can’t wait to see it with the cork floor and all put together. I will also rest easy knowing you have done the research and settled on a reasonable price point. I too love my money and want to be sure I spend it well and wisely.
I have a tiny galley kitchen that is floor and tile wall heavy, and I just got back from Sweden where I saw dark wood with light tile all over the place. Love, love, love.
nice work.
Brandy says
i’m waiting for your kitchen to be done – it’ll be a BIG reference guide for when i can attack my kitchen. we’re going to repaint our cabinets white and i want to put up a fun backsplash too! your step-by-step instructions, tips, videos, and pics are SO helpful and inspiring. thanks!!