Oh man, backsplash-ing is 50% scary and 50% suuuuuper excitiiiiiiiiinnnnnggg! Sorry, got carried away there. Maybe it’s 90% super exciting and 10% eeeks. Anyway, we began wrestling with it a few days ago and it’s taking a bit longer than expected (we spent nearly three hours just figuring out how to cut it, prepping our work space, and mixing up thinset before ever getting started). But by the end of the day (after Clara had gone to bed) we had accomplished this:
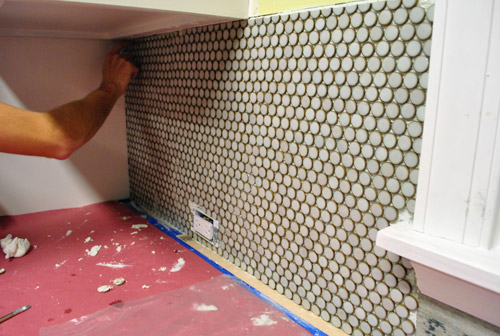
Isn’t it awesome? Well, at least the beginning of awesome. I keep doing awkward things like stroking it and saying “oh yeah” and then blushing and backing away slowly. There’s plenty about the process to share, but for now we’ll just give you a look at our preferred cutting method and how we got there and elaborate about what we learn as we go (since we have the rest of this wall and the entire oven wall – all the way to the ceiling – to do).
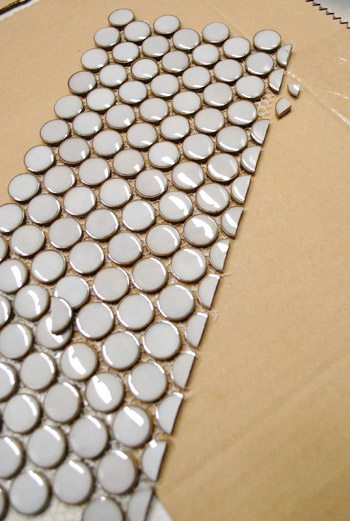
First we tried some tile nippers at Home Depot that worked great on our test tile sheet (we brought one with us to try things out in the store). But once we got home with it, it was giving us results like this when trying to cut each penny tile in half:
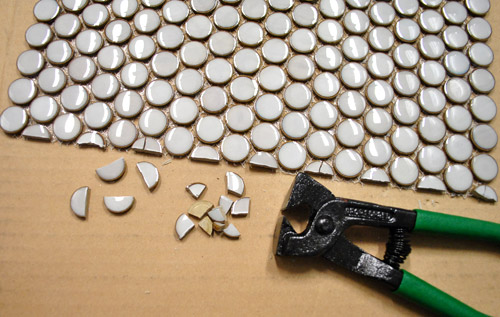
Ugh. See all the cracked and uneven tiles still on the sheet? Not good.
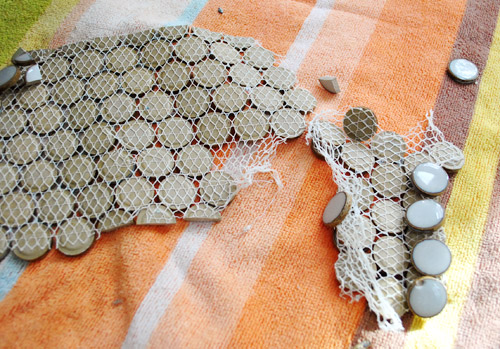
Since that didn’t seem to be working, we turned to the wet saw. John is usually a big fan of the wet saw, but the wet saw wasn’t a fan of the penny tile. Specifically the mesh that held the penny tile together in a big sheet.
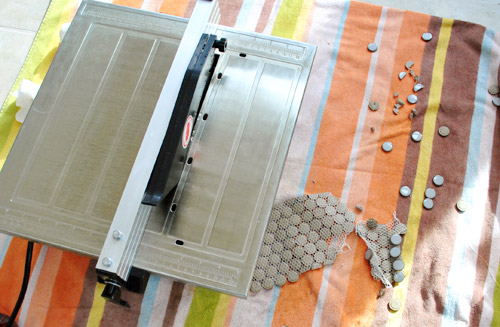
The water from the wet saw (even without using much water at all) caused the mesh to break apart, so it wasn’t working for us (even though we’d heard others have success with this method – so maybe it depends on the type of mesh that the tile manufacturer uses).
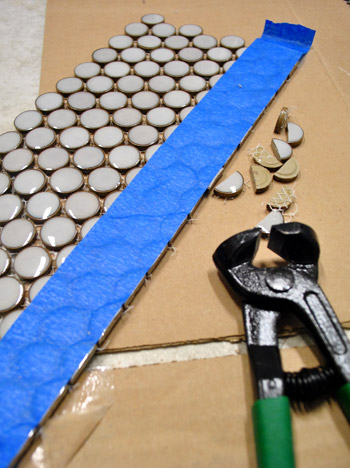
So we decided to give the nippers another shot (at least the sheets were staying intact when using them). After some trial and error, we landed on this pretty reliable technique for our tiles (though it may not work for other types of penny tile since things like thickness probably vary):
For those who can’t watch the video, here are the highlights (although seeing it in action whenever you can will probably paint the best picture):
- We used a piece of blue painter’s tape to mark our cut line, which seemed to also discourage the tile from cracking when snipped
- We made sure the nippers were as centered as possible on the tile to be cut (if they’re too close to one edge of the tile it had a much stronger chance of shattering)
- We squeezed gently with the nippers at first (sort of like flexing your hand a few times) and gradually squeezed harder and harder until it broke. This seemed to score things or somehow prep them for a cleaner cut.
- It wasn’t a flawless method, but it had a MUCH higher success rate than anything else.
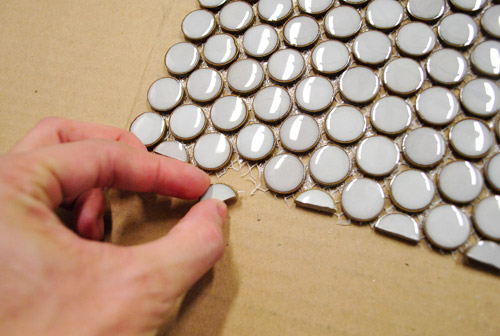
- When one tile shatters, you can just pull it off the mesh and replace it with a non-shattered one, so we did a lot of this (we called it back-filling). Once you add thinset you can stick missing tiles back into those spots and it looks great (obviously you have to pay attention to spacing them to make sure they fit in without being too close or too far from the surrounding tiles but it’s not too hard and you can step back a few feet to check your work).
- The thinset is “open” for about 30 minutes, which means you can tweak things for a fair amount of time if you notice anything that doesn’t line up, needs to be shifted, etc. Then it starts to harden and things are pretty much set for the long haul.
- It took us about 2 hours to do this much of the wall (after spending around 3 hours refining our cutting method, pre-cutting all the squares to fit this section of the wall, prepping our workspace, etc).
So that’s what we’ve learned so far. We’ll be back with more thinset info like step by step pics of us spreading it and fitting the tiles together in a staggered pattern to avoid seams (just wanted to be sure we had our method down before pausing to take photos of that stuff). But now that we’re straight we’ll get that done during our next tile sesh. This is definitely going to be one of those we’ll-share-photos-and-more-details-as-we-go-and-it’ll-be-real-time-so-it-won’t-be-in-30-minutes-like-on-HGTV things, but we can’t wait to make our way around the room and share all the pics (and more videos) as we go! Here’s hoping that big wall o’ tile over the stove isn’t too much of a doozy…
Psst- Check out another adventure in tiling from our first house’s bathroom here.

Cheryl says
Dumb question… how is the tile sticking to the wall?
YoungHouseLove says
With thinset! We’ll focus more on that application stuff in our next post for ya!
xo,
s
Jen @ The Decor Scene says
O.M.G….it’s going to be gorgeous when it’s finished. Good Luck with the rest of the install! Here is to only good cuts and no cracking or crumbling of any more penny tiles. I can’t wait to see the oven wall done. Your kitchen is going to be gorgeous!!! :)
katie says
Great work so far. It looks fabulous.
You know, my husband landed on the painters’ tape method for cutting marble tile with our wet saw – it really seemed to cut down on breakage in that instance too!
YoungHouseLove says
Too funny! Three cheers for painters tape!
xo,
s
Cair says
Looks great so far. Hopefully now that you have things figured out it will move a little faster – at least on the big wall there won’t be so much cutting, right?
YoungHouseLove says
Yup! That’s my hope too!
xo,
s
Sayward says
Woooo!!!!!! A few years ago I tiled a side table with penny tile(the top was tray-like). I couldn’t cut my tiles cleanly either, so I sent them off to a friend of a friend who worked with tile professionally, and some of them still broke on him too. So rest assured that your attempts were as good as a tile professional’s in Pennsylvania. Fortunately, just like you guys, I had enough clean pieces to make up for the shattered ones. Your kitchen is totally awesome!!!!
YoungHouseLove says
Aw thanks Sayward!
xo,
s
Sayward says
Totally. Awesome.
Kate Battle says
I would like to put in a small backsplash, but haven’t picked one out yet…at my last house I did a 1 inch square glass mosaic tile that was also difficult to cut and the tiles would move around in the thinset and make the spacing difficult! Are you having problems like that with the penny rounds too?
I spent my whole weekend sanding my cabinets! I was about to TSP substitute degloss them, when I read the bottle and it said not to use it on raw wood! Then I went all over looking for Next Liquid Deglosser and I can’t find it anywhere! I think I am going to have to skip the deglossing step and go right to priming. I hope it will be ok!
My kitchen is a mess right now! Ahhhh!
YoungHouseLove says
We did some research beforehand and learned that the number one challenge with penny tile is with paying attention to spacing, so we’re being extra careful! Since you have 30 minutes to shift things and step back and check your work before things harden it’s not too bad! Hope it helps!
xo,
s
Emily says
I don’t think the Next liquid deglosser would have helped either. I’m not certain of your particular circumstances, but deglosser is used to break the surface of an existing surface treatment like paint, or laquer, etc. Its not to achieve the smoothness you get from sanding. So if you have raw wood that is rough, deglosser is not going to help you. Only good old elbow grease.
alison says
I love these tiles, guys! We installed the EXACT same ones in our bathroom this summer. LOVE the look — only bummer is that they were difficult to cut for sure, and grouting them was a nightmare (for us). We installed them in little sunk-in boxes in the wall of our shower — and it was REALLY hard to get the grout off of them. Hopefully you have better luck and can give some tips on how to get them gleaming! Ours still have grout crusted on :(
YoungHouseLove says
Good to know! We’ll look out for that issue and keep you posted if we figure out the best method for the job!
xo,
s
Emily says
Looks great!
What about cutting the tiles by applying the tape like you did, and then gently peeling back the mesh from the tiles you are going to cut? Then you can run it through the wet saw without the mesh getting chewed up? This also would eliminate the need to hand install the cut tiles since they’d be stuck to the tape!
Haven’t tried it myself, but just a thought. Looks great so far. Good luck!
YoungHouseLove says
Since the tiles are so small (as tiny as a penny) we worried that removing each one and trying to cut it on its own with the wet saw could be dangerous for the ol’ fingers (and cutting them each with the nipper was probably faster and less nerve-wracking). Hope that makes sense!
xo,
s
EmilyR says
Oh no! That would be tough. Use the blue tape on the front to keep them together and enable you to eliminate the mesh. Ultimately the tape on the front acts in place of the mesh on the back and your cutting line. Hope it makes more sense.
YoungHouseLove says
Oh that’s smart! Didn’t even think of that! Haha. Might have to try it and see how we fare- although we’re so comfortable with our little nipper method (and we don’t have to go into the sunroom to make cuts like we did with the wetsaw) so it might be the way to go! We’ll keep you posted!
xo,
s
Alison says
First time I saw small tiles being installed (a swimming pool in asia) the tiles were glued onto a piece of paper (on the good side). Once they were set, the paper was washed off with water and then the grout applied. You might want to keep that in mind if you end up creating a strip of cut tiles to ease installation.
YoungHouseLove says
Wow- that sounds cool! I wonder what kind of paper is washable- must have been a special application process! So cool.
xo,
s
Alison says
it was the glue that was water soluble. The paper just sort of balled up once it got wet and was easy to remove from the tiles – and didn’t leave a mark. It was a thinish paper, but strong enough to hold the tiles on. Now a-days, like Emily suggests, you could just use painters tape to hold the tiles in place once you remove the mesh, and remove the tape once they the quickset had dried.
YoungHouseLove says
Oh that sounds cool! Yeah, we’re not minding our current method but will definitely change things if we’re not getting the effect we’d like!
xo,
s
Robin says
Looks awesome!!! We installed small mosaic glass tiles a few years ago for our backsplash. My hubby ended up buying a diamond bit for the dremel and then we used 2 metal rulers as the guide to score the tiles and then the nippers. Worked great.
YoungHouseLove says
Ooh smart!
xo,
s
Monique says
I was eagerly anticipating this post. We used the same tile in our bathroom and our handyman said it gave him PTSD! He actually added a clause to his contract paperwork charging extra for penny tile application after that. I think he used the same technique, but maybe not with the painter’s tape to help.
When it was done, it was beautiful, and included in his payment envelope was a single penny tile, which I’m sure sent him shivering in a corner somewhere.
YoungHouseLove says
Haha, so funny that you stuck a penny tile in there with his payment!
xo,
s
Jenn L @ Peas and Crayons says
ooooh its so pretty! I would probably be just as guilty of stroking it and staying whatever came to mind ;) haha! Glad you guys got a great cutting technique down! and so happy you shared it so I know for my future backsplash!
Thanks as always darlings! xoxo
Erin says
This is unrelated, but I was watching a show this weekend called Texas Multi Mama’s and one of the Mom’s has an uncanny resemblance to Sherry! http://www.wetv.com/texas-multi-mamas/blogs/suz-on-episode-3-under-the-knife Her name is Suz, she sort of looks like a slightly older version with shorter lighter hair, they even talk alike. I just wanted to share in case you hadn’t heard about it yet!
YoungHouseLove says
Ooh she’s much prettier than me! Haha. But I’ll take it!
xo,
s
Wendy says
Love, love, love it!!
Bethany says
It’s looking great! Our last roommate installed our glass backsplash for us a year ago and just put the crooked snipped tiles up on our wall like that! OMG it was awful!
We finally had the entire thing redone 2 weeks ago. It stunk having to buy all new tile, but we actually were much happier with our new choice (from the tile shop!). I absolutely LOVE glass backsplashes, but it didn’t work well in our kitchen because there are 3 windows opposite of the backsplash and it just looked like a glossy reflective mess.
YoungHouseLove says
Aw man that stinks but the new tile (and the new tile job) sound awesome!
xo,
s
Elizabeth says
I’m so looking forward to watching your tiling adventure unfold. I am planning on tackling my own back splash soon so this will be great inspiration.
Sara @The Fat Hydrangea says
Seriously even 1/2 way done and only seeing a little sneak peak of it make me excited, it looks beautiful! Cannot wait to see the finished product!
I’m thankful for the tile tips too – I just bought 65 sq ft of a marble hexagon/ black diamond small patterned tile and have been wondering how the heck we will cut it precisely! I will have to try your tricks – and most importantly remind myself not to discouraged! :)
Kat says
My husband just finished tiling a wall of subway using those clipper things (we don’t have a wet saw) so you can imagine how long it took him:/ Frustrating but he did a great job! Here’s a link if you’re interested:
http://www.mapleleavessycamoretrees.com/2011/12/subwayin-it-up.html
YoungHouseLove says
Wow- he did an amazing job!!
xo,
s
Molly says
Every time I read “penny tile” it comes out to the tune “penny can” from Cougar Town. Makes me chuckle. :) It’s looking great so far. I can’t wait to see it all finished!
YoungHouseLove says
Haha- Penny Can! I love that show/game. So sad it’s canceled.
xo,
s
kristen says
it’s coming back this spring! for some reason ABC didn’t put it in the fall schedule, but it’s not cancelled yet :)
YoungHouseLove says
Oh yesssss! Here’s hoping it comes back!
xo,
s
Jamie says
I LOVE your tile! We did ours last year and wished with all our hearts we had bought a tile nipper. We did some wrestling with a wet saw. We only had a few pieces so we think a tile nipper would have been faster. So happy you got it figured out! Looks great!!!
http://jpandjamie.blogspot.com/2011/05/baby-got-backsplash.html
Penny says
It is looking so so good! I’d love a penny tile backsplash in our kitchen but I’m afraid it would clash horribly with our black and white checkerboard floor. Keep up the great work!
Roeshel says
Can’t wait for the reveal! We had to get creative with cutting our marble subway tile too (kept wanting to break and crumble) and we had the same solution – tape! Looking forward to the next sneak peek!
Amanda says
We just finished tiling our backsplash with this exact tile (different color) – we actually had good success using the nippers, nothing like all the trouble you guys had. Bummer! (sounds like we’re the oddballs on that front, though) Also, pretty quickly we fell into mat disassembly mode: they were easier to get in and straight in pieces about half the size of the original square (I was surprised how much stretch that mat has), and it was pretty easy to have a collection of pieces of various sizes to just plug in where needed and eyeball the spacing.
Also – we used Tile Shop’s grout release, and it’s kinda tha bomb. We’ve tiled 4 rooms – this was our first wall – and I’m pretty sure we’ll never tile without it again. So. Much. Easier.
Good luck! Lookin’ good!
YoungHouseLove says
Thanks for the tips Amanda! We also love breaking up the sheets and installing them a bit smaller to keep things straight (and back-filling as we like to call it when we plug in various tiles). Sounds like the grout release stuff is awesome (I think we used that on our first bathroom project and it was really helpful)!
xo,
s
Jeanie correa says
Nice tutorial! And great visuals. I didn’t even have to read every word to get the gist! Again, good job!
Jane says
That is already looking amazing! I am in awe of you all’s handiness!
Amanda J. says
Awwww yeeeah! Looks killer so far – I can’t wait to see the rest!
I’m curious, though, about the upkeep on the penny tiles – from the photos, it looks like the kind of thing that would get all grubby and collect dirt in the in-between spaces. I adore the aesthetic quality, but I know for my not-very-fastidious homemaker-self, “pretty things” that mean I have to clean more wind up looking nastier in the long run.
Probably not something you can speak to yet, but when the time comes I’d be curious to know about the ease of use. :)
Carry on, Petersiks.
YoungHouseLove says
We’re all about sealing tile to keep that pesky grout clean! We used a sealer that we loved on our first house’s bathroom (subway tile all the way up the wall to the ceiling meant tons of grout!) and over the year+ that we still lived there we didn’t scrub it once! It’s amazing what sealer technology is like these days! So we definitely plan to protect that grout because we don’t have time to be scrubbing it at all! There shouldn’t be any dust buildup because the grout will be flush with the face of the tile so there won’t be grooves once we grout it all!
xo,
s (& the fam)
Whitney says
Wow, it’s looking fantastic! I’m having backsplash regrets now – I should have looked at the penny tile more seriously!
Regan @ RenovatingRothenbergers says
Love the penny tile!! :) Have you mentioned what color grout you’re going to use? I can’t remember if you did or not . . .
YoungHouseLove says
We’re going to use the same grout as was used in the sample we showed in our “Lucky Penny” post. It’s sort of a soft white color so mixed with the soft gray it has the tones of carera marble without the big price tag! So excited to see how it all turns out!
xo,
s
Ethne says
Well, I have to say it looks like a whole lot of work, tho infinitely shorter than if you didn’t have the mesh backing. Still, probably not as much work as your office stencil. You should do a time comparison.
YoungHouseLove says
Haha- oh yes it’s nowhere near as long as the stencil I think! Although I’ll have to tell you after we do the big wall!
xo,
s
Vanessa says
Can. Not. Wait.
Oh…and I have the same exact beach towel.
YoungHouseLove says
Haha- too funny!
xo,
s
Micha says
Oh, nice! I can’t wait for the big reveal!
Husband and I hopped in at the deep end DIY-wise when we bought our historic fixer-upper last year; neither of us had any prior DIY experience. So far we’ve grown to love a whole variety of DIY projects, tools and techniques but tiling isn’t one of them. That’s the one thing husband abhors and promised he’d never do again *LOL*
The Parkers Blog says
Looks great! I love this sort of tile :) I have to say you guys are so motivating, and, well, I think I would have given up on the tile after the first go. Not enough experience here to feel like I could do something like that.
YoungHouseLove says
Aw, if there’s one thing we have learned from doing this whole DIY thing for the past 4 years, it’s that things you think will be easy can be hard and things you dread can be easy- so we usually just keep trying until we figure things out. If at first you don’t succeed…
xo,
s
Megan L says
It’s looking sooo good! I completely understand being giddy about tile, I actually got a little giddy myself when I saw this post! I’m a dork, what can I say? Anywho, I hope the whole project goes smoothly and I know it’s going to look FABULOUS!
Sherry from BC says
I love this tile but I must admit when I saw it I was curious how you find the cutting. I think it will be worth the fuss in the end but I am sure your hands will be aching after all that nipping. I do think the big wall will be scary work intensive but what an amazing look you will have in the end. Can you give up a breakdown of the time involved as well. It will be interesting to see that too.
YoungHouseLove says
Oh yes, we plan to do a big rundown of time it took at the end of the job just like painting the kitchen cabinets!
xo,
s
heyruthie says
wow. the penny tile seems to be pretty labor intensive now that you’re in to it. it will be beautiful in the end, though!
is there a way to score the tiles with an exacto knife or something before you nip them?
YoungHouseLove says
We tried that with limited success (maybe our blade just wasn’t sharp enough) so the nipper method seemed to work best for us!
xo,
s
Julia @ Chris loves Julia says
That penny tile. I die. It’s so gorgeous. We went to an expo home show this weekend and picked up a tile cutter. After watching this guy cut tile in straight lines and curved lines with so little effort–I was sold! And he gave it to us for $30. I wish I was in your neighborhood because I would totally just drop it off.
http://chrislovesjulia.blogspot.com/2012/01/tile-cutters-and-cash-catchers.html
Now that I have it, I am LOOKING for a tile job, just so I can use it. Can you hear me saying “Honey, we DO need new flooring in the laundry room.” ?? Haha.
YoungHouseLove says
Haha- that sounds awesome! Have fun with it!
xo,
s
js says
Our tile guy had a heck of a time with the accent tiles in our bathroom. The mesh kept melting when he’d make cuts with the wet saw.
beth says
Hey, love the penny tile , it will be gorgeous!. I am thinking of this for the floor when I redo guest bath. Just wondered , did you try a Dremel? When I did our master bath, it was wonderful at cutting odd pieces of tile.Of course, I was using 4×4’s so maybe it wouldn’t work on the penny , but it is worth a shot . I have the Dremel max and the round blade was what I used. Hope it helps, can’t wait to see it all done.
YoungHouseLove says
We actually don’t have a Dremel Max (we have a Dremel Trio but it’s terribly about cutting accurately- so terrible that John’s ready to craigslist it). Thanks for the tip! Wish we bought that one instead of the Trio!
xo,
s
Melissa Evans says
Looking good!! Can’t wait to see more! :)
Vanessa says
I’ve been lurking on your blog for quite some time even before Clara (B.C.) was born but this is the first post that has prompted me to comment. It looks AMAZING- All that white inspired my own kitchen reno! We just purchased a 1950s home and the kitchen was #1 on the priority list. I had already marked your first house’s kitchen as my inspiration and mimicked the granite etc. Anyway, that penny tile is awesome!
YoungHouseLove says
Aw thanks Vanessa!
xo,
s
Jennifer says
We’ve been searching for a grey penny round, and when I originally looked at the Tile Shop, they only had “Moss” which was described with emerald tones . . . then I saw in your Lucky Penny post that it looks like Moss IS the color you bought? And it’s actually grey in person?
The only other grey we’ve found is by Ann Sacks and it’s $$$$$.
YoungHouseLove says
Yes, it’s definitely best described as gray- at least that’s how it reads in the store, outside, and in our house. It’s sort of a muddy gray color – hope it helps!
xo,
s
Jennifer says
that is AWESOME — thank you!!!
xo
Renee says
It looks great! We actually used a similar penny round tile. It’s gray but it actually looks very close to the color that you chose.
We tiled around our fireplace and grouted with an earth color and added a big chunky white fireplace surround. I love the way it turned out. I was really worried about the spacing of the tile and heard a lot of horror stories about how the tile can look even until you grout. We grouted and it was perfectly fine. I can’t even guess where each sheet started and finished.
We found the tape/nipping method to work best also :)
YoungHouseLove says
Wahoo! So glad your turned out so well!
xo,
s
Nina says
Hi guys! I showed this post to my husband becuase I was totally baffled at how the mesh on your tile was giving you trouble like that.
This is going to be hard to explain in text – but he said that it might be because the type of saw you have: you have to push your tile through your saw. Some tile saws (i.e. more expensive ones) have trays that allow you to glide your tile through the blade so that you don’t have the added friction of pushing your tile across your saw’s platform. Mesh softening due to water + friction = mess.
This is probably more useful information to someone else, since it’s not likely that you are going to go buy a whole new saw. So he suggested that you try cutting the tile upside down (the face of the tile is on the platform instead of the mesh). He warned that it can sometimes cause your tile to chip a bit, so take it nice and slow.
I told him you guys were using cutter for all that tile work, and he cringed. :) But if it works best for you, more power to you!
It looks fantastic so far either way and I can’t wait to see the completed tile loveliness!!
YoungHouseLove says
Thanks so much for the tip Nina! I’m sure it’ll come in handy for other folks out there who are planning to use penny tile and have yet to pick out a saw!
xo,
s
Alexis says
Oooh it’s looking so pretty.
BTW,Sherry I loved the way you said “Good job” to John as if he were Clara.
YoungHouseLove says
Haha- I say that to Burger too! Everyone in my house gets toddler praise. Haha.
xo,
s
kathleen says
From working in mosaic, I’ve learned that there are various types of nippers and a wide price range. My teacher really worked on us to use our upper arm muscles rather than ones in our hands for greater snap. Good luck!
YoungHouseLove says
Ooh that’s smart! I’m going to try that technique!
xo,
s
Meredith says
Looking good so far! I’m curious why you decided to go with a backsplash in this kitchen when you didn’t have one in your first kitchen. Was is mostly for the look, or did you end up wishing you had backsplash in your old kitchen? Thanks!
YoungHouseLove says
We just wanted to add something more to this kitchen since the last one had texture in the countertop (it was veiny granite) and we went for a flat white color this time! So we thought a backsplash accent wall (that goes all the way to the ceiling) with floating shelves would be awesome (and functional since it’ll be easy to wipe down above the stove, etc).
xo,
s
Meredith says
um, “was it”, not “was is”…
Meredith says
ah, good point. I guess you did have a lot going on in your last countertops. :)
Charlotte says
Looks great so far! We too are about to venture into the penny tile world for our kitchen backsplash. I’ve been eyeing penny tile for a year or two, and when I saw your “moss” color I knew it was what I had been searching for all along (I assumed it was more green than grey searching online). Apparently there has been a run on it at The Tile Shop, even in Nebraska! You guys are infectious, but in a good way :) One question, have you heard of the product “Bondera”? It is used in place of thinset, just wondered if you had any thoughts about it. Thanks for the step-by-step updates, I have a feeling you will save me a lot of headaches down the road!
YoungHouseLove says
Never tried it! Anyone have info on Bondera for Charlotte?
xo,
s
Jennifer says
I’ve read that the tile setting mat can be WAY trickier to use than thin set, because there’s not as much flexibility to nudge tiles into place once they’re on — it’s not as workable. for what it’s worth . . .
Julie says
I had a very similar experience with mosaic tile. The glass pieces cut amazingly easy but the stone pieces snapped similar to yours. We ended up doing the cut and replace method but I wish it would have crossed my mind to tape. It seems so obvious in retrospect!
I can’t wait to see yours grouted but I’m sure you can’t either.
Kristen says
LOVE! You guys make me wish I wasn’t a renter every time a read your blog.
PS- Nippers kinda sounds like a naughty word in a Katie Bower sort of way…
YoungHouseLove says
Haha, totally!
xo,
s
Firesparx says
LOVE the tile! My first thought when I saw the little cut pieces of tile was “what kind of fun craft can be done with those after?” If you have enough left over you could make a tiled hot pad.
YoungHouseLove says
Wahoo! I have been excited by a coaster idea, but hot pads are fun too!
xo,
s
Elaine says
so exciting! And great tutorial video. Great reference. Hopefully I’ll get to install some myself someday and with your ‘troubleshooting’ I’ll have a great start. Thanks for the great post as always and have fun tiling! Can’t wait to see the ‘after’ shot.