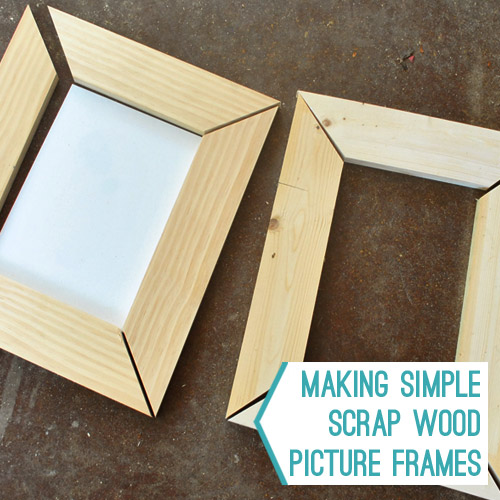
As Sherry mentioned in her Pinterest Challenge post this morning, we DIYed some easy wood frames for her homemade artwork. We did it partially because, well, we’re cheap. And partially because we wanted to see how truly simple we could keep this project.
So we challenged ourselves to try to spend zero dollars and just use things that we had around, which basically ended up being:
- leftover scrap wood
- wood glue
- a staple gun
- a hammer
- sandpaper
- a miter saw (but a miter box and a hand saw would work too)
- duct tape
- spray paint (the kind with primer built in)
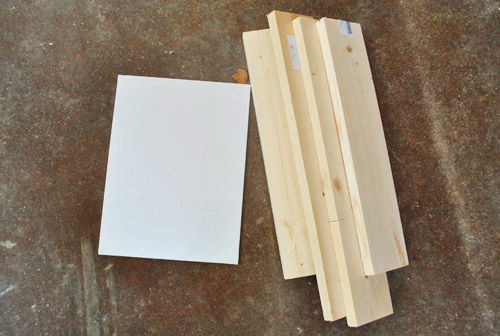
Here’s how it all went down. We started off on the right foot by digging out enough scrap wood from my enormous basement junk pile. That, plus a spare canvas still wrapped in plastic (so my manhandling wouldn’t get it dirty) to use as a template for the frame size, kept our grand total at “free” so far.
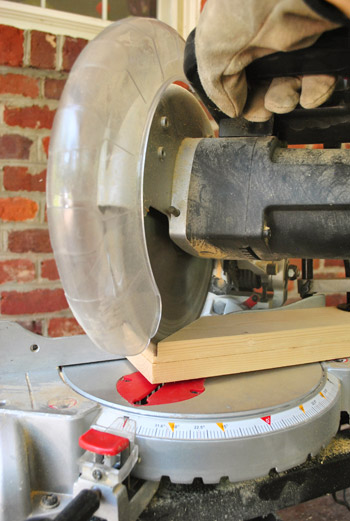
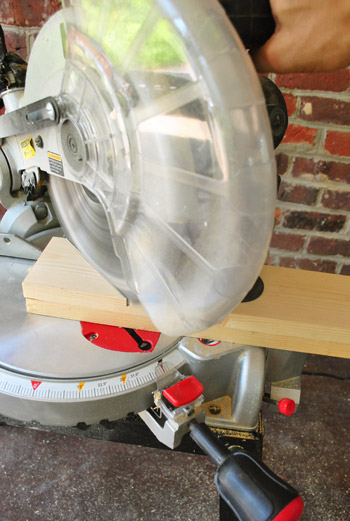
The process promised to be simple: cut 45-degree mitered angled on all four boards and attach them. I already have a power miter saw, so that was the fastest way for me to accomplish it, but if you’re trying to keep things simple are are saw-less, this could be accomplished with an inexpensive miter box and a hand saw (it’ll just take a little longer to make the cuts by hand). Oh yeah, and I cut my boards two at a time (they were held together with a clamp to keep things secure) – both for efficiency and to ensure I’d get equal length boards on parallel sides.
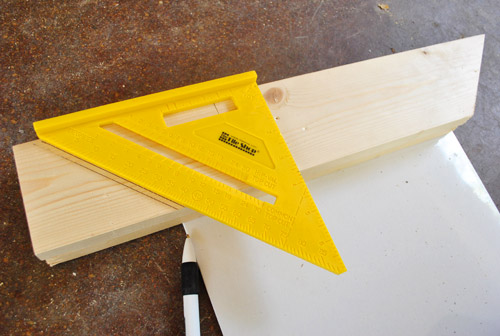
With one miter cut made, I laid my two-stack on the edge of the canvas so I could mark my next cut – being sure to overlap the edge of the canvas a little bit so it’d have something to rest on when my frame was complete.
With the boards still together and lined up perfectly, I did my second 45-degree cut in the opposite direction.
So far this project had taken me about ten minutes. Not bad if I do say so myself.
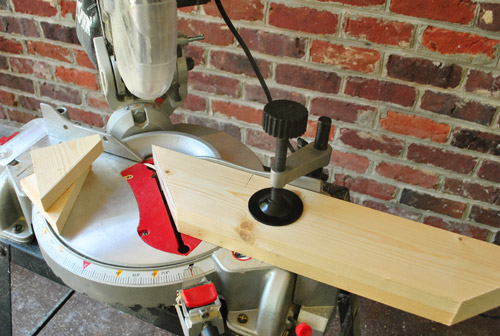
Now that I had my two long sides cut, I took my two shorter boards and repeated the process: stacked them together, cut one side at 45-degrees, then laid it on the canvas to mark my next cut (again overlapping the canvas a bit)…
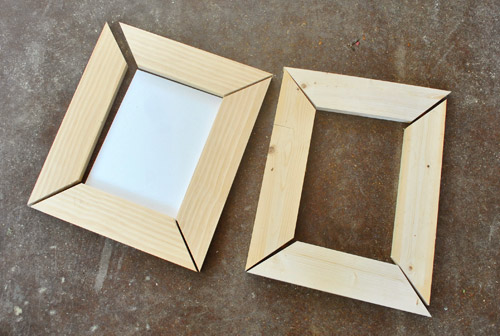
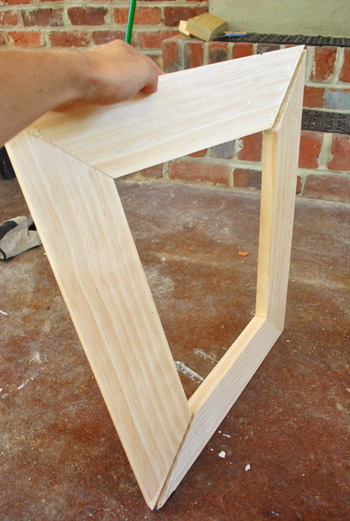
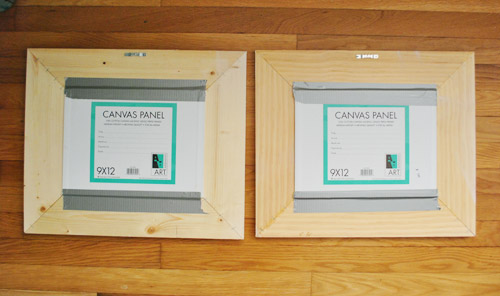
…and then I made my last cut with the saw. Boom. Just like that I had the sides to my simple wood frame all sliced and diced. You can see them just resting together in this photo (nothing was secured yet):
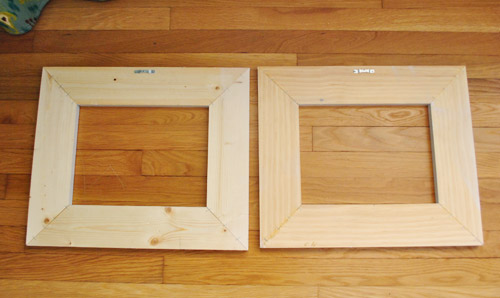
Since Sherry had painted two canvasses, I repeated the process with another piece of scrap wood to make a second frame. It happened to be a different type of wood from our scrap wood (less polished, sort of knottier and more rustic), but at least it was the same size. And we’re not suckers for things being super matchy anyway.
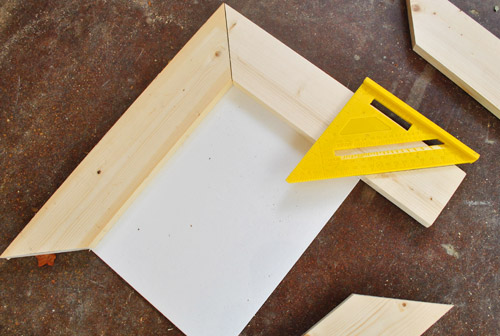
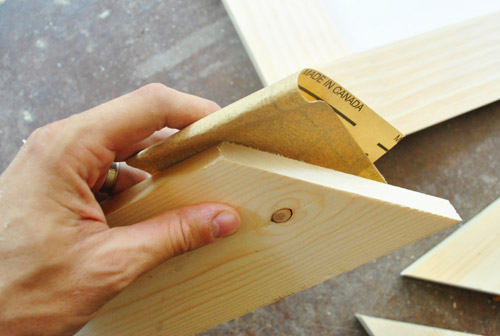
Before attaching the sides together, I did a quick pass with some sandpaper to make sure all of the edges were smooth.
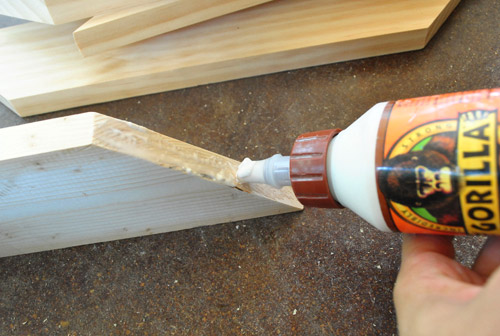
Then – again, trying not to use any terribly complex method to secure them – I broke out some wood glue I already had. I’m usually a nails and screws guy, so I wasn’t thrilled about having to wait for glue to dry – but I figured getting over my glue hang-ups was just part of the simple-and-cheap challenge. But in real life (since clearly this is a fantasy where I’m not allowing myself to follow my instincts) I’d probably screw a flat L bracket into each corner or even drill pocket holes with my Kreg jig to fasten the corners together. I just really wanted to make simple frames so anyone at home without a Jig or other more complicated materials could follow along.
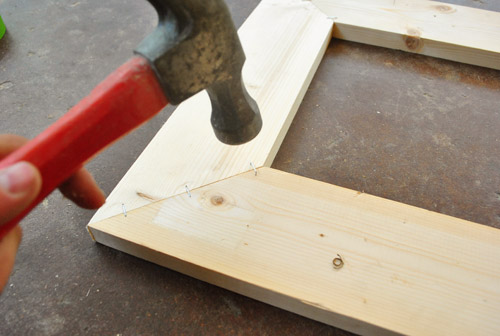
Thank goodness Sherry suggested stapling the corners together (on the backside) to help hold the glued edges together. This made me feel a bit more confident about what I was building. Plus it was pretty darn fast. We used the same sort of staple gun (from Home Depot about five years ago) that we use to upholster things.
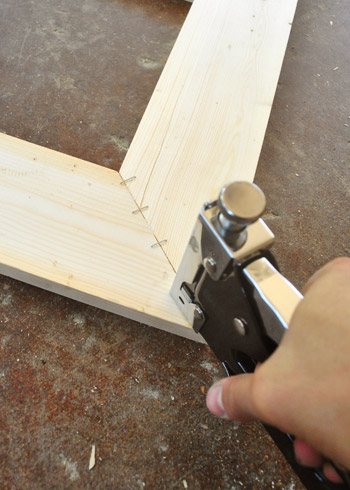
It’s a pretty strong staple gun, but it wasn’t quite strong enough to go all the way into the wood, so I hammered each staple in all of the way just to be sure they were in there well.
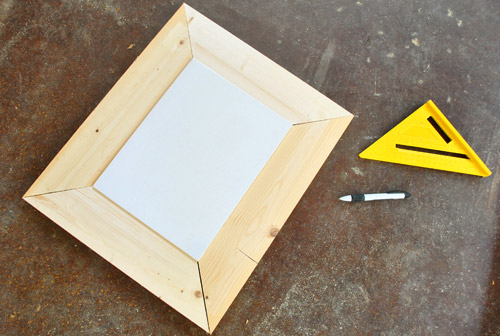
Things were feeling pretty secure, actually. And having clocked in at just about 25 minutes, I was feeling surprisingly secure about my construction method… until I turned it over. Hello wonky!
But before I abandoned my method completely, I decided to reinforce things with more glue in the crack (applied from the front this time). Plus, I think my Gorilla Glue may have dried out a bit so fortunately I had some Elmer’s that was in better shape which I used instead.

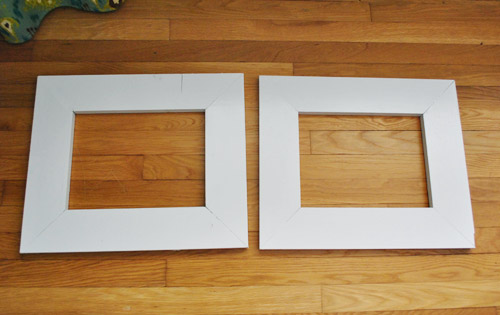
After both frames sat for a couple of hours – all glued and stapled up – we picked them up and they were no longer wonky. They were actually really solid. Woo hoo! So Sherry whisked them to her spray painting station (okay, it’s not a literal station) and applied a nice coat of Rustoleum’s paint-and-primer-in-one spray paint (in satin white). We figured this was the faster version of priming it with a brush, waiting for it to dry, and then painting it by hand – but that always works too (we have painted frames both ways with success).
As for hanging them, Sherry nailed in a couple of those sawtooth hangers on the back. Call us weird, but that’s the sort of thing we actually have around at our house so miraculously we still hadn’t had to purchase anything yet.
When it came time to affix the canvasses to the back, well, we just duct taped them. Certainly not the most elegant solution but hey, it worked, it was a fast and it was free. And it made them easy to switch up down the line (if we glued the canvases in place it would have been a lot more of a commitment).
And the rest is history… Well, actually I should point out that we didn’t actually end up using the sawtooth hangers on the back because the art ended up in the kitchen (not in the office where we originally thought we’d hang it). So we used some 3M velcro-style picture hanging strips for the one over the stove instead. I did have to go buy those (we had run out), so I guess you can call the grand total for this project a whopping $3.

Oh and as we mentioned we also got a piece of plexiglass from Lowe’s to cover the canvas over the stove (to keep it splatter free and wipeable) so that was another $3, although we included that cost in this morning’s Pinterest challenge cost. Has anyone else ever DIYed some cheap frames? Any other trips or tips to share? Or did you tackle something else in the easiest or free-est way possible lately?
Update: We finally created this Shop Our House page to help you hunt down any furniture/accessories that you see in our house, along with all of our paint colors.

Deneen says
I just did some affordable frames using a canvas and ripping it apart. http://dreaming-n-color.blogspot.com/2012/07/easy-metal-flower-frames-tutorial.html Also the metal flowers are from the dollar store.
YoungHouseLove says
Fun!!
xo,
s
K.E. says
Love the project! I recently did a semi-DIY frame project inspired by Pinterest. I fell in love with some “Bathroom art” (word art for a kid’s bathroom). A friend recreated them for me and I just printed them on regular printer paper – high quality printer made them look great. However, they were on 8.5×11 paper, so I needed document frames. I hit up my local Hobby Lobby and found only document frames in black, stained wood, and metal. I wanted white. So I picked up the four cheapest wood frames I could find for $4.99/each (plus 50% off). I hand-sanded them and spray painted them with the rustoleum (sp?) satin white paint. Super easy! In total I spent roughly $10 on frames and about $5 on the spray paint. The art was free, so that’s a wall of pinterest-inspired art in my son’s bathroom for only $15!
YoungHouseLove says
That’s awesome!!
xo
s
Kathryn says
For future reference: to keep frames made this way stable both while the glue sets and over the long haul (as the glue gets older it can get brittle and the joints can get wonky again), just put a triangle of heavy paper or shirt cardboard on the back of each corner and staple through *that*–if you also glue the triangles on, imagine how reinforced your corners are going to be. Still uses readily available materials (recycle your paper or paperboard from some packaging or junk mail), and the frame’s corners’ll be about ten times stronger with that one little addition. Cool frames, cool project post!
You did make me deeply nostalgic for my beloved miter saw a wonderful one I bought second-hand years ago but had to sell when moving into a place with no shop area possible (a modest apartment). My favorite power tool ever. Sigh.
I enjoy your blog immensely and always get inspired by both of you!
Cheers,
Kathryn
YoungHouseLove says
So smart. Love that!
xo,
s
Jan Thompson says
Never thought of using a staple gun to hold the frame together until the glue dries! Brilliant! I have an unrelated question for you. I have painted walls a ton and I don’t tape off anything but the basebords to prevent the little paint splatter dots from getting on it. I noticed in a earlier post that you don’t tape them off. How do you prevent those little paint speckles from getting on the base board? Also, any tips on painting the ceiling?
YoungHouseLove says
Oddly enough I don’t get splatters. Maybe it’s your type of brush or too much paint on the brush?
xo,
s
Lisa says
Hey you two,
I did the command-strip thing above my stove here in NC, and after my art crashed down twice I finally gave up and hung it with a nail instead.
I don’t know if it was more the heat or humidity or both. I usually am a huge fan of the strips for pictures, and have them all over my house without a single problem, but the above the stove thing? Just didn’t work.
Just wanted to give you a friendly heads-up. Keep an eye on that artwork so it doesn’t wind up in your spaghetti… not that this has, er, happened to me. No no no. Hope yours will hang on!
YoungHouseLove says
Thanks for the tip! Ours is still holding strong, but we’ll keep an eye out!
xo,
s
Melissa M says
The timing of this post is so funny – after nearly a year of us talking about it, my husband has just finished making some giant, custom-size frames for some irregular-poster-size prints we bought several years ago. Now it’s my turn to sand them down, spray paint, and finish them.
Now that he’s had some practice, I’m going to save this post to show to him so I can keep hitting him up for custom built frames. :)
Teresa @ wherelovemeetslife says
Thanks for posting this :) I am such a cheapskate on purchasing frames. Seriously, its a little wierd. lol I can whip up some of those at the house with my new yard sale find miter box and I have everything I need!! I may actually be able to put something on the walls in the kids room soon.
It’s nice that you guys keep a good variety of posts – from money you spent on well thought out items to simple cheap/free finds or projects. That’s what keeps us all coming back! That and the incredibly corny, but still hilarious puns. ;)
YoungHouseLove says
Aw shucks, thanks Teresa!
xo,
s
Melissa says
Are you guys watching HGTV Design Star this season?? Brittany (my favorite) just did pictures along the backsplash like that and I loved it! On the show, the judges commented on how they might get splattered with food so that was my first thought..then I see you guys grabbed the plexiglass. That’s why I was wondering if you saw that episode!!
YoungHouseLove says
You actually should check out our book! Haha. We shot another frame tip for that back in January! We did see that Design Star episode and loved it.
xo,
s
Katy says
I have DIY-ed even cheaper (looking) frames than that! No mitter box cause Home Depot couldn’t cut it on an bias for me. LOL. http://thefirstapartment.blogspot.com/2011/03/50-dollar-fix-fabric-frames.html
~Katy
YoungHouseLove says
Love that!!
xo
s
Simon says
great post. Love makin our own frames. You can fancy it up pretty cheap n easy with some baseboard trim. Also for bigger ones I will back it with Masonite or thin plywood. Helps with structural integrity. Mount art and frame to backing. We got our saw at a pawn shop for $40 so it was an easy investment
Kelsey says
Be careful with the duct tape above the stove…usually heat and tape mixed together never turn out good! Hopefully your hood will do all the work its supposed to!
Becca Bermingham says
Did you guys spray the frames with any type of gloss or sealer or something? Especially if its so close to your food.
YoungHouseLove says
It’s easily wipeable oil-based paint (spray paint with built in primer is really durable and easy to wipe down). Hope it helps!
xo,
s
Lynn says
Ever since you guys finished your kitchen reno I’ve been staring at the pictures, saying to myself, “they’ve got to put something over the stove – it’s driving me crazy – can’t they see that big blank spot?” :) So glad you made the leap – the art looks great there, and really makes the wall!
Amy Knisely says
Awesome! I’ve been looking for a tutorial on this sort of thing because I had the idea to take some decorative molding and do a similar project. Sweet!
kelcey says
These came out very nice! Just fyi – plexi scratches easily so don’t use paper towels or it will get cloudy looking eventually. Soft cloth should do the trick
Erin says
Awesome project, but I have one quick question: Did your miter saw come with that clamp (giving you an extra hand!!) or did you add it? Since my husband’s been overseas, I’ve been learning to use all of our tools (even took woodshop!), but I’ve concluded my husband has hidden arms and hands to hold everything in place. That clamp is exactly what I need.
YoungHouseLove says
It actually came with two, but one of them went missing. It’s definitely helpful to have even just the one still!
-John
meg says
Can’t wait to try this for my wall of frames coming soon!