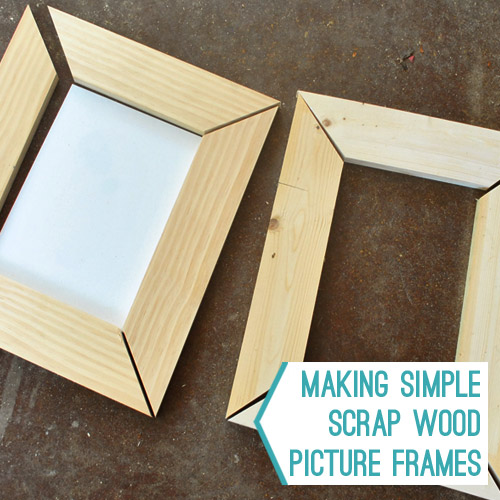
As Sherry mentioned in her Pinterest Challenge post this morning, we DIYed some easy wood frames for her homemade artwork. We did it partially because, well, we’re cheap. And partially because we wanted to see how truly simple we could keep this project.
So we challenged ourselves to try to spend zero dollars and just use things that we had around, which basically ended up being:
- leftover scrap wood
- wood glue
- a staple gun
- a hammer
- sandpaper
- a miter saw (but a miter box and a hand saw would work too)
- duct tape
- spray paint (the kind with primer built in)
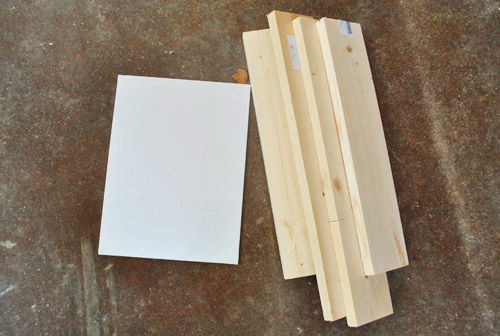
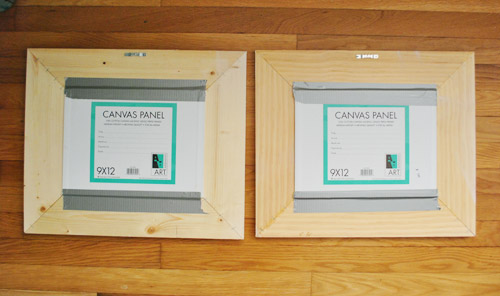
Here’s how it all went down. We started off on the right foot by digging out enough scrap wood from my enormous basement junk pile. That, plus a spare canvas still wrapped in plastic (so my manhandling wouldn’t get it dirty) to use as a template for the frame size, kept our grand total at “free” so far.
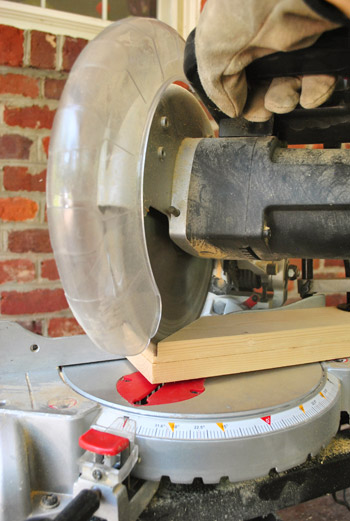
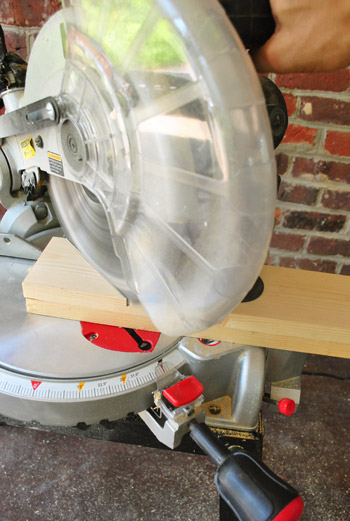
The process promised to be simple: cut 45-degree mitered angled on all four boards and attach them. I already have a power miter saw, so that was the fastest way for me to accomplish it, but if you’re trying to keep things simple are are saw-less, this could be accomplished with an inexpensive miter box and a hand saw (it’ll just take a little longer to make the cuts by hand). Oh yeah, and I cut my boards two at a time (they were held together with a clamp to keep things secure) – both for efficiency and to ensure I’d get equal length boards on parallel sides.
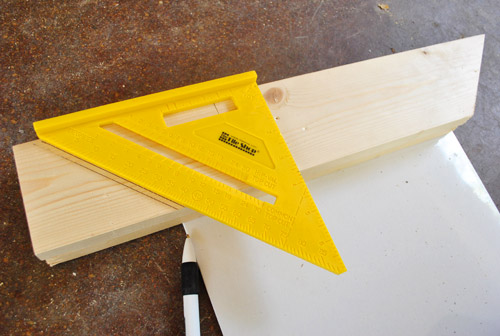
With one miter cut made, I laid my two-stack on the edge of the canvas so I could mark my next cut – being sure to overlap the edge of the canvas a little bit so it’d have something to rest on when my frame was complete.
With the boards still together and lined up perfectly, I did my second 45-degree cut in the opposite direction.
So far this project had taken me about ten minutes. Not bad if I do say so myself.
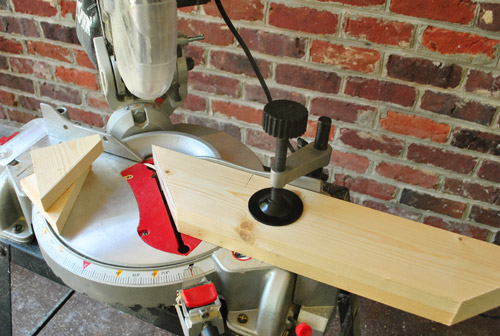
Now that I had my two long sides cut, I took my two shorter boards and repeated the process: stacked them together, cut one side at 45-degrees, then laid it on the canvas to mark my next cut (again overlapping the canvas a bit)…
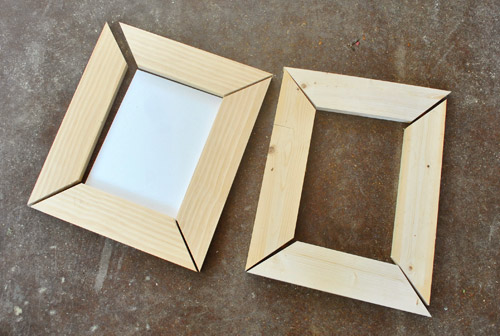
…and then I made my last cut with the saw. Boom. Just like that I had the sides to my simple wood frame all sliced and diced. You can see them just resting together in this photo (nothing was secured yet):
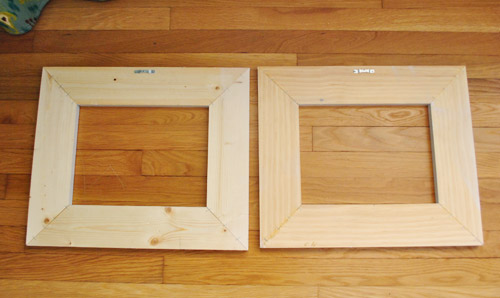
Since Sherry had painted two canvasses, I repeated the process with another piece of scrap wood to make a second frame. It happened to be a different type of wood from our scrap wood (less polished, sort of knottier and more rustic), but at least it was the same size. And we’re not suckers for things being super matchy anyway.
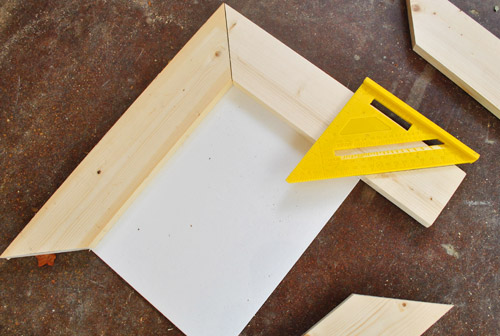
Before attaching the sides together, I did a quick pass with some sandpaper to make sure all of the edges were smooth.
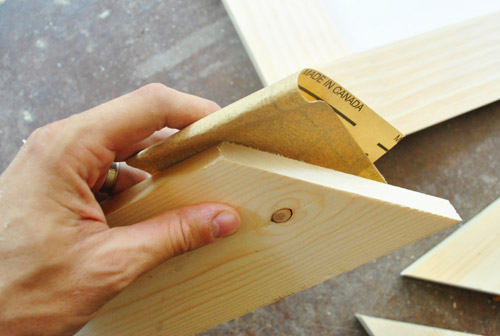
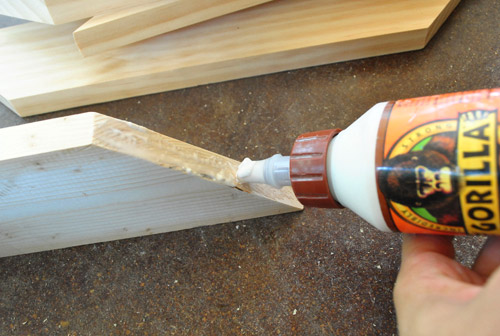
Then – again, trying not to use any terribly complex method to secure them – I broke out some wood glue I already had. I’m usually a nails and screws guy, so I wasn’t thrilled about having to wait for glue to dry – but I figured getting over my glue hang-ups was just part of the simple-and-cheap challenge. But in real life (since clearly this is a fantasy where I’m not allowing myself to follow my instincts) I’d probably screw a flat L bracket into each corner or even drill pocket holes with my Kreg jig to fasten the corners together. I just really wanted to make simple frames so anyone at home without a Jig or other more complicated materials could follow along.
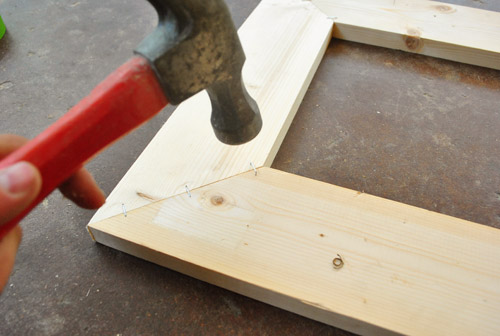
Thank goodness Sherry suggested stapling the corners together (on the backside) to help hold the glued edges together. This made me feel a bit more confident about what I was building. Plus it was pretty darn fast. We used the same sort of staple gun (from Home Depot about five years ago) that we use to upholster things.
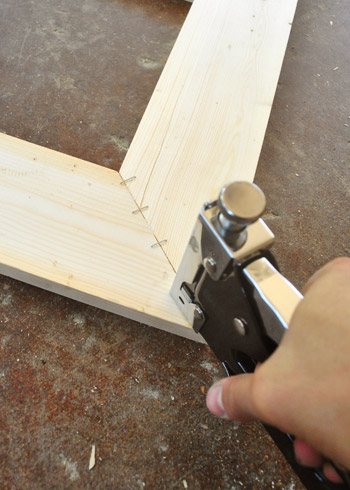
It’s a pretty strong staple gun, but it wasn’t quite strong enough to go all the way into the wood, so I hammered each staple in all of the way just to be sure they were in there well.
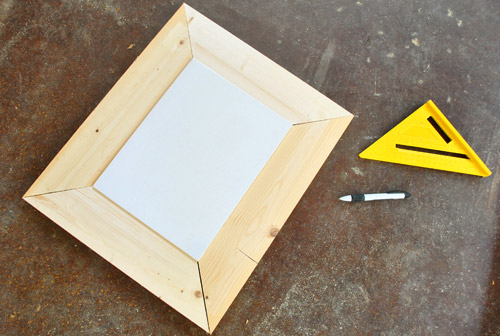
Things were feeling pretty secure, actually. And having clocked in at just about 25 minutes, I was feeling surprisingly secure about my construction method… until I turned it over. Hello wonky!
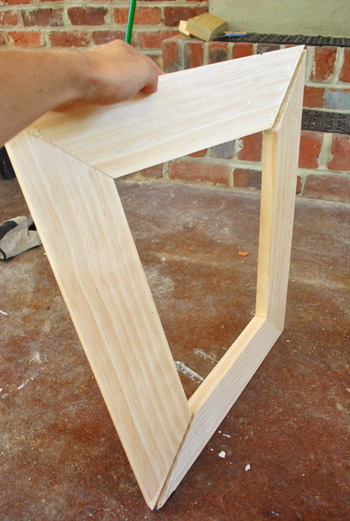
But before I abandoned my method completely, I decided to reinforce things with more glue in the crack (applied from the front this time). Plus, I think my Gorilla Glue may have dried out a bit so fortunately I had some Elmer’s that was in better shape which I used instead.

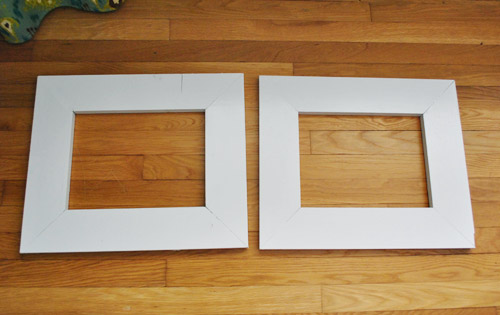
After both frames sat for a couple of hours – all glued and stapled up – we picked them up and they were no longer wonky. They were actually really solid. Woo hoo! So Sherry whisked them to her spray painting station (okay, it’s not a literal station) and applied a nice coat of Rustoleum’s paint-and-primer-in-one spray paint (in satin white). We figured this was the faster version of priming it with a brush, waiting for it to dry, and then painting it by hand – but that always works too (we have painted frames both ways with success).
As for hanging them, Sherry nailed in a couple of those sawtooth hangers on the back. Call us weird, but that’s the sort of thing we actually have around at our house so miraculously we still hadn’t had to purchase anything yet.
When it came time to affix the canvasses to the back, well, we just duct taped them. Certainly not the most elegant solution but hey, it worked, it was a fast and it was free. And it made them easy to switch up down the line (if we glued the canvases in place it would have been a lot more of a commitment).
And the rest is history… Well, actually I should point out that we didn’t actually end up using the sawtooth hangers on the back because the art ended up in the kitchen (not in the office where we originally thought we’d hang it). So we used some 3M velcro-style picture hanging strips for the one over the stove instead. I did have to go buy those (we had run out), so I guess you can call the grand total for this project a whopping $3.

Oh and as we mentioned we also got a piece of plexiglass from Lowe’s to cover the canvas over the stove (to keep it splatter free and wipeable) so that was another $3, although we included that cost in this morning’s Pinterest challenge cost. Has anyone else ever DIYed some cheap frames? Any other trips or tips to share? Or did you tackle something else in the easiest or free-est way possible lately?
Update: We finally created this Shop Our House page to help you hunt down any furniture/accessories that you see in our house, along with all of our paint colors.

Casey @ wafflingdesign says
sigh, posts like this make me wish I could somehow fit a table saw into my tiny condo- oh the projects I could do!!
Looks great!
YoungHouseLove says
You could totally use a small miter box and a hand saw! Those could fit in a small box under the bed or in the closet I think!
xo,
s
robin @ our semi organiclife says
You do make it seem nice and easy! Although I’d need to buy wood, wood glue, a triangle, a saw, a staple gun, staples and photo hanging supplies. Until I beef up my tool collection I’ll stick to IKEA frames.
Katie says
finally! Ive been waiting patiently all afternoon for this post :) I have a stack of offsized art that I dying to get up on my walls but spending all that dough on specialty sized frames seemed crazy to me. Cant wait to tackle a few of these this weekend!
YoungHouseLove says
Good luck!
xo,
s
Natalie @ barnesdailycircus says
I’d love to do this, but we need to make a significant tool investment. Which we plan on doing. Time and money friends. Time and money.
Meredith says
Please tell me that the phrase “more glue in the crack” made someone else laugh…I’m not the only faux second grader, am I?
YoungHouseLove says
Haha, I laughed when I was proof-reading, does that count?
xo,
s
Stewart says
me too!!! I totally thought it was just me. So glad it wasn’t.
Hemma says
woohoo, me 2, eh make that 3 ; ))
Danielle Granfield says
how do you get thos 3m velcro sticks to work? mine always fall of the walls! Ugh.
YoungHouseLove says
Hmm, ours always seem to stick. Do you press on them hard for the length of time they say (is it 30 seconds? I forget)? That seems to help us. We follow those directions to the letter, and usually use a few of them to hold things up (ex: four of them on each edge of the frame). Hope it helps!
xo,
s
annabelvita says
Mine didn’t stick the first time, so I cleaned the wall with alcohol (surgical spirit) to get invisible grease etc off and it worked!
Kristen | Popcorn on the Stove says
We use the 3M velcro sticks and they work really well for us! To date, only one has fallen and I think that’s because of two reasons:
1)We didn’t have any AC units set up in our apartment when we got hit with that heat wave so I think that had something to do with it
and…
2) It was the one I put up high and I’m fairly short so I don’t think I did the best job!
Heidi S. says
So clever! I have thought abou making my own frames but have been intimidated until now. The staples were an especially good idea! hmmmm…I now have more project ideas! I think for bigger frames I would use the Kreg tool though (which I LOVE)! I just used it on the bench in my kitchen.
http://www.statelykitsch.com/our-diy-kitchen-window-seat-radiator-cover/
YoungHouseLove says
Love that!
xo,
s
Vidya @ Whats Ur Home Story says
Totally pinning this. Thank You!
YoungHouseLove says
You’re welcome Vidya!
xo,
s
Melanie @ Mailbox Journey says
I’ve seen a lot of gorgeous frames made out of reclaimed barn wood – I’d love to get my hands on some of those, or even make my own.
YoungHouseLove says
Love that idea!
xo,
s
Sara M says
Did you put the acrylic over the front of the frame, or just over the front of the canvas, and how did you get it to stay in place? I’m about to make some frames for some prints for our bathroom – thanks!
YoungHouseLove says
That actually fit right into the opening in the frame and stays secure because there’s such a deep lip (around an inch) that it just rests in place and doesn’t pop out unless you tip the frame over to get it loose (so once it’s hanging against the wall it’s in there for good).
xo,
s
Barb says
We’re in the process of framing out all of our bathroom mirrors (came with the house) and the one we finished last weekend was made with scraps from the “wood-pile”. I make my husband keep every scrap, no matter how much it annoys him. But look how much money we save! And with stain & wax already on hand, this last mirror also cost us nothing!
YoungHouseLove says
That’s awesome!!
xo,
s
Danielle says
Uh… I think you all are psychic. When I got up this morning, I thought about making frames would be a great thing to learn so I could begin decorating our (hopefully) new home on the cheap. I was sure that YHL would have a tutorial, and voila! There is was! You all are wizards.. Magical, powerful wizards.
YoungHouseLove says
Haha, so glad to help!
xo,
s
Gabriella @ Our Life In Action says
Nicely done! No more searching for the perfect sized frame – I love it!
Gabriella @ Our Life In Action says
OMG!!! We just finished putting new up molding in our upstairs….left over pieces would be perfect for frames. MUST CALL HUBBY!!!!!
Allie ~This Yellow House says
I love that you guys made these just by using the things you had around. It’s so nice saving money when you can and frames can be so expensive!
Jess @ life, happily ever after says
That’s easy enough! I see endless custom frame possibilities! :)
Nikkidd says
I tried to build similar frames for doors over this hole-thing we have above our closets using glue and staples and it was DEFINITELY all wonky and we totally had to take them down. I guess I’m glad I’m not the only one who had that problem, but since they’re bigger and will get more abuse than the frames you made, I’m going to have to go back and use our new kreg jig (purchased after this project failed) to try to make them better next time.
Jamie says
I recently won a photo print from an Etsy store’s grand opening – the local frame shop estimated $35 to frame it but I may try making one myself instead! (and if you’re curious, the Etsy shop is http://www.etsy.com/shop/LemonBlossomPhotos)
YoungHouseLove says
Cute!!
xo,
s
Gina (Lady Goats) says
Seriously? STAPLES!? DUH, GINA! I glued 10 frames to make a gallery wall with (blogged here), and was SO IMPATIENT for the glue to dry to move them (they were taking up a lot of space in my work area). And the answer was as simple as STAPLES!?
Emma says
Nice! I initially thought you’d made the frames with left over trim. You kids are dangerous now that you can -make- your own white frames. I predict a lot of frames in your future :)
Karla@{TheClassyWoman} says
I LOVE your kitchen, it’s so cheerful! The art turned out great, it was the perfect addition! :)
Sam M says
I know you guys change things out a lot and it probably won’t be there for very long, but duct tape is REALLY BAD for artwork. If you ever decided to frame something that Clara made or something else that you want to keep long term, please invest in a roll of acid free tape. The frames are awesome. An actual stretched canvas starts out in a very similar fashion, but the duct tape in this post made my artist heart cringe.
YoungHouseLove says
Oh yes, it’s only on the back of the canvas board, but with paper (where it could effect the front) or something more valuable than a $1 DIY canvas project we’d skip the duct tape!
xo,
s
brandi says
Wow, that really was simple. I have some off sized prints that I need to frame, but I am having such a hard time finding frames that fit. Your tutorial just solved that problem. Thank you! You guys always share the best stuff.
Crystal @ 29 Rue House says
I love how you used duct tape to attach them. You guys make me think outside the box every day (M-F) and make me try harder to simplify things (if you try harder to simplify, is that really simplifying?? lol).
Cassie says
Staple gun! Great idea. I actually cut some frame pieces this weekend but had’t thought of how to hold them yet while gluing. The frame is sloped a little, but I think I’ll just use some scrap on the other site to keep it flat while I staple.
I do like the idea of using a miterbox and hand saw, but in my experence, unless you have one of the older, awesome miterboxes that lock the saw’s angle in place, the cut isn’t going to be accurate enough for picture frames… but maybe I’m just sloppy.
YoungHouseLove says
We don’t have much experience with them. Anyone have a specific brand to recommend?
xo,
s
Cassie says
Well I’m still saving up for a nice one like this: http://www.amazon.com/Rockler-Nobex-Proman-Miter-Saw/dp/B001F2Y238/ref=sr_1_fkmr0_2?s=hi&ie=UTF8&qid=1341950383&sr=1-2-fkmr0&keywords=Nobex+Champion+180+Miter+Saw, but I can’t recommend it personally, since I haven’t used it. I do like hand tools :D
Depending on one of these: http://www.amazon.com/Stanley-20-600-Clamping-Mitre-Box/dp/B00002X232/ref=cm_cr_pr_product_top won’t give perfect results, like I was saying, but you could still get the job done. However, for those with a steady hand and some patience, a good miter handsaw and a 45° pencil line has potential to give great results, but it does take some time and skill.
YoungHouseLove says
Good to know!
xo,
s
Karin K says
I used duct tape to keep the back on a Target frame because the Goodwill print inside was mounted in foam-core matting so thick that the frame back would not fit back into the frame. EPIC FAIL! I heard a “thump” and discovered the back still hanging on the wall, and everything else on the counter below. I decided to ditch the backing, then taped the mat into the frame from behind, and screwed two eye hooks into the back of the frame and hung it with wire. So far, so good, because the tape isn’t supporting any weight. Thank you SO MUCH for this post! I have a miter saw at home that I have been afraid to touch, and now I know exactly what I’m using it for.
YoungHouseLove says
Smart about the eye hooks and wire!
xo,
s
Karla F. says
If you are short on scrap wood, staples and elmers, wwww.framefit.com lets you order lovely frames by the inch in pairs, and sends all the hardward without being asked! Lovely customer service too if needed. i get lots of frames for posters, photos and actual canvas art.
YoungHouseLove says
That’s awesome!
xo,
s
Lisa says
Nice job! They look great. Do you have any ideas on how to DIY a frame for needlepoint? I’ve got all your supplies but I think duct tape might mess up the back of the canvas. Do you think staples would work or would the frame stick out too much from the wall?
YoungHouseLove says
Hmm, maybe try the staples and see of they work?
xo,
s
annabelvita says
Here’s a tutorial on that – http://rosylittlethings.com/framingtutorial.html – it’s not quite DIY but the foamcore board bit could easily be adapted to a DIY at home method.
Kim W Rily says
I did something like this with some 2x2s. I used my router to make a little inset so the strangely shaped piece, (I think it was 5×17 or 7×15) could sit in there. It took me much longer than 25 minutes, though. I stained it, and mine was very bumped and roughed up for a rustic look.
Where’d you get the acrylic? I cut up a cheap dollar store poster frame poster to get the plastic cover for mine. Not the best cut, but it did the trick.
YoungHouseLove says
That sounds cool! The acrylic is from Lowe’s. They sell it in a bunch of sizes and will even cut it for you.
xo,
s
Eva says
The ledge on the inside of a frame is called a rabbet. If you guys can do that you guys would be able to frame anything.
YoungHouseLove says
Ooh I love that term!
xo,
s
Janet says
You make it look so easy. I want a miter saw!!! The plastic box saw I have will not do this justice! Love the final product.
Shannon says
Occassionally, I make cross stitch birth or wedding announcements for friends and family. They are never a standard size! I think I’ll be making a few frames myself soon!
Alicia says
I’m going to have to try this! I love your frame wall but I’m too cheap to buy all those frames.
The cheapest easiest thing I’ve made lately was $0. I took an old tent and a broken umbrella and made a play parachute for my kids.
http://www.thecreativevault.blogspot.com/2012/07/diy-play-parachute.html
YoungHouseLove says
Fun!!!
xo,
s
Jess @ Little House. Big Heart. says
What a great use of scrap wood! I knew I was making the hubs keep all those scraps for good reason. Wait til I tell him. ;)
Nikki Kelly says
My Pinterest challenge project was pretty cheap and easy, just like these frames. I made an arm rest wrap side table thingy for less than $5 total! I could probably make another with the left over wood too.
Nikki Kelly @ the ambitious procrastinator
YoungHouseLove says
So cool!
xo,
s
linette says
Un bonjour de France (près de Paris) Je fais des cadres et pour fixer le verre et l’image il faut une feuillure. Donc j’achète des baguettes spéciales que je taille. Beau travail, bravo et bonne route.
YoungHouseLove says
Great tip, merci!
xo,
s
Ashley says
Just wanted to say thank you guys for always breaking stuff down and making it look easy. I’ve been reading for at least a year, but did my first project this weekend. Bouyed by watching Sherry the Spray Painter Extraordiner I went to the hardware store and bought bright cheery yellow spray paint to paint a lamp I bought at Goodwill (local thrift store). I smile every time I see it in the living room. And I totally get why you guys love this so much. Thanks again!
P.S. How did you attach the plexiglass?
YoungHouseLove says
Aw thanks Ashley! You’re so sweet! As for the plexi, since there’s a lip around the frame (about an inch) when the frame is hung on the wall and the plexi is pushed in, the depth of the frame sort of holds it in. It just rests in place. Hope it helps!
xo,
s
Andrea says
Is the art in the frames a DIY??? I’ve been hunting DIY abstract art on pininterest the last few days for a project I have plotting in my brain!! Would love to know more about it!
YoungHouseLove says
Yes check out this morning’s post (the one before this).
xo,
s
Mary says
Ahem. Negative comment here. Art over the stove? Forget about the humidity from boiling water, wouldn’t it be a grease magnet? Yep, I know you can change it out, but my first impression is grease magnet, other than, what pretty art! Sorry. Looking forward to your new deck post.
YoungHouseLove says
Check out the post! We added a plexi-glass sheet in front of that one so it’s easy to wipe down and splatter proof!
xo,
s
Andrea says
Never mind. Just read the earlier post on the paintings! Awesome job on the paintings and frames !
Michelle DuPuis says
Nice tutorial John. Thanks!
lomr says
As soon as I saw the hammer and saw I knew I was out ;)
Bernadette says
We made giant super sized frames for our hall cubbies. It was easier than I thought it would be and we ended up stretching canvas over them. Love the paint projects for the Pinspiration challenge. I did (and linked up) a paint project too. So fun to get messy again.
Now, back to pinning (smile).
Bernadette
Rebecca Li says
Another reason they were wonky was probably because you’re gluing end-grain together. All-wood frames should have splines (thin pieces of long grain glued in grooves you cut) to hold end-grain pieces together. With such small frames it was probably nbd and wouldn’t make a difference unless you dropped it or banged up on something.
Tiffinie says
I’ll definitely need to try making some frames soon. My latest frame project was completely free because I found an old frame that someone had thrown out in the alley. Great thing walking dogs through the city of Chicago, people throw out all kinds of stuff! My husband wasn’t so sure about this frame but a little spraypaint, our staple gun and a coffee sack we’ve had around for awhile. Nothing too specatacular be we think it looks great on our living room wall! :)
http://www.facebook.com/media/set/?set=a.1094279683531.2014021.1422738356&type=3#!/photo.php?fbid=3360951748916&set=a.1094279683531.2014021.1422738356&type=3&theater
YoungHouseLove says
That’s awesome!
xo
s
Jennifer says
Saw this on pinterest and thought of you guys
http://pinterest.com/pin/204280533068440190/
YoungHouseLove says
Oh yeah, love that idea!
-John
Anna says
My handyman dad always said, the glue is what holds the wood together, and the nails (or in this case, staples) are just what keeps it lined up while it dries! Hope this project cures your fear of glue!
YoungHouseLove says
Love that! Thanks Anna!
xo,
s
Daena says
I did something similar. My bathroom medicine cabinet was really dull and the mirrow had edging that looked cheap and plastic. I framed it out with some inexpensive but fancy trim using the method you mentioned here. It looks 1,000 times more classy now. Funny thing is, I never even thought of doing this for photo frames.
YoungHouseLove says
That sounds awesome!
xo,
s
Sarah R. says
Awesome! I bought myself a rad poster for my birthday this year and just made a lovely frame for it (it’s the ‘we have a strategic plan’ poster at Baltimore Print Studios–google them!).
I miterboxed the pieces, then used a clear finish tinted with a few drops of yellow food coloring. Total experiment but it worked and gives the wood a teeny bit of warmth. I kreg jigged my corners together then attached the matted poster with duct tape. It lasted one day before falling off. Boo.
Then I ended up finding some great little metal clips at Michaels (for $2) near the custom framing dept on an end cap. They screw on and have just a bit of curve to allow for the depth of the matte and poster jutting out from the frame. Make sense?
Anyway, hope this helps anyone attempting to diy a frame, without the use of a router or any of that jazz. Thanks for the tutorial!!
YoungHouseLove says
So cool! I love that tip! And the food coloring thing is fascinating! So good to hear that you’ve DIYed one with a miter box and without fancy things like routers!
xo,
s
Sarah R. says
And don’t forget glazing points (glazier points?) to hold the plexi or glass in place. For diy frames they are super helpful!
YoungHouseLove says
Love that tip!
xo
s
Luis says
Thank you for the tip on how to make easy angled cuts we need something like this. We have tackled some projects but have not dared to make angled cuts with confidence.
Luis says
By the way I loved your artworks I like to think of myself as the artsy type when I’m inspired. I used to love drawing and painting when I was a child all the way through high school and my professors used to tell me I was gifted but somewhere down the line life happened and I just stopped. Sometimes I get inspired and paint things for my family, hopefully I will post some of the artwork I have done for my family on my blog and then you guys can come take a look. Thank you for sharing.
YoungHouseLove says
I’d love to see it!
xo,
s