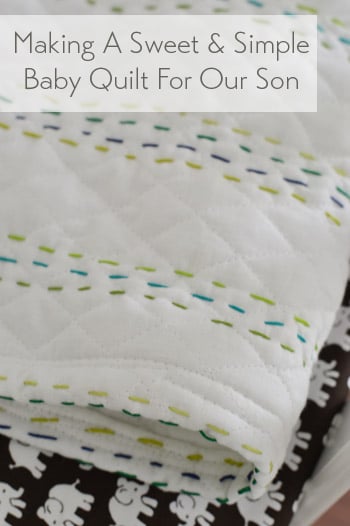
Here’s the story of how I made a cute little quilt for our baby boy on the way.
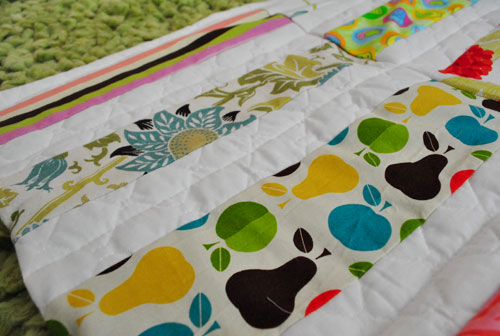
A few years ago I chronicled how my not-nearly-a-seamstress buns were compelled possessed to make a quilt for the bean.
And here I am a few years later (after a tornado of thread and a surprisingly successful sewing machine date) with another homemade quilt – this time for our little man.
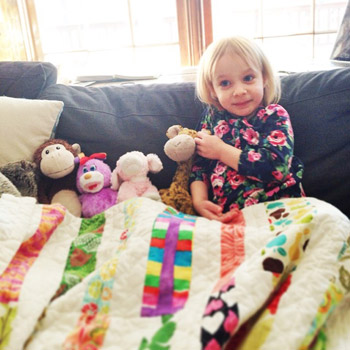
I don’t think I would have been so into making him a quilt if Clara hadn’t grown so attached to hers. She not only has slept with it pretty much every night since I finished it…
… but she brings it in the car for road trips, and even drags it downstairs to to the sofa for lazy Saturday snuggling.
The sweetest thing about it is that John has told her a few times that mommy sewed it just for her, so every once in a while when she hugs me or kisses me goodnight she leans in and whispers “thank you for my beautiful quilt.” Yup, just typing that made me tear up. She’s the best.
So I wanted to make something for my little man to hopefully love just as much, but I thought it might be fun to try a different method this time. I hedged for a while, not really sure where to begin, and then I saw this awesome hand-stitched quilt and knew it was just the inspiration I was looking for (it’s by Citta Design, but sadly no longer for sale).
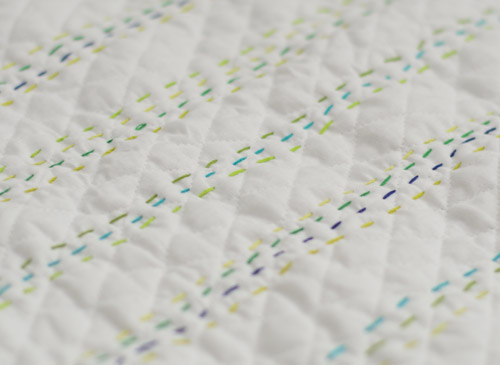
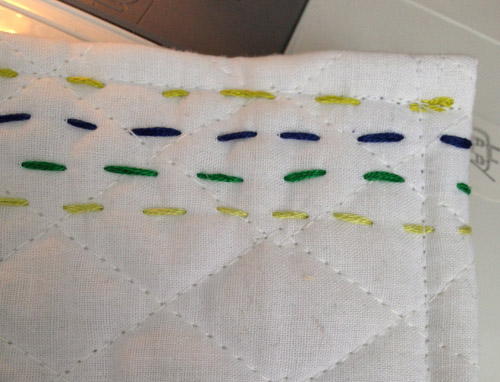
I love how charming that sweetly imperfect hand-done stitching is. Each line is irregular enough to clearly not be machine-made, and it feels so full of love thanks to those slightly varied dashes. So I decided to give it a try…
Here’s a list of my materials:
- one square yard of white diamond-quilt fabric from JoAnn (the kind with a quilted cotton front and back with some thin batting sandwiched in the middle), which came to $4 after using a 40% off coupon that I googled for on my phone
- 17 little packs of embroidery floss in a variety of colors from Michaels – like chartreuse, kelly green, pale green, teal, navy, and lime (I actually bought 5 of each of those colors for a total of 30 packs, but ended up returning 13 of them, so at 27 cents each, the 17 that I used rang in at $4.59)
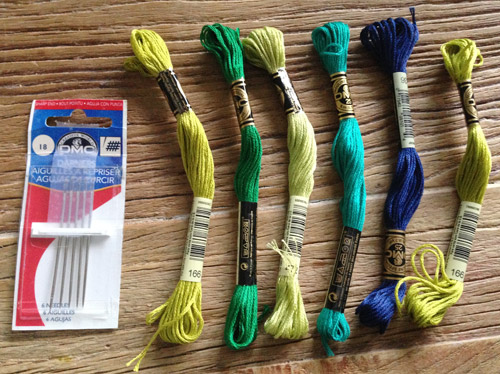
- a leftover pack of embroidery needles, which just look like giant sewing needles and can be threaded with embroidery floss instead of string (they were originally 99 cents at JoAnn when I bought them for a book project a few years back)
- my sewing machine (I already had Oh Brother all loaded up with white thread)
All told, I spent under $10 to make this quilt (and about ten million love-filled man-hours spaced across a weeks’ worth of evenings, but we’ll get to that in a second). While I was pre-washing my quilt fabric (I thought it was best to let it shrink up before I embroidered it), my first step was just to decide what type of stitched pattern I liked best. I debated everything from evenly spaced lines like the ones in the inspiration image to some sort of diagonal or crosshatched design, but in the end, the idea of some simple stripes in varying tones of blue and green won out.
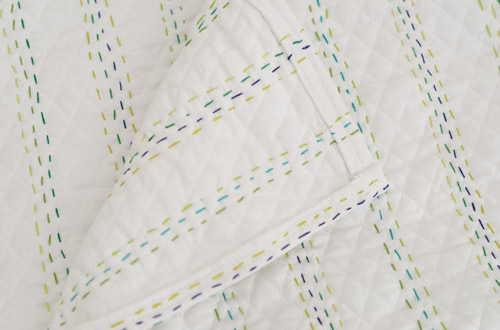
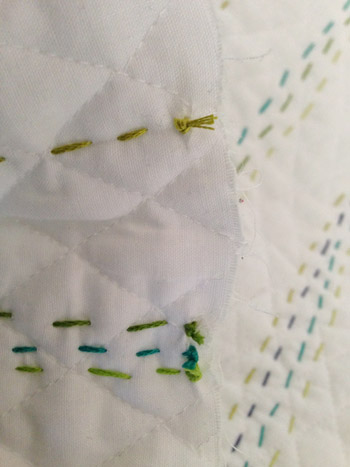
I just started from the left side of the quilt and hand stitched four different lines of embroidery floss – each one in a different color.
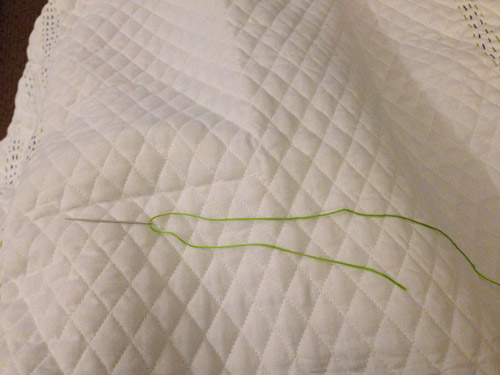
I made sure not to double up my thread (I kept it single like the inspiration quilt, which meant threading the needle like this with a little excess, but not looping it all the way down and knotting it like I do when I sew a button with regular thread).
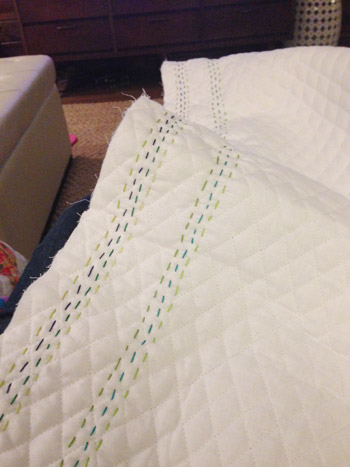
After completing my first “stripe” (which was comprised of four different stitched lines that went from top to bottom) I used the diamonds on the quilted fabric to roughly space the next stripe about two diamonds away. That way I could keep the spacing somewhat even, although I did some of the stripes 4-stitched-lines wide and some of them 3-wide, just for variety. I really do love how the inspiration quilt is unmistakably done by hand – and it doesn’t hurt that I couldn’t make something look perfectly spaced if I tried.
The diamonds in the embroidery fabric also helped me keep my lines somewhat straight from top to bottom. For example, if I started one hand-stitched line at the peak of a diamond, as I stitched from the bottom of my fabric to the top, I made sure to connect each diamond peak as I went. This kept me from veering off too far to the right or left.
Now let’s talk about the time factor. You know I like to keep it real with you guys, and I’d never say “fast and easy” if something takes forever. Well, the good news is that this quilt is mad cute. The bad news is that it takes forever. I don’t know if I’m slow or just easily distracted by Housewives drama (I did it every night across about a week while sitting on the sofa watching TV), but my average was about 3-4 stripes (made up of either three or four colors) a night, which took about 2 hours.
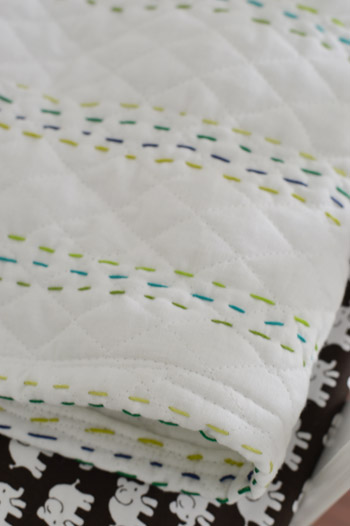
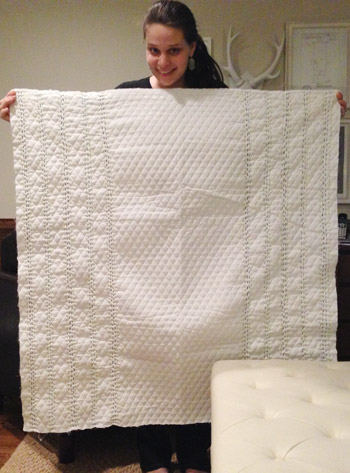
So all told, this 16-stripe one-yard quilt (well technically there are 57 stripes, but they’re spaced to look like 16 thicker ones) took me around 11 hours in total (including one more hour spent hemming the outside seams with a sewing machine, which actually wasn’t too bad).
Even though it took a while, it wasn’t one of those torturous projects that makes you want to poke your own eyeballs out (that’s painting blue trim or peeling wallpaper, FYI). It’s more like one of those relaxing repetitive motions you can do at night from the sofa, where your butt might be parked anyway. But instead of taking quizzes on Buzzfeed or scrolling around on Instagram, you get to be stitching something while snuggled under a blanket with your chihuahua and feeling pretty dang quaint about it.
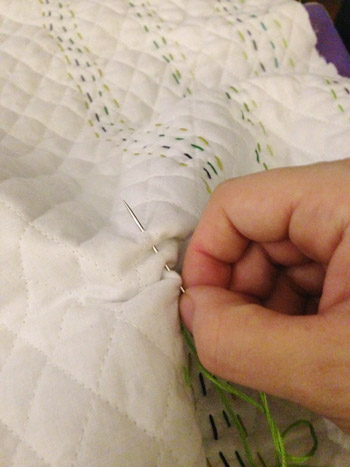
As for how I knotted each stripe, I just tied off the top of each one with the thread still on the needle on the top edge of the back of the quilt. And then on the bottom edge I cut the embroidery floss off with about 7″ to spare so I could slip my needle back onto that end and knot it there as well. That left me with a seam full of knots like this along each edge (top and bottom) on the backside of the quilt.
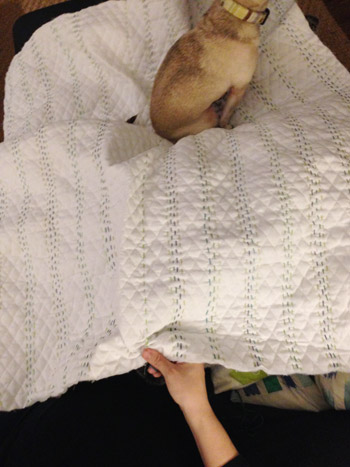
Once I got about a third of the way done with my stripes (working from left to right), I started on the right side and worked from right to left to get about a third of the way done with that side. Then I bounced back and forth doing every other stripe on each side, as I got closer and closer to the middle of the quilt, which allowed me to space everything so it was somewhat symmetrical. It probably would have been just as easy to work from left to right and use that two-diamond spacing, but I might have had to trim off a few inches of the quilt at the end if everything didn’t line up perfectly, and I liked the idea of a square quilt.
Allow me to share this creepy low-lit iPhone pic to demonstrate how I sort of worked in towards the middle.
To hem the edges I broke out the ol’ sewing machine and said a few prayers to the sewing machine gods. I’m paraphrasing, but they were something like “please let me make it through this attempt without throwing this thing out the window or revealing my evil sailor-mouthed alter ego to my sweet husband in the next room.” Then I just folded each edge over in the back, took three deep cleansing breaths, and stitched them in that folded position.
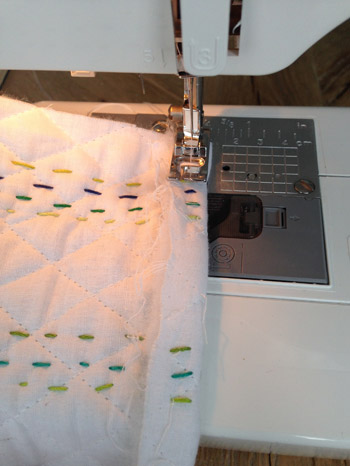
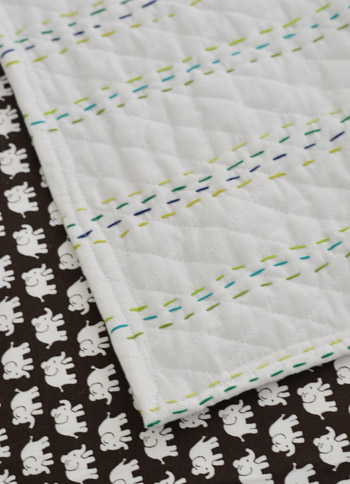
This hid the knots on the top and bottom but there was still not a finished edge along the back hem, so I folded each of them over again and did one more stitch-session with each side for a nice finished look from the back and front. This is the front:
And here’s what it looks like from the back:
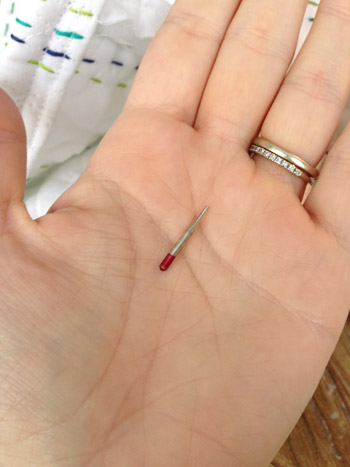
Lo and behold, I only broke two needles (that’s not a joke, I really managed to break two needles) but I think it came out really sweet.
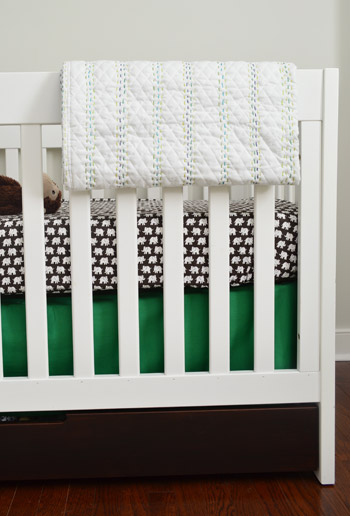
Can’t wait to meet this little bun and wrap him up with all sorts of love and quilt-y snuggles.
Right now it’s just chilling in the nursery, waiting for the big arrival.
Is anyone else sewing anything for their kiddos? Friends or relatives? Four-legged babies? Have you ever tried hand-stitching or embroidery? It’s oddly restful. Sort of like hand hypnosis.
Psst- Wanna know where we got something in our house or what paint color we used? Just click on this button:


Anna says
Went to michaels and joanns today to buy everything needed for this project!! I absolutely love it! All the quilts online or in stores are so “theme” ish and we have a very simple nursery…creams and golds with very small touches of pink. Can’t wait to get started and hope she loves it as much as Clara!! Thanks so much for posting!!!
YoungHouseLove says
So glad Anna! Good luck with it!
xo
s
Emily says
Sherry, this is so lovely. I literally dropped everything and ran to the fabric store after you posted this. I’m doing an orange ombre argyle/diamond pattern and oh. I love. But I’ve got three rows done and I realized that this will have to be washable – have you run yours through the wash yet? Did the embroidery floss stay colorfast? I had a nightmare last night that I finished the whole thing only to have it bleed out in the wash…any tips would be so helpful! Thanks for the idea, our second bun is due in September and I’m going to require that he/she love this quilt above all others.
YoungHouseLove says
A few folks said either to use Shout Color Catcher for the first few washes or to run it under water and just keep the water running for a while to hopefully not let anything set/settle. I think I’ll try the Shout and see how it goes!
xo
s
Christine Murry says
It is stupidly easy to make envelope pillow cases, ya know. This is an easy project for you. Here’s the video I watched: http://www.youtube.com/watch?v=Zd89N8XDelQ. I’ve made tons of them.
Christine Murry says
Oops! This is the right video http://www.youtube.com/watch?v=yDJh5Tuo5r8, Although they are sorta the same
YoungHouseLove says
Thanks Christine!
xo
s
Amanda Sheren says
What an incredibly simplistic and beautiful idea! You did a great job. I’m actually inspired to do something similar to this with maybe a chevron twist. Thanks for sharing!
YoungHouseLove says
Thanks Amanda!
xo
s
(Mostly) Happy Homemaker says
That is about the sweetest post ever! You guys are the cutest parents! Your precious baby boy will love his quilt! My husband is a quilt lover and calls them his man-quilts.
Oh how I wish I had the patience to learn to sew :)
Dusty @All Things G&D says
This turned out beautifully, Sherry! He’s going to love it.
YoungHouseLove says
Thanks Dusty!
xo
s
Kari says
Love the quilt, simple but beautiful. Have you seen this bike pillow on sale at bed bath and beyond. Might go nicely with your green and bike theme??
http://www.bedbathandbeyond.com/store/product/Threadless-Infinity-MPG-Toss-Pillow/1040232720?Keyword=Mpg+toss+pillow
YoungHouseLove says
Really cute! Thanks for the link.
xo
s
Brooks says
Sherry–
It amazes me how “you” those colors are. If I saw this blanket in a shop, I would think “those look like Young House Love colors!”
Definitely want to try this method for the neice that’s joining us this summer!
YoungHouseLove says
Thanks so much Brooks, that’s so sweet!
xo
s
Dacia @ Lemon Drop Life says
I LOVE this quilt! I’m sometimes leery of quilts being too granny-ish but all the white really give this one a modern, classic feel!
Sevi says
Hey there Sherry,
I fell so in love with this quilt project, I decided to start one for my baby girl due in Mid April. I got some beautiful colors and some quilt fabric, but the fabric turned out to be pretty stiff. The guy at the store told me it would get softer after i washed it but nope, it didnt :( Now i’m dyyying to start it right now :_( and not so sure i need to go out again and look for a softer one with this huge body of mine :(
YoungHouseLove says
Oh no! I would hold out for a soft fabric since the stitching is a ton of man-hours and you’d be so frustrated if you did it and the quilt stayed crunchy. Maybe try a few fabric stores until you come upon the perfect soft one and then you can just park it on the sofa and stitch away? I loved that part. It was actually relaxing :)
xo
s
Quilter says
Hi Sherry, this post has been bothering me and I finally figured out why. You and John spend a lot of time researching house projects to make sure you do them the “right” way, but you seem to try to find shortcuts on home dec and sewing projects and don’t do as much research on the “right” way. Now, to each their own, but as someone who is so public, I feel you do real quilters disservice by flaunting these shortcut projects. Also, you are really using inferior products. That pre-quilted fabric you are purchasing from Joann is filled with POLYESTER batting. Aren’t you and John advocates of ecofriendly products? Plus, it’s really not heirloom quality at all. For all the work you put into it, don’t you want a great product that will last, just as your house projects end up? I think that if you took a basic quilting class, you would find a)it’s really not as hard as you think to actually make your own quilt (using cotton or wool batting – talk about soft!) and b) you would really enjoy it! There is a fantastic quilting shop in your area called Quilting Adventures that offers tons of resources and classes and sells a ton of modern quilting prints. Here is there website: http://www.quiltingadventures.com/. I think you do beautiful work on your home and I’d love to see you put as much thought into your sewing projects (no more hem tape or pre-quilted fabric!) as you do your home projects. I mean this in the nicest way, really!
YoungHouseLove says
Thanks for the tips Quilter! There are so many things that we would love to learn more about and home our skills and take classes on. My mom is an awesome seamstress and quilter too, so I’d love to sit down with her for some one on one lessons too!
xo
s
danielle says
i had to laugh at this because as i was reading it i thought to myself “how on earth does everyone else sew and not break a million machine needles in the process?” and then i got to the end. ;-)
Nichole says
I somehow missed this post when it was new, but read it today from the link…LOVE this quilt!
Gabriele says
Oh so many comments! But I still wanted to add mine…
First of all: such a lovely quilt with that handstitching! It’s beautiful! And I wish you such a wonderful rest of your pregnancy and loads of fun with your children!
My aunt is a nun, who learnt embroidering in her monastery – what means: she really learnt this old artificial way of embroidering the church does since hundreds of years. And she showed me to embroider when I was a child. I stopped making it, but during the last years I started again as I also think that it is a bit of relaxing to sit there and… make something with thread, yarn or fabric.
I have 3 grandchildren and make a lot for them.
Among others I made them granny square blankets for their birth – and they also use them all the time: that’s so wonderful to see!
(just in case you’re interested:
http://notonlypaper.blogspot.de/2012/03/granny-makes-granny-squares.html
here are examples for 2 of the blankets – I just recognize that I forgot to post the finalized blankets as well as the third one I made for the girl….)
Wishing you all the best – for your entire family, and especially your kids – already born or about-to- come.
Greetings from Germany,
Gabriele
Gabriele says
Uhm – I’m really sorry but I forgot one thing which originally made me comment ;) :
Thaanks so much for sharing how to do that embroidery! It’s a wonderful idea.
I am just a sewing beginner – and just began to read a bit into the quilting topic. But I will definitely try that out (one day).
Thanks for the time you spend to share!
YoungHouseLove says
Thanks so much Gabriele! You’re so sweet!
xo
s