Here’s a tale I’ve been dying to tell for a while, but now that we actually got it done (this has been done in my head for over a year), we can spill the beans. Because apparently doing something in your mind does not a blog post make. Ha. So without further ado, here’s how we took two 5-year-old side tables from Target (that we hadn’t used since we lived in our first house) and turned them into much needed padded ottomans at the foot of our bed (since Burger needs a little help getting up into our extra tall bed, they’re like our version of doggy steps).
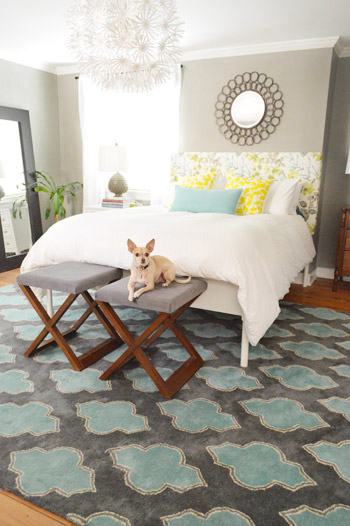
First we placed the side tables in front of the bed to see if we liked them there.
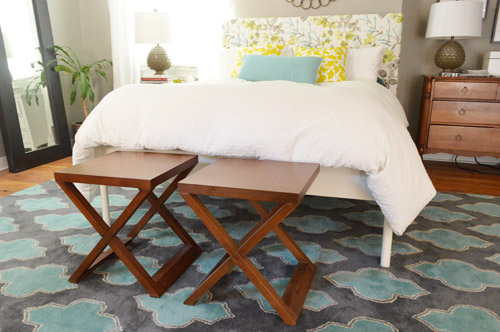
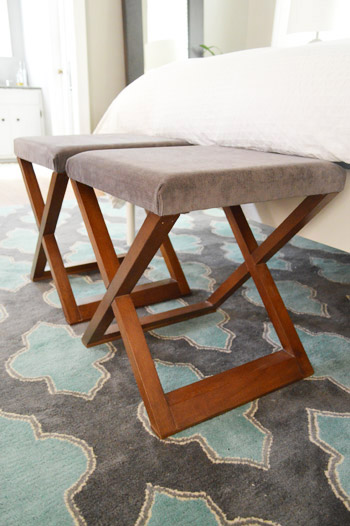
Sold! The color is great since they tie into the hand-me-down dresser that we got from John’s parents. And we’re always suckers for an x-based anything, so we were off to the races. Of course they didn’t feel quite as integrated with the rug as they could, but we thought a thick charcoal fabric on the top of them (along with some nice cushy foam) could help them tie in a lot better (scroll up to check out the first pic to see how much that gray cushion seems to help).
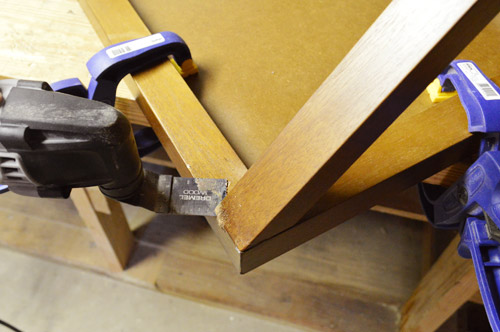
But on with how we did it. First we used a flat cutting attachment from our Dremel Multi-Max to cut off the top of the table (freeing it from the x-based legs). Sounds crazy, right? But since we wanted to upholster the tabletops – to take them from side tables to benches – and it didn’t pop off with the removal of some screws (it was attached with nails and some glue), using the Dremel to get them separated was our best move. Yes, we might have been singing “Keep ‘Em Separated” during this phase.
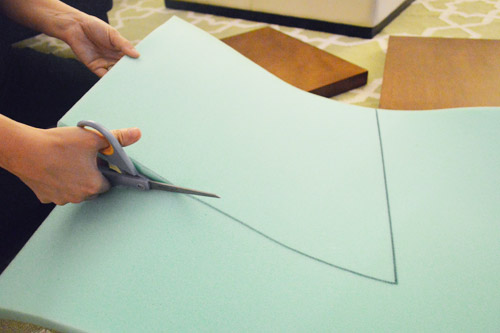
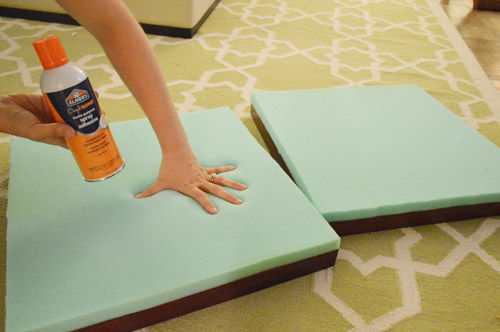
Next I used 1″ foam from JoAnn to create cushions for the top of each ottoman (a 50% off coupon scored us enough to do both tables for just $9). I cut it to the exact size of each top by tracing it with a sharpie and then just cut along that line with a regular old scissors.
Then I used some spray adhesive that we had in my craft drawer to spray the back of each foam square (I did it outside since the residue is super sticky if it settles onto your floor) and then brought them inside and stuck each of them to the table tops.
We only needed one yard of $15 fabric that we snagged at U-Fab to cover those babies (it’s sort of a dark charcoal corduroy). So I cut squares of it that were about 4″ wider than the tabletop on all sides (to give me enough fabric to wrap around the foam & wood sides and staple it in place around the back).
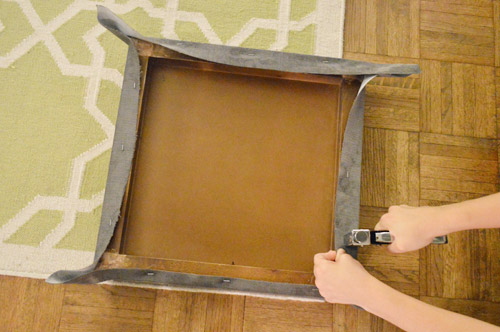
I like to pull it all tight and staple it just a few times (ex: 3) on each edge of the back of the table (see above). Then I flip it over to make sure it’s tight enough (and nice and centered, since there are small lines in this fabric) before going crazy and adding the rest of the staples to hold everything in place, like you see below:
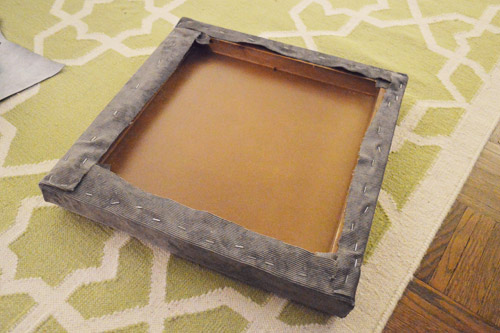
The corners are always a little tricky, but I just folded the fabric into triangles, sort of like how you wrap the corners of a present. One little triangle overlaps another one and they form a nice clean edge.

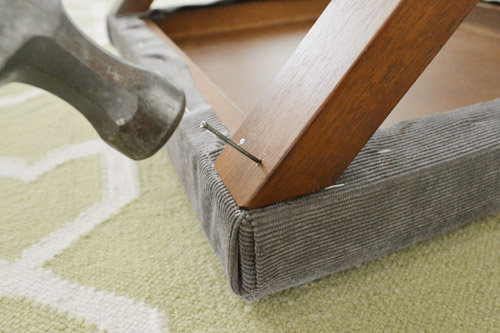
Next we brought the legs down to the basement and sanded the edges to make sure there wasn’t anything pointy going on (since we cut the top right off of them, they were a bit sharp from that step). Then we used a regular old brown magic marker to color the unstained parts that we sanded down, just so it would all blend again.

Then we pre-drilled some very small pilot holes at an angle that would ensure that a nail would go right through the legs and into the tabletop from underneath, securing everything for a strong result. We did two 2″ nails on each leg (8 nails total) just to be sure it was all nice and secure.
Boom, done. Total spent = less than $12 per ottoman. Total time spent = around two hours (mostly while watching NY Housewives, which might have slowed me down since I was pausing every few minutes to try to understand why everyone was fighting the. entire. episode).
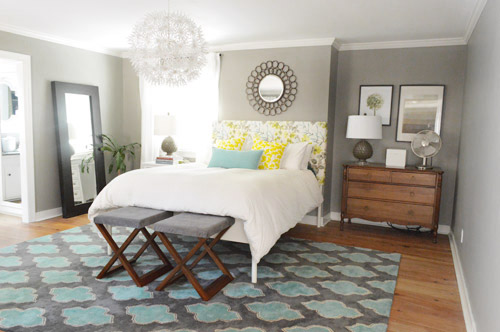
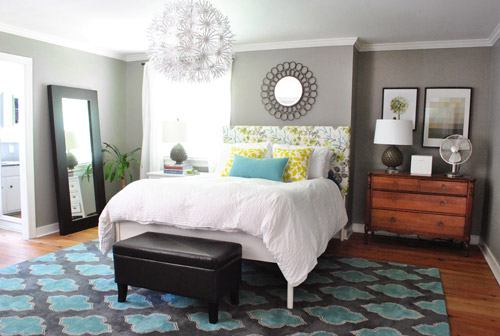
They definitely work for our Burger-getting-into-bed objective, and the best thing is that the colors/materials are so diverse that if we ever wanted to scooch them around the house into some other room/spot we totally could (if we ever found a super long bench for a steal that we’d rather use at the foot of the bed someday, for example). Gotta love flexible pieces. Oh and just for fun here’s what we had there before (an old leftover storage bench from our first house), which felt a lot heavier and clunkier:
Oh and as for our “construction” process, our tables are both super light, so our little foam + fabric + nails seem to have done the trick (Burger has hopped on and off a bunch of times along with the bean, who has completely manhandled them provided some great quality control) but if yours are heavier it probably doesn’t hurt to use small screws instead of nails to secure things (the way the legs of our x-based tables were configured we worried that screw-heads would be a lot more obvious/ugly, so we figured if small-headed nails worked that would be a more subtle choice for us).
Oh and I sat on each of them and they didn’t explode into kindling or anything, haha, so they’re decently strong, although I don’t know that we’d actually use them for perching (we have a chair in the corner of the room for that), so as long as they hold Burger (and piles of dirty clothes if we’re being real) we’re happy.
What items of furniture have you guys been tweaking with fabric or paint or foam or hardware lately? Any other side-table-to-ottoman conversions going on? Does anyone else remember that awesome Victoria Hagan collection from Target from back in 2007? That’s where we got these x-based babies (I think for around $50 a pop). Her collection was totally the best. Wish she’d come back for an encore presentation. Who wants to bang on the table and slow-chant “we want Hagan” with me? Anyone?

Rebecca says
These are really neat! I love how you re-purposed those tables into something new :)
Ally says
Wow…who says apricot-coloured dogs can’t jump! :)
To my eye, the new additions still look quite high?
Burger’s like SUPERDOG…able to leap TALL ottomans in a single bound! :)
xox
YoungHouseLove says
Haha, he’s got ups. He actually can jump all the way into the bed, it just takes him a few tries, and the ottomans are about 7″ lower than the top of the bed (although it’s hard to tell from some angles) so he can get up on the first leap ;)
xo
s
Dana says
They look great!
heather says
First, these look great. Second, for some reason the brown magic marker part cracked me up. I adore you guys.
YoungHouseLove says
Haha, we’re weirdos and we know it, know it, know it (<--sing that to the tune of Sexy and I know it). xo s
Carla says
That’s such a clever way to repurpose end tables. I’m not a fan of how small they look next to the bed and feel you need something more substantial that spans the full width. And the fabric looks baggy along the edges. That will probably increase as their used.
But this project inspires me. I’ve always thought it would be fun to convert a coffee table into an ottoman. Should I need to remove the top, do you feel wood screws would be a better option than nails? I’m thinking torque and weight could loosen them.
YoungHouseLove says
I think if you think you can get away with screws, using them would be better (they hold better, are easier to remove, etc). We just worried ours would be really obvious, so we went with nails :)
xo
s
Jillian {Her Split Ends} says
Explode into kindling…you crack me up ;) Always bring a smile to my face when i read your posts!! I love the benches super cute {and i couldn’t agree more…that anything with an x-base = awesome sauce!} How about adding some nail head trim to them for a little extra detail.
Cheers
~ jillian
http://www.hersplitends.com
YoungHouseLove says
Haha, thanks Jillian! A few others voted for nailhead trim too. For now I love how simple they are without competing with anything for now (the rug and the headboard and the chandlerlier are the “look-at-me!” things in the room) but who knows where we’ll end up!
xo
s
Beccii says
I love almost all of the stuff you guys do, not sure about this project though. Which makes me think of your post about not everyone loving everything you do… Which in turn makes me appreciate even more how much I love your blog :0)
YoungHouseLove says
Haha, thanks Beccii!
xo
s
how2home says
Love the tutorial on how to make it the ottoman! Thanks for sharing!
Kim says
Goodwill lesson: two really cool framed and matted Thai art pieces-$39 each, so $80. Yikes. Thought and thought, carted them around. Decided if I was that indecisive, not to buy them. Tried to hide them behind an ugly pictures in hopes of coming back next week for 1/2 price. Decided to go back and look today-ack! One was gone! (my favorite, that I thought about buying by itself but didn’t). So I took it as a sign and bought the remaining one. A worker there said there was a tag on them saying they were worth $250 each! I should have bought both! But at least I have one. They look awesome and go with our style and the colors we have.
YoungHouseLove says
Oh man! At least that second one was still there! Whew!
xo
s
Alison says
I love the x legs! I was wondering if you guys had ever considered layering a more neutral rug over your patterned one? I LOVE the rug, but I thought maybe a second one would add more dimensionality/could potentially tie all the room colors together. Just a thought! :)
YoungHouseLove says
That’s a fun idea! We love layering things, so you never know where we’ll end up!
xo
s
bfish says
I’m totally on board with this — great recycling effort! The new X benchs look about 1000X better than the old bench did. (I was tempted to write that sentence in all caps as admittedly, to me, the dark bench was an eyesore and looked cheap next to your other nice furnishings.) Thanks for sharing.
YoungHouseLove says
Aw thanks Barb!
xo
s
Steph S. says
You’re so right about the room looking less ‘heavy’ this way. Totally lightens things up and I love how it ties in with the dresser. It’s so great to see how you guys use what you’ve got for updates and fun projects! Hooray :)
Laurie says
I am about to tackle re-covering my dining room chairs but I am envious of your corners. You fold a mean tuck! There is a reason all my presents to people go into gift bags. I can stuff tissue like no one’s business but cannot fold a corner to save my life. Also re: the RHONY, I, too have NO idea why they were fighting. It was all a bunch of silliness….what was with Aviva asking why there were no banners welcoming her?? Girl got on a plane, millions of people do it every day. She acted like they should name a holiday after her.
YoungHouseLove says
Haha so true! She was my favorite in the beginning but now I live Carole.
xo,
s
Carolann says
Those are some very nice, neat corners you got there. Corners are hard!!
YoungHouseLove says
Aw thanks!
xo,
s
Lynn @ Our Useful Hands says
It looks so perty. Right now we have a huge honkin’ cedar chest that sits at the front of our bed, but he might be headed out on the next thing smoking because we are realizing that he just attracts clutter to no end. Clutter is so year 2 in a marriage, so 8 years in – yeah, we’re over it. I can’t wait for a bed with nothing in front so our comforter can just hang…
My best, Lynn
sylvia says
I’m glad you mentioned that you sprayed those puppies outside. I was not so clever with my last (massive bulletin board) project and the carpet was sticky for weeks. I didn’t hear the end of that for a while.
That aside, they look great! :)
YoungHouseLove says
Aw, so sorry Sylvia! Hope the carpet is better now ;)
xo
s
Katie says
This is totally unrelated to ottomans, haha, but had a quick question. I just hung 2 frames (with pics of my kiddos) and my 2 year old can reach them when she’s on the couch. Just curious if you ever did any baby proofing to the low frames in your frame hallway? I looked back at some old posts but couldn’t find if you actually ended up using the heavy duty velcro on the back or not. Feel free to direct me to a post if you did mention it somewhere. I just don’t want my pictures to come crashing down at the hands of my sweet little girl! Thanks!
YoungHouseLove says
Oh yes, we used 3M picture hanging velcro on the low frames in our hallway and it’s awesome. Clara hasn’t ever had any issue with them, and she points to them and even walks into them from time to time, haha.
xo
s
Emma says
Not sure if you have already seen this yet but I think this Target chair matches your headboard.
http://www.target.com/p/avington-upholstered-armless-accent-slipper-chair-gazebo-cloud-floral/-/A-13916598#?lnk=sc_qi_detaillink
YoungHouseLove says
Awesome! Looks pretty darn good as a chair too…
-John
Darlene says
You guys are amazing!!! You sure inspire me!
YoungHouseLove says
Aw, thanks Darlene!
xo
s
Erin @ WriteTasty says
I love the idea of eventually adding a longer bench there, but for the time being the side tables looks great! I love the gray upholstery at the top– it makes it.
Jasanna says
Love it! did you use a regular, manual staple gun for this? I’m also curious how you guys post so regularly. Editing pictures, uploading them, and fabricating a post just takes *time*! What’s your method for ‘smoothness’? :)
http://www.munchtalk.net/
YoungHouseLove says
Aw thanks Jasanna! Yes, we did use a manual staple gun (Just a $20 one from Home Depot a while back). As for our blogging method, it’s pretty much to work the night away once Clara’s in bed (like we did with this little ottoman update, 8-12 is prime project time) and to try to steal time to work on things during her nap as well. Other than that we’re pretty much always chipping away at writing posts, editing photos, coordinating giveaways, managing sponsors, and doing side gigs like book stuff that help pay the bills. We always say that we work a lot harder than we ever did at our 9-5s (on nights, weekends, and even on vacation), but we love what we’re doing, so it’s definitely a blessing.
xo
s
Molly says
Hellllpp… can you please do a video or a picture montage of what exactly “folding the corners into triangles like you would do with a present” looks like? I am terrible at folding presents, worse at folding fabricy things for upholstering, and I am getting a set of hand me down dining room chairs that will desperately need reupholstering. Or if you have already done that on another post, can I get a linky please? Thank you!
YoungHouseLove says
This post has a close up pic that might help. https://www.younghouselove.com/2011/08/the-dastardly-rocking-chair-part-one/
We’ll have to shoot a quick video next time we tackle it!
xo,
s
Jen@The Decor Scene says
Look this room as similar bench at the foot of the bed. Nice!!! http://pinterest.com/pin/68820700526907530/
YoungHouseLove says
So cute!
xo
s
Hot Coupon Job says
Incredible work on the tables to ottomans. You made me re-envision everything in my home. Nothing is satisfying now, Thanks.
Celina Moore says
ooh really love these! Great job
Megan Wood says
I am constantly amazed at your resourcefulness! We just bought a home and have a lot of arranging/painting/upgrading to do! I always look to your blog for inspiration (and motivation!) and am having trouble with our big-open-high ceiling living and dining area. How do you all do your mood boards? I think something like that would help me immensely!? thanks, and can’t wait for your book :)
YoungHouseLove says
Aw thanks Megan, we have some info on how we make our mood boards on our FAQ page (see the link under our header?). We use Photoshop but have listed a few other free options that might help. Good luck!
xo
s
Natalie says
The “new” tables/benches look great! And I love me some gray. :) Nice job!
Lindsay says
I recently did a bench too! The link is here: http://www.blogger.com/blogger.g?blogID=5041342447113099848#editor/target=post;postID=4721748914654867979. I had a brilliant foam moment! You can buy a twin-sized foam mattress top for $20 from Walmart. Then you can cut out the size you want and there is enough for several projects! Just for your future upholstery endeavors!
YoungHouseLove says
Aw man, the link isn’t working for me. Sounds awesome though!
xo
s
Emma says
I was looking Kate Middleton’s dress on her trip and it totally reminded me of your bedroom rug! What a trip…
http://www.usmagazine.com/celebrity-news/pictures/kate-middleton-prince-williams-diamond-jubilee-tour-of-southeast-asia-2012129/24915
YoungHouseLove says
Haha, I love that!
xo
s
Brittney says
I know its been almost a year since your wrote this post but where in the world did you get that rug? I am obsessed and those are the very colors of our bedroom so it would match perfect!
YoungHouseLove says
It’s from Joss & Main a while back. Hope it helps!
xo
s