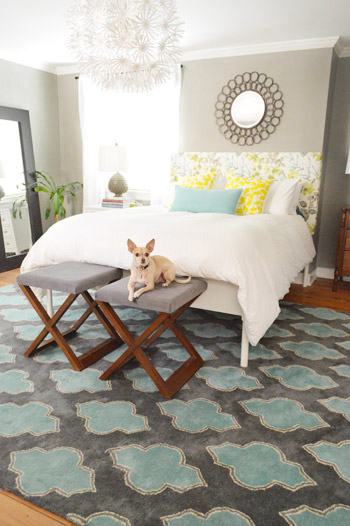
Here’s a tale I’ve been dying to tell for a while, but now that we actually got it done (this has been done in my head for over a year), we can spill the beans. Because apparently doing something in your mind does not a blog post make. Ha. So without further ado, here’s how we took two 5-year-old side tables from Target (that we hadn’t used since we lived in our first house) and turned them into much needed padded ottomans at the foot of our bed (since Burger needs a little help getting up into our extra tall bed, they’re like our version of doggy steps).
First we placed the side tables in front of the bed to see if we liked them there.
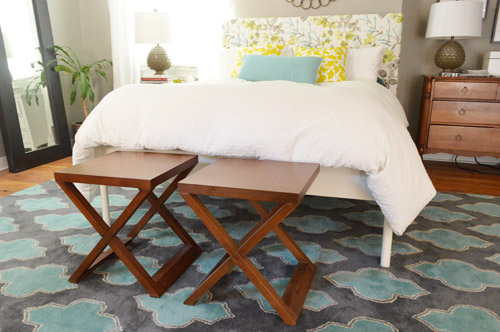
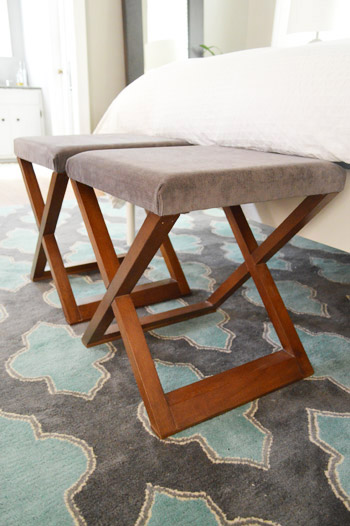
Sold! The color is great since they tie into the hand-me-down dresser that we got from John’s parents. And we’re always suckers for an x-based anything, so we were off to the races. Of course they didn’t feel quite as integrated with the rug as they could, but we thought a thick charcoal fabric on the top of them (along with some nice cushy foam) could help them tie in a lot better (scroll up to check out the first pic to see how much that gray cushion seems to help).
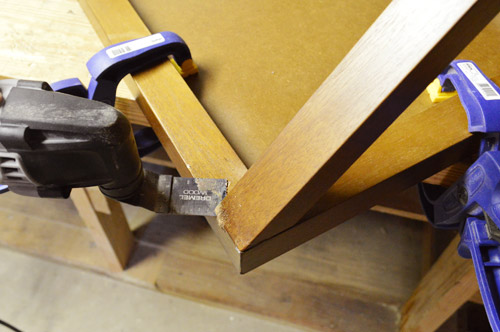
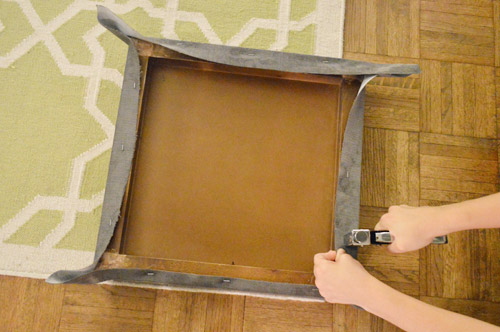
But on with how we did it. First we used a flat cutting attachment from our Dremel Multi-Max to cut off the top of the table (freeing it from the x-based legs). Sounds crazy, right? But since we wanted to upholster the tabletops – to take them from side tables to benches – and it didn’t pop off with the removal of some screws (it was attached with nails and some glue), using the Dremel to get them separated was our best move. Yes, we might have been singing “Keep ‘Em Separated” during this phase.
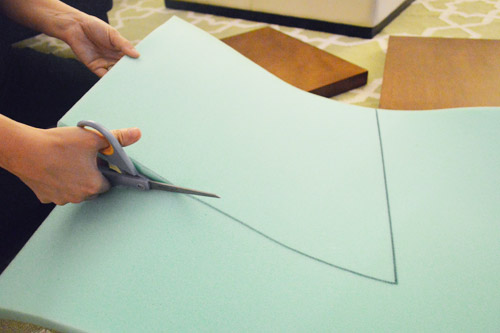
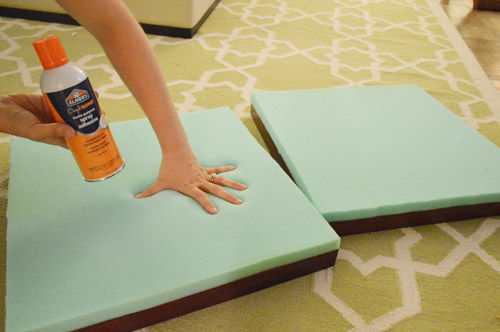
Next I used 1″ foam from JoAnn to create cushions for the top of each ottoman (a 50% off coupon scored us enough to do both tables for just $9). I cut it to the exact size of each top by tracing it with a sharpie and then just cut along that line with a regular old scissors.
Then I used some spray adhesive that we had in my craft drawer to spray the back of each foam square (I did it outside since the residue is super sticky if it settles onto your floor) and then brought them inside and stuck each of them to the table tops.
We only needed one yard of $15 fabric that we snagged at U-Fab to cover those babies (it’s sort of a dark charcoal corduroy). So I cut squares of it that were about 4″ wider than the tabletop on all sides (to give me enough fabric to wrap around the foam & wood sides and staple it in place around the back).
I like to pull it all tight and staple it just a few times (ex: 3) on each edge of the back of the table (see above). Then I flip it over to make sure it’s tight enough (and nice and centered, since there are small lines in this fabric) before going crazy and adding the rest of the staples to hold everything in place, like you see below:
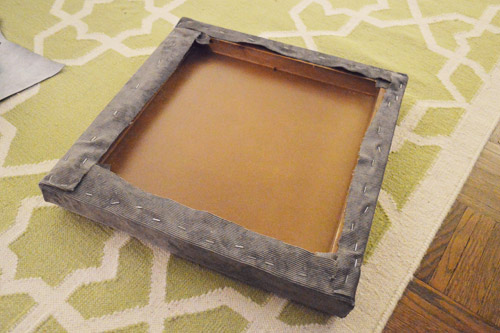
The corners are always a little tricky, but I just folded the fabric into triangles, sort of like how you wrap the corners of a present. One little triangle overlaps another one and they form a nice clean edge.

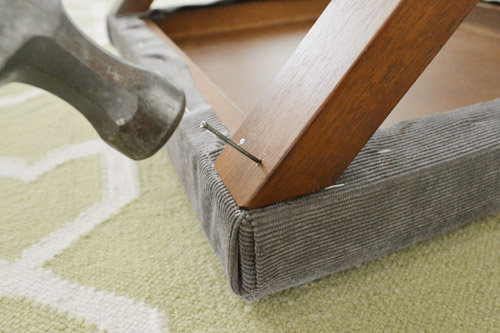
Next we brought the legs down to the basement and sanded the edges to make sure there wasn’t anything pointy going on (since we cut the top right off of them, they were a bit sharp from that step). Then we used a regular old brown magic marker to color the unstained parts that we sanded down, just so it would all blend again.

Then we pre-drilled some very small pilot holes at an angle that would ensure that a nail would go right through the legs and into the tabletop from underneath, securing everything for a strong result. We did two 2″ nails on each leg (8 nails total) just to be sure it was all nice and secure.
Boom, done. Total spent = less than $12 per ottoman. Total time spent = around two hours (mostly while watching NY Housewives, which might have slowed me down since I was pausing every few minutes to try to understand why everyone was fighting the. entire. episode).
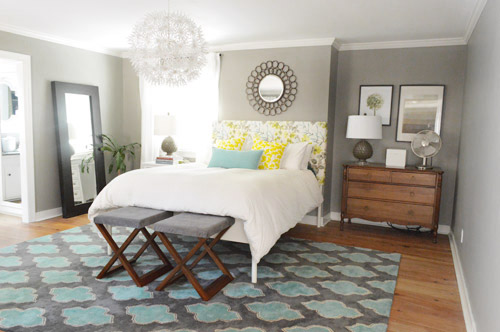
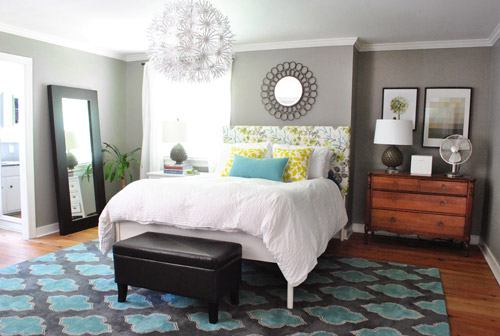
They definitely work for our Burger-getting-into-bed objective, and the best thing is that the colors/materials are so diverse that if we ever wanted to scooch them around the house into some other room/spot we totally could (if we ever found a super long bench for a steal that we’d rather use at the foot of the bed someday, for example). Gotta love flexible pieces. Oh and just for fun here’s what we had there before (an old leftover storage bench from our first house), which felt a lot heavier and clunkier:
Oh and as for our “construction” process, our tables are both super light, so our little foam + fabric + nails seem to have done the trick (Burger has hopped on and off a bunch of times along with the bean, who has completely manhandled them provided some great quality control) but if yours are heavier it probably doesn’t hurt to use small screws instead of nails to secure things (the way the legs of our x-based tables were configured we worried that screw-heads would be a lot more obvious/ugly, so we figured if small-headed nails worked that would be a more subtle choice for us).
Oh and I sat on each of them and they didn’t explode into kindling or anything, haha, so they’re decently strong, although I don’t know that we’d actually use them for perching (we have a chair in the corner of the room for that), so as long as they hold Burger (and piles of dirty clothes if we’re being real) we’re happy.
What items of furniture have you guys been tweaking with fabric or paint or foam or hardware lately? Any other side-table-to-ottoman conversions going on? Does anyone else remember that awesome Victoria Hagan collection from Target from back in 2007? That’s where we got these x-based babies (I think for around $50 a pop). Her collection was totally the best. Wish she’d come back for an encore presentation. Who wants to bang on the table and slow-chant “we want Hagan” with me? Anyone?

Kate says
Looks fabulous. But I have a question…
If you guys didn’t have a blog and have to post pictures of your bedroom…would you make your bed every day? I feel like it completes a room but I just can’t get myself to do it every morning!
YoungHouseLove says
Yes, John actually makes our bed every day! It was a resolution he started a few years ago (he even blogged about it a few times) and actually stuck with it! It does make the whole room look a lot more “together” – although Burger is known to mess up the pillows (I think just to annoy his dad, haha).
xo
s
Cristina S. says
Ok those are great…. But what’s better…. I just pre-ordered your book! Bwahaha!!! :)
YoungHouseLove says
Aw thanks Cristina!
xo
s
Nicki says
Hi! I just noticed when reading this post that you do not have a bedskirt on your bed. I was just wondering, is it because you like it without one, or because you have not found one you like? I could not live without one because I store under the bed bags with shoes and purses under my bed!
YoungHouseLove says
This bed is so high that I don’t think a standard one would work, but we actually like it without – it’s sort of a clean look and it’s easy to vacuum under there.
xo
s
Jen E. says
Love the project. But I have to be honest, I don’t think they work there. I remember reading somewhere that furniture with legs tends to look more “nervous.” KWIM? Something about the balance, when you add these very leggy ottomans with the already very leggy bed and dresser, for me the room starts too feel too…ungrounded.
Love all the other tweaks you’ve made to the bedroom since moving in. It is really my favorite room in your house at this point, and inspires me to keep tweaking my own (much less photogenic) house.
YoungHouseLove says
Oh yes, they might not stay there forever – we just liked them more than the clunky old bench and wanted to work with what we have for now! Will keep you posted as the room continues to evolve for sure!
xo,
s
Carla says
I’ve heard the same thing about a mixture of furniture that is “leggy” vs. grounded. I love the project too but I am thinking you will be so happy once you find a longer bench. I sorta miss the black; it balanced the floor mirror to my untrained eye. We have a low long wooden slatted black bench at the foot of our cherry Shaker pencil post bed and absolutely love it. Did you consider black fabric for this project? But I must say I do love the room and although I was Team “Keep the Walls Teal” I like the gray better! :)
YoungHouseLove says
I actually didn’t consider black since the mirror is actually dark brown in person (it’s a deep mocha wood). Once we refinish the floors in a darker mocha color I think it might make more sense (the gray on the cushions ties into the wall and the rug, while the floor mirror will tie into the floor and the moroccan table in the corner that you can’t see in this shot)… but who knows where we’ll end up ;)
xo
s
MissusPatriciaAnn says
They’re kinda cute, but do look ungrounded in the space, next to the bed. I think maybe a beefy-er piece of foam on top might have helped? Love your stuff, just missed a bit with this one.
Karen Elizabeth says
Props to both you! What a great idea, I will definitely be sharing this with my sister-in-law who has been on the hunt for two small ottomans for the same purpose. Great work! You both never cease to inspire me! : )
Karen
Kelly says
Your bedroom looks so good!! :)
Sara says
Love them! Looking for inspiration for re-covering our kitchen chairs and this may be what I needed to just DO IT!
Liz says
I love your bedroom! I want to recreate it in my house head to toe. :)
YoungHouseLove says
Aw thanks Liz!
xo
s
Chair Blog says
Ha
I saw a click coming from here. Nice to meet you all!
Eggs and Ottomans in a bedroom. Could be a good combination;-)
YoungHouseLove says
Haha, nice to meet you too! Love me some eggs…
xo
s
Suzanne says
We want Hagan, We Want Hagan, WE WANT HAGAN!!!!
YoungHouseLove says
Wahoooo!
xo
s
Krystle @ Color Transformed Family says
I love working with what you have around the house. Just the other day I was wondering how Burger managed to hop in the bed when you guys are up and around the house. A disguised step is so much better looking than those unsightly pet steps you find in the airplane magazine!
K says
These totally need naihead trim, even if in pewter to keep it subtle. They will look much less DIY. A little trim and they’d be perfect!
YoungHouseLove says
Fun idea! I’ve never seen pewter.
xo
s
Courtney Madden says
When we were renovating our living room, silly me set a can of oil-based paint on top of our coffee table which left a horrible ring through the top of the wood. Since it was thin, we decided to turn it into a bench! It now sits under the window in our new beautiful living room and I get so many compliments on it! Not bad for fixing a mistake, huh?
YoungHouseLove says
Love that!
xo
s
Melanie says
Love them! I converted a coffee table into an ottoman for my little condo.
http://livefromb5.blogspot.ca/2012/06/bye-bye-table-hello-ottoman.html I use it everyday!
YoungHouseLove says
So sweet!
xo
s
Casey says
I used that same fabric from JoAnn’s to make curtains for my living room! :)
YoungHouseLove says
So funny! It’s really nice fabric!
xo
s
M.J. Robidoux says
I just re-did my hand-me-down from my grandma kitchen table and chair set. they were a light wood with a beige fabric cushion on the chairs. i sanded and painted it all a glossy white and for the chair cushion i used the exact same fabric that you loved from ikea (in your last post about your stop at ikea). i had already bought the fabric in june but when i saw your post i was so excited! it looks amazing!
YoungHouseLove says
They sound awesome!
xo
s
Maggie Rose says
Great solution! I too have a pair of tables from the Victoria Hagan collection (first thing I bought when I graduated college, almost!). Mine also have an X design on the sides and a shelf about 2/3 up. We don’t have a spot for them now but I love them so they’re in storage :) I agree – come back to Target, Victoria Hagan!
Laura@JourneyChic says
Love it – so cheap and easy!
But you know what…a little nailhead trim and I bet they’d be even more spectacular. Think about it! :)
YoungHouseLove says
We’ll definitely keep you posted!
xo
s
heyruthie says
I’m too intimidated to “deconstruct” furniture like this. (Honestly, part of it is that I *am* klutzy, and not very strong, so the few times I’ve tried, I actually broke the item! I do better with non-power-tool jobs! ha!)
So…..Do you think these could have been “reupholstered” in a similar fashion without removing the top? “Faking” it somehow? I have some that are similar.
YoungHouseLove says
I think it would have been hard to work around the legs. Does anyone have tips or ideas for Heyruthie?
xo
s
Cristina says
Can you do a post on how to clean upholstery? I built a big toy chest and upholsterd the whole thing with foam and fun outdoor fabric – it is gorgeous! The kids even take naps on top of it sometimes. But now the top is all grimey and dirty looking from kids climbing on it and the sides are still clean and new looking. What do I do? Pry the staples out and throw it in the wash? How do you clean it in place without the foam turning into a giant waterholding sponge?
YoungHouseLove says
Anyone have tips for Cristina? We usually go with dark fabrics that we can spot clean, but if it’s lighter it might be hard. Yo can always pop the staples out with a flat-head screwdriver and wash the fabric somehow and put it back on I would think, right? Any faster ideas?
xo
s
Suzy says
I have great success cleaning up stains with distilled white vinegar…usually mix one part vinegar and two parts warm water. I dab area with a rag no rubbing. It cleaned up pink yogurt stains on my carpet along with yellow stains from puppy. Very mild & vinegar smell goes away in a day or so. Google it & you will find many uses listed.
A lot of people use it in kitchen to clean counters, etc…
Missy G. says
Maybe check out this post for a way to clean light-colored fabric. http://551eastdesign.blogspot.com/2012/05/how-to-clean-microfiber-couch.html
Julia says
Would you ever be concerned with people sitting on them? That’d be the one things ‘d worry about, they look so awesomely ottoman/chair like that people might want to get comfy!
YoungHouseLove says
I mentioned a little bit about that at the bottom of the post (I actually sat on them and they seemed fine, but we won’t be using them for that purpose, so as long as they hold Burger and a pile of clothes we’re ok, haha). Hope it helps!
xo
s
Sarah says
Ugh! I have a clunky thing at the end of our bed and I have been wanting to get something softer! Now I have great inspiration! Yay!
shanna says
Love it! The whole room looks fantastic!
http://restorationredoux.blogspot.com
Eileen says
I have been wracking my brains trying to figure out how to turn an old hinged piano bench into a cushioned bench. You’ve turned on the lightbulb over my head! I’ve got a scrap of memory foam that will work, now that you’ve shown me the way with spray adhesive. Whenever I come up against a little conundrum like this, I need to ask, “What would John and Sherry do?”
YoungHouseLove says
Aw, you’re so sweet Eileen. Good luck!
xo
s
Carli says
Those look great! Love the repurposing.
kristi says
I like them so much! I give you a high five/thumbs up for bringing in more natural wood tones into the home. I think wood makes a home feel more cozier. A few splashes of spray painted or black/white furniture is fine but wood is just home to me. I’m learning this myself as I redecorate some rooms in my home!
Laura H says
Those look great! Very creative and a nice way to give them new life. I love the changes in this room, so very pretty.
Jordan@the2seasons says
Your corners look great! I am loving how your bedroom is looking.
YoungHouseLove says
Thanks Jordan!
xo
s
Amber McGinnis says
That looks so much better! And makes a world of difference. I love cheap/free/redo house makeovers!
YoungHouseLove says
Thanks Amber!
xo
s
Alison says
Love the new ottomans. I need to get better about standardizing colors throughout the house. I like the way yours is so cohesive and the fact that you can easily move things from room to room.
As for furniture make-overs, I spent yesterday cleaning up a vintage dresser we found over the weekend. It’s going in our storage-deprived office. I’m doing another one today to replace my husband’s old dresser. The rooms are total works-in-progress, but I did a little post about what I use to clean up old wood furniture on the blog today: http://piesandpuggles.blogspot.com/2012/09/project-refresh-wood-dresser.html.
YoungHouseLove says
Wow- you did an amazing job!
xo
s
Laura says
Let’s just refer to Aviva as “A-Diva” ;)
YoungHouseLove says
Hahah!
xo
s
Sheila says
LOVE! They remind me of some I saw on Pinterest (http://pinterest.com/pin/41517627785937388/) … which would also look super swank in your space!
YoungHouseLove says
Ooh la la, so swanky!
xo
s
Suzy says
Love this idea….we got a new king bed which is soooo much higher. Our shih tzu, Roxi, can’t jump up on the bed right now so we always have to lift her up. This is a great idea
for small dogs with short legs who need an extra boost.
Need to hit some garage sales this wkend looking for just the right piece or pieces to help our little Roxi. Thanks for sharing! Love the fabric choice.
YoungHouseLove says
Aw thanks Suzy! Good luck!
xo
s
Angela says
Very cute! Good way to reuse and I love x base tables/stools. I am sure you get tired of everyone’s input….but did you think about piping or nailhead trim? I loooove nailhead and it would be pretty easy and really dress it up. just a thought.
YoungHouseLove says
A few other folks have suggested that too! I actually considered nailhead trim but thought it might be too busy (I love that they fall away and let other things like the rug and the headboard and the chandelier demand all the attention) but you never know where we’ll end up!
xo
s
Deb says
I think I may be in the minority here… I prefer the other one! I know it’s a personal preference and all… but this one seems to busy up the area. Too many shapes with the X’s going on. I think you guys did a great job on them, but I think it totally takes away a little of how awesome the room was. Love the fabric choice!
Mizden Medina says
Hola Sherry & John!
I wonder how you can see behond the obvious into the stuff at your house….I guess that’s just proves that we were all made with different skills haha..
I might be missing something…but are those “pin it” buttons new or did you blogged about it and I didn’t notice? haha
Happy Thursday and well I know this is not relevant for you…but Sunday is Mexico’s Independence day (we start celebrations at 12 am so basically it starts 15th at night) so happy holiday weekend to me! :D
YoungHouseLove says
Yes, they’re new! Although two other folks said they were distracting so I think we’re actually in the process of taking them down. Haha! Happy holiday weekend!
xo
s
Alice says
Nice legs on those ottomans(ottomen?)
I am also on the look-out for a longer bench for the foot of my queen bed. I was thinking of getting a console/sofa table (since some come extra long) and cutting the legs shorter. It sounds good in my head but putting it into practice may be another story.
JoDi says
Love the project! I just popped over to the site today to see comments, and I have to say I’m glad I read almost all your posts through my email subscription. Those Pin It buttons on every picture are really annoying. I haven’t noticed them before so it’s either been a long time since I actually came to the site, or they’re a very recent addition. ;-)
YoungHouseLove says
Aw man, we just added them today. We thought they’d help. Anyone else annoyed by them? Good to know! Please tell us, we’re just trying them out!
xo
s
Karen says
They look great! I have a senior dog who is going to need some help getting on our bed, so this is a great idea for the end of the bed. (I have a bigger dog, so I’m going to need a bigger ottoman!)
Donna says
This was a very cool idea ( and so useful for the small dog owners out there ). I have followed your blog for about three years now, and am curious: do you guys have a proudest/favorite project that you have worked on? Can’t wait to get your book!
YoungHouseLove says
Aw thanks Donna! I think they change all the time. We love our chandelier made of clothespins and our basket light and our homemade headboard. And I think we’re extra proud of the things we make Clara since she seems to love them (her dollhouse, play kitchen, train board, etc).
xo
s
Laura@Elegant Nest says
Love these! They are similar to the garage sale side tables I turned into beautiful bedroom stools. See my post here
http://elegantnest.blogspot.com/2012/08/bedroom-stools-reveal.html
Great minds think alike! :)
YoungHouseLove says
LOVE THOSE! So cute!
xo
s
Caitlin @ Desert Domicile says
Love X benches! Too bad most of them are so expensive! Speaking of Target, have you seen their new home decor items? I want them all haha
YoungHouseLove says
Yes, they’re so pretty lately!
xo
s
Sayward says
Love it. There are SO many things I wish Target would bring back.
Abby says
Great post and I love seeing your bedroom progess, but I need to weigh in on how the “Pin it” buttons on every picture are very distracting. They just seem to take away from the overall vibe of the post. I know it’s valuable to promote your blog on Pinterest, but I’d much prefer a more subtle route.
Just my two cents, though – still love what you’re doing!
YoungHouseLove says
Thanks for the tip Abbby! We just added those today to see how it worked out and you’re the second one to say that. Might remove them right now, actually :)
xo
s
T. Y. Lee says
I actually keep an old Bombay trunk at the foot of my bed (that I purchased from a store going out of business, for a mere $45). I think the dark ottoman at the foot of your bed looked great too! Seeing both, makes you realize how much different a room can look and feel by simply changing out one thing though!
I do love simple upholstering jobs, the kind that basically require disassembling, attaching foam, covering with fabric, stapling, reassembling, and done! For any of you worrying about your ability to do a project like that, I’m a total novice and have done several upholstery projects like that, and I actually recently BUILT an upholstered toddler-size ottoman from scratch, which sounds way hard, but it was sooooooo easy, and fast! And I don’t own half the tools that Sherry and John do. It’s the perfect way to customize a piece, without shelling out big bucks.
Love your blog, you guys!
Your corners are way less sloppy than mine, LOL!
YoungHouseLove says
That’s awesome! Sounds like your ottoman from scratch came out so well!
xo
s
Sonda Jordan says
My grandfather is a professional reupholsterer. I had purchased six chairs from a garage sale that I had reupholstered with a twin sized foam mattress pad cut to the exact size of the chair seat. After a year of not being able to clean the red striped ticking fabric I asked my grandfather if he had any left over vinyl for my chairs. He did and when I took the chairs to him he kept asking if I wanted new foam which I said no at first because it looked fine to me. After more kind encouragement for new foam I relented. I watched grandpa cut the new foam and instead of an exact copy he left a quarter of an inch overhang on all sides. A light bulb went off in my head, Grandpa had not wanted to hurt my feelings that I had not cut the foam properly. I watched him gently compress the foam as he stapled the vinyl in place. The chairs look great!
YoungHouseLove says
Aw, that’s so sweet! I love that!
xo
s
AMANDA says
I was just thinking that what would make these better is if you had the two tables together with one solid top covering both. That way instead of having two separate ottomans, it would act as one longer ottoman. Just a suggestion…
YoungHouseLove says
Yes that was actually my initial intention (to use them to make one big bench, since that was what we were used to) but I realized they would be more “flexible” in the future (they could be moved a ton of places, into other rooms, etc) if we didn’t connect them, so I kept them as separates. That way if we ever see an awesome big tufted bench to redo for the foot of the bed these guys are super flexible to live somewhere else (one long bench would be more limiting).
xo
s
Kelley says
The corduroy is great. So cozy and should hold up well, too. And you guys aren’t the only ones to make a change based on your pooch’s needs. We actually sold a bed with a footboard taller than the mattress and bought another bed just so our pup could jump from her bench to the bed. Suckers!
YoungHouseLove says
Haha! So sweet.
xo,
s
Devon @ Green House, Good Life says
Cute!
You know what I’d love? (You know, if you were just thinking, “I wonder what that Devon kid from Texas would really love….”) I though of this the other day when you posted the video, and again now: A budget breakdown of your bedroom. Since it wasn’t one big project with a reveal and budget post, it would be interesting to see how much you’ve spent in there. (Maybe two totals: one of just everything that’s in there now, and a second total that includes all the meandering (the Kentucky Polo Club paint, original curtains, duvet, etc.). Just a thought.
YoungHouseLove says
I would love to get that together! I think we include prices for almost every project we do, so it would just be a matter of trolling the archives and digging that up and adding everything. Hope I can get ‘er done someday!
xo
s
Jen says
Unrelated, I know, but check out these beautiful IKEA tablesettings and fun facts. Thought you guys might enjoy: http://beekman1802.com/decor/5-beautiful-things-26.html
YoungHouseLove says
Awesome! I love that!
xo
s
Jen says
Table art, I should say. :) Not really conducive to eating.