Here’s a tale I’ve been dying to tell for a while, but now that we actually got it done (this has been done in my head for over a year), we can spill the beans. Because apparently doing something in your mind does not a blog post make. Ha. So without further ado, here’s how we took two 5-year-old side tables from Target (that we hadn’t used since we lived in our first house) and turned them into much needed padded ottomans at the foot of our bed (since Burger needs a little help getting up into our extra tall bed, they’re like our version of doggy steps).
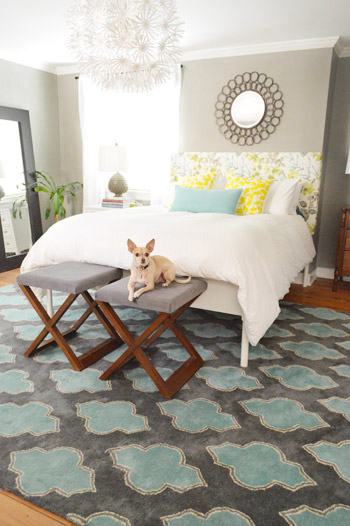
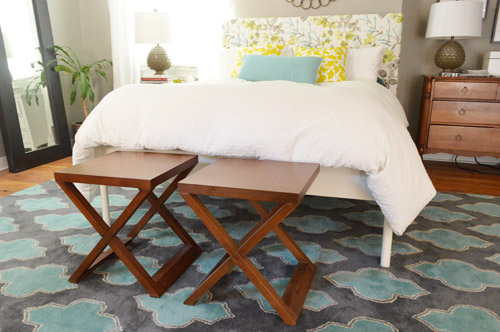
First we placed the side tables in front of the bed to see if we liked them there.
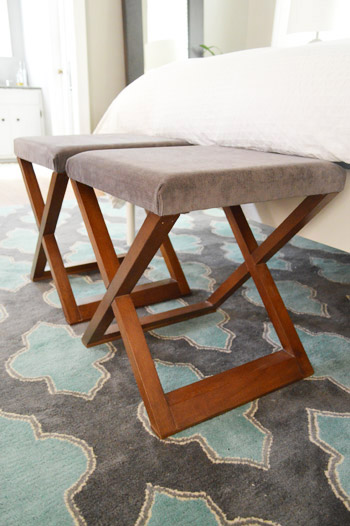
Sold! The color is great since they tie into the hand-me-down dresser that we got from John’s parents. And we’re always suckers for an x-based anything, so we were off to the races. Of course they didn’t feel quite as integrated with the rug as they could, but we thought a thick charcoal fabric on the top of them (along with some nice cushy foam) could help them tie in a lot better (scroll up to check out the first pic to see how much that gray cushion seems to help).
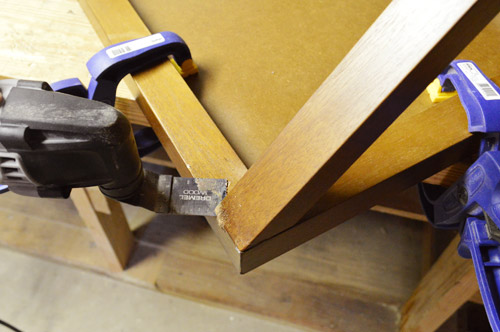
But on with how we did it. First we used a flat cutting attachment from our Dremel Multi-Max to cut off the top of the table (freeing it from the x-based legs). Sounds crazy, right? But since we wanted to upholster the tabletops – to take them from side tables to benches – and it didn’t pop off with the removal of some screws (it was attached with nails and some glue), using the Dremel to get them separated was our best move. Yes, we might have been singing “Keep ‘Em Separated” during this phase.
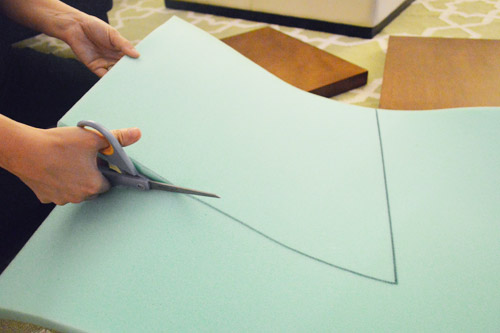
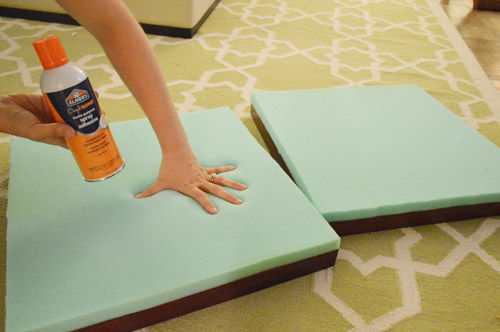
Next I used 1″ foam from JoAnn to create cushions for the top of each ottoman (a 50% off coupon scored us enough to do both tables for just $9). I cut it to the exact size of each top by tracing it with a sharpie and then just cut along that line with a regular old scissors.
Then I used some spray adhesive that we had in my craft drawer to spray the back of each foam square (I did it outside since the residue is super sticky if it settles onto your floor) and then brought them inside and stuck each of them to the table tops.
We only needed one yard of $15 fabric that we snagged at U-Fab to cover those babies (it’s sort of a dark charcoal corduroy). So I cut squares of it that were about 4″ wider than the tabletop on all sides (to give me enough fabric to wrap around the foam & wood sides and staple it in place around the back).
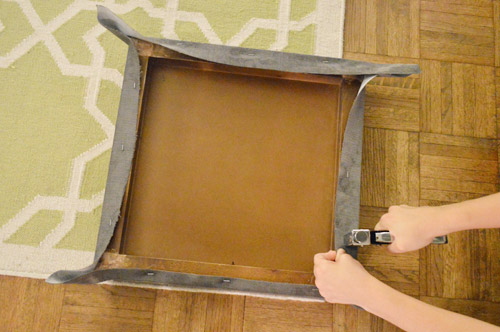
I like to pull it all tight and staple it just a few times (ex: 3) on each edge of the back of the table (see above). Then I flip it over to make sure it’s tight enough (and nice and centered, since there are small lines in this fabric) before going crazy and adding the rest of the staples to hold everything in place, like you see below:
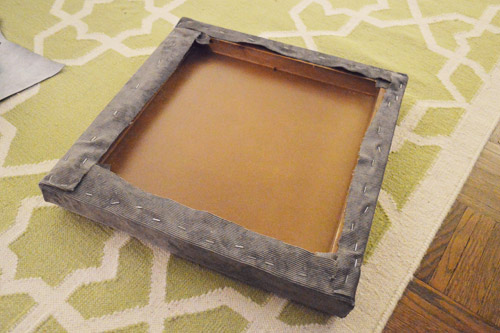
The corners are always a little tricky, but I just folded the fabric into triangles, sort of like how you wrap the corners of a present. One little triangle overlaps another one and they form a nice clean edge.

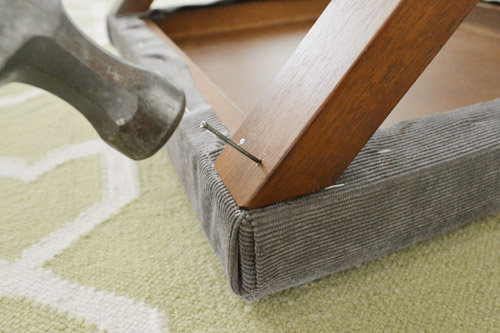
Next we brought the legs down to the basement and sanded the edges to make sure there wasn’t anything pointy going on (since we cut the top right off of them, they were a bit sharp from that step). Then we used a regular old brown magic marker to color the unstained parts that we sanded down, just so it would all blend again.

Then we pre-drilled some very small pilot holes at an angle that would ensure that a nail would go right through the legs and into the tabletop from underneath, securing everything for a strong result. We did two 2″ nails on each leg (8 nails total) just to be sure it was all nice and secure.
Boom, done. Total spent = less than $12 per ottoman. Total time spent = around two hours (mostly while watching NY Housewives, which might have slowed me down since I was pausing every few minutes to try to understand why everyone was fighting the. entire. episode).
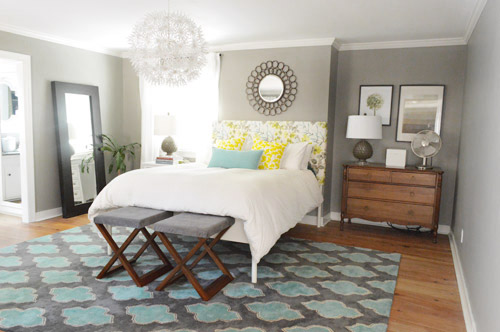
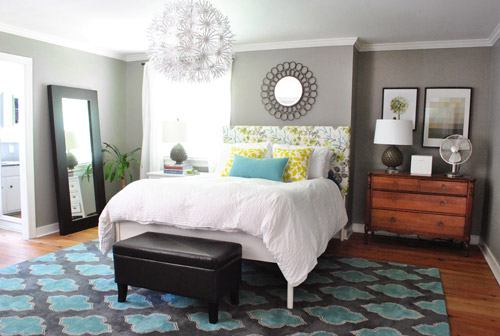
They definitely work for our Burger-getting-into-bed objective, and the best thing is that the colors/materials are so diverse that if we ever wanted to scooch them around the house into some other room/spot we totally could (if we ever found a super long bench for a steal that we’d rather use at the foot of the bed someday, for example). Gotta love flexible pieces. Oh and just for fun here’s what we had there before (an old leftover storage bench from our first house), which felt a lot heavier and clunkier:
Oh and as for our “construction” process, our tables are both super light, so our little foam + fabric + nails seem to have done the trick (Burger has hopped on and off a bunch of times along with the bean, who has completely manhandled them provided some great quality control) but if yours are heavier it probably doesn’t hurt to use small screws instead of nails to secure things (the way the legs of our x-based tables were configured we worried that screw-heads would be a lot more obvious/ugly, so we figured if small-headed nails worked that would be a more subtle choice for us).
Oh and I sat on each of them and they didn’t explode into kindling or anything, haha, so they’re decently strong, although I don’t know that we’d actually use them for perching (we have a chair in the corner of the room for that), so as long as they hold Burger (and piles of dirty clothes if we’re being real) we’re happy.
What items of furniture have you guys been tweaking with fabric or paint or foam or hardware lately? Any other side-table-to-ottoman conversions going on? Does anyone else remember that awesome Victoria Hagan collection from Target from back in 2007? That’s where we got these x-based babies (I think for around $50 a pop). Her collection was totally the best. Wish she’d come back for an encore presentation. Who wants to bang on the table and slow-chant “we want Hagan” with me? Anyone?

Jess @ Little House. Big Heart. says
I was a little lost when you first cut the legs off, but the pic of you nailing them back in totally makes it make sense. Upholstering with the legs on would be a nightmare!
I love how they tie into the other wood tones in the room and bring a little warmth to the foot of the bed.
PS. I love how Burger poses! He’s such a good puppy!
Brittany T says
They look AWESOME! But I’m wondering if the side tables have enough support to hold one of you sitting down on it, like to put on your shoes or something.
YoungHouseLove says
I sat on each of them and they didn’t explode into kindling or anything, haha. I don’t know that we’d actually use them for that though (we have a chair in the corner for perching, etc), so as long as they hold Burger (or piles of dirty clothes, haha) we’re happy.
xo
s
Chelsea @ Riding Escalators says
Love these! I wish I had your ability to look at something and see something else in them… I think I’m too literal sometimes. I would have looked at those and saw only side tables and probably would have painted them and used them as side tables for the rest of their lives. Thank goodness I read your blog though – because now I sometimes look at an old, worn out piece of furniture and think “What could Sherry do with this?” Or look at our tired old bathroom and think – “Well John DIY’ed their bathroom in after-work spurts… whats stopping me?!” :)
Ashleigh says
Glad I’m not the only one who is “too literal” sometimes. :-)
Lindsay B says
Haha, “What would Sherry Do?” is becoming one of my mottos too!
YoungHouseLove says
Aw, you guys are sweet!
xo
s
Chelsea @ Riding Escalators says
We need bracelets! haha!
YoungHouseLove says
Haha!
xo
s
Jessica says
“what would Sherry do?” bracelts and “free the kitties” tshirts :)
YoungHouseLove says
Hahahahaha, I would laugh until I cried if I ever saw those.
xo
s
Julia @ Chris Loves Julia says
We are all about airy pieces lately and your “new” footstools make our case even more! The difference between the ottoman that used to be there and these two awesome (!!! love them !!!) x-benches is so great. It feels so peaceful and light. You should include a before photo with the ottoman!
YoungHouseLove says
Aw thanks Julia! Off to hunt one down.
xo
s
Kristen | Popcorn on the Stove says
Fun update – definitely goes to show you can work with what you’ve got! I should invite you over to figure out what we should do to our coffee table!
YoungHouseLove says
I’ve seen some awesome coffee-table-turned-ottoman/benches out there! You know like a big tufted thing in the middle of the room to add pattern/color/softness?
xo
s
Kristen | Popcorn on the Stove says
That would be very fun and since it’s just the Lack coffee table (from IKEA), I wouldn’t be super upset if we botched it!
YoungHouseLove says
And now for the peer pressure: do it, do it, do it!
xo
s
Erin {Home Everyday} says
What a clever idea. YAY for Burger! Have you considered a little nail head trim to dress them up? Is that hard to do?
YoungHouseLove says
I think it might be tricky with these since they’re not solid wood (it appears to be a veneer on top of some sort of framing) so I think we’ll keep things simple, at least for now ;)
xo
s
Merideth says
Richmond tip when you need foam and don’t have coupons handy: Foam to Size (http://www.foamtosize.com/) in Ashland is a warehouse where you can walk in and get upholstery materials for a good price. They have many different densities and heights as well as other necessities like batting. I used them for redoing our dining table chairs and the advice they gave was realy helpful for a first time upholsterer like me.
YoungHouseLove says
Love the tip!
xo
s
Ashley@AttemptsAtDomestication says
So cute! I love the X of the legs!
Sarah says
Had you considered building a new top for them and upholstering that?
Like setting each across the length of your bed and building a top to make one large bench?
Either way they look nice. :)
YoungHouseLove says
Yes, that was actually my first thought, but then we liked the idea of them being lighter and just having a pairing of two that were more flexible. It definitely could have worked too though, so if anyone else is looking to make all one pieces that would be an awesome way to do it (a long slab of wood, with foam and upholstery, just drilled in from beneath).
xo
s
heather s. says
That was exactly my first thought – make a larger bench out of them rather than two separate ones. They look great but I would love to see it longer since every time you spoke about upgrading the bench you mentioned you wanted something longer there (and I agree). The two separate benches don’t seem much longer than the bench you had there, though they are a bit taller and lighter/airier.
YoungHouseLove says
Oh yes, if we see a longer bench that would work better for that spot, we’ll be all over it! We’re just working with what we have for now – especially since we think they’re diverse enough to hang out in other rooms if we invite a new bench-friend into our bedroom. Haha.
xo
s
Sarah@SBrandesDesigns says
That was exactly my thought too!
Jess says
Oh, I thought I was the only one with the super original idea to make those in to one long bench… haha. Good thing I read the comments before posting one!
P.S. – I. AM. SO. EXCITED. FOR. THE. YOUNGHOUSELOVE. BOOK!
Megan says
Brilliant! I have just discovered a window seat bench in an old coffee table we haven’t been using. I’m so excited!
Lauren says
Those are such a neat idea! But, look! NPR’s tumblr. had egg chairs, but literally egg chairs http://www.chairblog.eu/2012/08/17/real-egg-chairs/ I knew I had to share!
YoungHouseLove says
Hahahhah! I love them.
xo
s
Monika says
The pictures of your bedroom appear so much lighter than before (I’m assuming that’s the new camera at work). Like the wall color looks completely different. What is more true to life (the lighter or darker version)? Nice job on the ottomans. :)
YoungHouseLove says
It’s actually somewhere in the middle I think. It also has to do with time of day (sometimes it feels like a light mocha and other times it’s a dark gray without much brown in it at all).
xo
s
Jill says
You should add a before picture with the black ottoman vs. the new guys.
YoungHouseLove says
Updated!
xo
s
Brittany says
Love what you guys have done with this room! I have loved watching it evolve! I also have a really random question about painting over oil based paint. How would you go about covering it? It’s on a wall and we’ve tried Kilz and the color underneath is still showing through!
YoungHouseLove says
Hmm, I would make sure you’re using oil-based Kilz (there are lots of water based versions, but to go over oil paint you have to use oil-based primer to neutralize it, and then you can follow that with latex based paint once it’s dry).
xo
s
Allie ~This Yellow House says
Those look great! I love the pic of Burger sitting on them :-)
Allison says
Neat idea! I am just looking at the new Crate and Barrel catalog and they stole your idea in one of their bedroom layouts with $349 x-based vanity stools. Yours are better looking and a steal!
YoungHouseLove says
No way! So funny!
xo
s
Tara says
These really help give your room a finished look. I love this layout and the entire new direction you’ve taken your bedroom these last few months.
Lori says
Love them! It’s great how neutral they are that you can move them anywhere. I always love to see how you repurpose what you already have and turn them into something totally new.
I just took a wooden crate from Michael’s and turned it into a book bin for my kids: http://familylovehome.blogspot.com/2012/09/diy-wooden-book-crate.html
YoungHouseLove says
So cute! I love that project!
xo
s
Abigail says
They turned out great! And, indeed, the wood tone and height are perfect. You mentioned maybe one day switching them out for a longer bench but am image of this west elm table ( http://pinterest.com/pin/57983913923106995/ ) popped into my head and I thought you could easily replace/cover the tops with one longer board someday and DIY a long bench from these two. Just an idea, I think the x legs would look pretty cute :).
YoungHouseLove says
Ooh that’s really pretty!
xo
s
Lesley says
Awesome! I love the transformation!
Tracie@MiddleClassMod says
Love that you used something you already had. The X-bases look so pretty against the bed. So awesome!
house Crazy Sarah says
I like the look of the wood color of the X’s – they echo the hardwoods and that small dresser. But, did you try the kiddo test on those ottomans yet? :) They seem like they might be a tad tippy if a little person is trying to climb up on them!
YoungHouseLove says
Oh yes, Clara tested and approved! She has manhandled them and had no issues, thank goodness! I think the fact that it’s not just four legs, but they have those bracing pieces on the bottom that connect things, really helps.
xo
s
Ashley says
Those turned out nicely! I do agree to be careful with putting too much weight on them, especially if they are part MDF. I love the grey cordorouy fabric! Where are you going to put the ottoman that was there?
YoungHouseLove says
I think that’s going into the yard sale pile!
xo
s
Ashley says
Oh man, I wish I lived near you – I would gladly take it off your hands!
YoungHouseLove says
So sorry! Maybe try Target or Bed Bath & Beyond? That’s where we got it originally.
xo
s
Nichole says
Target still has them and they go on sale occasionally. We bought one about 3 years ago and it’s still going strong. http://www.target.com/p/espresso-double-storage-ottoman-bench/-/A-10320236
Reenie says
Love em. And Burger looks so cute posing on them :)
Kathy says
Funny thing about ottomans…. I was on Groupon this morning and in their Groupon Goods section was an online deal for ottomans! I didn’t see any I liked for our house..but I swear I thought of you guys and your end of bed bench!
YoungHouseLove says
Haha, so funny!
xo
s
emily @ go haus go says
Looks great! I love instant satisfaction projects like this!
Amanda S. says
This is totally unrelated to your pretty new ottomans, so I apologize but don’t know where else to request a specific blog post topic.
I have a lot of trouble staying on top of home cleaning and you guys seem to do a good job with that- could you post on the topic?? Would be ever grateful. :)
YoungHouseLove says
If you click the word Projects under our header, there’s a cleaning and organizing section with lots of posts on that subject for ya :)
xo
s
Gabriella @ Our Life In Action says
Very cute – do you find you use them more than the other piece of furniture that was there?
Side note: every piece of furniture I look at, I often tell my hubby “we should paint….or spray paint….or…” etc. To which he responds: “you can’t do that” and then I say “oh yeah….” and proceed to open your blog. I think he has a love/hate thing with you guys…..loves the blog…..hates that I can prove him wrong. ;-)
YoungHouseLove says
Aw thanks Gabriella. I think they get the same amount of use (mostly by Burger hopping up and down) which was the only reason for the old bench, so they do the same job, they just look less bulky and bring in some fun lines/shapes with the x-based detail.
xo
s
Michelle says
Great idea… as always!
On a side note, do you find the cords being visible behind the dresser to be distracting? I notice it in every bedroom pic. I know you’ve had great suggestions for other cord wrangling and just wondering if there’s a reason you don’t do it here.
YoungHouseLove says
In real life I don’t think we can see them from our height (we photograph the room with a tripod at a lower height, so I think that’s why we see under the dresser more in the pics). I think if they start to bother us we’ll definitely wrangle those guys!
xo
s
Anele @ Success Along the Weigh says
They looks awesome! (Big surprise…not) I love that you made something to help Burger. We had a small 6 lb Toy Fox Terrier and there’s nothing more pathetic looking that those eyes looking at you when they’re on their tippy toes and have no way to hoist themselves the rest of the way.
Stephanie says
They look really awesome. I love how they have more height than the other bench so they look more related to the bed. I can see how you’d want something longer though. Maybe someday you’ll come across a 3rd one and you can have 3 of them! haha.
I finally painted an old dresser I’d had sitting around for like a month. I painted it black and it looks really nice. I was considering doing a fun pop of color on the inside but once it was painted, I liked the natural wood inside. :) Now I need to go buy hardware and then I can move it into my room. It’ll be so nice to have a dresser after 4 months of being dresser-less! Yay! :)
YoungHouseLove says
Yay! That sounds awesome!
xo
s
Ginny @ goofymonkeys says
Love them! I have a similar plan in the works for a few old side/coffee tables once we do our basement. I love how these turned out.
Was 1″ foam thick enough? And did you consider a little batting on top to add to the plushness?
And another trivia question (‘cuz I like to keep you thinking) – what’s your favorite one-day-super-quick project on THIS house?
YoungHouseLove says
We actually were conscious about not making these too tall for Burger reasons, we didn’t want to make him jump higher since it might defeat the purpose) but if height is no issue, 2″ foam would be even plusher, and layering on some batting never hurts (our fabric was so thick that I thought it would be great without batting, but if it were thinner I would have used to to “smooth things out.” Hope it helps! And as for the trivia question, hmm. I think it was our headboard. It wasn’t super quick, but it was a one-day project, so it didn’t drag on. I bet if you ask me again in a week it’ll change though. Haha. I’m a fickle soul.
xo
s
Bronwyn says
Wow guys!! it is amazing how something so small can make such a big difference!! We did some chair upholstering/make over a few weeks back. Check it out. Would love to know what you think? :)
http://www.strydomsmakinghome.blogspot.com/2012/08/old-chair-new-look.html
YoungHouseLove says
Woah! You did an amazing job! I bow to you, oh upholstery master.
xo
s
Katie says
Really like these! Just wondering how they might look side by side turned the other way (so you didn’t see the X)? Did you try it that way?
YoungHouseLove says
Yup, I was sort of deadlocked either direction (they seem to work both ways) but John loved the x, so his vote tipped them over into staying x-forward. It does give them a little more of a special feeling for sure.
xo
s
Sarah says
I’m so glad that you did this! I keep looking for something to help my Chihuahua to get in our bed. He is getting older and has a hard time jumpng up there. Most of the ottomans are so clunky, but this seems light and easy to do! I’m wondering if there are any side tables at Target now……:)
YoungHouseLove says
Aw, good luck!
xo
s
No Biggie says
Beautiful! Love the color and texture of the fabric.
I also love “X” things — I have many subtle “X” shapes in my living room.
(Subconscious recollection of childhood days spent watching “Family Feud” …?) :)
YoungHouseLove says
Hahahahhahahh! Hilarious.
xo
s
Misty says
I am seeing a trend in your warm wood home additions lately…. lol
YoungHouseLove says
Haha, it’s true!
xo
s
Jennifer Harrup says
I’m with Erin I think they definitely need some nailhead trim if you can manage it! They look amazing, but there is something…unfinished looking about them. Just compared to all the other amazingness going on in that room! Love you guys though and I didn’t comment yesterday, but I am so excited for your book release- I pre-ordered a month or so ago and I can’t wait!
YoungHouseLove says
Aw thanks Jennifer! I think for now with things like the chandelier and the headboard and the rug, we don’t want everything to compete/shout, so we’re ok with some basic stools that just slide in without demanding too much attention. I worry that nailhead might be too blingy/look at me with all the other stuff going on, but who knows where we’ll end up!
xo
s
Krissy says
I love end-of-the-bed benches/ottomans/stools. Our current bedroom is too tiny for that, but I’m hoping our bedroom in whatever house we move into (wayyy down the line) will have room for something at the end of the bed!
Julia says
ooh really love these! Great job upcycle-ing! The color of the wood really helps that dresser fit in the room better!
DanielleR says
I see you got Burger’s seal of approval right off the bat!
YoungHouseLove says
Haha, thanks goodness!
xo
s
Lauren M. says
I love this! The new ottomans blend in well with the other colors and wood pieces in your room. Great idea!
http://www.ColorHug.com
Ammie says
Love the new ottomans. Have you considered using that brown magic marker to cover the nail heads? I think it’d help them blend right in.
YoungHouseLove says
Oh yes, I meant to do that! Off to get ‘er done…
xo
s
Erin {Cali-Land Chic} says
They look really amazing!!! I love the fabric that you used to cover them!!!
I am looking to something like this with my super cheap ones from IKEA…they are in white!!!
Thanks!!!
Erin
Kelly says
Love them. I just finished my own DIY tufted ottoman project. Here’s the result.
http://instagram.com/p/PPglh8KbFt/ I’m smitten!
YoungHouseLove says
Gorgeous! What a great DIY!
xo
s
Sarah K says
I’ll join your slow chant! As soon as I saw the tables I said “Victoria Hagan, Target” in my head. Haha. Target nerd alert!
These turned out great. Love the grey cord! I’m totally inspired to think out of the box for our bed too now. Our pup also can’t make it into the bed on her own, so we have a chair at the end of the bed currently, which does NOT look good. Great job guys!
YoungHouseLove says
Haha, yesss! Someone else who remembers!
xo
s
Lisa says
Honestly, I like the dark storage bench better. X-legs always remind me of those folding things at hotels that you can use to set your suitcase on. To each his (or her) own.
Tyra says
Love these!! Could this count as a dude get on that already challenge??
Side note- a lot of times when you have a new post up I am unable to get the web page to refresh and let me see it (but I know there is a new post via FB). Even now (an hour later) my browser still won’t got to the newest post. I can still link over from facebook or search a key word in the posy (i e ottoman)… But it never just pulls right up! Maybe just because lots of people are reading? Anyone else have this problem or know how to fix it??
YoungHouseLove says
YESSSS! They totally could! I got on it in my head about a year ago but had yet to actually get on it. Dude! Haha.
As for that issues, it sounds like a cache-ing one, so if you clear you browser’s cache/cookies/data it’ll probably pop right up!
xo
s
Jen says
Love this upgrade. You guys are so clever and resourceful.
Burger question: you have added some new unwashable fabric items lately with these stools and the upholstered headboard. My dog is approximately 5 times Burger’s size, so maybe that’s the difference, but I’ve always been concerned about all those extra textiles attracting dog hair and being yet another surface to vacuum. Have you noticed that more cleaning is needed with these new items? Thanks!
YoungHouseLove says
I totally think it’s a dog/type/size thing! Burger is 50% hairless (and short-haired on the rest of his body) and only tends to really lose hair when he’s actively scratching or rubbing his body (which usually happens on a rug or the sofa) so he doesn’t do things like that on the headboard of the benches, which seems to keep them safe from his wrath. Haha. He’s also just a very not-stinky/muddy dog (my childhood dog loved rolling in mud and Burger hates being dirty, so it’s a whole new world!).
xo
s
emily says
Had you considered orienting them the other way [turned 90 degrees] so the X’s are on the end and they read a bit more continuous? Just a thought!
YoungHouseLove says
We did give that a try but voted on this direction as being the winner (I liked them both ways, but John was the tie-breaker, haha).
xo
s