Before we get to our weekly deck update, we just have to say HOLY COW you guys have awesome homes! So many folks submitted house crashing photos for our upcoming trip to Atlanta for the Haven conference – and we wish we had time to see every last one of you! We’ve worked out a plan to crash as many as we can fit in and are crying a little inside that we can’t get to all of you – but we might be back out that way for book tour stuff in the fall so there’s always next time! So this is just a huge thanks to everyone for offering to allow a toddler, a chihuahua, and two curious bloggers to snoop around.
Ok, back to business. I’m quite proud of this post title as it includes not one, but two deck puns about our latest accomplishments: leveling more stuff and digging holes. Continuing with the theme of Deck Day #1, Day #2 wasn’t quite as productive as we had envisioned. Day #2 actually happened the day after #1, but since that progress wasn’t really post-worthy we wanted to squeeze in a bit more ’til writing another update. But we finally accomplished both a fully completed ledger board and made all of our post holes thanks to Deck Day #3, so here’s the rundown on those last two days of deck work.
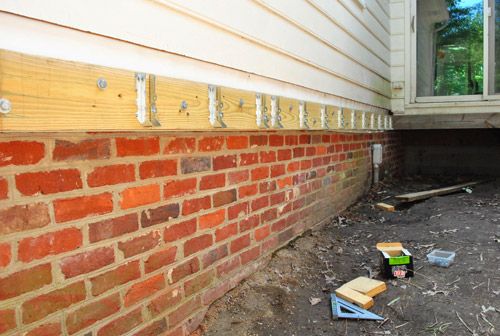
You may recall that we left off with hanging one ledger board on the brick side of the alley and had readied the siding side for ledger board-ing as well.
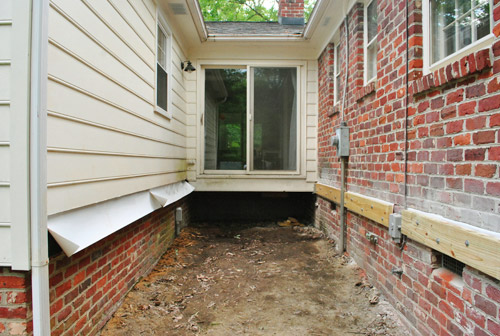
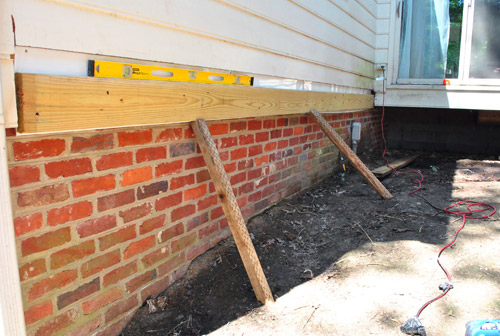
Obviously the first task for Day #2 was to get the other ledger board hung against the house (for more explanation of what these guys do and how they’re installed, check out this post). So the first thing we did was mark where all of our hangers would go (the metal piece that a joist sits in) so that we didn’t put any bolts in those spots. Since the hangers would have to line up with the hangers we had already marked on the brick side of the house, I created a little diagram with all of my measurements so we could mark them accurately. Clara is responsible for the crayon scribble.

The ledger was a bit of a bear to maneuver because it was one 17-foot-long 2×8′ board. But my dad and I managed to get it into place – and between our two sets of hands and some scrap board for propping, were able to level and screw it in without too much trouble. The actual bolting process was faster since (a) we only had to use 6″ lag screws this time and (b) we were going through wood, not brick.
Since the ledger board attachment phase went faster than expected, we decided to insert another task to our to-do list: attaching all of the joist hangers. Our ultimate goal was to dig post holes by the end of the day, but since it was barely 11am we thought we could knock out the hangers pretty fast. So off we went with our level and scrap joist, hammering in the hangers right down the line. Although we actually did every third hanger first (to take advantage of the full length of our level) and then went back and filled in the ones between.
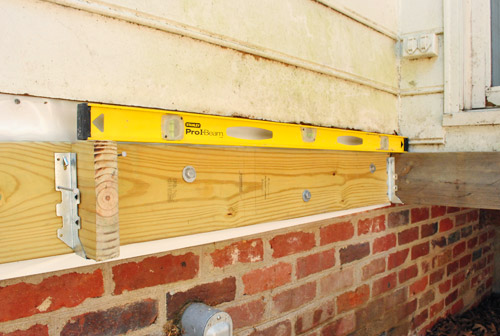
It was a relatively straight-forward process, though a bit more time consuming than we had bargained for.

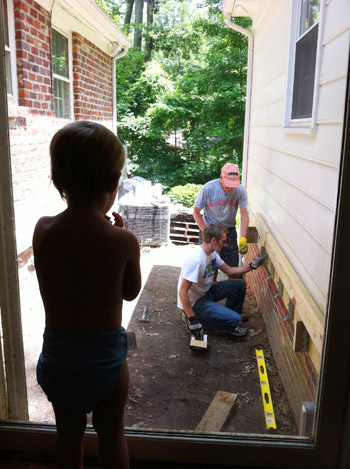
And just like the day before, we had our cheering section observing from the door. Unlike the day before, the cheering section was no longer wearing clothes for some reason (except, thankfully, for a blue cloth diaper). This doesn’t include my wife (she was diaperless, yet clothed – and thankfully very helpful for photo taking and conferring throughout the day while she Clara-wrangled).
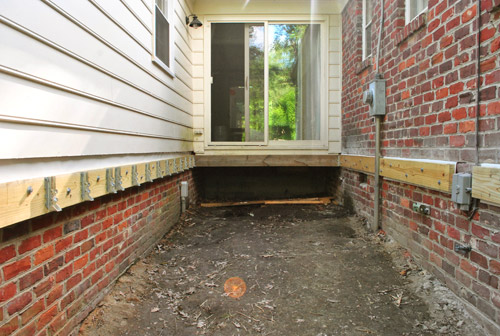
By about 1pm, my dad and I had finished all of the hangers on one side of the house. And we were growing a bit less confident about our schedule and more than a little hungry.
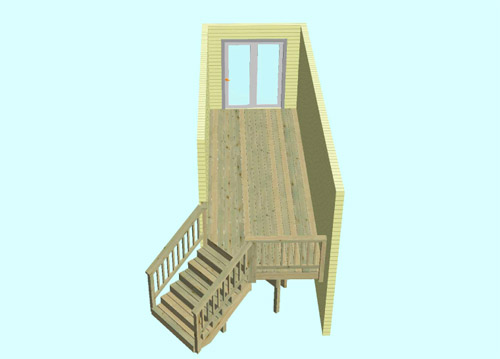
So instead of tackling the hangers on the brick side of the house, we decided to get some food in our bellies and then turn our attention to digging post holes since our first inspection was only about footings, not ledgers or hangers or any of that other jazz. But can’t you just see it- our future deck. Try to squint and imagine beams going across these ledgers and boards running on top of those. Bam: instant imaginary deck. If only making that a reality were that easy. We can only devote one or two days a week to it since it calls for such big chunks of our time (we’re also working around my dad’s schedule, which we’re happy to do in return for his help) so our goal is to complete it before the end of July. So expect weekly updates for the next month or so and then hopefully we’ll have a nice purty after picture for ya. Haha.
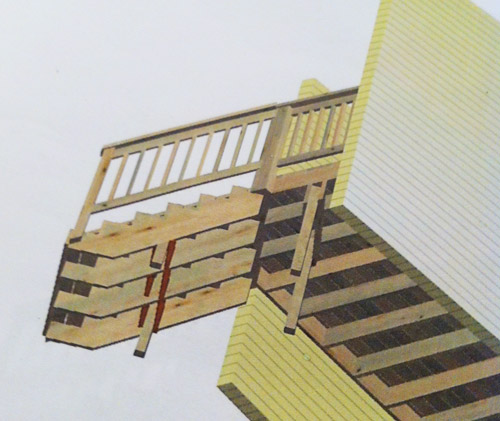
After our late lunch we got right to planning where our post holes needed to go. On paper, it looked fairly straightforward. As you can sort of tell from this 3D rendering that 84 Lumber provided with my plans (this is a few from underneath – almost as if you were beneath our AC unit) – we’d need two posts at the end of the deck, two in the middle of the stairs, and (although not shown clearly) two at the very bottom of the steps.
Actually figuring out where those holes went on the ground was a bit more involved. For the two at the end of the deck, we first had to figure out exactly where the end of our deck was and what angle the stairs would come off at (we made it easy on ourselves and went for 45 degrees). We marked our lines with some string tethered between two bolts hammered into the dirt.
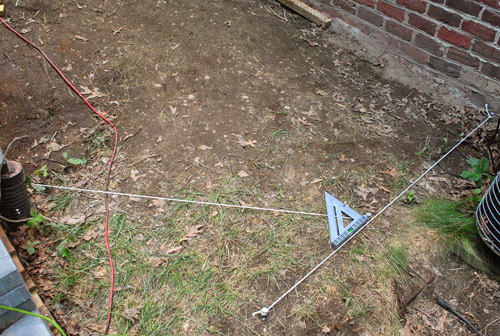
Figuring out the stair posts meant actually figuring out how long our stairs would be. My geometry is a bit rusty, so thank goodness for this EZ Stair Calculator I found online. And thank goodness for my fancy schmancy temporary desk:

Even with the calculator, we spent more time staking out our stairs because Sherry, my dad, and I got into this big debate about what the stairs should look like (and what we felt capable enough to build). We had at one point envisioned stairs that flared out at the end. But there were seven stairs instead of three, so that would have gotten too wide for the space.
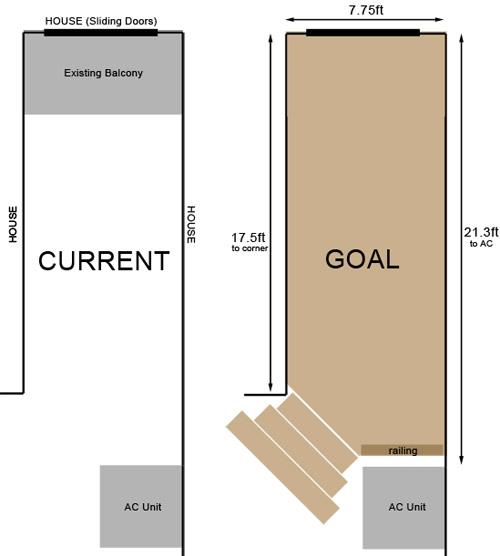
We even talked about three stairs with a large platform halfway down and then three more stairs. But ultimately we opted to keep things simple and just go with basic straight stairs for now (we didn’t want them to go on forever – which they would do with a platform in the middle – and with the air conditioner to the right of the stairs and the house to the left of them, it sort of limited our creativity). Oh but see the railing on the deck to the right of the stairs in the picture below? We think that’s going to be a big built-in planter box instead. Will keep you posted as we go!
At least our decision to go with “classic stairs” was easy to mark with our string (we later shifted them over five inches away from the house – oh and we’ll plant something to the right of them so there’s a buffer between the steps and the air conditioner – not too close though, so it won’t inhibit the air conditioner’s function).

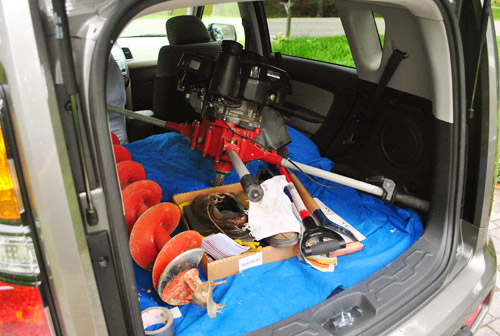
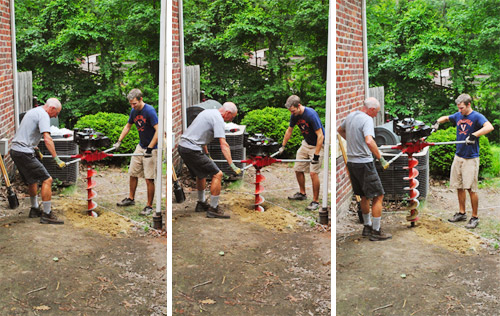
But by that point it was about 5pm on Deck Day #2, and two straight days of work were catching up with us, so we made the call to leave hole digging for another day. So let’s skip ahead to just a few days ago when my dad arrived with this in his trunk. Enter Deck Day #3, stage right.
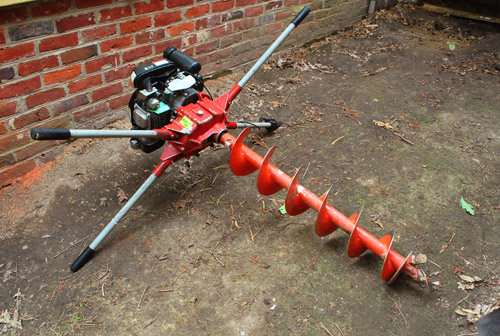
That’s a two-man auger from the Home Depot Tool Rental Center. After having not the most fun manually digging holes for our fence last year, I figured we’d got the power tool route this time. It was $60 to rent for 4 hours (and it would have been $85 if we wanted it for a full 24).
To get us started I dug a shallow mark in the ground where we needed our hole to go, which also helped the auger bit sit in the right place before we powered it up.
The thing started up like a lawn mower (you pull the cord and it starts to rev) and, although a bit unwieldy it wasn’t all that challenging to use. It took both of us holding tight while I controlled the speed of the bit with one hand. We’d let the motion and weight of the machine do most of the work – we just had to keep it from falling over. And occasionally we pulled it out to help the dirt actually get out of the hole. NOTE: Always call your local Miss Utility first to ensure you’re not digging through any wires or pipes that could be damaging to yourself or your property. We did this as one of our first deck planning steps way back in May (more on that here).
If you asked me today, I’d say the auger wasn’t that hard to use. But looking back at these pictures, boy does my face tell a different story.
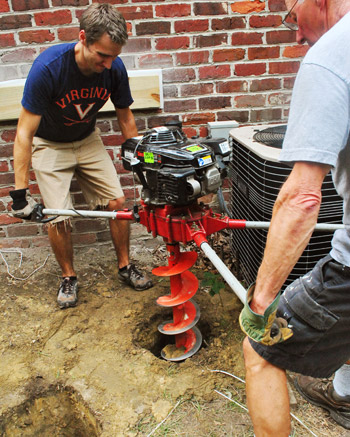
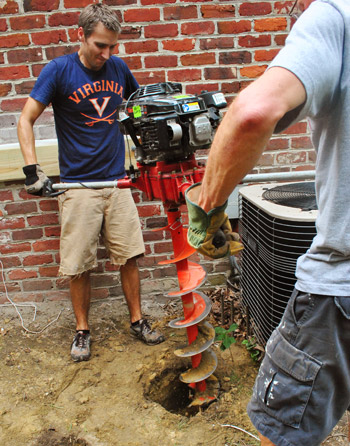
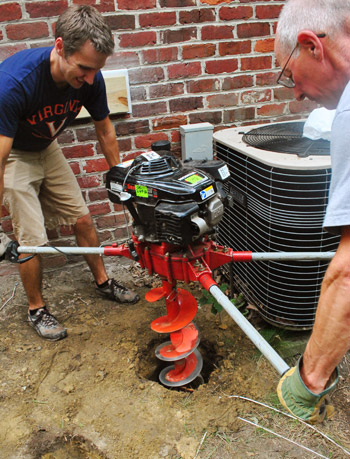
And I guess it wasn’t only my face trying to prove just how hard we were working. Sherry thought it was funny that the veins in my arms were bulging… even several minutes after putting the auger down to rest.

Also contributing to the vein-bulginess was the fact that following each spin with the auger, we had to go back manually with a shovel and a post hole digger to “tidy up” the hole and get it to the required dimensions.
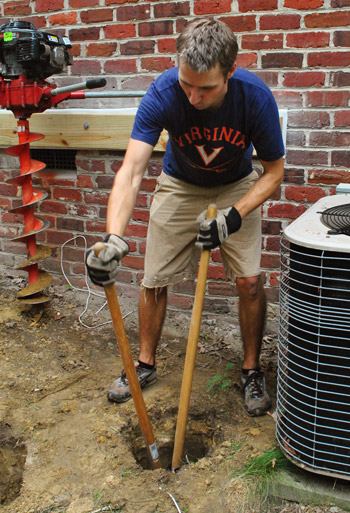
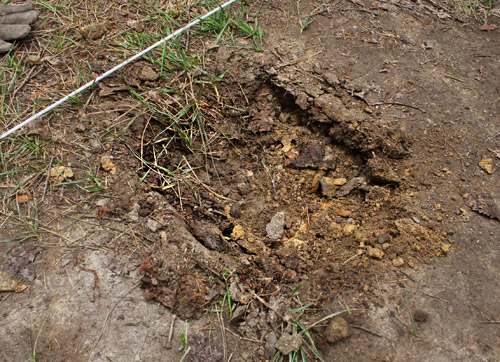
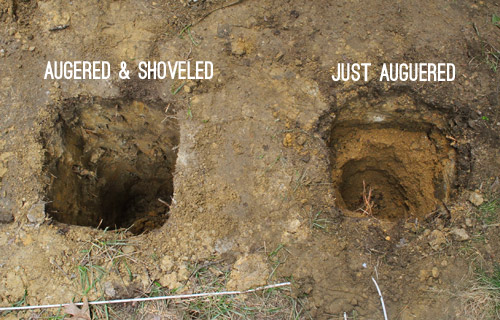
Part of the reason we did this was just to get some of the loose dirt out that the auger had churned up, but not successfully carried out of the hole. The other reason was that (due to a miscommunication with my dad on my part) he rented an 8″ auger bit and we needed 12″ holes to pass inspection. So you can see from the picture below how a “just augered” hole wasn’t quite as wide as we needed.
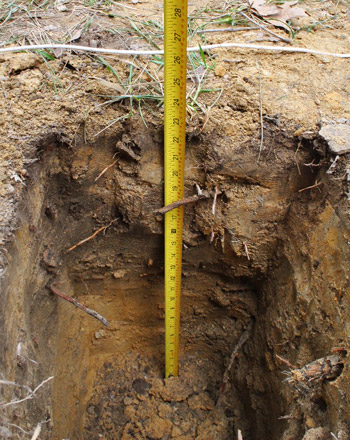
But once everything was cleared out, we checked all of our dimensions to make sure they would pass inspection. The holes had to be 12 inches wide. Check!
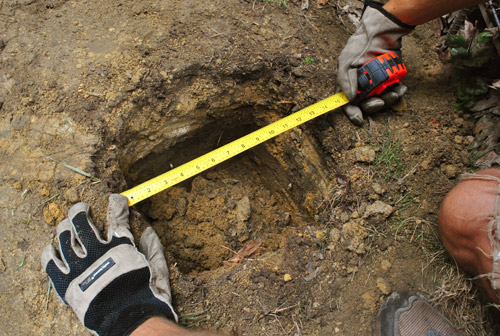
And at least 18″ deep (which is the local requirement given our frost line). We tried to get at least 21″ though, because I plan to put a few inches of gravel in the bottom to help for drainage before I put in the required concrete.
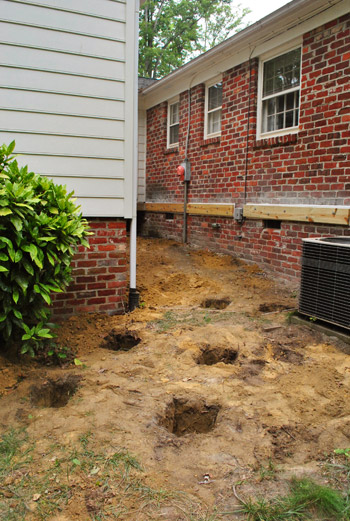
Digging the six required holes only took us about two hours. Pretty speedy compared to all of the other work that had gone into this deck so far. Of course, the day we worked felt like the muggiest and most humid day of the summer so far, so my dad and I were both pretty well spent (not to mention drenched in sweat). I’ll spare you that picture. Instead, I’ll leave you to admire our holes. Wait, that sounds inappropriate…
With our footer holes done we’re now able to proceed with scheduling our first inspection. While I’m super confident about our holes, something about the inspection just makes me nervous. So please keep your fingers crossed for us! Perhaps I’ll have to put on a fancy inspection-getting outfit much like my dapper permit-getting one. Or should I just send Burger and Clara out there to charm the guy?
What did you guys tackle this weekend? Any other auger users out there? Or do you dig the old fashioned way like I did for the patio’s fence installation? I gotta say it took a lot less time, so the $60 rental fee was money well spent!
Psst- Want to follow along as we inch towards a finished deck from the beginning? Here’s a post about planning it, clearing the area, getting a permit, demoing the old deck, and day one of deck building.

Ally says
“Instead, I’ll leave you to admire our holes. Wait, that sounds inappropriate…”
This made me LAUGH OUT LOUD (all caps laugh :), JBoom!
A friend of mine is doing a BIG reno on her new T/H. It’s in the very early stages. On Sat. afternoon, we decided to “drop in” and take at look at the progress. We may have caught the painter a bit off-gaurd. Manuela and I glanced to the top of the staircase, and there he was…shirtless and wearing only his underpants! HAHAHAHA! Guess he wasn’t expecting company :)
xox
Mary A says
Pre ordered your book today on Amazon
YoungHouseLove says
Thanks Mary!
-John
Frannie says
Deck looks great so far! So much work for a small space but I’m sure you will love it for years, so worth it.
Paint question: Is there a way to turn flat paint into a semi gloss? We’re painting our house and the shutters and doors with some accent colors… and I’m realizing that the flat paint is not working. Is there something we can either add to the paint or add after the fact to give it a subtle sheen?
YoungHouseLove says
Oh man, I don’t think you can since it’s based on the base paint that they mix it with.
xo,
s
KathyG says
Every time hubs and I start to discuss an outdoor project, we look at each other and say…first you dig a hole. After the fence project, this project, and the bushes renovations, I am thinking you and John will be saying this too… LOL
You won’t believe this, but he even worked that into a business presentation he had to give. Made every one chuckle, b/c what homeowner can’t relate to projects that require digging holes in the yard!
Good Job, and Good Luck with the project!
YoungHouseLove says
Haha, so funny!
xo,
s
Jill says
Looks great. I love that you all keep a clean space while you work (or at least present it that way). I’m really looking forward to the finished product.
My guys all headed to the beach with my husband’s family on Saturday. Before they were down the driveway, I started pulling out all the furniture in our bedroom. The Martha Stewart’s Cherry Blossom, complete with vanilla swirls soon disappeared under Pratt and Lambert’s Stormy Sea. Our questionably brothelesque room now is calm and peaceful, despite the color’s name.
Amazing how much I can get down while trying to avoid bigger jobs.
YoungHouseLove says
Haha, so excited for you! Good luck!
xo,
s
Julie says
Your deck is going to be fabulous. I can’t wait to see the “after” pics of it all decorated. I got a tip from somewhere (?) when we built our fence that we should rent a one man auger instead of a two man, even though it didn’t make sense to us. Well, when we compared the two in person, we realized the one man auger is designed for the machine to do one man’s work. It was great. One can auger, one can clean out, and switching off makes it less exhausting. Next time you are digging holes just look them both over and talk to the people you are renting from – you may get twice as much done in half the time!
YoungHouseLove says
Sounds awesome! I’m not sure our HD had a one man one, but we should check it out!
xo,
s
kristen says
had a dream last night that sherry came to crash my house and she was SO disappointed and couldn’t find anything cool to photograph!
haha – back to the design drawing board for me :) kidding – a little.
YoungHouseLove says
No way!!!
xo,
s
Erin says
Hey guys,
I totally understand the deck building process my husband and I did our whole backyard, deck, patio. Its an incredible feeling when it is all done trust me!
Keep up the awesome work, I cannot wait to see the after, love it!
YoungHouseLove says
Aw, thanks Erin!
xo,
s
Alexis says
You guys are going to Atlanta?! Hope you have a ball. I just came back from there and if you have the time, I totally suggest that you make a trip to Serenbe in Palmetto, GA. It’s about 30 minutes south of the airport, where the HGTV Green Home is, and possibly the most adorable and charming community I’ve ever seen. I missed the original post in which you said you were going, so forgive me if this is old news. Have fun guys!
YoungHouseLove says
Aw, thanks so much for the tip! Would love to squeeze that in!
xo,
s
leah says
Auger story… we live on a corner lot, and my husband and I built a fence a couple of years ago for our back yard… we took a week off from our jobs and couldn’t find anyone available on a weekday to help with an auger for the post holes (I was not so sure I could handle it with him). SO – he rented a one-man auger and had great luck with it, UNTIL… the auger hit a big hidden rock in one of the holes, bucked back out, hit him in the bicep and flipped onto the ground still running, gyrating in a big circle! It was kinda hilarious and scary all at the same time, and my poor hubby got two big round burns on his arm! So, after waiting for the auger to turn itself off and taking care of his burns, we managed to build the fence without further incident and he literally has the scars to prove it! Next time, it’s a two-man auger and another guy on the other side of it…
Good luck with the rest of your deck-building – hope that wasn’t a too terribly scary auger story! :-)
YoungHouseLove says
Oh my gosh- so scary! Glad he was ok and you manged to get the fence done!
xo,
s
Brianne says
Can’t wait to see the homes that you crash!! How fun!
Hannahhenning says
Love the reference to “This little light of mine, I’m gonna let it shine” in the give-away post. An oldie and a goody! Wonder how many picked up on that?!
YoungHouseLove says
Haha, I hope some folks did! John loves his little song puns.
xo,
s
Alison @ Living Joyfully says
I have no idea about deck building so this is interesting all the work that goes into it step by step! Can’t wait to see it done!
YoungHouseLove says
Aw, so glad!
xo,
s
alg at rental house rules says
I had a dream that you guys house-crashed us & for some reason our house was a HUGE mess. My subconscious was mortified!
(Although dreamland-you-guys couldn’t have been sweeter about it & politely tried to take pictures that didn’t include piles of dirty laundry/dishes.)
It made me literally LOL when I woke up!
YoungHouseLove says
Haha- that’s so funny! Trust we, we can make a mess like the best of them, so I promise we wouldn’t have been scandalized at all! Haha
xo,
s
Kristen says
You should try an impact nail gun for the hangers. We did all of ours by hand when we did our deck. As soon as we finished, my dad reminded us about his palm nailer that would have helped us finish SO much faster. They are also great for tight spaces where you can’t swing a hammer.
YoungHouseLove says
Thanks for the tip! We’ll have to check it ont!
xo,
s
Kristin F says
As a Hokie, the only thing I have to say is I’m glad you’re wearing your Virginia tees and hat to get dirty in during this project. They aren’t worth much anyway. :)
YoungHouseLove says
Haha, thanks Kristin!
-John
Allison says
We’ve had our fair share of inspections (John cracks me up with his dressing up. You do know what most contractors looks like when they go in there?) We built our own house without a contractor and the inspections made us super nervous too. We found it all determined which inspector came that day. Some were super picky and would leave us with a list to fix two pages long! Others barely looked at it.
I remember the stress of our footing inspection because they wouldn’t inspect it if there was rain in them (because they had to make sure it was a certain depth and on solid ground rather than fill dirt). It kept raining every few days and wouldn’t drain out fast enough with all the clay.
The day of, I spend a few hours by myself scooping buckets of water out. It was actually a foot deeper than pictured here when I started. Sorry for the small pics and alignment issue. I was new to blogging then.
http://mattandallisonkelly.blogspot.com/2009/12/rain-rain-go-away.html
YoungHouseLove says
Haha- so funny! So glad it worked out!
xo,
s
mp says
Clara and Burger are your best bet. :-)
YoungHouseLove says
Haha, don’t I know it!
xo,
s
Natalie says
My dad and I finished a fence project for the patio on Father’s Day… quality time! He has an awesome auger that attaches to the tractor, but he had to dig all the post holes by hand because they were right next to the concrete patio. Here’s a post about the new fence!
http://greennackeacres.blogspot.com/2012/06/fathers-day.html
YoungHouseLove says
That does sound like a quality Father’s Day!
-John
karen says
JOHN!!!! Augerring (is that a word?) is very stressful! I know the machine does most of the work, but still every muscle is bracing for something horrible to happen. Adrenelin is flowing. Our first few holes we used an 8 inch and the last ones we used a 12. The 8 inch was much easier to use, but the twelve made pouring concrete much easier. Not that I helped with that part. I just went in the house, cried and nursed my aching… lower than my hip muscles and higher than my bum muscles… with a big glass of wine.
Aline says
Hi beautiful family!
I cannot believe that you are going to be there (Haven)! That’s so exciting!
Why is Australia so far from everything? :(
Do you guys have any plans to come to Australia sometime soon? Or would happen to know about any conference happening here that you guys recommend?
love from: mycolorfulnest.com
xoxo
YoungHouseLove says
We’d love to make it out to Australia someday (it’s on our bucket list, we hear it’s like nowhere else!). Does anyone know of a conference over there for Aline? Maybe google “blog conference Australia” to see if anything comes up?
xo,
s
Aline says
I’ve tried it already and It brings up old conferences… hahahah I’ve typed everything you can imagine on google hahahahah… tried to contact some famous australian bloggers this week… will see what happens :)
Thank you Anyway <3
Let us know when you guys are coming!! my hubby and I will be delighted to take you guys on a tour around the Gold Coast.
Love from: http://www.mycolorfulnest.com
xoxo
YoungHouseLove says
Aw, man, I hope one comes your way soon!
xo,
s
Lydia says
We’re in minnesota where our post holes had to be 48″deep for our deck. Good times! You will love it all when it’s done. :)
Kismet says
http://www.google.com/search?q=inset+deck+stairs&hl=en&client=safari&tbo=d&source=lnms&tbm=isch&sa=X&ei=Sh3gT63cOofM2gWp2M38CQ&ved=0CEsQ_AUoAQ&biw=1024&bih=644#biv=i|0;d|PWaSYs-bjDHtrM:
One of the best things about the deck our son-in-law helped us build was to inset the steps so the bottom came out flush with the edge of the deck. I know it might be a little too late to mention it now but our deck looks so professional and the stairs dont look like an add on or after thought, (not that yours would ). Hopefully that link up there works.
Good job staying on task.
Swedish Maria says
Hi! Enjoy your blog alot, have read it a while but never left a comment before. But today I actually have a tip about the stairs. You dont have to have to have railing all the way down to the bottom step. We built a stair where the two last steps have no railing and those two steps are a bit wider than the first five steps, the second last one about 10 cm (sorry, I´m on the metric system) wider on each side and the last one an other 10 cm wider than that. The construction underneath is not wider however. I´m not at home right now but I´ll try to remeber to take a pic or two to show you.
keep up the good work! If you ever come to Sweden you are velcome to housecrash in our home.
Best regards, Maria
YoungHouseLove says
Thanks for the tip, Maria!
-John
Swedish Maria says
I´ve emailed you two photos to youngster@young…..
YoungHouseLove says
Thanks!
xo,
s
Melissa B. says
Phew, makes me tired just reading this! We started our deck project last fall (trying to get it in before the snow/cold in upstate NY). We rented a power auger and between 5 of us (and a healthy amount of beer) we managed to dig 5 holes in a full day, but only to about 24-30 inches. Code here requires 48 inch deep holes!! Darn frost line. Anyway, we put our mine-field looking yard/deck on hold for the winter and hired someone to come dig the holes this spring. The guy dug 13 holes BY HAND in less than 3 hours – with no beer! Maybe that was our mistake… so at this point we have the structure totally built and I’m waffling on my plank and railing design/staining scheme. Hoping to have a deck for the 4th! We’re right there with you, John & Sherry! Keep up the good work! – Melissa
YoungHouseLove says
Wow, that guy sounds like a beast!
-John
Melissa B. says
Oh! And a tip – we rented our “Auggie” from Taylor Rental in my area and found that the price and rental duration was better than Home Depot. It looks like you have a Taylor Rental in your area – check ’em out! You can rent just about ANYTHING from them! Again, keep up the good work, looking fantastic! And John should TOTALLY dress up for the inspection (snort). The contractors I’ve worked with are “dressed up” if they’ve showered that week! -Melissa
Hilary says
I love how you rock the UVA gear in all of these deck building pics!
YoungHouseLove says
Gotta represent!
-John
kim says
18″ lucky duck….we have 36″ to frost line in Ontario. By the way, how do you get into the crawl space in the old part of the house?
Deck looks great makes me want to get off my but and do our deck that has been planned for 2 years. lol
YoungHouseLove says
You access that through a door on the side of our house. And 36″ sounds hard!!
xo,
s
Maggie S. says
Looking good! We took on a kitchen remodel this weekend. Cabinets came out Thursday. I painted walls and trim on Friday. Cabinets got some fixing up and new white lacquer on Saturday and Sunday. They came home and were installed Monday night. Counter tops, rest of drawer fronts and trim are getting installed tonight. Ok, that was a long weekend but still a weekend in my book. :) I am so excited and can’t wait to get everything back in. It looks like my previous kitchen threw-up into my living room! Stuff everywhere. Well, good luck on the rest of your deck. Drop in sometime at http://mojaneofalltrades.blogspot.com/ to see my kitchen.
YoungHouseLove says
So exciting!!! Looks great!
xo,
s
Anne At Large says
It is so interesting seeing this all come together! I had to post because I used to use a two-man auger like that for work – we used it for coring soil samples in the desert, so the other guy on the team had a backpacking backpack frame that he strapped the auger to to carry it up and down hills while I had a backpacking backpack full of soil samples (a.k.a. backpack o’ dirt). I love seeing one of these suckers used for its actual purpose ;)
Megan B says
I have to say, I was happy to see the picture of your face while using the auger since you originally said it wasn’t that bad. I helped my husband use a 2-man auger to dig the holes for our deck a few years ago, and I have never experienced such difficult manual labor in my life! We were drilling through some serious layers of clay, and my entire body felt sore the next day. I do still feel pretty tough knowing that I helped accomplish the job though!