Let’s make a floating frame, shall we? I did a little frame hack that’s super easy and free if you have a few basic items on hand – or only a few bucks even if you don’t. So for anyone out there who likes the look of a floating glass frame but doesn’t want to pay around twenty bucks for one, you can probably use an old frame that you already have to whip one up.

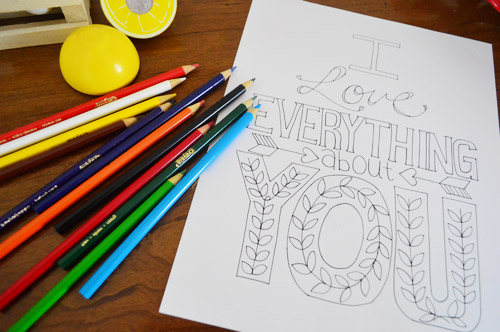
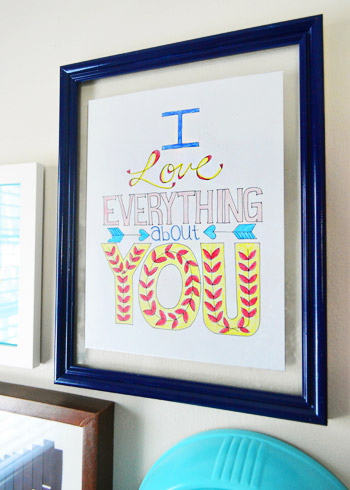
First, I colored this cool printable that I mentioned in that original art-hanging post (which I got here, printed on card stock at home, and colored with regular old colored pencils).
Then I was about to run out and buy some large paper to use as a backing or mat when I thought… what if I just let it float behind the glass? Sort of like the art in Clara’s nursery that floats in a store-bought frame from Target (it’s the frame on the bottom-left of this old pic).

But instead of changing gears and running out to Target in the hopes of finding another floating glass frame, I took apart the regular old frame that I had and looked at it. And I realized that if I removed the backing, added a hook to the top of the frame so it would hang, and secured the art to the glass and the glass to the frame, I’d be good to go. So I gathered just a few materials…
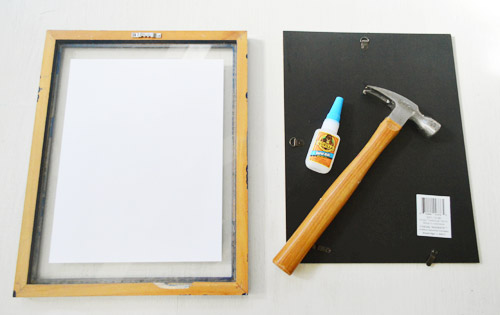
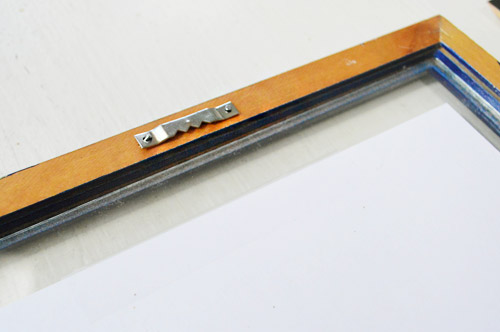
Material #1: A sawtooth hanging attachment, which I nailed into the top of the wood frame (make sure it’s centered so your frame hangs straight). These guys are usually four for 99 cents at Michael’s, by the way.
Material #2: Super glue, which I used to glue the glass to the front lip of the frame. This picture is like one of those “reenactments” on TV (you know the ones where the reenactor looks nothing like the original person being interviewed in one of those crime or ER stories). The reason it’s a bad reenactment is because I got too excited and glued the glass to the front lip of the frame and then realized I forgot to take a picture of the process…
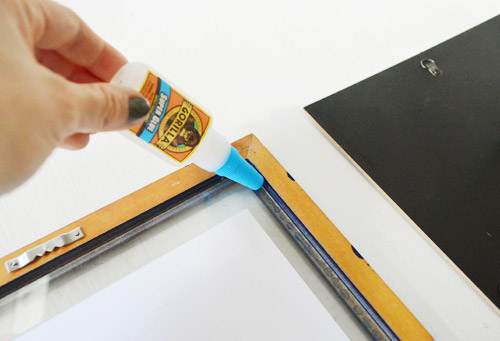
So just imagine that the cap is off of the glue, and the glass is actually lifted out of the frame. Yup, I just ran a thin bead of glue around the entire outside lip of the wood frame so that when I dropped the glass back onto the lip it would be glued in place. If you look closely at this picture you can actually see the dried glue along that lip, which isn’t visible from the front of the frame since the lip is there. Note: this doesn’t change anything about being able to clean either side of the glass – you can just lift the frame off the wall and wipe the back of the glass if you’d like.
Material #3: Nada. You’re done.
The result? Well, once it was all dry, I had a floating glass frame. As for how I attached the art, I used regular old clear scotch tape applied to the back of the art. I just overlapped it ever so slightly so the very very tiny top edge would meet the glass along the top of the printout and the very tiny bottom edge would meet the glass along the bottom. Lo and behold, it actually worked. Since it’s such a thin sliver it’s not noticeable from the front – even when you get close (I was pleasantly surprised that the tape didn’t show). And I only needed that one piece on the top and one along the bottom, so it was held nice and smooth.
If the tape was all awkward and obvious, my next plan was going to be trying spray adhesive – lightly spraying the front of the printout and carefully sticking it to the back of the glass in a nice centered position. Although I would only do that to something that’s not valuable or one-of-a-kind (so a free printable is a good example of something I’d dare to spray right in the face).
Speaking of that, my suggestion for this little frame hack would be to avoid using it to hang anything super valuable or irreplaceable since there are two notable differences:
- there’s no back pane of glass or piece of cardboard protecting the art from the rear (instead of being sandwiched like the art in most frames, it’s backless like a Carmen Electra dress). I’m not sure how much of an issue this poses, since it’s essentially just sealed in a box made by the the frame that touches the solid wall behind it on all sides, but it’s a difference so I thought I’d mention it.
- you’re putting a bit of clear scotch tape on the back of the art (which is actually something I do a lot when I frame things the traditional way as well, but it’s not the recommended method whenever you’re framing anything that’s especially valuable or irreplaceable).
That being said, for hanging a free printable that you printed and colored at home, well, it’s pretty darn perfect. I figure since we’ve got approximately nine million and seventy eight traditional frames in the house, two floating glass ones are a fun little twist. Have you guys added anything (or subtracted anything) from a frame or some other item of wall decor to give it a fresh spin? Spill the frame-hacking beans.

Ashley says
I am SO happy to learn that I am not the only person with a completely unnecessary amount of frames lying around their house! Thanks for the awesome new idea!
amyks says
Totally off subject, but did you know your book was recommended by Design Sponge in their 10 best books about love?!? I am sure someone else told you, but I just saw it and thought it was very cool!!!
YoungHouseLove says
Ahhhh, isn’t that exciting! Just found out about an hour or two ago. Such an honor.
xo
s
Sarah says
I was wondering how you guys did that back when you first revealed the gallery wall! Smart idea!
I recently found some 11×14 floating frames at Ross for $7 a piece. I love the look!
Sarah
Mary | lemongroveblog says
Oh my gooodneesss! Such a great idea. Love the look of a floating frame – adds a bit of contrast on the good old gallery wall. I’ll definitely be trying this with some of the extra frames I got laying around.
Tarin @ Office chairs says
The floating frame looks fun and easy.
I am now thinking of making one for our kitchen and I love to use this photo, I edited long time ago…
http://tinypic.com/view.php?pic=2w6f9lx&s=6
tristan says
When my husband and I got married we received approximately 4564 black picture frames. I painted them funky colors and hung them in the hall and I love them!
Emily says
I’m going to try my hand at this once I run to the craft store this weekend. I’ll be sure to leave a comment on how it goes!!
P.S. How did Clara’s vday gift bags for the kids play out? I hope she had fun!!
YoungHouseLove says
They seemed to go over really well! We even heard from one of her classmate’s grandmas that her grandson (Clara’s classmate) loved it!
xo
s
MomHomeGuide says
Great tutorial! I love the free printable, too!
LARY@ Inspiration Nook says
Such a cool idea. Will attempt to make soon! Happy Valentine’s to you 4 (I can’t forget burger) :)
Megan @ Two Live Colorfully says
So genius!! You could so easily switch back and forth between the two styles!!
I love it!
Laurie says
Cool diy project — I think I must do this one! I love colouring! Also, just wanted to say that I really appreciate your posts (?) leading to information about Adult Failure to Thrive. It is important info to get out there — good on you two for helping! Cheers.
Lori says
so smart!
Sara says
I got your book for Valentine’s Day!!! :) :) :)
YoungHouseLove says
Aw, hope you LOVE it!
xo
s
Katy says
I might just be out of the loop but are you guys now only posting once a day? I know you talked about possibly cutting down to have some more work/life balance (which is necessary!) but didn’t know if it had officially changed or if you were just super busy with the end of your book tour (very understandable). Just curious :)
YoungHouseLove says
We just went down from 8 posts a week to 7, so now you’ll see two posts on Mondays and Wednesdays and one post the other three days. Thanks for asking!
-John
Harrovian Mama says
Such a great idea! We are about to paint my daughter’s bedroom green and I thought I would have to paint frames green or white to tie them into the room but just letting the wall peek through is perfect!
Such a great idea-thanks!
Heather says
Any chance you could post a photo (real or mock) of putting on the tape? I tried to do this a few weeks ago when my second panel of floating frame glass broke, but I could see the scotch tape pretty well. I’m curious where you actually put the tape! I’m a visual learner :-P
YoungHouseLove says
If we do this again I’ll snap updates and add them to this post! Just put 99% of the tape over the back of the print with 1% overlap (which will stick onto the frame). Hope it helps!
xo
s
Paula says
I know you’ve mentioned your favorite cutting-in paint brush a few times but I am too lazy to find one and am commenting here instead =) I bought my first house in July, bought several of the brushes you mentioned, and did all the cutting in without tape. At first I was a little shaky but I quickly did a great job. Fast forward to now, my brother just bought his first house and didn’t believe you could cut in without tape. So I sent him a housewarming gift that included one of those brushes. He had already done some painting before he got it and tried to cut in with no tape and he said the new brush made ALL the difference! I never tried any other brush so I didn’t have much frame of reference, but he said it was life changing! SO we both send a big THANK YOU for all the money we saved in painter’s tape =)
Tanya says
Love your converted floating frame!
My latest frame conversion was a .99 thrift store buy (and an additional 50% off). I replaced the glass with stained glass then a quick and easy mosaic using more stained glass and little seed beads. Notice the seed bead “leaves” also extended into the frame. It was a fun and quick project! Take a look here for the tutorial:
http://stainedglassantics.com/glass-on-glass-mosaic-tree/
YoungHouseLove says
So cute!
xo
s
Justine says
The planets must be in alignment! I just posted on my blog about framing some of my little boy’s “artwork” using an old frame that I painted.
I’ve never thought of making a ‘floating’ frame though, so thank you for the tip.
YoungHouseLove says
You’re welcome and good luck!
xo
s
Julie says
Love the aqua color on the clock!! Was it a DIY project? If so could you please share the brand/ name of the specific paint!?
Thank you much.
Julie
YoungHouseLove says
I actually got it that way from Hobby Lobby! Hope it helps!
xo
s
Christina @ Homemade Ocean says
Very cute!
You should be a professional re-enactor!!!!
YoungHouseLove says
Haha!
xo
s
Janelle Kay says
I love that you just colored the printable. So clever! It could be an awesome activity for kiddos too! You guys always come up with the coolest things! Thanks for sharing.
YoungHouseLove says
Aw thanks Janelle!
xo
s
Nicki says
I can not believe I did not think to do this. You may not have ever noticed BUT it is more difficult to find white floating frames than black ones. I have bought several black ones that I’ve spray painted white because of this. How much smarter is your idea????? About a million times smarter, easier, and MUCH less expen$ive! As always… y’all are wayyyyy too awesome!
P.S. I wonder if washi tape would be transparent enough to show through the glass to give it a cute “intentionally messyish” look?????
YoungHouseLove says
Aw you’re so sweet! And washi tape sounds so cute!
xo,
s
Randi says
Great idea. I wonder if you’d have a similar effect by painting the front chipboard instead of leaving it off? That way you’d have the print sandwiched without tape and could still use the hangers on the back. It wouldn’t be a true floating frame, but behind the print would be the same color as the wall.
YoungHouseLove says
Sounds fun!
xo,
s
Christina @ Floridays Mom says
Not sure which made me chuckle more “floater” or reference to a carmen electric dress. Haha! Love floating frames. I’ve purchased some before, but never new it could be so easy to make. Thanks for sharing. Have a terrific weekend!
Krista says
Great idea! Will have to borrow it…. It wouldn’t (obviously) work for this example but for traditional frames I have started using painters’ tape to secure my pics to their mats so they remove more easily when I (frequently) switch out my “art” :) thanks for the DIY
kathleen says
I really love how this turned out, the colors, font, and everything!
YoungHouseLove says
Aw thanks Kathleen!
xo
s
Chrystina says
If you hadn’t shown me the black and white image with the colored pencils, I never would have believed it. Nice work – that picture came out wonderful.
YoungHouseLove says
Aw thanks Chrystina!
xo
s