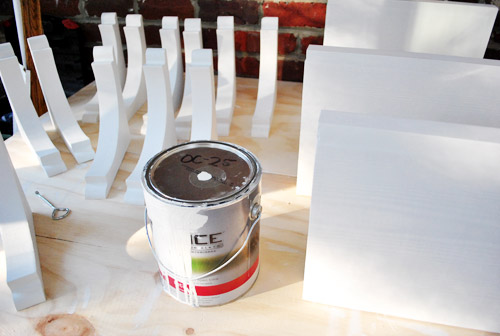
Let’s see… when we last left off on Monday, our open shelves had been primed in preparation for their big hanging debut.
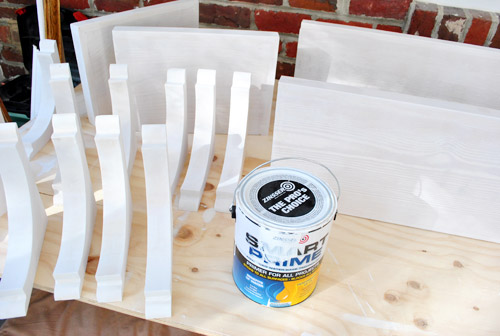
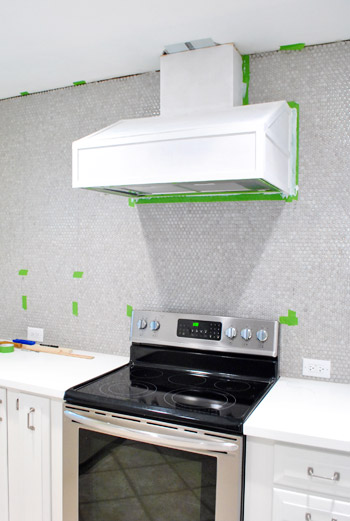
While we had the primer out we went ahead and slapped a coat on the hood cover too (using a 2″ angled brush in the cracks followed by a small foam roller to smooth everything out). Things were instantly looking less wood-sy on that wall.
Once the primer dried on both – we used Zinsser Smart Prime which is low-VOC and was recommended by a few pro cabinet painters that we know – out came the same high-durability paint that we used on our cabinets (yes, there’s still plenty left!) and we gave the brackets, shelves, and the hood a couple of coats. Two thin and even ones over one coat of primer did the trick. We also applied those with a 2″ angled brush followed by a small foam roller to keep things smooth and even. Oh and the paint is Benjamin Moore Advance paint in Cloud Cover, bee-tee-dubs (which many pros use to paint the inside of their clients’ cabinets along with the outside, so it should stand up really well to everyday use once it’s nice an cured up).
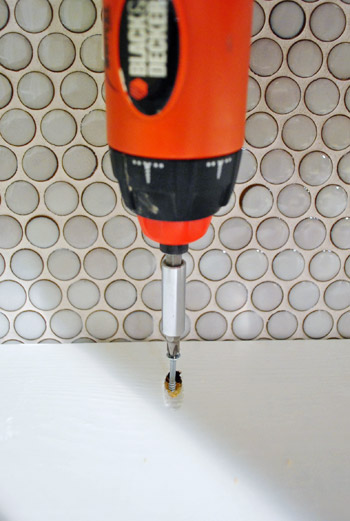
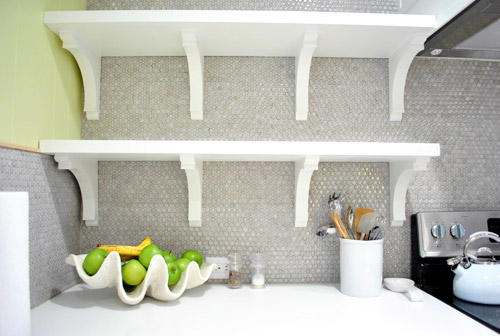
But the exciting stuff really started to happen when we finally got to the point of ACTUALLY PUTTING STUFF ON THE WALL. Yowza. Sorry for the caps. I said we were excited, right? Excited might be an understatement actually. Luckily, since we had already drilled all of our screws into the wall, the hanging step was pretty easy. Up went the brackets on the short side…
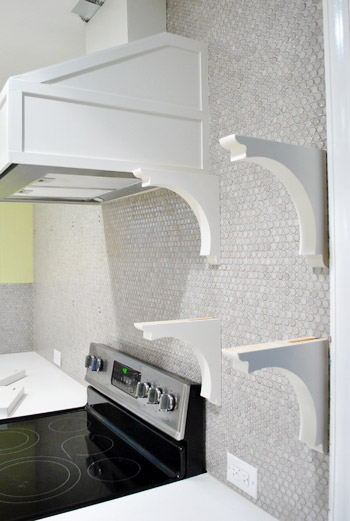
…followed moments later by the shelves themselves. Can I get an “Ooooh”? How about and “Ahhhhh”?

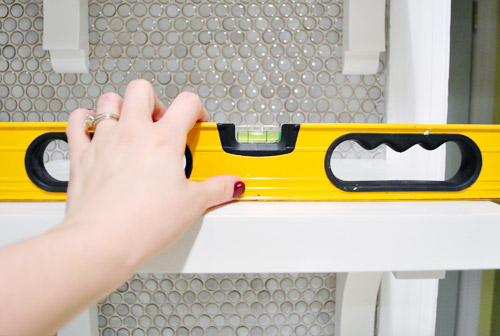
Don’t worry, we weren’t gonna just let them sit there unsecured. We just had some other things to do first – like making sure everything was still level. It was. Phew.
So then we put everything up on the long side of the wall.
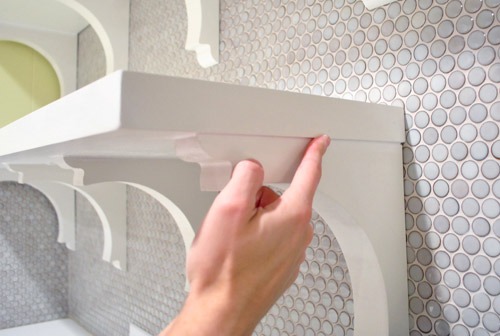
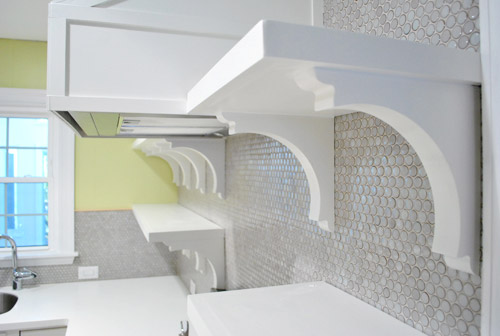
We had mentioned in the previous post that we had originally planned to screw the shelves into the wall (we even made some pocket holes in preparation for this step). Well, after feeling how solid the brackets felt (more on that here) and not really wanting to put 12 more cringe-inducing holes in our tile – we opted to just use those pocket holes as a spot to screw the shelves firmly into the brackets (so the screw actually went straight down, not at the angle of the pocket hole). In hindsight, we definitely could’ve skipped the pocket hole step, but at least now the screw will be hidden in a spot that we can easily caulk over.
Speaking of caulk, that was our next step after everything was drilled together. Since there were some dark seams where the shelves met the brackets, we just ran a thin bead of white paintable caulk along the top of each bracket and smoothed it with our finger to make the shelves and brackets look more like one unit. Tedious? A smidge. Worth it? Totally. Then of course we painted over it so everything matched.
And with that folks, we were done! Except for more waiting. Booooo.
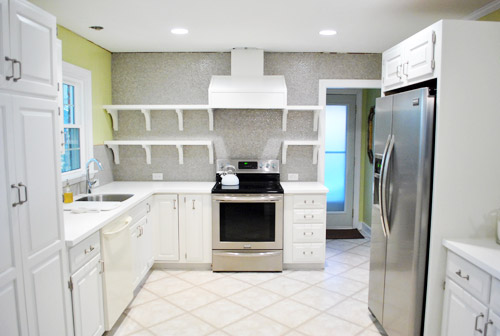
As eager as we are to immediately fill them with plates and bowls and cups, we resisted that urge in order to let all of the paint cure a little bit longer – just because we caulked those screw holes and around the edges which called for some touch up paint. We definitely don’t want to jump the “fully cured” gun (which could result in a bunch of dents and dings in our shelves during their first few days of use). So for now we’ll just have to enjoy these empty “after” shots thanks to following the full curing time on the paint can’s directions. But tomorrow – oh baby, it’s on. Sherry’s even planning to shoot a little time lapse video of the process of loading them up.
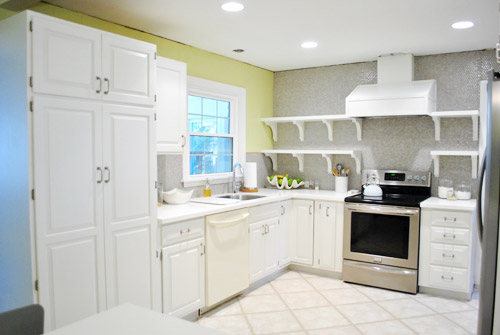
Oh and of course we still have to add crown molding to the ceiling to finish things off and make the top of the hood a lot more seamless. But slowly it’s all feeling a lot closer to “done” than “just started” – especially now that the hood is painted too (never mind the fact that we still have some patch work to do on the ceiling along with that aforementioned crown molding).
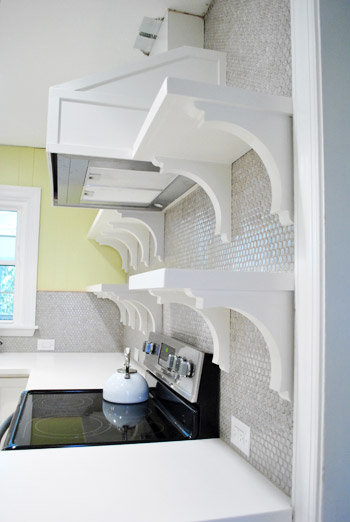
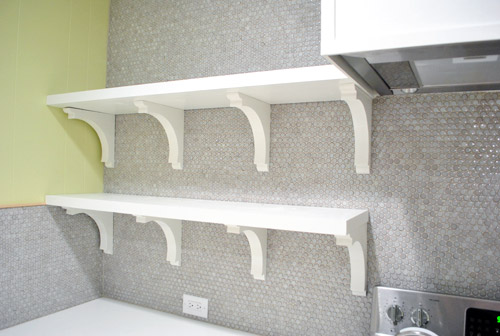
We’re really happy with how the brackets turned out, so we haven’t thought twice about our decision not to do true floating shelves. We think these are really charming – and they’re super stable so Sherry could probably hang off of them if she wanted. Instead she wants to fill them with ceramic animals. Same difference.
It’s nice that there’s still plenty of room to load them up and make them really functional, even with the brackets (no, they will not actually end up full of ceramic animals- not on my watch). Our shelves are deep enough for our 12″ dinner plates and the brackets are 15″ apart so we should have lots o’ room to put everyday stuff up there – which we hear from other open-shelf-having folks works really well, since it’s used often enough not to get dusty).
And even though it was a bit weird at first to see our wall of penny tile suddenly broken up by these bright white lines, it’s cool to see the thing we’ve always envisioned come that much closer to being a reality.
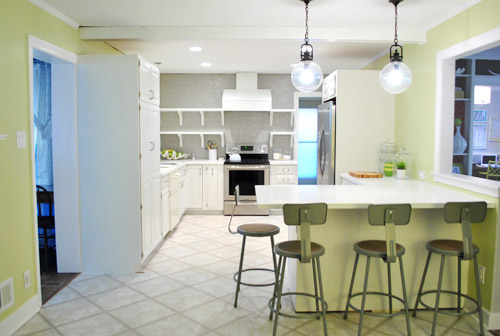
So we should have pics (and a video) of the shelves all filled for you tomorrow. Until then, we’ll leave you with this slightly-closer-to-after shot of the room. We’re definitely getting there. And we’re counting down the seconds to Operation Cork My Floor (along with adding that crown molding, patching the ceiling, adding a pendant over the sink, covering the base of the peninsula with some decorative wood planks, hanging some art to the right of the fridge, do something to the side of the pantry, etc).
We feel especially giddy when we look at old photos of the room back when it looked like this:
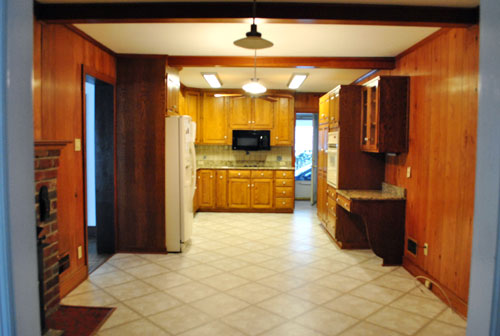
We can hardly picture that old room anymore. Isn’t it funny how quickly your brain replaces things? It’s so crazy that we lived with the room just like that for over six months before even painting the paneling. But once we finally got the ball rolling… well, it’s still rolling. Haha. Is anyone else in the home stretch of one of their home projects? Though I probably should knock on wood when I say that, since it sounds like a sure way to jinx myself into some last-minute wrench in the plan (he says as he gets up to literally go knock on wood while crossing his fingers and eyes).
If you’re interested in more ideas for adding shelving or vertical storage, this post has a bunch of DIY shelving projects and ideas for you.

kimmy K. says
How come you didn’t chose floating shelves? I think it would look a 100% better and more sleek/ chic.
YoungHouseLove says
We thought about them a lot and even photoshopped them in and didn’t like it. Looked very cold and sort of über modern and we like a mix of old and new so we preferred brackets. But it’s definitely a personal preference thing! To bracket or not to bracket is probably a lifelong debate. Haha.
xo,
s
Claire Jain says
Holy buhjeezuss, I am so unreasonably excited about the progress you guys are making! The shelves are amazing, this is a fun milestone!
YoungHouseLove says
Thanks Claire Jain!
xo,
s
Sherry from BC says
Oooooh! Aaaahhhh! Looking amazing. Can’t wait to see them with pops of colour. I like the idea of a a video taken as you dress them. I have tons of amazing stuff but keep shuffling them on my shelves till I think I have it right. Will be interesting to watch your process. I am hoping you do at least one piece of art leaning against the wall. Have you looked at encaustic wax artwork? Love it. And the bonus is they are quite wipeable with the wax finish. Here is one I just bought off Etsy http://www.etsy.com/transaction/68458117. I can see this one on your shelves http://www.etsy.com/listing/69605396/speckled-blue-eggs-original-encaustic But I can also see this one if you are into doggie art in the kitchen….http://www.etsy.com/listing/82707044/art-for-kids-doggy-love-original-acrylic I do see some lime green moving up to the shelves from the fruit bowl……
YoungHouseLove says
I love those! Thanks for the links!
xo,
s
Amanda says
Your before and after is just unreal, and to top it off you did 99% of it yourself! You make it look so easy, and so fast. It’s just gorgeous. Congrats you two! Can’t wait to see those shelves loaded up.
YoungHouseLove says
Thanks Amanda! You’re so sweet.
xo,
s
Paige says
YES. Virtual high-fives all around!
You guys rocked my socks today.
YoungHouseLove says
Aw thanks Paige. You rock mine right back.
xo,
s
april says
Holy cow you guys they look amazing! Loving the progress…your kitchen is super awesome!
YoungHouseLove says
Aw thanks April!
xo,
s
Nicole says
Finally made a compost bin! Just had to share and say thanks for teaching all about it!
How is yours looking? Have you used the “soil” on anything yet?!
I’m so excited! :)
YoungHouseLove says
Still loving ours! It’s definitely ready to be used after use for a while but now that it’s winter we’re not planting anything. Haha. Soon!
xo,
s
Angela says
I love it. You guys have such amazing vision. It looks incredible.
vsk says
Four brackets under the long shelves are just too much. It detracts from the awesome tile and looks too busy.
YoungHouseLove says
Thanks for the thoughts! It’s definitely one of those personal preference things! For balance we looked at it with three brackets but it wasn’t evenly spaced with the brackets on the right so it looked better like this to our eye (we planned it out both ways and chose this option). To each his own though!
xo,
s
Chyenne says
Just got tickets to the Portland OR home show on the 22nd!! Can’t wait…. In a normal person kinda way. ;)
YoungHouseLove says
Wahoo! So excited to meet you!
xo,
s
C.A. @ How To Be A Heroine says
Love everything so far – y’all are DIY Rockstars. Very excited to see what kind of pendant you choose for over the sink. I am stuck at home, sick along with two little sick ones, and this is my main entertainment. This, and LOTS of tea. Cheers!
Miranda says
Oh my goodness! I have been so excited about seeing the shelves go up! Everything looks great!
Tuyet says
This is amazing, I can’t believe you guys did this all yourself! I always look forward to checking in daily to see the progress. Can’t wait until it’s completely done!
Megan says
Wow- great job guys! All your hard work is starting to pay off. Your kitchen is starting to come together and looks fabulous!
Tia says
Have you thought about putting stainless steel panels (probably not the right term!) on the hood? I think it would be a nice way to tie in the hood to your other stainless appliances.
YoungHouseLove says
We did think about that but had a stainless steel hood in our last kitchen and like the idea of a painted wood one this time!
xo,
s
Eva says
Shelves look awesome! Congratulations!
One question: Are you still happy with the green colour you choose for the walls? I feel like you could find a colour that would go better with the grey penny tiles… but maybe that is just the pictures, maybe it looks better together when you are actually there… and it will probably also look much better when the mocha cork tiles have been installed.
Just wondering because I painted my kitchen walls before I renovated and painted the cabinets and changed the flooring, table top and backsplash and now I keep wondering if I should repaint the walls…
YoungHouseLove says
Yes, we love the grellow in person so much. It’s happy and will look so pretty with the dark contrasty cork when it goes in! We’re just not white or cream wall people- especially with white counters and gray-white cabinets so we like a hint of color! But if you don’t like your own walls after your renovations, we’re all for painting it! After all that work it’s not a big deal to repaint if your feelings have changed!
xo,
s
Mariah says
Looks wonderful! Those brackets were a great choice. Our house is from 1963 and is pretty small. One of the first things I did when we moved in was add floor to ceiling built-in white shelves on the fourth (blank) wall of the kitchen. Our small kitchen table sits against them. I can’t imagine living without them now. Four years later and I still enjoy rearranging the eye-level shelves with an ever changing mix-up of dishes, vases, and cute knick-knacks. The lower shelves (below waist level) hold an assortment of books, supplies, and a wine rack. :)
Elaine says
You guys are insanely good and blow me away with your transformations! I CAN NOT wait for the book! Lovely, lovely work on the kitchen!
YoungHouseLove says
Aw thanks Elaine! You guys are so sweet. Best readers ever.
xo,
s
Sheena says
This makes me so happy! I picked up those same brackets a few months ago.. sadly they’re still sitting in the garage awaiting a few coats of paint. But I’m not gonna lie, I was definitely waiting to see how your floating shelves turned out before I hung ours with the brackets! Lol.. can I just copy/paste yours into my kitchen?? Great job as usual!
YoungHouseLove says
Haha- don’t you wish it worked like that?!
xo,
s
Melissa Evans says
AWESOME……I’m speechless….except for the fact that I’m in love with those floating shelves!!
Michele says
Sigh…so beautiful. Do you guys just stand there all day and stare?
YoungHouseLove says
Haha- sometimes. And I talk to it. For example, this morning I said “hi kitchen” when I walked in.
xo,
s
Bridgette says
WoW!! It is exactly like night and day, night being before. =) I can not wait for the dark floors to come in, those chairs just stick out with out them in. But I still think even with the floor, they are just not you guys, lol, let me rephrase that as you know who you are, it just does not go with rest of kitchen. But you guys always surprise me. Congrats on being this far. Thank you for still posting on here while the madness that is the book is happening. I really think you guys should set up guest bloggers and take a TRUE 100% break for more than a day or two. You guys deserve it.
diana says
I’m sorry, I’m in a hurry so no time to skim the comments. You always said that the cabinet on the left of the window will be balanced by the width of the shelves; I somehow expected to see a picture of the window with the shelves, to see it in real life. Does it work as you planned? Anyway, the shelves are great, and the end of the kitchen makeover is nearing. I assume you two are quite tired by now!
YoungHouseLove says
Haha, I know! I can’t believe I didn’t take that shot! It looks nice and balanced. Will include it asap!
xo,
s
John says
Amazing! Perhaps adding a sheet of glass to the shelves would prevent any scratches and make it easy to wipe down.
YoungHouseLove says
That could always be a fun addition if we have any issues! Love it.
xo,
s
Sarah says
Hi John and Sherry:
Some friends of ours have their entire home painted in Cloud Cover. I love it! However, it certainly is more of a grey white with some depth to it — just wondering if there is a lot of contrast between the crisp white of your corian counters and the cabinets?
YoungHouseLove says
Oh yes, the counters are definitely crisp and white while the cabinets are a softer whispy gray-white!
xo,
s
Diana @ Boy + Girl says
Oh-Em-Geeee. The kitchen is looking crazy good now! I can’t wait to see how you style those shelves! Soooo exciting! I love the brackets. You’re right! They’re totally charming. I’m glad you didn’t do true floating shelves. To me they look too Ikea-ish.
-Diana
YoungHouseLove says
Thanks Diana!
xo,
s
Stacey O'Brien says
Oh. My. Goodness. This is looking so great! I can’t wait to see the finished product!!
Mitchell says
Every thing looks great and is a vast improvement over the before. One question, though: was there a reason you didn’t move the stove so it and the shelves could be centered and symetrical?
YoungHouseLove says
The hood was vented through the hood there and reusing the cabinets to keep that placement (and not re-routing the stove vent) saved us thousands, so it was just a budget call.
xo,
s
Robin @ Our Semi Organic Life says
Lookin’ all white!
Brianne says
I love the way it looks! Now, are you going to buy new dishes? I know I would be tempted to buy all new stuff to fill those sparkly new shelves. :) We have been working on a kitchen remodel that will not end. You have motivated me to get back to it.
YoungHouseLove says
We have some pretty cups and bowls and some basic white china so here’s hoping it works!
xo,
s
Kristen F. says
Looks way awesome!! I have loved seeing this all come together!! Such an inspiration!
Lindsey @ arkadian belle woods says
AHH! This looks AHH-MAZING! I am so stoked! You guys are mindblowing and I am loving these shelves foooorr realz! You guys are so close to the finish line….how’s the victory smellin’? haha
YoungHouseLove says
It smells like sweat. Haha.
xo,
s
Penny says
That made me lol so loud the person next to me in the school car line turned to look.
YoungHouseLove says
Haha, nice.
xo,
s
Pam C says
I still think you need to paint a “chalkboard” on the side of the fridge cabinet. A nice chunky frame painted that wonderful eggplant color would be nice around it, too.
YoungHouseLove says
Definitely a possibility! We’re waiting for the dark floors to go down to see what we want to do there!
xo,
s
SherriEakin says
I like that idea too! The frame could also be painted that cool color you sprayed Jarvis to tie in more of that color. *Going back to being patient so I can see what you decide to do and reminding myself that it’s actually your house and not mine* hehe :)
Amy @ TrangleHoneymoon says
Wow they look so great!
Melissa says
I love reading about your kitchen progress! Our kitchen is from the…1950s and has never been updated! We are tackling it next year, but first we ripped down our basement and are building it back up…check it our progress. http://www.theduplexdiaries.com It certainly is a lot of work but rewarding, as you know!
YoungHouseLove says
Great progress! Good luck with everything!
xo,
s
Heidi P. says
Wow! Congratulations!! That is some pro work.
YoungHouseLove says
Aw, thanks Heidi!
xo,
s
Helen says
You guys, I have a crazy idea! What if you lopped off one corner of your pantry cabinet so that it’s more angled toward your front door? This could 1) reduce the depth of that “wall” (the side of the pantry) right next to the living room doorway, 2) allow you to move the “wall” a couple of inches away from the door frame, and 3) make that entrance area feel a lot more spacious! You can do this and reuse your existing doors too. Here’s a quick sketch to illustrate what I mean:
http://i41.tinypic.com/2kpj0m.jpg
The yellow area represents your current cabinet, and I’ve drawn lines to show where you might cut. The downside of course is that you’ll lose some pantry space. I know y’all have got a million things going on right now, so I’m just tossing that out there as an idea!
Good luck with the photo shoots and the rest of the kitchen. I can’t wait to see those floors!!
YoungHouseLove says
Fun idea! Unfortunately with the pull-out door system we have in our pantry (seen here) that wouldn’t work. But it’s a cool idea if we ever do major rebuilding down the road!
xo,
s
Helen says
Holy dang, I had no idea that the innards were so complex. Yeah, retrofitting that is probably more trouble than it’s worth. Nevermind then!
YoungHouseLove says
Haha- no worries! That cabinet is a beast for sure, but we love allll that storage!
xo,
s
Heather says
Amazing! You guys rock!
Jennifer says
The shelves are awesome!
I have a suggestion for the side of the pantry – paint it with chalk board paint. The top half can be for menus, reminders and notes and the bottom half can be Clara’s domain.
YoungHouseLove says
Could be lots of fun!
xo,
s
Nicole says
Love them! Can’t wait to see them filled!
Emily says
I’m embarrassed about how badly I want to see the new floors go in. Soooooooo bad.
Missy G. says
I think I’ll read through these comments later tonight, whilst playing a drinking game. It’s gonna be awesome. One shot for each time someone comments on the following:
– Are you keeping the grellow?
– I can’t wait for the cork floors!
– You should paint the side of the pantry as a chalkboard!
– Why did you use 4 brackets on the left side?
– Can Sherry reach it?
I may add more. Bwahahahaha… I crack myself up. ;)
YoungHouseLove says
Haha, it could work! Don’t get too tipsy!
xo,
s
Casey says
Haha tuche, Missy! Bottoms up!
Kim says
Love It! Have you thought about adding a third shelf. There is a lot of open space above the shelves. Adding a third shelf the height of the top of the door or hood?
YoungHouseLove says
Once we add crown molding and put stuff up on the second shelf we think it’ll look nice and not too heavy! Of course we can always tweak if we change our mind down the road…
xo,
s
Keisha says
It looks great! What re: a chalkboard wall on the side of the pantry? Might be too stark, but could be fun for your little bean.
YoungHouseLove says
Could definitely work- will have to wait for the cork to see if it’s too dark- we’ll have to see where we end up!
xo,
s
MB says
Looks so awesome guys! Thanks for the good timing on hanging the shelves with the corbels. That is our weekend project in the entryway/mudroom :)
jill says
Loved, loved your last kitchen remodel but loving this one. It looks DIY – shelves and hood look clunky especially since there’s no separation visually between the hood and shelves and wall.
Do you ever solicit appraisal or realtor feedback on your improvements?
YoungHouseLove says
We would love to have the realtor who sold us this house come back over to see what we’ve done when we’re done and tell us what she would sell the house for now! Would be fun, right?
xo,
s
John says
Like the circle theme, from the tile, brackets, globes, barstool footrests and recessed lights ties it all together.
Good planning-right?
YoungHouseLove says
Haha- totally an accident! Gotta love happy subliminal accidents!
xo,
s
Stacy says
I keep trying to tell my husband how AMAZING I think your kitchen renovation is and he keeps saying he didn’t know what it looked like before – so I am so glad you posted an updated photo with the old photo so I don’t have to keep jumping back and forth. I LOVE the open shelves. They look great and I love how they look in your kitchen with the tile behind them.
YoungHouseLove says
Aw thanks Stacy!
xo,
s
Sheila @SZInteriors says
Oh my gosh, your kitchen is looking just incredible! I am loving your penny tile so much – great pick, Clara ;-)
YoungHouseLove says
Aw thanks Sheila!
xo,
s
Rachel says
Jarvis should take up residence on those shelves! He would look mighty fine on that kind of perch!
YoungHouseLove says
Haha- he’s itching to get in on the action.
xo,
s