2, 4, 6, 8, Who Do We Appreciate? Planning!
And why do we appreciate it? Because we get burned when we don’t do it. At least we did on the frame arrangement we just hung above our sectional.
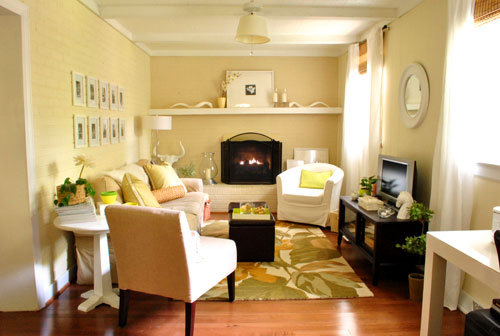
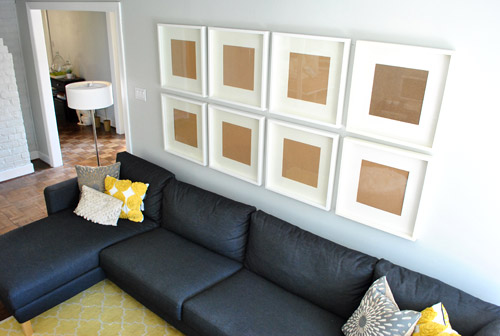
Here’s the story. We’ve always planned to take the big empty space above Karl and do a grid of large picture frames. We sort of envisioned it as a larger version of the frame grid that we hung above the couch in our old den…
… but instead of 8 x 10″ frames we’d use oversized 20.5 x 20.5″ Ribba frames from Ikea for more impact (since we already own and love four of them – and they’re just $19 a pop).
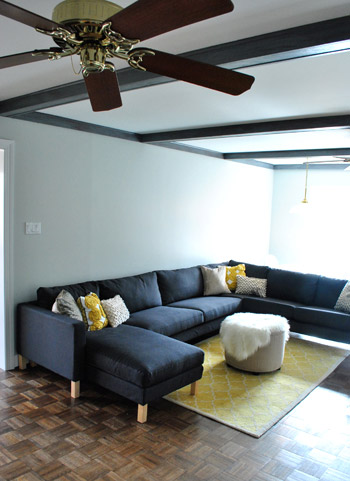
After some rough math and holding up a couple of the Ribba frames that we already owned, Sherry and I determined that we wanted to do a grid of six frames (two rows of three) to fill the space in the middle of wall, allowing for some empty space on either side for two table lamps that would sit on the future console table that we’ll eventually build to go behind the sectional. Note: we moved the 5 x 8′ Pottery Barn rug into the guest room for my in-law’s stay, and it will eventually live there permanently, we just brought it back into the living room until we upgrade to a bigger rug, since we’re currently guest-less and Clara appreciates having a soft place to play.
Anyway, back to the frames. We went to Ikea, bought six new Ribba frames (they sometimes vary slightly in color, so we figured it would be safest not to mix and match old frames with new ones, and we have a ton of other spots for the four that we already own) and headed home to begin the whole hang-it-up process. When we got home with our six new Ribba frames from Ikea, I suggested that we tape up some paper to figure out how high we want them to hang and how much space to leave between them. After all, we both know these things are worth planning out. And luckily the paper that comes in the frame is almost perfectly sized to help you figure this out. So we started with two sheets to see how high to hang them.
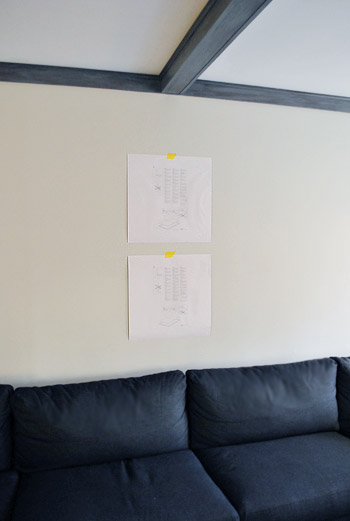
This is where things veered off course (thanks to me, I’ll admit). Sherry suggested that we tape up the other four sheets of paper to make sure we liked how all six looked together. Maybe I was just an eager beaver and wanted to get to drilling. Or maybe I decided we should blow it off because we had already accidentally thrown away one sheet of paper to complete the all-six arrangement. Whatever it was, I reassured Sherry that it would look just fine and we didn’t need to be all paranoid and hang the remaining three sheets to double-check everything. Famous last words.
She believed me (albeit hesitantly), so I started drilling. Insert happy testosterone filled sound effect here (there’s nothing like a little afternoon drilling). It wasn’t a fast process to measure, mark, and double check everything to make sure it was all lining up, so maybe an hour or so later I had five out of six frames hanging on the wall.
That’s when Sherry broke the news that the arrangement wasn’t big enough. We needed eight frames. As much as I hated to admit it (for more than one reason), she was right – the five frames looked too small on the wall (and adding the sixth wasn’t going to help). They floated awkwardly and just didn’t have the impact we wanted.
**I’d insert a picture here of giant Karl sitting awkwardly below those poorly placed frames but I was too pissed/disgruntled/ashamed to snap one.**
This was all my fault. Had I taken the time to tape up all of the sheets of paper we would’ve realized it before I put a single hole in the wall. I even would have taken a picture of the taped-up configuration to show you what a learning process taping them all up on the wall can be, and how grateful we were to have taken the time to complete that first to save a step. Duh, John. Grumble, grumble, grumble.
The next step was to take down the five already-hung frames with a big ol’ sour face and begin re-measuring everything so that eight frames would be centered above the sectional (and on that middle ceiling beam). Then came the not so fun process of not only removing the ten screws that were already in the wall (I was doing two per frame to be safe) but marking, drilling, and screwing in an additional sixteen. And since we already had two old Ribba frames that happened to match – finally, a lucky break – I was able to hang all eight frames in place without another four-hour-round-trip to Ikea, leaving us with this:
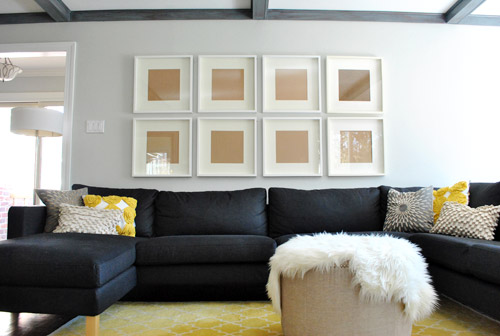
We definitely needed all eight frames. They should be just right when we add table lamps on either side of the arrangement after I build an über long console table.
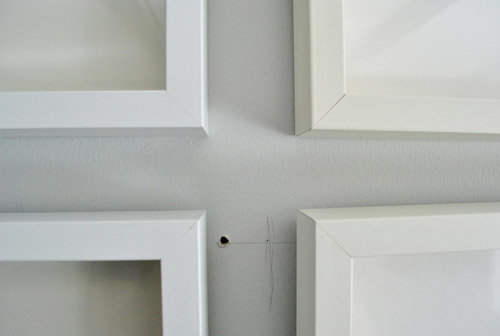
We’re still debating exactly what to put in them (maybe family photos? maybe something more graphic?) but we’re certainly glad to have the whole frame hanging part over with. Even if it involved a lesson learned the hard way. At least it was a mistake that only took time and energy (and a bit of humility) to fix. You know, as opposed to a big wad of cash. Oh and speaking of time and energy, there are still some holes and pencil marks from the first attempt that need patching. Sigh.
Wait, who am I kidding. That’s Sherry’s department. Have fun with that babe.
What about you guys? Surely we can’t be the only ones who’ve made the mistake of not planning well. Or maybe we are. But we’d love to hear some of your stories if you’ve got ’em. Bad planners unite!
Psst- Speaking of frames, we found a really cool one for displaying kid art (or any art that you like to rotate out without taking it off the wall and removing the back). Check it out over here on BabyCenter.

MS says
Ugh, I hate it when that happens. Looks great now though! Can’t wait to see what you fill em with.
In an effort to avoid that whole rehanging mess, I haven’t hung anything in our freshly painted guest room. I have one series of botanicals that are 3 frames, but what I really want to hang is a 4 print series, of which I only own 3 because the artist was sold out of the 4th. So I’m on the mailing list so I can snatch up the missing print when he finally does another run. In the meantime…nothing and its making me krazee!!!!
I’m thinking about hanging all 4 frames and just leaving 1 empty until this issue resolves itself. Super classy and designy, right?
Nik says
I love the 3M Command strips. They are like velcro for picture hanging and they don’t damage the walls. Ever thought of using those for your hanging projects. I am a big fan of hanging lots of frames in a “collage-esqe” fashion and I couldn’t get by without the strips.
YoungHouseLove says
Yes we love them for lighter things (too scared to trust them for big 20 x 20 glass shadow box frames like these though)!
xo,
s
Angela B says
I use the 3M strips too, as I’m in a rental. But I did the dumbest thing the other week. I was creating a big asymetrical display in my bedroom and as I went to stick one frame up I realised I didn’t like the location so quickly pulled it off. I’d barely even made contact with the wall but two big bits of paint and plaster pulled off. And beacuse it’s a rental I don’t have the paint to fix the wall. Uh oh…
Leslie *Fresh Out of Lemons* says
Symmetry thrills me to no end! Good (take two) job!
bungalowbliss says
Funny, last night’s project involved the major decision between centering the artwork over the toilet or centering it in the space of the toilet’s “nook.” After much consideration and moving my sheet of paper back and forth(great minds!), I chose the former–and I definitely think it was the right choice.
bungalowbliss says
Btw, I love the result of your frame wall! Can’t wait to see what you choose to put *in* the frames! :)
Erica says
Clara is too cute! I love the 8 frames and can’t wait to see what you put in them!!!
Erin C. says
Nothing EVER goes right for me the first time.. seriously. Never ever. Hanging curtain rods tops my list of temper-tantrum antecedents, regardless of how much planning I think I put into it.
I think your frame arrangement looks great :)
Elle says
This is totally off topic, but look(!), Clara is famous!
http://blogs.babble.com/babys-first-year-blog/2011/03/08/best-baby-book-album-journal-ideas/#more-5266
YoungHouseLove says
How cool is that? My baby’s a star. Haha.
xo,
s
beth says
Not sure if anyone mentioned this yet, but will Clara be able to reach those frames once she’s cruising/pulling to stand? I have three kiddos and the youngest is almost 1. I can guarantee he’d be trying to shake, smack, pat, pull, etc. on the frames while standing on the couch. Just something to consider…make sure they are secure LOL.
YoungHouseLove says
Yup, they’re secure and high enough to be out of Clara’s reach for now. We’ll also be building a console table for behind the sofa to put more space between the beanette and those frames before she gets big enough to reach them, so that should help too!
xo,
s
beth says
GLad they are secure :) I should have expected that from you guys ;) They look fantastic.
Irene says
That looks great! It’ so balanced.
Rebecca @ the lil house that could says
My husband used to be the king of just winging things and ending up with holes in the wall.
Then came the giant hole in our old condo. He was like, hey I can run the cable line over the doorway so we can mount the tv behind the fireplace by making holes every 12 inches or so! Then we couldn’t patch them easily ourselves. We had one giant hole left on top of the doorway for a YEAR. We finally admitted we needed professional help because of the 20 layers of paint on the walls and getting the drywall nice and even.
Needless to say, we’re a little more cautious these days… :)
Jennifer says
I just made a drum shade for over the dining room table. On the first cut of the material I measured and marked for an even height. But then I hung it up and decided it was too big. But instead of measuring/marking again I decided I could freehand a perfect 11″ cut across a 75″ piece of fabric. Didn’t happen. But I had already hemmed and hung it before I noticed the error. I corrected it by adjusting the ribbon trim to give the appearance of evenness.
Heather says
Hi, there. I love how the frames look above Karl. I’m so glad Ikea finally sells the larger frames in white. Question. (Speaking of planning.) Maybe I missed it, but do you guys have a design plan for the room or are you just kinda letting it come to you organically? I feel like I just wait until I stumble upon things and then I never get anywhere, or things end up not working out. I’m just curious how your mind is working (especially now that you have Clara!)…
Thanks for the update, they are best part of the day!
YoungHouseLove says
We have general plans for a room (ex: big grid of frames, add console table, hang curtains, hang something over the desk, bigger media cabinet, bigger rug) but we try to take it step by step. Like walking up a staircase, you don’t want to run too fast or you’ll get to the top and if you don’t like something or want to change it, there are a lot of stairs that you have to go back down. But if you take it one project at a time, and then evaluate whether you like it, and then move on when you do, it feels a bit more controlled so it works for us. Hope it helps!
xo,
s
Lindsey says
In eleven years the biggest fight my hubs and I have gotten into was while hanging mirrors. I had 6 mirrors that where all different sizes and shapes. He was trying to hang them on either side of our dining room window. It was a mess. We laugh about it now, but it was the worst fight we’ve even gotten into.
Jenna says
“(there’s nothing like a little afternoon drilling).”
That’s what she said.
Sorry, it’s all I could think of after I read it.
I definitely think it should be more graphic art to make it really pop!
YoungHouseLove says
Haha, I thought the same thing when I proofread it, but I didn’t wanna change the man’s words. Haha.
xo,
s
Karen says
Or an afernoon delight a la Glee – haha!
YoungHouseLove says
Haha. I’ve been singing that song all day!
xo,
s
Lisa says
I agree with Paige – I would love to see graphic prints for pops of color in those frames! If you decide to go with family photos, I hope you do black-and-white prints rather than color. The grey of the prints would look great with Karl. So anxious to see the final result! (Has John started the console project, yet?)
YoungHouseLove says
Not yet, but we can’t wait to tackle that!
xo,
s
Dawn Young says
So I had the same problem but chose to hang all my photos with the command picture hanging strips I found at the hardware store. I moved to photos and no holes in the wall. The pictures are still in place after 8 months!! I love the Command products and have used them in every room in the house now.
Christin says
That is really super frustrating. Ugh. But it looks great now! I love the grid idea. What size pictures go in those frames, you know, with the matting and all filling up some space. I took a hanging wreath down off the wall finally and left the nail in the wall b/c it’s not centered and it drives me crazy to see something hanging on it looking all off. I had asked my hubby to hang it for me a while back and usually he’s really careful about that stuff. Not this time. Sigh. It’s ok. I’m rethinking everything on our walls now – time for a fresh new look anyway. :)
YoungHouseLove says
12 x 12″ pics go in them. We get things printed at a downtown printing place for around 1-3 bucks a print at that size, so it’s not too bad.
xo,
s
Lauren says
Any idea on when you’ll decide on what to do with Karl’s feet? The Hubby and I are thinking about purchasing Karl in the Linen fabric but I want to change up the birchy feet too. I’m not sure if painting or staining is the way to go. Keep up the good work and learning process!
YoungHouseLove says
Yup, we’re planning to tackle those someday! They’re on the list, we’re just bouncing all over the place. Haha. Staining or painting them would definitely gave them a whole new look (and make the whole sofa feel more expensive).
xo,
s
Maya says
What if you framed some of your favorite fabric from the Clara photo shoots?
Family photos would also look great, if they’re cropped and artsy (as you said somewhere else)… maybe in color but vintage-y-looking color, if that makes sense.
Looks great!!
Maya
YoungHouseLove says
We have actually considered framing some Clara fabric! We want to use it to make her a quilt and a birthday banner to hang each year, but if we have extra it’s definitely a possibility!
xo,
s
annabelvita says
You could take pictures of it and print and frame that if you don’t want to cut it up.
Or.. crazy idea (I’m probably not serious about this), do like a ceramic animal version of clara’s weekly shots – 8 fabrics and 8 animals shot from above. Haha.
YoungHouseLove says
Amazing idea! Why didn’t I think of color copies of the fabric? And as for the ceramic animal idea, don’t tempt me. I’m just that crazy!
xo,
s
Ever - The red house by the lake says
You are definitely not alone.
I am not too found of planning, so I often take shortcuts. Sometimes it works out great, and sometimes not.
When I tried to create a similiar wall gallery using 16 small IKEA frames (the cheap wood ones), I was stressed and really wanted it to be finished before that nights guests would arrived. So, instead of meassuring them, I just went by the size that is printed inside them, and I marked the spot for each of them and hang a few before I realized that the measure on the inside is of course the inner-meassure and they are at least 3-4 cm bigger on the outside. (I knew that of course, I was just in such a hurry that I didnt think.)
I am dreading the day I will take them down, because it will probably mean repainting the wall.
But at least it turned out quite nice:
http://theredhousebythelake.blogspot.com/2011/01/when-we-first-met.html
Kelly Anne says
Ugh! I’ve definitely done this. And it took about two weeks to realize it. I jumped the gun and refused to iron two long panel curtains before hanging them. It seemed strange that they keep seeming a little longer each day until it finally hit me that the wrinkles and folds were falling out. Now they rest on the floor just a little too much — not in a pretty, luxurious drapey way, but in a “DOH! that was stupid” kind of way. No way I’m rehanging those babies either. Rookie mistake…
YoungHouseLove says
Oh man that sucks. Glad you figured it out though! I’d think they were growing or something. Haha.
xo,
s
Andy says
The arrangement of frames looks great! Will the switches on the wall be hard to get to with a lamp in the way?
YoungHouseLove says
We hope not since the lamp will hopefully not be smashed up against the wall (we’ll build a console table that’s wide enough for the lamp to breathe a little so we can get back there).
xo,
s
Laura C says
I had a similar experience, but it was with three shelves of different length – the proportion was totally wrong for the space so I took them down and am planning on putting them up on a smaller wall once I figure out the spacing.
I absolutely love your blog and your style. I am in the habit now of checking first thing in the morning :)
megs & bacon says
I’m with Clara; you totally should have bought a motorboat.
YoungHouseLove says
I know, right?
xo,
s
Chicago Cuisine Critique says
The frames look great! Can’t wait to see what you guys put inside of them. I’m hoping to get some ideas as I have one large blank wall behind my (also L-shaped) couch and can’t decide what I want to go behind it! :)
Taylor says
The Clara video isn’t showing up! Is there any other location I can watch? She is just too cute!
YoungHouseLove says
Oh no! It’s only up on our Flickr page, here’s that direct link for ya: http://www.flickr.com/photos/younghouselove/5496103490/
If not maybe try viewing it from another place (if you’re at work, Flickr could be blocked)? Good luck!
xo,
s
Erika says
I hung a picture gallery up my stair well… they were all crooked and looked terrible. I knew I should have planned but for some reason I decided to wing it. I had to rehang everything – luckily it was before I painted so I patched up all of the holes and painted!
renee says
I imagine Clara will be a hoot on a roller coaster one day :)
YoungHouseLove says
Seriously. Can’t wait for that.
xo,
s
Bob says
Drywall anchors? Screws? Two per frame? Holy cow!!!!
I’ve used the Ribba frame before and found them to be super light. Two #17 x 1″ wire nails is all you need. The resulting hole is tiny so future patching is simple.
Most people over engineer their hanging mechanisms. Your wall suffers as a result. Try it out next time. I hang 20 pound paintings off the wire nails all the time and never had an issue. Galleries like that there’s virtually no holes to fill afterward.
YoungHouseLove says
We can definitely attest to being laughably over-cautious! Haha. But we’ve found with our old houses and their plaster walls that chunks of wall can come out when nailing without anchors (or removing nails without anchors) so sometimes “containing” the screw with an anchor is easier and more secure. Or maybe we’re just Safety Geeks. Haha.
xo,
s
Bob says
Oh… if these are plaster walls, then you are totally right. If they are drywall, then you suffer a case of severe over-engineering! :)
YoungHouseLove says
Haha, yup drywall. Old houses = quirky and crumbly. Haha.
xo,
s
Lindsay says
This was my biggest surprise about moving from an apartment (with drywall) to a house (with plaster). Things are MUCH more annoying to hang now. And just promise me if you’re ever at my house you won’t look at the mess I created drilling (and then drilling AGAIN with a sharper bit because what in the heck is that wall made of?) to hang up the master bedroom curtains, m-kay? ;)
To be fair though, I live in earthquake country, so I should have always been careful about how I hung things. The plaster walls are a good reminder though…
Krysta says
First of all, Clara is the funniest little thing EVER. I love her!!
Second of all, the frames look fabulous!! Probably my favorite thing you have done so far in the new house. Can’t wait to see what you put in them!
Corrie says
Your frame post reminded me of my boyfriend’s attempt to hang a shelf with hooks in our first apartment rental. I don’t even remember where things went wrong, probably because I am still scarred by the thought of the 6 holes – one the size of a bottlecap – that were left in our wall when he was done. For one shelf.
Thank you to whoever created spackle and all other gooey hole-filling products!
Izabela says
Trial and error makes for the best stories. The end result is beautiful.
Marie says
You know what would be kind of cool in those frames? A progression series of pictures, like of your baby walking or doing something funny. We have a great series of my husband’s cousins running down the dock holding hands and jumping off the end into the water. With the splash at the end it’s a great series of pictures. The grid of frames really set up a snapshot in time sort of feeling and you’d have a number of photos that sort of matched color-wise without having to wash them out into black and white.
Just a thought, though now I really want to do it. :)
YoungHouseLove says
That would be so much fun! Love it!
xo,
s
sonya says
I am notorious for getting impatient and just hanging something and then deciding later that it’s too high or two low, and then I have to go back and fix it! But I did a gallery wall almost exactly like yours and almost had the same experience, but thankfully I did do what Sherry suggested (she would be so proud!) and hung up squares of paper… this helped me realized that I too needed to add more frames to the mix to make it look better. I was SO glad I did that because my gallery has 10 frames! I learned from that, that when doing gallery walls, hanging templates first is really the best bet because it’s so easy to picture it one way and then having it look totally different on the wall!
So have you considered finding an artsy calendar for your artwork? I did that- maybe a little bit unoriginal of me, but the result was awesome because it’s cohesive as a set, picks up all the colors in my space, and I also happen to love the calendar I chose! Another idea is finding an old coffee table book and ripping pages out of it…
YoungHouseLove says
Oh yeah- we love calendar art. It’s cheap and almost guaranteed to look cohesive!
xo,
s
ellis says
Yup! Calendar art is my trick too- it’s crazy how much of an impact you can make with some cheap frames and one calendar!
Stephanie says
The final layout looks great! Have any tips for hanging frames gallery-style over a couch? I want to do something really organic, mixing sizes, frame styles/colors, etc. Is there any rule of thumb for proportions? Like big frames vs small ones? Are some frames TOO small to make an impact? And what’s the best way to decide the placement? Ahh so many questions!
YoungHouseLove says
For organic and asymmetrical framing arrangements we like to lay things out on the floor to find a layout that we love, or even hang paper on the wall cut to the size of each frame to experiment with different options. In general it looks nice and grounded if the biggest frames are in the middle (and not on one end looking unbalanced) but there are lots of exceptions to that rule!
xo,
s
Carolyn @ Lovin' Losing says
Am I the only ones who don’t think the two older frames you had don’t actually match. I could tell a color difference even in the far away shot and it’s VERY obvious in the up-close shot.
YoungHouseLove says
Yup! It’s completely obvious in photos for some reason but nearly undetectable in person. We still plan to get two new ones from Ikea the next time we’re there though. And then we’ll reuse those two on the end somewhere else in the house!
xo,
s
Virginia says
I would love a tutorial on how to spackle/touch up drill holes in the wall so that they look invisible!
I live in DC and we go to the Woodbridge IKEA all the time – maybe someday I’ll bump into you guys and tell you how much I love your style. In a non-creepy way, of course.
YoungHouseLove says
Here are my steps:
1. Sand hole so nothing is bumping out or hanging off of it
2. Use flexible metal spackle knife to smear spackle into the hole (I recently discovered the Dap Lightweight Spackle in the red pail and I love it).
3. Swipe filled hole with spackle knife to create a nice flat application and shave off any excess
4. Wait to dry and sand each hole for even more smoothness
5. Paint each filled hole with a brush, feathering it out so the paint stretches about 4″ beyond each hole for the most undetectable look
Hope it helps!
xo,
s
Suzy says
Wow, congratulations you guys, the house is looking great.
How do you guys find the motivation to do all this? Or how is it that you do it? I moved into my house like 2 months before you guys and I still have boxes on the entrance. I just don’t know where to start. It’s almost embarrassing. I see how far along you are and how well your house is going and I’ve only completed 2 1/2 rooms (the essentials) :(
Keep it up, I admire your work and your tips have been very useful to me. :)
YoungHouseLove says
I think we’re kind of a rare case so don’t beat yourself up about it at all! First of all, we’re obsessed. We love this stuff and don’t really do much else for fun. I mean instead of going to the movies or out to dinner we hang frames. It’s our idea of a good time (unless we don’t measure like this project, haha). We also do this for a living, so it’s kind of like a full time job. And I’m not going to lie, the pressure to churn out projects all the time is definitely there pushing us when we just want to take time out and sit on Karl- er, the couch. As for where to start, we always believe in breaking things up into bite-sized chunks, so they’re more manageable. Just start by painting a small bathroom. Or unpacking two boxes a week. It’ll get done, just slowly build momentum and take it from there!
xo,
s
Suzy says
Thanks for the advice. I guess that’s my big problem, I see the house as a whole and get overwhelmed. If I do a small thing I immediately think that I’ll never get done! lol And don’t get me wrong, I enjoy doing stuff to the house but it could be easier if my hubby enjoyed it also. ;)
I like your “projects” section and how everything is broken down into small tasks. It’s like my self-help section. :)
YoungHouseLove says
You can do it! Good luck with everything!
xo,
s
karen @ our slo house says
I was thinking you were going to hang the vintage maps here, but I guess they won’t fit in the square frames. I have always had a thing for Karl Blossfeldt photographs.
http://www.google.com/images?hl=en&q=karl+blossfeldt&rlz=1R2ADFA_enUS418&um=1&ie=UTF-8&source=univ&sa=X&ei=IUR2TfqIA4OesQPF6enABA&ved=0CDMQsAQ
Sorry about the mess up, John. At least you were man-enough to admit it.
YoungHouseLove says
Those are gorgeous! Thanks for the link!
xo,
s
GEORGIA says
We have a long lounge and the main wall always looked so Bare, so when we re-decorated i put 3 ribba frames and 2 lack shelves up, it went, ribba, lack, ribba, lack, ribba… lol
It looks really nice, all with my own photos in that i got printed up on a special off from snapfish. (ill put a pic on your facebook page to show you later :)
x
stephanie says
i probably would have similar stories because i like the look, but my husband is strictly against this style of hanging for exactly the reasons you describe above. too difficult to achieve perfection and the imperfections (a millimeter here or there) would drive us bonkers. recently for an anniversary i made a collage for him of his favorite restaurants in new york (he moved from there to be with me) and i struggled over whether to do a set up like yours with 9 different photos, or to make it like a flickr style cube of photos. i went with the latter, and it looks amazing! plus i saved a ton on frames.
GEORGIA says
Oh and i forgot to say, i love the arrangement you have and cant wait to see what you put in the frames! ha
Jen @ The Decor Scene says
Love the look!!! Can’t wait to see what pictures you put in them.
Erin @ The Impatient Gardener says
I’m a horrible picture hanger. My motto is to always aim low (and not just because 80% of the world hangs pictures too high and it drives me nuts) because then when you move it up the picture will cover the other holes!
OK … but why are you guys drilling into your walls to hang pictures? Why not just use picture hangers?
YoungHouseLove says
We have plaster walls, so anchors and screws are better suited for the job than picture hangers or nails (which chip off chunks of the wall and aren’t as secure). Hope it helps!
xo,
s
heather says
I am a graphic designer and I would love to hook you guys up with some awesome photo art for your tonnage frames! I’m picturing some silhouttes created from your family photos with accompanying text titles. All done in a complementary palate coordinating with Karl and you accessories already in the room. I can send you some examples if you think you might be interested? These would be printable files you could take to kinkos, etc to have laser printed, or sent to a letterpress for something with more texture and pizzazz. Love your blog! Fellow Virginian The Fresh Ink Press
YoungHouseLove says
You are too sweet! Thanks so much for the generous offer. We actually have a no-special-treatment-or-swag policy (we like to keep it real and tackle projects in a way that anyone at home could) but we definitely appreciate your kind suggestion. They sound lovely!
xo,
s
Pasc says
Looks great guys!
Just wanted to tell Sherry that there’s a ebay seller called Cheri that sells ceramic animals with a great pice. Here’s the link: http://stores.ebay.ca/CHERIS-CERAMIC-BOUTIQUE
Ima lovin the hippo <3
YoungHouseLove says
Oh my gosh, the Cheri/Sherry thing makes it fate, right? I heart the turtles.
xo,
s
Lindsay says
I love the penguins!
Dana says
The frames look great!
I’m not a planner in any aspect of my life and when it comes to hanging things in my house, it’s no different. I think I get too excited.
Sara N says
Please “crash” the house of Ohsheglows…their recent reno was amazing!http://ohsheglows.com/2011/03/07/reno-before-and-afters-2009-present/
YoungHouseLove says
We would LOVE to! She did such amazing things with that reno.
xo,
s
Amanda @ Our Humble A{Bowe}d says
I did the same thing in our hallway. At first, it was a jumbled mess. Then, I rehung everything and it’s much better.
http://ourhumbleabowed.wordpress.com/2011/02/16/picture-this/