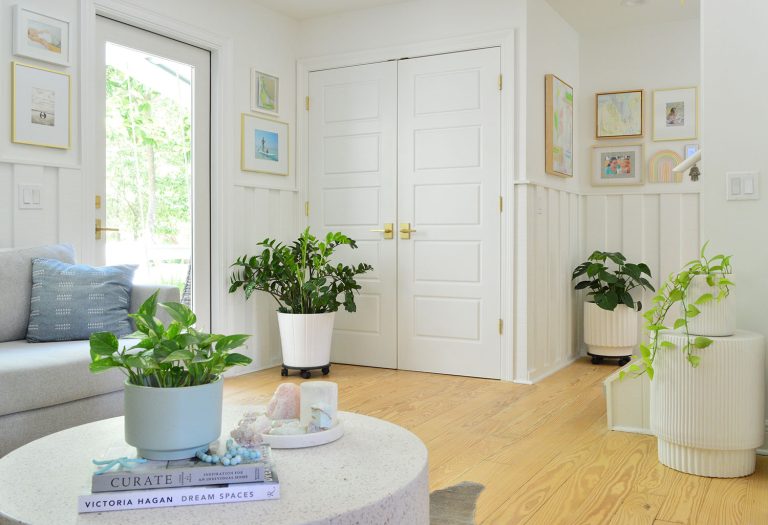
Author Archive
I Gotcha Covered
Even though I’m sure you figured we’d just grow to love the look of our crazy exposed hood (“oooh, it’s so unfinished chic”) we were ready to get this hood-covering train in motion. Oh and as for the height of the range hood, we just followed the manufacturer’s recommendations (the JennAir website offered a range and we went right in the middle of that range at 34″ above the counter).

As for the hood cover, the first thing we did was use photoshop to mock up two different options to figure out what we thought would look best. This was our original thought, since it looks most like a lot of the hoods in our inspiration pictures. The squares on the front are supposed to be panels we’d make using trim.

But it looked a bit top-heavy to us, so we tried this version instead:

We liked that much better, so I took some measurements and drew up a “technical” drawing of the plan. I roughly sketched the hood to scale (using some graph paper under this white sheet) with pen and then used a thicker marker to design the cover around it.

And in the other corner you can see where I started to figure out what sort of wood I would need to actually build this thing. I’m not going to even try to explain what this means now, since it will become clearer as you see the actual cover come together. But just know my goals with this thing were to:
- Make it sturdy (and use moisture/steam/grease resistant plywood so it would last)
- Make it as light as possible (I didn’t need worry about another heavy thing falling off of the wall)
- Make it pretty

When I returned from the store with some plywood panels and 1 x 2″ boards in hand, I got right to building. I was going to build from the bottom up so I started off by building a frame and cutting some plywood panels to size:

The frame is basically three pieces of 1 x 2″ screwed together in a U-shape using my Kreg Jig. To attach it to the wall, I made a couple more holes with my jig so that I could screw it tightly to the wood plank that we used to mount the hood (see, I told you that weird overhang would make sense!).

It looked a little something like this. Note that it’s not touching the actual hood at all, so our cover will essentially float around the entire thing (our high-efficiency range hood should have no issue directing moisture/steam up into the hood and up the vent, and our wood surround should stand up to everyday use like many wood hood surrounds built by various cabinetmakers and handymen/handywomen). We’ve heard from a ton of folks in blogland who have built or hired out wood covers since revealing our crush on them and we’re happy to report that everyone seems to have had a great experience with them (no moisture or steam issues with the wood around the hood). It actually makes sense since non-covered range hoods usually have wood cabinets against either side of them and they don’t typically have issues with those sort of things either.
Note: these pics were taken before we realized we should use metal foil tape and not duct tape for those vent joints, but we’ve since swapped it out and will share those pics in another update post about other things we have to share, like how we patched our giant honking ceiling holes, etc).

With the frame in place I started nailing the thin plywood panels in place.

Here’s what it looked like with the first three sides done.

Remember the reason that there’s a small gap around the outside is to leave room for us to reach the control buttons on the front of the hood. There’s enough room for our fingers to slip in, without being a totally garish amount of space.

And if you’re Sherry’s height (or me slightly ducking) you can even see the buttons so you don’t have to wonder what you’re pressing (to see any buttons on the underside of a hood you usually have to duck a bit to see them, so we like that ours are just as accessible, albeit slyly hidden).

To add the next “tier” to our cover, I had to build a slightly smaller version of the previous 1 x 2″ frame. Since this would be the one against which the sloped part of the cover would sit, I ran it through my table saw at an angle to make it easier for the angled piece of plywood to lay against it. I didn’t measure or anything to make the angle perfect – it was just an educated guess since I figured anything would be an improvement over it meeting the original square edge.

Here it is attached to the upper portion of the hood.

Even though the next set of plywood panels would sit just fine on the top edge of the previous set, I did add a small piece of 1 x 2″ to give me a place to secure them with a nail. And yes, I gave it another guesstimated angled cut to help that sloped piece sit better.

This picture should help make more sense out of this. See the sloped plywood panel in place?

The next two sides would be on only non-rectangular pieces of plywood. Since this angle had to be exact, I held the piece in place so I could mark the exact line that I had to cut.

Then I ran them through my table saw to get these fun little quadrilaterals. Wow, I don’t think I’ve used that term since Mrs. Miller’s 9th grade geometry glass. That’s the class where I decided I should wear my glasses during tests because they would help me feel smarter (even though I just needed them to read the blackboard). Nerd alert.

Anyways, here are those two panels attached on the sides. It’s starting to look like something, no? Of course it’s still very clunky and unfinished looking without trim, but we’ll get there in a minute…

For the third and final tier, we had to cover the vent pipe with the section I affectionately called “the chimney.” First I cut my tiniest 1 x 2″ frame to date. Ain’t he cute?

And then I screwed him straight into the ceiling (hitting nice firm wood that I knew would hold it nice and snug – you never want to drill up into nothing- that hollow feeling is the worst). The only problem was that I hadn’t accounted for how gargantuan the hole was for that vent pipe. Guess we’ve got more patching to do (Sherry’s my spackling queen). And we’ll eventually be installing crown molding around all of this too, so it’ll look nice and polished in the end.

Here’s the chimney covered with the plywood panel, essentially completing the major construction phase of this project.

So here’s what it looked like at that point. Hood is sufficiently covered. We still have access to the buttons. It’s plenty secure and we’re happy with the shape of it. It’s just looking a smidge unfinished. Okay, maybe more than a smidge.

This is where trim comes in. And I’m telling you, it’s one of those “details make the difference” things. I decided to make the trimming portion on this fairly easy on myself. In keeping with the theme of “make it light weight” I decided to use some super lightweight plywood. And to minimize nail holes (and having to hammer against the cover) I opted to glue everything in place. This method should definitely hold up to heat and moisture and all other kitchen loveliness (grease!) – especially once it’s primed and painted with the same super durable Benjamin Moore Advance paint that we used on our cabinets – so we’ll keep you posted.

We also ditched the idea of doing panels across the front and sides (as shown in our original renderings) because we kinda liked the clean look better (and worried smaller boxy panels might not jive with our existing cabinets). It also made my job a bit faster, meaning I had the first row of trim cut and glued into place in no time.

I did like working with the LiquidNails because it gave you a bit of play for the first 10 minutes (hence the tape above to stop it from moving when playtime was over). But I ran out about halfway through (it was an old tube leftover from something else) so I started using this leftover tube of Loctite instead… and kinda wished I had used it from the start. I wasn’t able to wiggle things into place as much (I had to peel it off and restick it instead) but things really stayed in place – meaning no more green tape was needed.

The top portion of trim took me a bit longer (especially because I ran out of wood and had to run out for more in the middle of everything), but by the end of the day I had it looking like this:

The angled cuts on the side took a bit of time too. We opted not to put trim on the chimney part because it’s not really supposed to be a “decorative” part of the hood. Plus there weren’t any open seams between the plywood or anything that needed “finishing.” Once we patch that ugly ceiling hole and add crown molding around the entire top of that wall (and hood) we think it’ll look swankypants indeed.

It’s not 100% perfect. For one, it needs to be primed and painted (we’ll do that when we prime and paint the open shelves we’re about to build) and it needs some caulk in a few places just to make it 100% seamless. But I’m just proud that I accomplished my three goals. It’s sturdy and durable. It’s lightweight. And it looks pretty (if I do say so myself).

Now of course it doesn’t have some of the bells and whistles that a professional hood might have, but once it’s primed and painted it should perform just as well as a painted cabinet would next to or above a hood. And it certainly was cheaper than the $3 – 4K price tag we saw some places (check out this post to see a price that had Sherry spitting liquid at her laptop). In the end it cost me about $90 to complete, mainly because I didn’t realize how much wood/trim I’d need. So I think that brings our total for the hood up to $150 (since the hood itself was $60 thanks to craigslist). Wait, that doesn’t include brackets/wood to hang it, so make that around $175. Still not bad considering we paid $250 for our last kitchen’s stainless steel hood (and it wasn’t an industrial strength JennAir one like the beauty we scored this time).

Even though it’s still a big, tan-colored box on the wall – I did take some “after” photos of the kitchen for ya. Mainly because with book photoshoots starting in our house this week I wasn’t sure of the next time our kitchen would look this clean again. It’s definitely still looking pretty raw in there (we need crown molding, shelves, a ton of color that Sherry can’t wait to add with art and accessories, new floors, an installed dishwasher, a light over the sink, etc) but we’re getting there.

As much as it’s kinda weird for us to see something hanging from this wall that’s been empty for two months, we do like that we’re starting to break up the sea of tile a bit. In some ways it just draws your eye more to that wall so you can stand there drooling. Not that we do that. Much.

It mainly just makes us eager to get that thing painted, get the ceiling patches sanded and painted, and get those open shelves hung. Sounds like a good project to talk about next, eh?

In the meantime, let’s talk about range hoods. Ever built one? If not, I never had either until a few days ago, so you never know what you might find yourself doing down the road…
  Leave a comment
The Latest On The Book
We’ve dropped a few mentions of working on the book lately, so we figured it was about time for another post about the process. Our post two months ago mostly covered the journey to getting the book deal and the beginning stages of writing, but now we’re really in the weeds of things so there’s definitely more to share… and we don’t have to use pics of Burger to illustrate it this time! Sorry Burger.

At the time of our last book post two months back, we had turned in our 160-ish page completed outline and were beginning to coordinate the design process with our publisher. If you recall, the book is a compilation of 250-some ideas for “how to show your home some love” (everything from small art projects, little tweaks, and quick ideas to bigger makeovers involving paint & furniture). Things were trotting along nicely and our publisher, Artisan, was trying to figure out whether to keep our Fall 2012 release date or hold off until Spring of 2013. Sherry and I begged for the earlier date and they agreed – but it meant putting the pedal to the metal. So we buckled our seat belts…
- In a matter of two weeks (the two weeks that happened to fall over Christmas and New Year’s) we had to turn our finished outline into a completely written book. Yikes. But we put our heads down and two dizzying weeks later we had the manuscript done. Phew.
- When we turned the manuscript in to our publisher, she took the next week to read the entire thing and we braced ourselves for edits or rewrites.
- She finished without any major edits (really?!) so it went off to a copy editor – someone who would read it for nitty gritty stuff like grammar and punctuation. It spent a week or so there before coming back to us.

- As you saw in last Monday’s post, this baby arrived last Saturday as a hard copy. Our manuscript now officially lives as a printed document that has our publisher’s edits and the copy editor’s notes marked up in different colored pencils. Our task was to use our designated blue pencil (they included it in the FedEx box) to respond to any questions, agree (or disagree with) all edits, and make any final changes. Scary. Especially because as a single-spaced, single-sided document it’s 375 pages long. We thought it was really funny because we assumed it would all be done via email, so getting a giant chunk of paper overnighted to our house felt sort of official and old-fashioned, but that’s apparently how it’s still done these days! It’s actually a lot easier to absorb the info and catch errors while “really” reading it (as opposed to reading it off of a computer screen) so it ended up being really helpful.

- Once again, we hunkered down and plowed through. It was due back to the publisher by yesterday so we overnighted it to them on Saturday afternoon. Bless Sherry for having the focus to sit down for two days straight and do pretty much nothing but focus on that. It’s how she spent all of last weekend while I watched Clara (and did kitchen stuff while the bean napped).

- After 16+ hours (broken up over two days) just to read through the thing, we then scrambled to fill in some gaps and rewrite some sections just to further explain a few projects/ideas in the remaining four days. Then back to the publisher it went…

But the manuscript is only half of the book process adventure right now. It’s probably less than half, actually. Maybe a third? Because what’s really keeping us busy is prepping for the photo shoots that began yesterday morning. So here’s what’s been going down on that end of things:
- With the 250-ish ideas we’re including, about 100 are going to be photographed. Another 100 will be illustrated and the remaining ones are pretty self-explanatory tips that make sense without an image. So that means 100 of the projects/sets need to be done so we’ve got something to actually photograph. Can we say yikes again? Anyone with a blog knows that churning out enough projects to keep things interesting (maybe 3-4 a week?) is a pretty substantial task. But completing 100 secret projects on top of that? Crazytown. But things are really exciting and fun in Crazytown so we totally can’t complain. Or sleep. But sleep is so 2011. At least that’s what we’ve been telling ourselves as we whirl through projects into the early morning.

- We didn’t really start full force on the projects until after the manuscript was turned in for the first time after New Year’s (we didn’t want to do a project that we or the publisher decided to later kill for some reason). That meant we had about 30 days to do nearly 100 things. So on pretty much any night over the past month you could find us painting, hanging, sewing, cutting, and shopping for up to five projects. And that pace will continue for the next three weeks until shooting wraps (since many things have to get shot as “before” and “process” pics before being completed). But it’s fun because we’re transforming some pretty ugly things, like this old rusted thrift store table:

- As much work as it’s been, we’re not doing it completely alone. Our publisher hired a producer to help keep things organized (100 ideas doesn’t just mean 100 photos, since many have a before, process, and after shots attached to them – so it’s a lot to keep straight and schedule). We also have someone who has been a big help when it comes to gathering supplies for us. Sometimes it’s faster for us to just grab things while we’re out and sometimes we email her and say “ahhhh, can you help us get blank by such and such a date so we can sand and paint it in time to shoot it? Thanks!”
- And of course we’ve got a pro photographer who’s going to make everything look prettier than we ever possibly could with our little Nikon. So our “crew” of helpers aren’t exactly elves who do all the projects at night (we wish!) but it certainly takes a load off to have such a great team. Since we’re ultimately the people who have to choose all of the items, do all of the projects, decide what rooms/corners to shoot all of the photos, and style all of the shots, we’re still burning the midnight oil.
- As for where things for the book are coming from, we have a pretty modest book budget so we’ve been stalking craigslist, thrift stores, and even borrowing items from some of our favorite stores with their blessing (they’ll be returned in three weeks when shooting wraps). The nice thing about a modest budget is that it keeps us honest (there are a good amount of under $50, under $25, under $5, and even some free projects in our book, so that’s pretty exciting to cheap-os like us). And yes, sometimes Sherry gets hyper when we’re picking out accessories (our aim is to style things so they look fresh for you guys, since reusing all the things we already have around our house that you’ve seen a million times would be kind of stale).

- And our house? Well, it’s a mess. We’ve got projects at mid-completion here and there (we need to save some that are halfway done to shoot progress photos, so we can’t just knock them all out at once). We’ve got tons of thrifted furniture piled in the sunroom just waiting for a makeover. There are a bunch of fabric and frames and accessories stacked on the dining table. Paint cans pepper the floor. We even have frames missing from the hallway where we’ve repurposd them for book projects. Nothing is sacred. Haha. Again, in a word, it’s a mess. But it’s pretty exciting chaos.

- Being the over-sharers that we are, we’d love to tell all of the details of every project right now (#ohmanit’skillingus). But I’m not sure our publisher would be very happy with us ruining the surprise. So here are a few hint-y sneak peeks:


- Our guestroom has kinda become home to all of the completed projects. The dining room is home to all of the things in progress and the sunroom is where we’re housing all of the things we can’t touch until before photos are taken. Here’s sort of what they look like (well, as much as we can show ya)…


- So that thing that Sherry mentioned at the end of yesterday’s post that lasts three weeks is some pretty crazy-but-exciting book photography. Most of it will be going on from 8:30am to 6pm four days per week for the next three weeks, so nearly our entire February will be spent on a photography set. Well, actually the set is our house for the most part – so it’ll be three weeks of being in our house-turned-photo-studio. We finish just a few days before flying out to Oregon for the Portland Home & Garden Show, so it will definitely be a jam-packed month. Thank goodness it’s only 29 days long!


- Yes, we’re pretty much hosting a little crew of people in our house for the better part of a month so we’ll have to tell you how that goes! They’re all awesomesauce so far, and yesterday we banged out a ton of before photos and as soon as they left we were painting and upholstering and doing all the things we can now do since those “before” shots are in the can. Gotta tell ya, it feels good to get this thing going – and we already can’t wait for the book to be out so we can spill the beans about all these secrets. We’re taking lots of behind the scenes photos to share with you guys this fall when it comes out!
Update: Lots of folks are asking what we’ll be doing with all those secret projects/items once the book is shot. We’re actually hoping to do a giveaway with some of them (not sure how shipping will work though) and some items have to be returned, etc. Maybe one or two especially sentimental ones will stay at our house, but they’re all “bonus” projects (we didn’t “design” any of them to fit into our house, which is actually really freeing since we can have fun with lots of color/fabric/textures, etc) so it should be fun to see where they end up!
So our apologies to anyone who left a comment yesterday and took a little longer than normal to see it pop up or get a response! We’re definitely juggling things over here when it comes to keeping the blog and the book (and the bean) attended to. And as nuts as the next month is going to be for us, we’re so grateful for the opportunity and so excited to share the whole crazy journey with you guys as we go. Anyone else dealing with someone visiting them for weeks on end? Or keeping 100+ secrets that are slowly burning a hole through their brains? Tell us about it. Or just tell us how crazy our house looks. Go.
Psst- Thank goodness our bean sleeps the night away so we can get stuff done (check out her technique over on Young House Life).
Fab Freebie: Your Publisher
***This giveaway is no longer accepting entries – see who won below!***
Okay folks, random.org has selected the two lucky winners of a $50 gift code. Although anyone can take advantage of the free extra pages code – GIFT3570 – through Feb 6th. That’s how I saved nearly $80 on ours! But I digress. Our winners are… Christine (whose favorite pic of 2011 is her and her husband beside the wild boar statue that stands outside the a building at her university) and Bethany (who caught her son shirtless, wearing a cowboy hat, boots, belt & buckle, Wrangler’s while iding his John Deere tractor around their yard this summer). Congrats!
Remember the Petersik Family Yearbook that we mentioned last week? Well now the folks at MyPublisher are gonna hook up two of you with $50 to spend on your own family yearbook (or any photo book really). And as we’ve found, $50 can really go a long way over there (we caught a free extra page promotion that meant our 100-page book was only $45 – including shipping). So get ready to get get your publisher on!
- PRIZE: A $50 gift card to MyPublisher
- TO ENTER: Comment on this post with the words “PUBLISH ME!” and tell us…
- BONUS QUESTION: … what your favorite personal photo is from 2011. Did you finally get the perfect family portrait? Or a great set of summer vacation photos? Or maybe there’s just a casual iPhone pic you snapped one day that perfectly captured the sweet face on your spouse / child / pet / imaginary friend?
- GIVEAWAY CLOSES: Wednesday, February 1st at 8pm EST or at 10,000 entries (whichever comes first)
- NUMBER OF WINNERS: Two
- PRIZE SHIPS: The United States or Canada (although we do try to wrangle as many international giveaways as possible)
- USUAL STUFF: One entry per e-mail address is permitted. The winners will be selected using random.org and announced on Thursday as an update to this post. That’s right, come right back here on Thursday for the announcement of our winner. Good luck…
Note: We aren’t paid or perked for hosting these giveaways, we just do ‘em to thank you awesome folks for stopping in. See our Giveaway FAQ page for more info. Pic courtesy of MyPublisher.
How’s It Hanging?
That was the big question last week. Not in the “Hey, how ya doing?” sense of things, but more in the “Um, how are we gonna hang this $60 hood we found on Craigslist” kind of way.

Sherry talked last week about how we planned to encase it in a DIY’d wood cover (see inspiration pics back on last week’s post). Both of us were so excited about (1) the price tag and (2) the final look that we didn’t really think through the middle part: actually installing the darn thing. So yeah… #planningfail?

Here was our challenge (beyond just not having any of the installation materials or instruction): this is an under-cabinet hood and, well, we don’t have any cabinets to install it under. I figured that there were dozens of sites online detailing how to convert an under-cabinet hood to a wall-mounted one, so I wasn’t worried… until my Google searches started coming up empty. That’s when I started to second guess our plan. Was this just something that couldn’t be done?
Then I discovered these.

We didn’t buy these (our hood is Jenn-Air brand). But the fact that Kenmore sold bracket specifically “for mounting range hoods to wall when overhead cabinet is not used” meant it was not a completely crazy idea to retrofit ours to hang on the wall as well. So Sherry and I concocted a plan, did some shopping, and readied ourselves for some hood hanging (and possible hood hanging failure, as is always a possibility when we attempt to figure this stuff out as we go). This picture will make more sense soon, but just know it involved some wood pieces as a makeshift mounting panel and some heavy duty metal brackets as a stand-in for a cabinet.

But before we could put our plan in motion, some details needed to be taken care of. You know, little things like oh-yeah-we-didn’t-tile-high-enough-under-the-vent-pipe. Another lapse in planning. Oh well, it took about 20 minutes to whip up a small batch of thinset and fill it in with some spare tiles. Yes, it was slightly maddening to have to go back to the tiling phase (especially for eight measly rows) but by this point we’ve learned just to laugh. Wince a little. Laugh some more. And get it done.

Then we mapped out all the important stuff on the wall to ensure that things would hang where they were supposed to hang. Looks pretty crazy, right? But I promise it makes lots of sense…

All of this painters tape is marking important reference points, such as:
- 1 & 2: Where our floating shelves would go – important because we wanted the bottom of the hood and the top shelf to be lined up (which was about 34″ from the top of the counter which is right between the hood manufacturer’s recommended 30″ – 36″ distance from the stovetop)
- 3, 4, & 5: Where our studs are – important so we could attach the hood securely to the wall
- 6: The center point of our stove – important so the hood would hang squarely over the stove
In case you’re wondering how I located the studs, it was actually thanks to some forethought on Sherry’s part. Back when that wall was open she begged me to somehow mark where they were before we tiled and covered everything up, so I opted to make small marks on the ceiling to keep track of where each stud was. Then I taped a piece of thread to that mark, tied a paper clip to the other end (to weigh it down) and voila – a perfectly marked stud all the way down the wall. And once we hang our crown molding around the ceiling those little stud-marking dots will be hidden once and for all.

With all of our guides marked, it was time to screw in our first piece of wood. Here’s the deal with the wood. The hood by itself was technically wide enough to hang from two studs, except the studs didn’t line up with the two notched holes in the back of the hood (which were at either end) and I didn’t trust that it would hold that way even if they were lined up perfectly.

So we figured we’d screw a slightly wider-than-the-hood piece of wood into two studs (and use a heavy duty anchor to secure it in a third location) and then hang the hood onto additional screws that lined up with the hood’s notched holes. We actually got a contractor’s blessing (just didn’t feel right drilling into our pretty wall o’ tile without double checking our plan with an expert first. So after that phone call we took a few deep breaths and moved on to the next (very scary) part of our plan: drilling into our tile. GASP.

I bought a special bit that’s meant for glass and tile. It took a bit of pressure, but eventually I got all of my holes drilled. Though I think we both silently freaked out the entire time drilling was in progress.

Once we got over having riddled our tile with holes (okay, there were just six) I used some 2.5″ screws to secure the chunky plank of wood to the wall. I have to tell you, feeling those screws grab the stud so tightly was one of the most confidence inspiring parts of this process. I felt like I could’ve hung my whole body weight from this thing – that is, if I was able to grip the tiny ledge with my lanky girl fingers.

With one board in (to hang the hood from) I then had to attach a second one (to hang the brackets from) also with long screws into two studs and a third set of screws into heavy duty anchors to further enforce things. Then it looked a little something like this. Note: the vent pipe is slightly off-center, not the boards (so once we build the frame for the hood that will be solved and it’ll all look centered). Oh, and the blue arrows are pointing to the two screws that the hood will hang from.

We felt pretty good when we realized that most upper cabinets are just held to studs with screws and then loaded up with dishes and plates and other items (and then a hood might be added on top of all that weight) and the whole shebang stays up.
Speaking of which, it was time to put the hood up (since the brackets would need to go up after the hood). Okay, so maybe this part was scarier than drilling into tile. We half pictured the whole wall of tile pulling off of the studs. But lucky for us, it didn’t budge. It was up there solid as a rock. Which is good news, because clearly I could use less time worrying about hanging hoods and more time spent shaving…

Anyways. Sherry supported the hood just in case (she’s the perfect height to rest it on her head from underneath it while standing on a small stepladder) and I attached the brackets to the wood panel and then into the hood using the same slots where it would’ve attached to a wall cabinet.

It was feeling plenty secure by this point, so I relieved Sherry’s head from hood-holding duties while I secured the second bracket and she took some more photos.

Once it was tightly held to the wall, I took care of some of the finishing touches – like attaching the vent pipe to the hood and plugging it in (btw, how lucky were we that the existing plug hole in the range hood was pretty much perfectly placed for our outlet???) – and we were in business. Phew! Update: We’ve since learned that metal foil tape (sold at hardware stores) is better for taping that duct together than duct tape (regardless of the more fitting name of the latter – haha) so we’ll be retaping that vent with foil tape to keep the seal nice and strong for the long term. Thanks for the tip guys!

Okay, so admittedly it looks kinda ugly right now. The exposed pipe / wood / giant hole in ceiling aren’t really a good look, are they?

But it was a good start. Not only did we have a hood for the first time in over two months, but we had a hood that wasn’t crazy close to the stove like our old microwave was (we hung it 34″ from the top of the counter which is right between the hood manufacturer’s recommended 30″ – 36″ distance from the stovetop). And this hood has two fancy light settings. Oooooh. Ahhhhh.

And I know the exposed wood looks kinda crazy – especially because it sticks out about an inch on the sides. But I promise this is all part of a plan (hint: they’ll make for a good spot to attach my homemade wood hood cover), so just bear with me for a couple of days.

Oh and don’t mind this POV, we didn’t have the filters snapped in yet (they’re basically big stainless steel rectangles, so it looks a lot better from below once those are in). We’ll have to share more photos soon.

Now in case you’re still worried about this thing coming crumbling down overnight (we were – we actually pulled the stove out before we went to bed the first night just in case!), know that it has survived a few full days now with nary a creak or shake. So without jinxing ourselves, Sherry and I are calling this hanging project a success. All is good in the hood, as they say. Between the long screws going firmly into those studs and the heavy duty brackets also adding extra from-the-top support, this guy is pretty darn secure. So after a few days of breath-holding, Captain Careful can officially exhale.

Now for the fun (?) part – building a pretty wood cover for it. Somebody crank up my jams! We’ll be back with all those details in a few days, but in the meantime, what did you guys do this weekend? Any heavy-object hanging? Tile drilling? Using your head to support something? Oh and something crazy crazy crazy is going on in our house today (well, it starts today and lasts for the next three weeks!!!) so we’ll fill you in on all that tomorrow (once we have lived through one day of it and have some photos to share).
Reader Redesign: Stenciled Seats
The soft spot we have for stencil projects has certainly grown since our office undertaking, but this one by Amy at The Casablanca Transformation would probably win over even the most skeptical stencil fans. And it actually sounds doable in well under fourteen hours! Score. Here’s her letter:
No matter how many decorating projects I do in my lifetime this one will surely go down in history as one of my all time best! I am so happy I had the idea and even happier that I dared to try! Here is the plain white leather bar stool before:

And the after!

I used a stencil from cuttingedgestencils.com and the paint is from turtlefeathers.net and is called Angelus Paint. It is made especially for painting leather (it has a bit of give to it and won’t crack). Since the chairs came unassembled I decided to leave them that way to make it a little easier to stencil. I was amazed at how easy the process was – total time was only about 4 hours.

I loved that I could pick out the exact style and colors I wanted for these chairs – a custom chair at a very cheap price! I bought the chairs 2 for $152 from overstock then add in the $80 in materials and my total cost is $384 for four bar stools ($96 each)! To have these stools custom upholstered in a fabric of my choice would have cost a lot more than that and they would have been ruined so quickly. I am hoping this painted leather alternative means they will stand the test of time and three boys! – Amy

Awesometown, right? You can check out more details over on Amy’s blog. Is anyone else’s head filling with ideas of what else they could stencil? And look at that pretty kitchen in the background. Me-ow.
Update: We just learned that there are some follow up posts about a few pitfalls with these chairs (specifically she wasn’t happy with the quality of the chairs themselves or the acrylic finisher that she used), so more details can be found here and here. Although Amy did drop in to say the actual stenciling process really works and some other chairs that have been stenciled (of better quality) are holding up great (without any acrylic finisher). Hope it helps!


