Installing drywall doesn’t have to be intimidating and, in fact, you can do it all by yourself! I was able to do our entire laundry room (including the ceiling) in one day AND without an extra set of hands. So today I’ll show you how and the secret weapon that made it all possible.
Drywall Installation Tools & Materials
Here’s what you’ll want to have on hand if, some of it is optional depending on the difficulty of your job:
- Drywall, we used 4 x 8′ UltraLight Sheetrock
- Drywall lift (we rented ours for $40!)
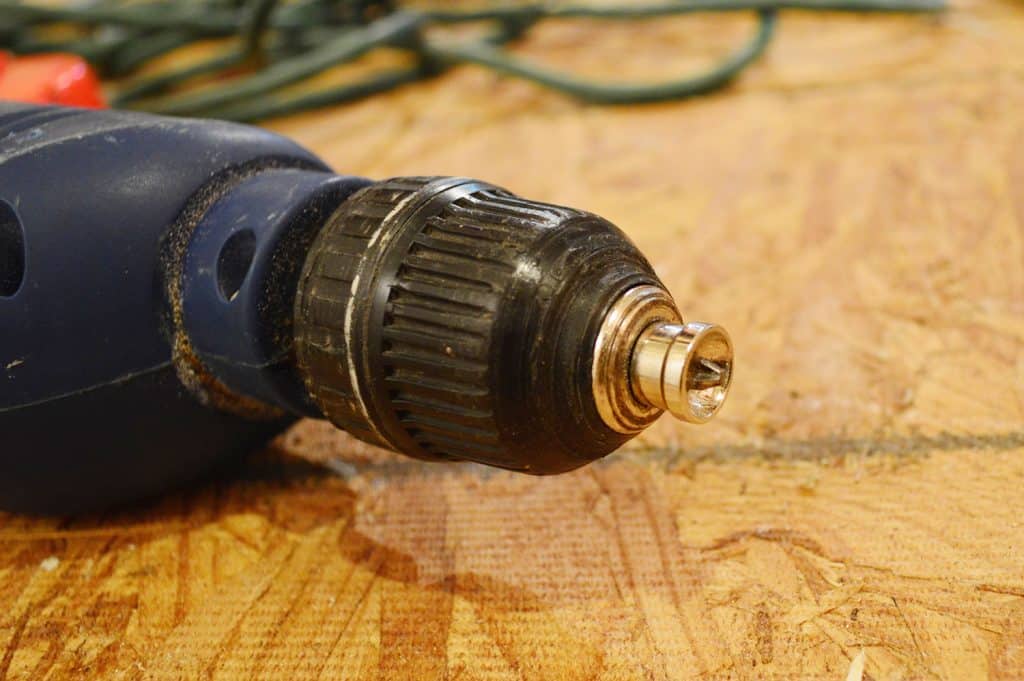
- An electric drill, in hindsight I wish I’d gotten a drywall screw gun
- Drywall setting drill bit (to countersink heads into the drywall)
- Coarse-thread drywall screws (I did 2″ on the ceiling, 1 5/8″ on the walls)
- Measuring tape
- Chalk line
- Utility knife
- Straight edge like a metal yardstick
- Drywall saw
- Hole saw drill bit (optional)
- Pencil or marker
- Step ladder
As you saw in our last post, I picked up the drywall along with my other big supplies when I rented the $19 Home Depot truck. I got fourteen 4 x 8′ sheets of UltraLight Sheetrock since the whole “ultra light” thing sounded helpful and it was well-reviewed.
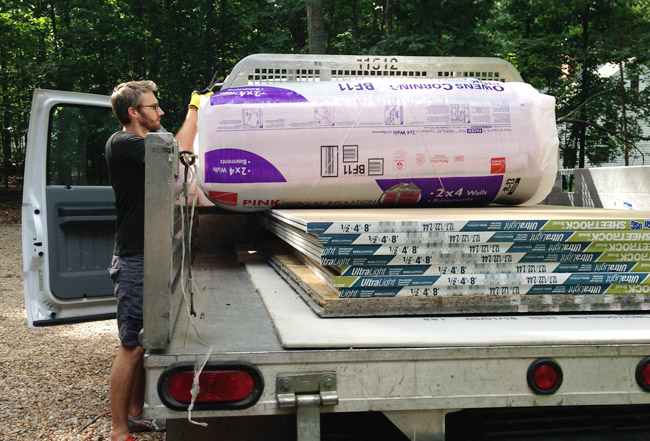
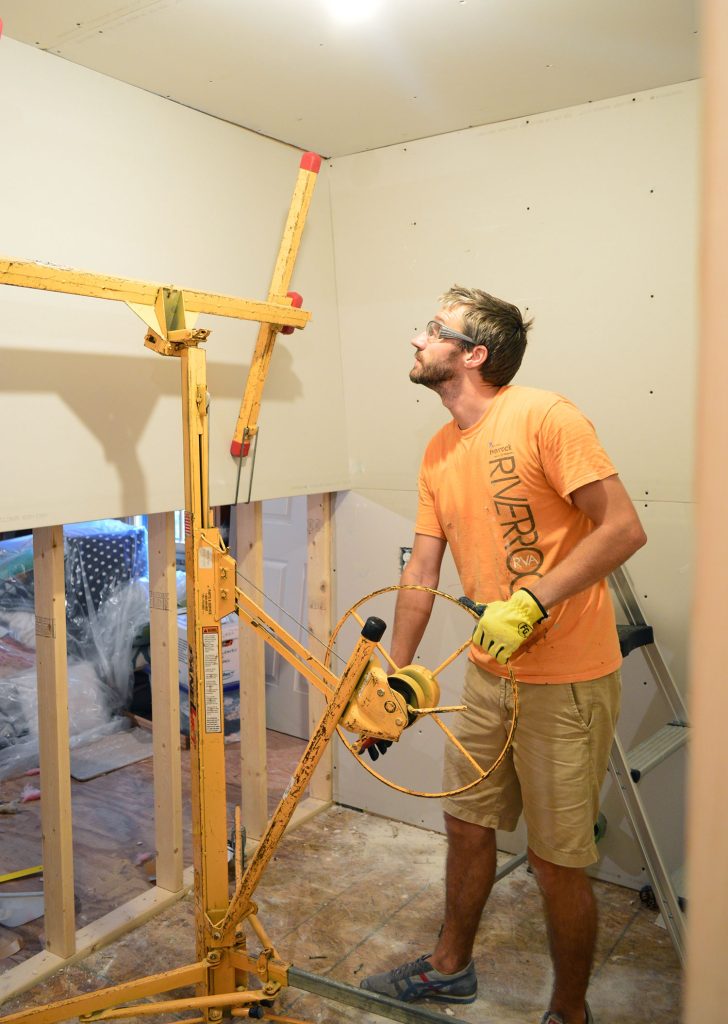
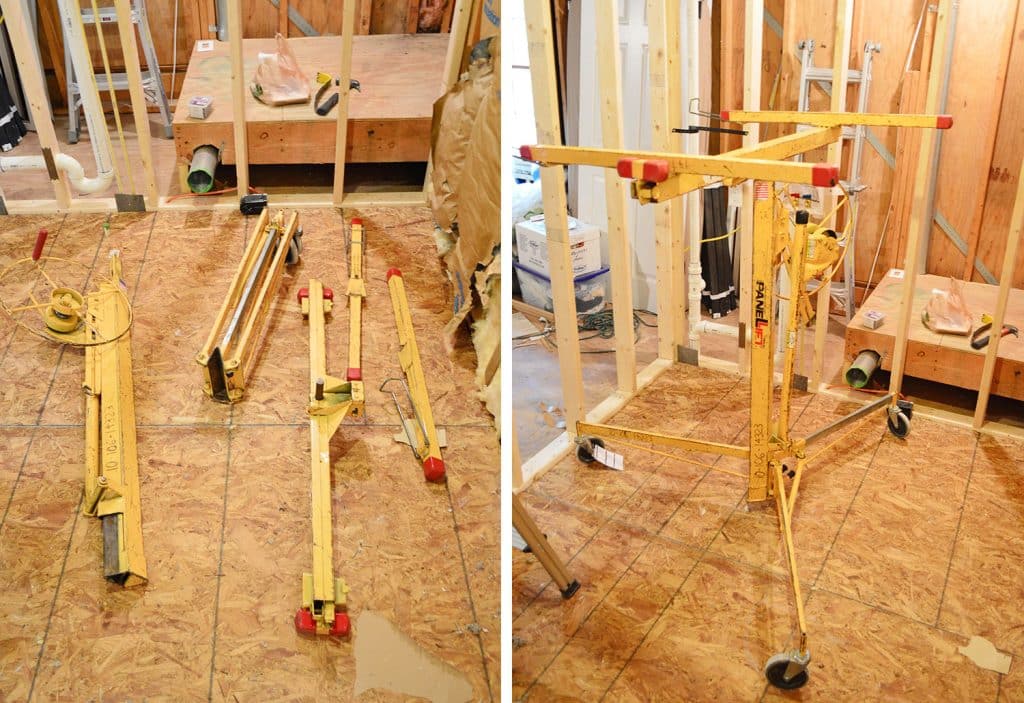
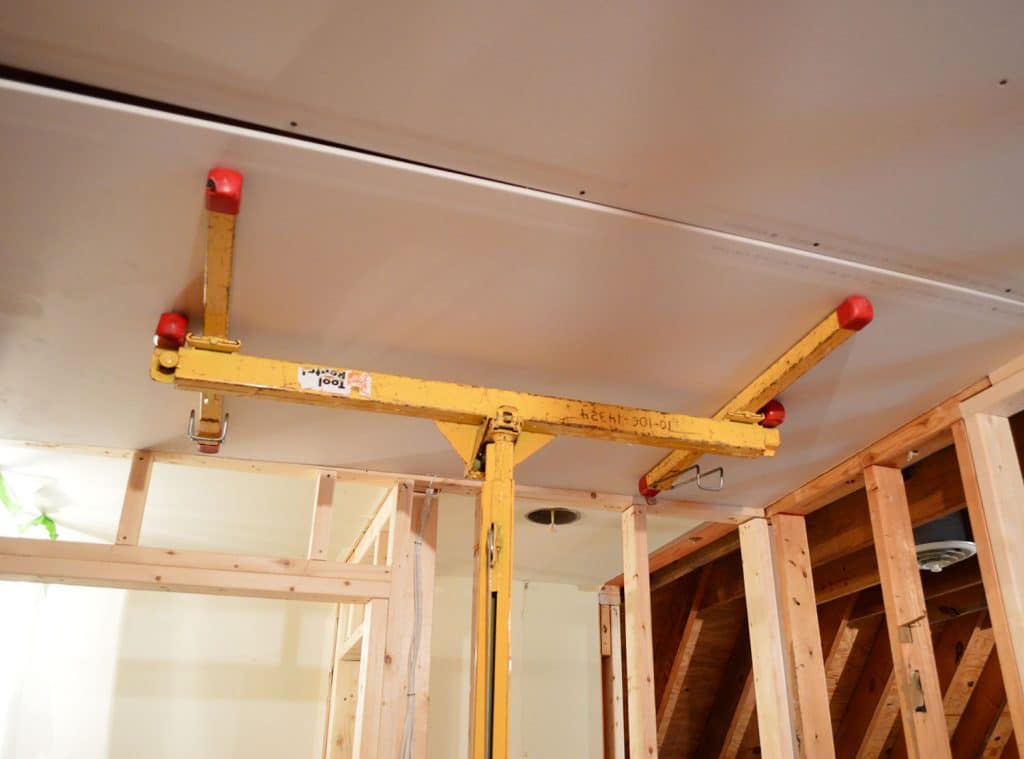
The lightweight thing was a bit of an over-promise. It’s lighter than traditional stuff, but still not something you can hold in place with one hand while the other screws it into the studs. So I rented this drywall lift from Home Depot to help with the job. It was $40 for 24 hours and the pieces easily fit in our car.
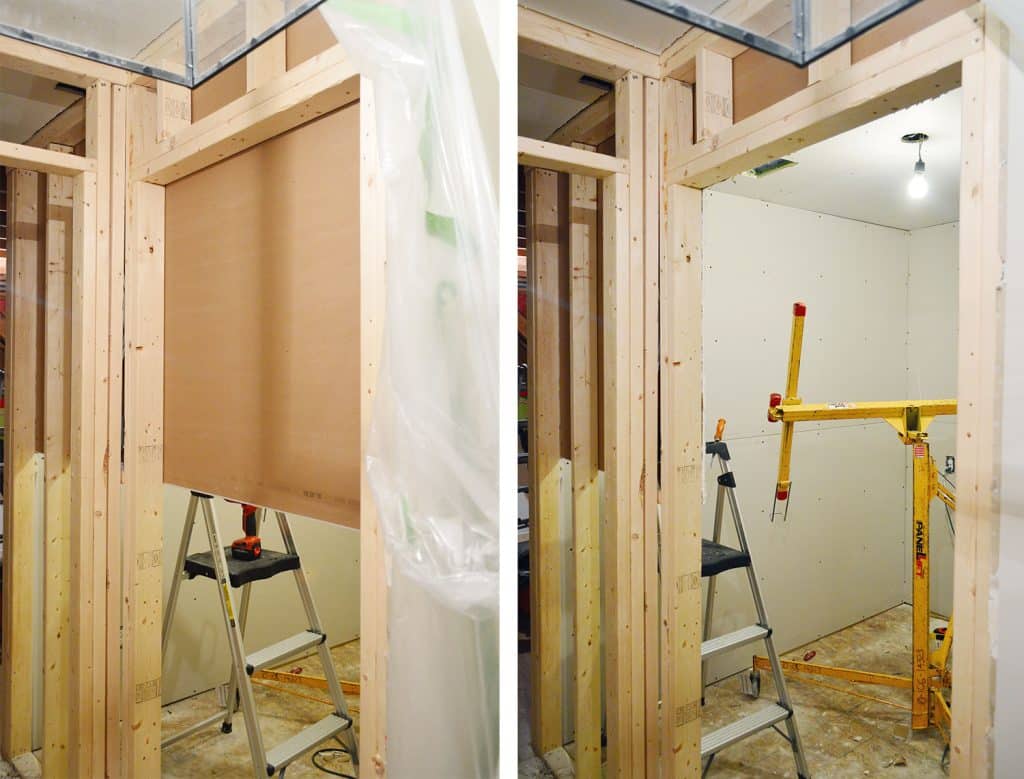
Hanging Drywall On The Ceiling
The drywall lift was a total lifesaver (and a backsaver). I could place a piece of drywall on it (once it was cut to size) and then crank it up into place with the spin of a wheel.
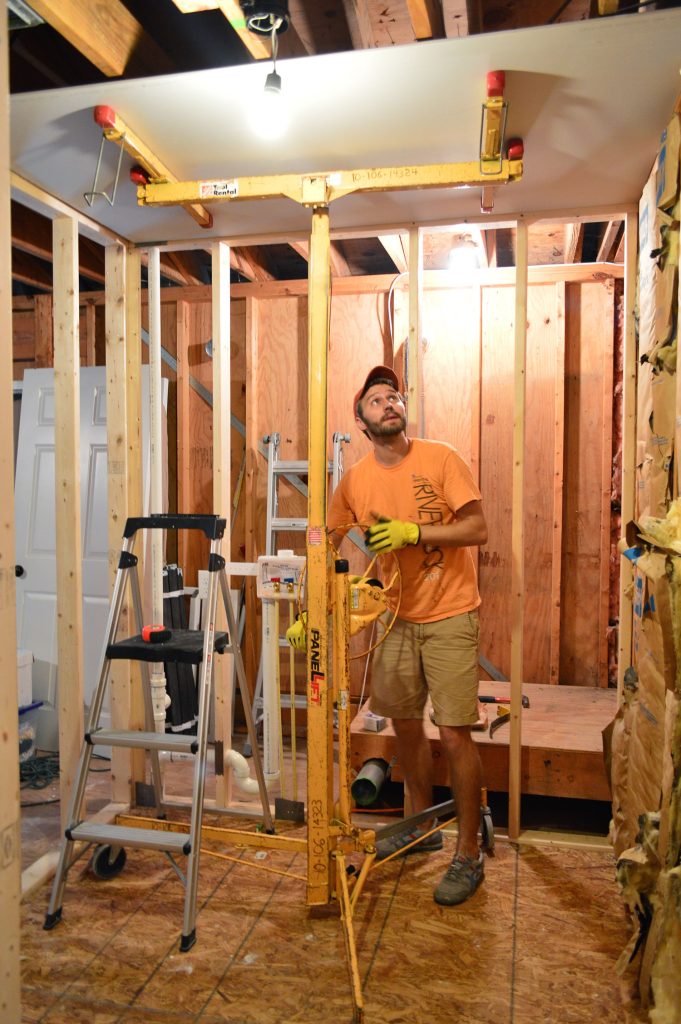
Then with the lift holding it in place, I was free to screw it into the wall studs or ceiling joists without having to worry about my arms (or a human helper’s arms) getting tired.
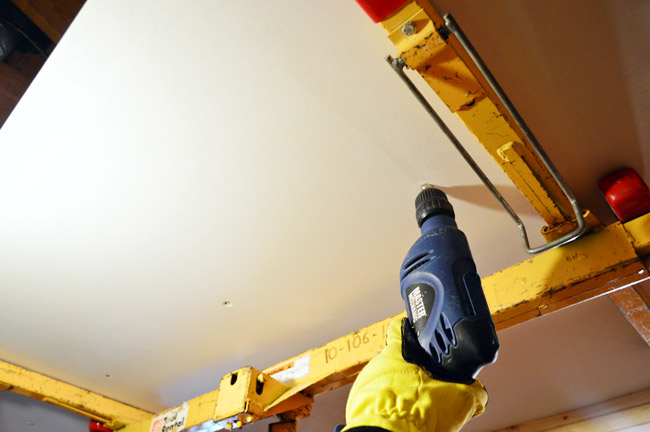
I used coarse-thread drywall screws (2″ on the ceiling, 1 5/8″ on the walls) and a special drywall setting drill bit, which makes sure the head of the screw gets counter-sunk into the drywall. In hindsight, I kinda wish I had splurged on a drywall screw gun because this step would have gone a lot faster.
The hanging process wasn’t really all that complicated – cut it to fit the pre-measured area, carry it upstairs, use the lift to get it into place, and screw it in.
Cutting The Drywall Sheets To Size
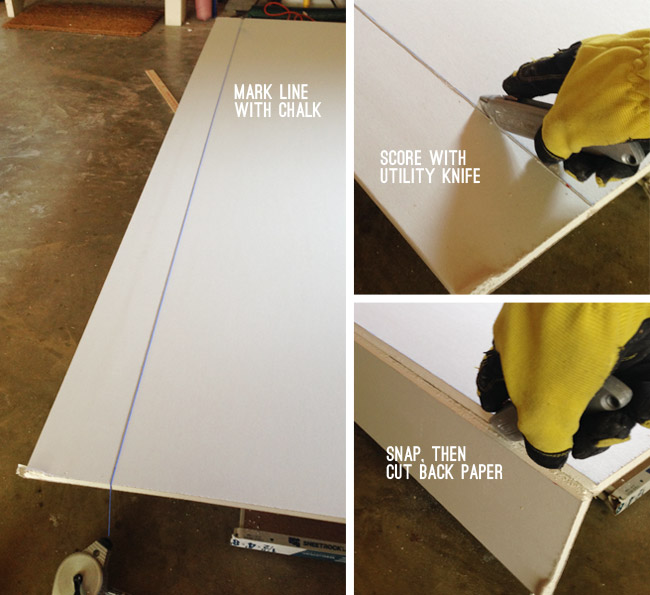
When a full sheet didn’t fit in a particular spot, I’d use a utility knife to score and break the drywall to size. Once I took my measurement, I marked my cut with a chalk line and then used a straight edge to score the line with my utility knife. Once you’re through the top layer of paper, you can run your knife along that ridge again without the straight edge, and it’s pretty easy to snap the piece along your line. Then you just have to cut the back layer of paper.
We also had to cut around various obstacles like light switches, vents, etc. For those I relied on a variety of tricks to ensure perfect hole placement.
Cutting Holes For Vents And Outlet Boxes
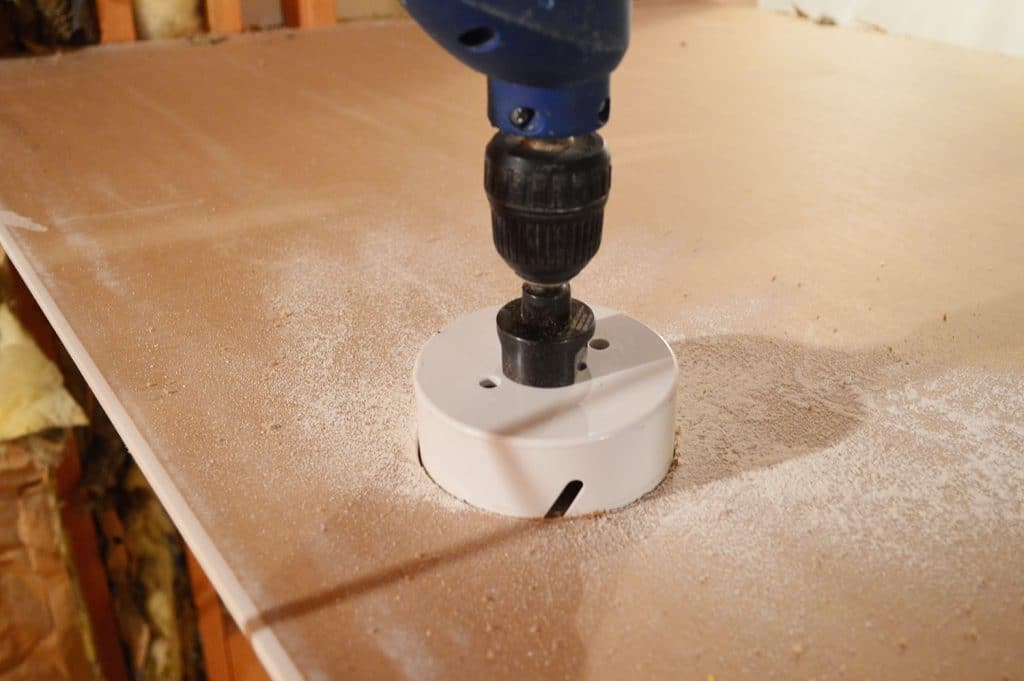
Since I had started with the ceiling, one of my first obstacles was the electrical box for our ceiling light. To mark its location, I dabbed some spare paint on the edge…
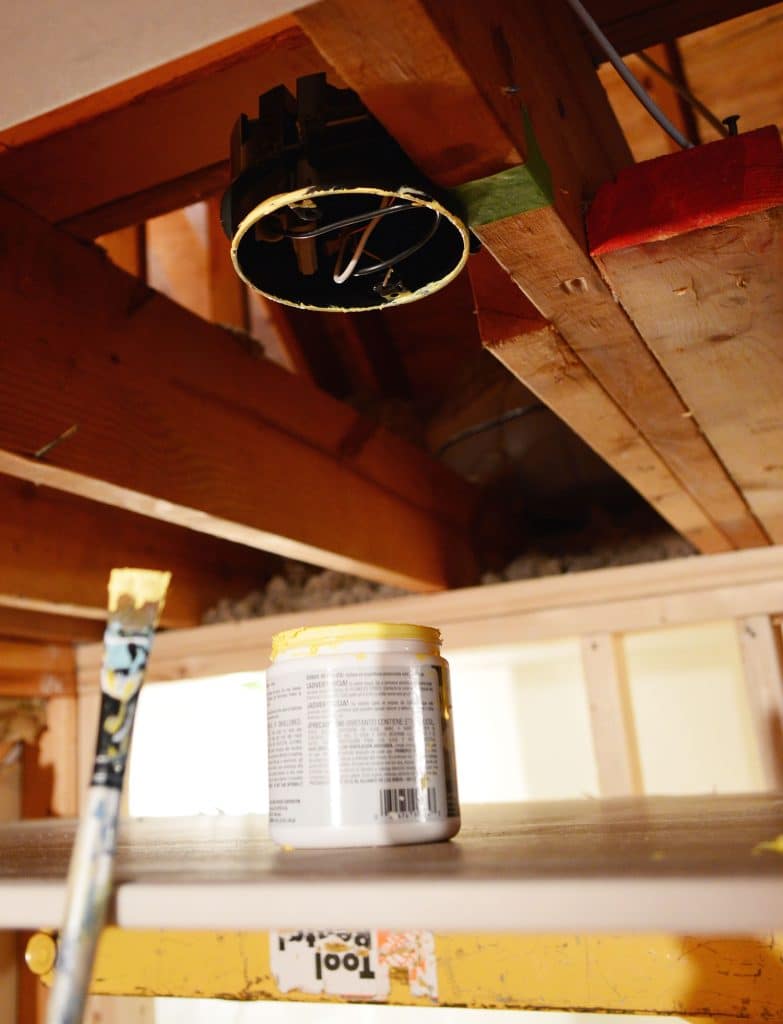
…then I pressed the sheet to the ceiling with the lift to transfer some of the paint to the drywall.
Then I could cut a perfectly placed hole using a hole saw drill bit.
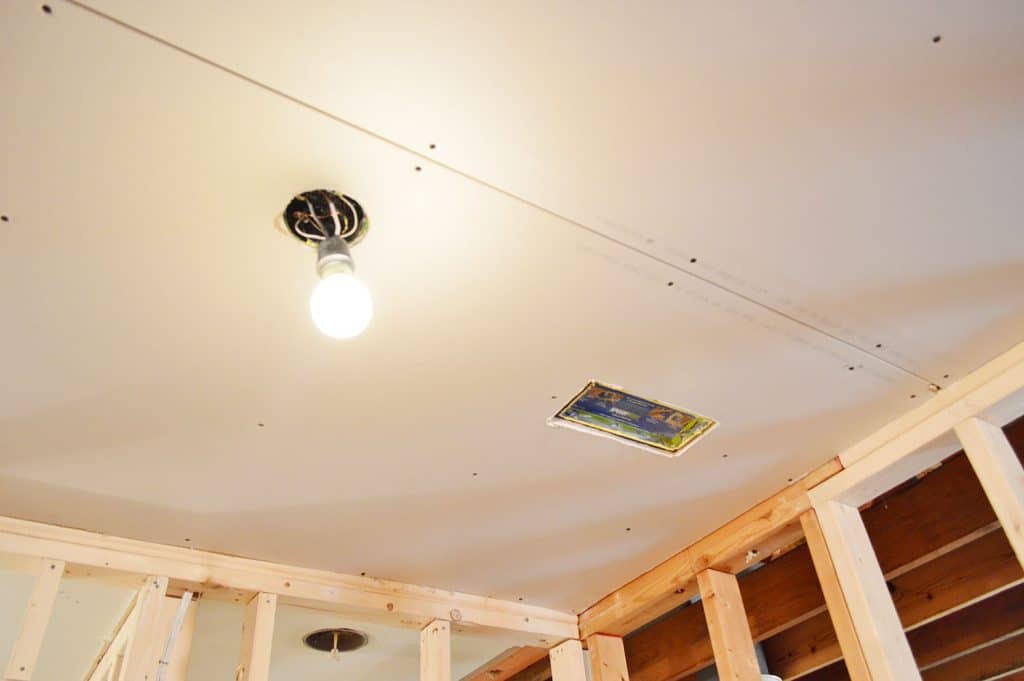
I used the same paint trick to mark the HVAC vent hole too, as you can see below.
For all the non-round holes, we used the drywall / keyhole / jab saw to cut out the appropriate sized holes. Whenever possible, we liked to cut from the front of the drywall because it kept the hole a bit cleaner on the inside.
Hanging Drywall On The Walls
The lift also pivots to help you hang a sheet of drywall on the wall. The room ended up being nearly 8′ deep and 7′ wide, so each wall required just two sheets of 8′ drywall that were cut a little shorter length-wise.

NOTE: It’s typically recommended that you hang your sheets horizontally across your studs. It creates fewer seams overall, hides bowing better, and gives you a stronger wall that’s less likely to sag.
As straightforward as the process was, it still took quite a bit of time. Between measuring & marking things, making our cuts, hauling things upstairs, using the lift to get them into place, cutting around additional obstructions, and screwing the drywall into place – I think we averaged about one board every 45 minutes. But because it’s not a large room, we were still able to knock out the room in a day.
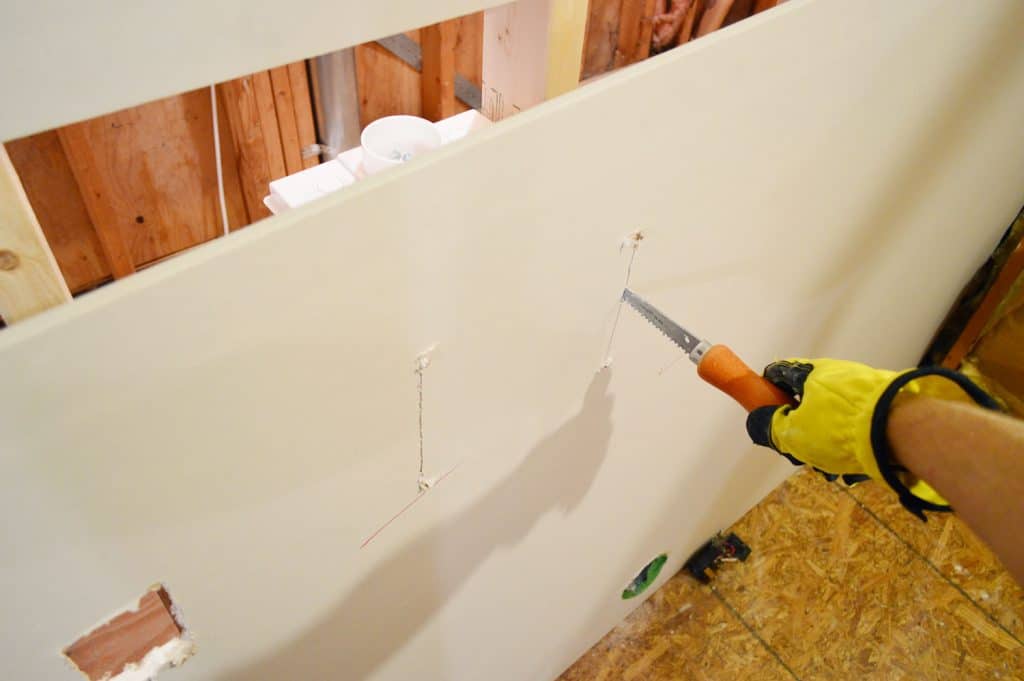
Cutting Around The Doorways
Cutting around the doorway was easy. We literally hung the sheets (one at a time) over the door opening and then cut out whatever covered the door opening with my drywall saw. This was a pretty foolproof way of doing it, but I think had I bought a spiral saw it would’ve been significantly faster.
Since we had four total doorway holes to cut (two doors with two sides each), we appreciated how foolproof this process was.
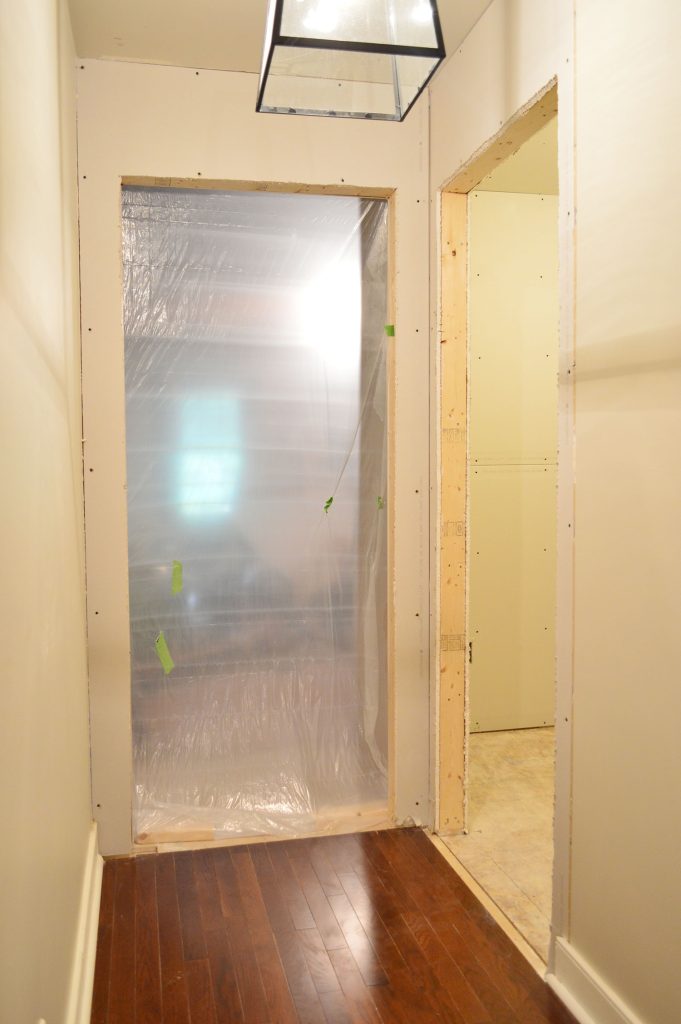
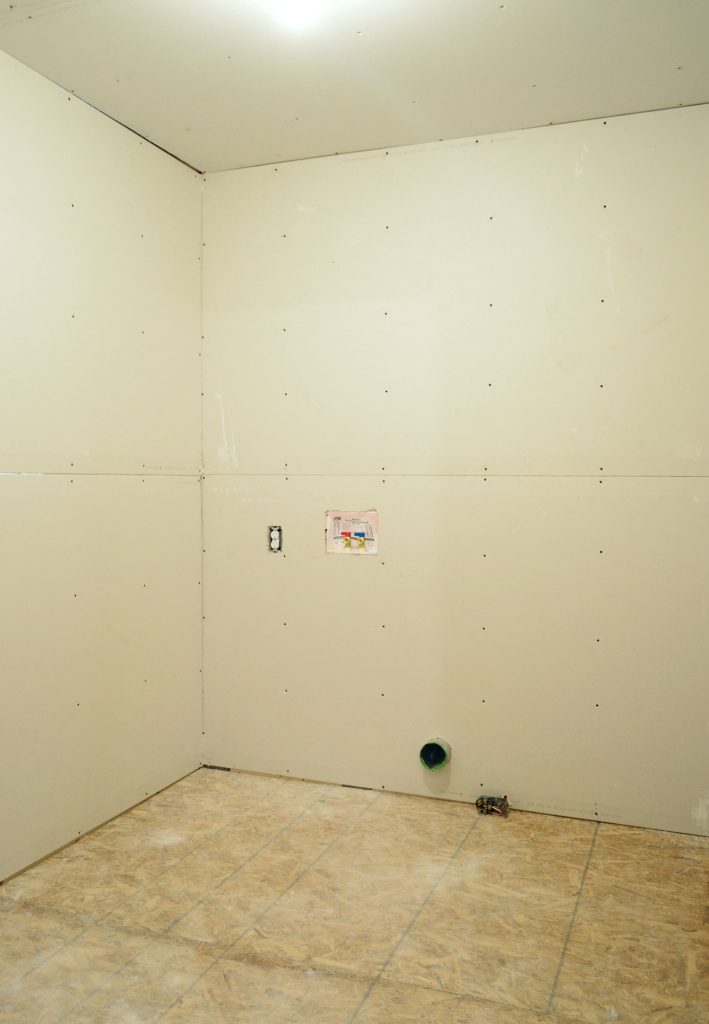
Eventually I got all 14 pieces in place (10 in the room, 2 in the hall, 2 in the storage room vestibule) and the space was really starting to take shape. This is where we started, as seen from the adjacent attic space…
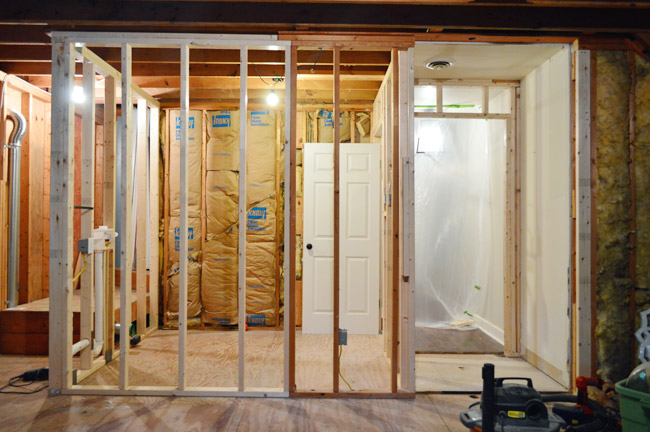
And this is where we ended up. Again, this is looking at the laundry room from the attic, which is why you still see exposed framing.
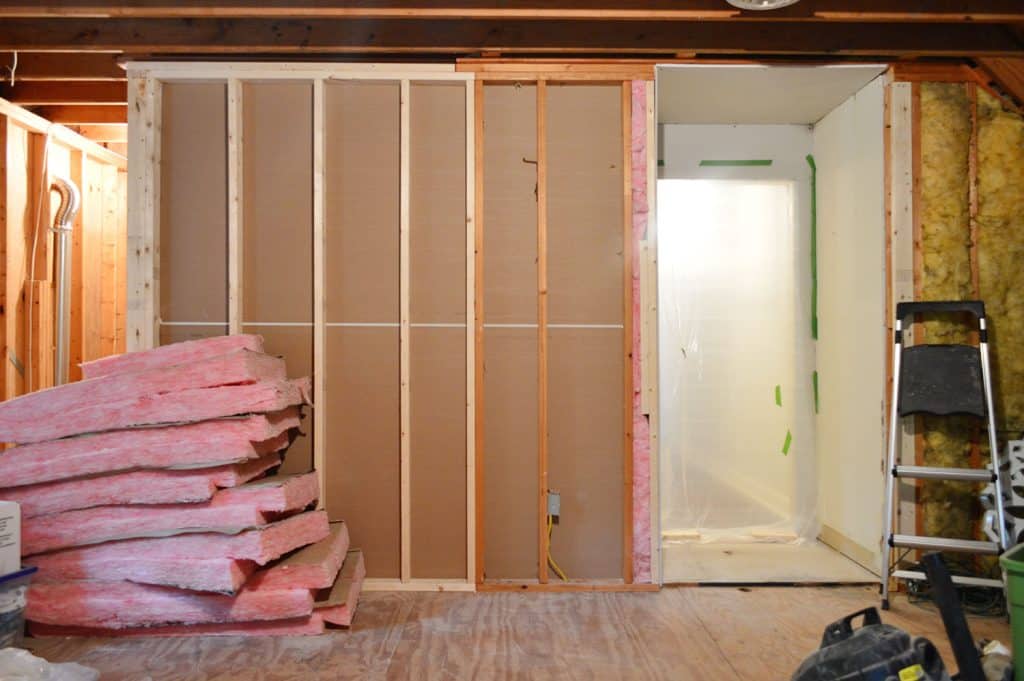
The inside of the laundry room isn’t looking very exciting. You can see that our drywall hanging isn’t 100% perfect (I had a slightly angled cut up in that top corner) but we’re still proud to have completed the task on our own. As many of you mentioned, the hanging part is a lot easier than the art of mudding and taping, so we tried to buoy our spirits with that info as we inched along.
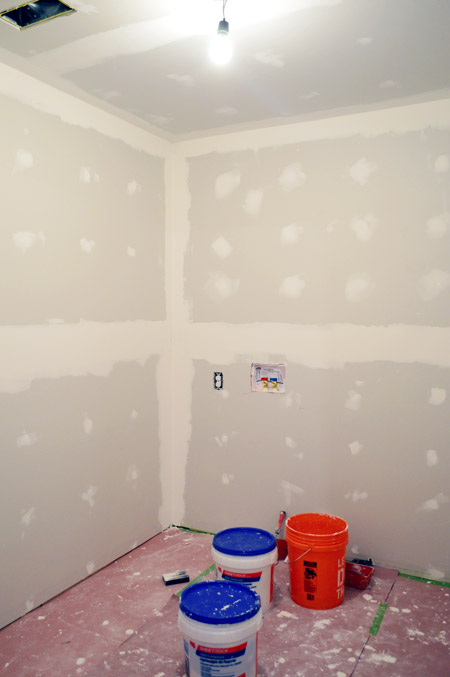
How To Mud & Tape Your Drywall Seams
Speaking of mudding and taping the joints, we’ve officially started in on that, and it’s definitely the more challenging part of this process – especially since we’ve got lots of corners.
UPDATE: We found a trick for making this process easier. So if you want to jump to the next step in this project, check out how we taped, mudded, and sanded the drywall (including a video)!
And if you really want to jump ahead, you can see how the final room turned out in this laundry room reveal post.

Amber says
It’s really fun to watch you guys take on more and more ambitious projects. And with a baby in the house, no less! Keep it up, guys, I look forward to seeing the finished product!
Anne says
I second that!
Emily @ Table + Hearth says
This is coming along fast you guys!! It is going to be soooo nice to have all that room :)
minabey says
Weeeeee! I’ve been waiting for your post since this morning! Ok, imma gonna read now. Thanks, you guys!
Julie says
I’ve been reading since way back in your first house! Are you guys ever just bowled over by how far you’ve come in DIY?!? It has been so fun watching you grow and learn over the years. :)
YoungHouseLove says
The funniest is when people who knew us in high school/college hear what we do and laugh out loud (there was nothing about us in college that said “I am handy” – I think we were both known for being uncoordinated). Still are, but it turns out you can still hang drywall.
xo
s
Constance says
This is impressive. Just impressive – well done!
Gwen says
You built a wall!!! (Que the Big Bang Theory theme song!) Great job, and can’t wait to see the finished room.
YoungHouseLove says
Ha!
xo
s
Ashley@AttemptsAtDomestication says
That drywall contraption looks like a life saver! Three cheers for progress!
Melanie says
You guys are so brave to tackle drywall finishing on your own! We just finished up having our basement drywall redone after a small flood…it took two guys 5 days, but it was a much larger space (almost 1200 feet). Best of luck to you!!
YoungHouseLove says
Wow! It must be awesome to have your basement all drywalled!
xo
s
Stephanie says
I hung drywall for the first time this weekend, so much fun. Well fun because I didn’t have to do the ceiling and someone else is doing the mudding. Saw Sherry in my HGTV magazine, I was like, I know that mantel.
YoungHouseLove says
So funny! Congrats on drywall and I can’t wait to see HGTV mag. Ours didn’t come yet!
xo
s
Katie says
You guys are so brave! Keep it up :)
I love watching y’all work (in a weird, non-creepy cyberspace way) ;)
Laura says
Looking good! Agreed – mudding and taping (and then sanding everything down!) is the most annoying part of drywalling. Can’t wait to see the progress!
Shay says
Do you still like your washing machine? I think it was a high efficiency top loader that you purchased last year? I have had nothing but problems with my front loader LG so I’m looking to purchase a new one soon.
YoungHouseLove says
Yes, so happy with it!
xo
s
Lynne says
You are not alone. I’ve had multiple problems with a front load LG washer too – and dealing with LG customer service has not been awesome.
Allen says
I bought the same W&D after Sherry and John did and we have LOVED ours! Big, easy, efficient and quiet!
YoungHouseLove says
So glad!
xo
s
Kim says
Are you having a lot of help with kid wrangling this time around? Or is John doing most of the heavy lifting while Sherry watches the kiddos?
YoungHouseLove says
Yup, I’m mostly on kid duty while John works, and we try to gear up and get a lot done while Clara naps/sleeps (hanging drywall isn’t very loud) – especially if Teddy is sleeping or lying happily on his playmat downstairs and I can sneak away to help John carry something upstairs. It’s kind of a juggling act.
xo
s
Dana says
Any chance you can share how you’re keeping the dust and debris down with a baby in the house?
YoungHouseLove says
We will definitely have dust flying when we sand the mud (hanging drywall isn’t too dusty save for the cutting, most of which we did in the garage). Mainly the key is lots of taped up tarps to section things off, like you’re living in a bubble ;)
xo
s
Blair R says
If you use a sanding block, (those sort of squishy ones – most definitely not the technical name/term), and wet it, it will cut down on the dust tremendously. Google: wet sanding drywall
YoungHouseLove says
Thanks Blair! We have been reading about that and cant wait to try it!
xo
s
Amanda B. says
I have also heard of a wet T-shirt technique. (You use it on the walls, not wear it!) An old drywall-refinisher-pro was describing it like you just rub the mud with the wet shirt and it smooths right out. Wish I had seen it in action to report how well it worked, but it sounded good!
YoungHouseLove says
Sounds intriguing!
xo
s
Charlotte says
DO IT! Use the wet sand/t-shirt technique! I read about this here this morning and commenced to use it in our kitchen, as an attempt to get the project moving forward. And it works! OMG! Compared to mudding/sanding the 2nd bathroom, this is so much nicer. I can do it with the kids in the living room, playing, and if they need me, there is no need for me to dust off, and worry about dragging the dust around the house.
I’m using a microfiber cloth and warm water. I wipe over with a damp cloth, and then come back a minute later, moving in gentle circles. Rinse your cloth/sponge early and often and change the water regularly. Thank you Blair and Amanda for suggesting this! :D I can’t wait to re-“sand” the bathroom, so we can finally finish it.
YoungHouseLove says
Wahoo! Thanks for the info Charlotte! Sounds awesome!
xo
s
Mary | Lemon Grove Blog says
Ambitious! Drywall is a pain in the tuckus. We’ve always installed it in our 1930’s homes (where nothing, I repeat nothing is straight) so it’s always been pretty tricky to match things up. It looks like you guys did a stellar job of laying it down, which should make the mudding turn out that much better. Looks good!
angie says
Good job! You will do great with the mudding and taping. Its really not that hard. I thought it was kinda fun. More so than hanging the drywall:)
christy says
I heart this project so much. I love that you guys are fearless in taking on projects of this size! I can’t wait to see the finished product (and every step in-between!) :)
YoungHouseLove says
Thanks so much Christy!
xo
s
Stardancer says
It’s funny how at first glance, the last week and this week photos don’t look that different. It’s sort of like, Oh, it has walls. But the actually difference is probably more like, WALLS! THERE ARE REAL WALLS!! With celebratory dancing, of course.
Shayna says
Looks great so far! Tape & bed is no joke! I have a feeling y’all will do great at it though!!
Blair R says
Ah, memories! We had to rip out and hang drywall in our kitchen remodel. Which, by the way, I referred to your site heavily for a number of things during our remodel. (We would not have been able to do it ourselves without your blog!) I may have missed this, but are you going to use the tile you bought for the previous laundry room plan on the floor or is that for the walls?
YoungHouseLove says
That’s going on the walls but we picked out floor tile and can’t wait to share it as soon as it comes in!
xo
s
Sarah @ Sarah's Daybook says
So jealous of your skills. So excited to see what it looks like done!
Greetings from California!
Sarah
April says
Looking good! We hired out the drywall process when we redid our living room. Too much mess and work. It was worth every penny too.
YoungHouseLove says
Right about now that sounds awesome!
xo
s
Megan says
Y’all are awesome — great job!
Mrs. Money says
Ok- I have to know, is it killing you guys to not have access to your washer and dryer right now?! I would go crazy.
It looks great and you should be so proud of yourselves!
YoungHouseLove says
It’s not so bad thanks to being able to run over and use John’s parents’ washer/dryer when we get low.
xo
s
Erin says
I’ve done some mudding and taping in the past, and still remember it as one of the DIY tasks that I absolutely flunked – ha! But you guys will nail it – good luck!
Anele @ Success Along the Weigh says
I will be anxiously awaiting the mudding/taping post (as I do all of them, of course!). We’re going to tackle insulating and drywalling the garage wall that’s been open forever so it’s not so hot and cold in there depending on the seasons. I think our contractor friend threw in the “side job” towel after doing our flooring so we’re on our own and the taping/mudding scares us both!
Evelyn says
I love that you guys are doing this! The plastic sheet gives a neat preview of the light that will come through the glass door. I can’t tell how wide the vestibule is but just wanted to point out, after much carrying of wide things through a narrow doorway/hallway, that the door handle/knob takes up some of the precious space. Though at this point, taking a door off its hinges is not a big deal for you guys at all. We just ran into the “narrow passage” situation so many times we finally made a little recessed nook in the drywall for the doorknob so the door would open all the way. It got pretty annoying to not have a door open all the way to the side even just walking through.
YoungHouseLove says
Smart!
xo
s
Reenie says
WOW….looking good!! :)
Samantha says
Loved the post! We have circular air vents in the ceiling of all of our bedrooms. I would love to move these so that we can add ceiling fans. Was it hard to remove and close off the old vents?
Good luck with the rest of the project!
YoungHouseLove says
We chatted about that process at the end of last week, so if you scroll down a post you’ll see all that info and a bunch of pics!
xo
s
Cat @ MaryMarthaMama says
We have some drywall work coming up in our bathroom reno so I am so excited to watch the progress of this project! Thank you so much for this post!
Ashley says
You know what I love about your blog/website/life is that when you guys decide on something, you just go for it. There have been many many months of me thinking “i’d just love to redo this kitchen” but then living with it a certain way. A few weeks ago I finally decided to just pull the trigger and began a three-week redo (i’m a single gal learning as I go!). The most labor intensive was the popcorn ceiling and painting dark dark 70’s cabinets. BUT all of that work has paid off–the room is GORGEOUS now and i just want to be in there all the time.
What I also really love is that when you saw the layout you wanted (from a reader, no less!), even though it entailed a LOT MORE WORK than your original plans, you went for it because you knew, in the long haul, it was what you wanted more. I think maybe you’ve learned the secret of renovating–it’s always worth it so just do it already? Or maybe it’s not a secret and it’s just taking me a bit longer ;) It’s absurd at how excited I am to see the end results of this laundry room. Question: Since you’ve been working so close to the unfinished attic space these last few weeks, does it make you want to get on finishing it? Especially now that you’re old pros at hanging drywall? And you’re going to have a gorgeous laundry space right next door?
YoungHouseLove says
Aw thanks Ashley! We’re definitely itching to get the storage room drywalled, but man, now that we’re drywalling this smaller space, let’s say we’re not really looking forward to doing that giant room (the laundry room is a little over 50 square feet and the storage room is 500!).
xo
s
Erin @ One Project at a Time says
Way to go Youngsters! Don’t forget about the worst part of the mudding and taping process though- the cleaning up of the sheetrock dust! I’m sure you guys will be smarter than me though and create a plastic barrier so that the dust doesn’t float down the hallway and lightly cover your entire home! Good luck!
Erin says
John – get thee an impact driver! It’s a bit of an upfront investment, but you’ll use it again if you have any more construction plans – from drywall to framing to swing sets, it’ll streamline your work flow.
YoungHouseLove says
Thanks Erin!
xo
s
Leesha says
Looking great! Are you already contemplating wall colors, decor and what not? I can’t wait to see how it all comes together. I loved what you guys did in the laundry room at that showcase house. Never thought a laundry room could be, dare I say it, beautiful! :)
YoungHouseLove says
You’re so sweet Leesha! My head is spinning with wall colors and lighting and cabinetry and art options! Can’t wait to get to that point!
xo
s
Gilly says
$herdog, is it easier to try and see the (completely!) blank room come together, now that you’ve done the showhouse? Or is it just the same?
YoungHouseLove says
Hmm, that’s a good question! I think it’s really exciting having recently done the showhouse because this is so reminiscent of that process (seeing the drywall go up and knowing a finished room is just around the corner). I’m still nervous about how it’ll come together of course, but so psyched to get to the fun stuff like light fixtures and tile.
xo
s
Diana says
You guys are rockstars!!! What does a large piece of drywall weigh? I had no idea it was that heavy or you needed all of those tools to get it done. Good to know, in case we have any future drywalling in our little DIY home!
You guys are making great progress!
http://www.thewonderfullymade.blogspot.com
Cadie says
Wow! You guys are GOOD! I’m so impressed that you would take on such a huge project on your own. I’m looking forward to seeing the cost breakdown and how much you saved vs. paying someone else to do the work. So fun to watch the progress and the finished laundry room is going to be awesome!
Beth says
Good work! I just wanted to mention with the mudding that we’ve had lots of success w/ a drywall “sponge” and water when you get to the smoothing stage. It’s a ton less messy than sanding, which is nice w/ little ones around. It takes a little more time because you have to let it dry thoroughly and then often there are little places to add to/”sponge” off after the first round, but it’s always been a more professional result. We’ve done it for little and big projects in our old house and I’ll never go back to sanding.
I love your site!
YoungHouseLove says
Thanks for the tip!
xo
s
Carolyn Kelley says
This is amazing! We’ve tried a lot on our house but nothing like this. I’m so impressed!
Cynthia LaPan says
Yayayayay!! This is so exciting!
You’ve talked about your plans to use a frosted glass door for the Storage Room (excellent choice). What do you forsee for the laundry room door? Will the window in the Storage Room remain the same, or so you have any plans for that?
YoungHouseLove says
Down the line we’d love a larger window in the storage room, and for the laundry room door we will just use the same hall door as the other six rooms off the hall (so the frosted bunk room one can be the star).
xo
s
Gloria says
A laundry room with no walls is like a ballroom with no balls! #namethatmovie
YoungHouseLove says
Bahaha! Frozen!
xo
s
Samantha @ Fabulous Fabris says
Wow, I don’t envy you that job. I love watching this proect come toether.
SherryB says
Looking good, you guys – Nearly there!
Bethany says
Putting paint around the light fixture and vents so you could mark the holes perfectly is BRILLIANT. I never would have thought of that. I’m going to feel like a genius if I never need to use that trick one day.
Melissa @ Loving Here says
Looking good. So exciting! We just did this unfun job in our kitchen. And since it was our first time ever tackling drywall on our own, it wasn’t easy. And it was back-breaking since the mudding and sanding on the ceiling takes forever. We learned a few tips and tricks, and now it’s looking fab, but I don’t envy you guys right now. Here’s to getting this part done and on to the fun stuff!
Here’s our recaps: http://lovinghere.com/how-i-helped-with-the-drywall/
http://lovinghere.com/i-cant-stand-to-sand/
http://lovinghere.com/mud-and-messes/
http://lovinghere.com/a-dry-wall-date/
Mary says
Have you guys ever tried using Roxul insulation? I used it for my reno last year and loved it! So much easier to install than the pink stuff – you can cut it smooth as cake with a bread knife, and it doesn’t make you itchy. It has a higher R value too, which is helpful. It also does a great job soundproofing, which you probably want in a laundry room.
YoungHouseLove says
That sounds awesome!
xo
s
Katja | Shift Ctrl Art says
It looks so good! Drywall is such a bear. Renting that lift was so smart.
I *think* figured out the secret to good mudding: Marry the idea that it does need three passes to be really great.
Can’t wait to see the progress!!
Julie says
Looks great!! very ambitious!
We did some drywalling/mudding when we redid our bathroom this year. When taping, we got a great tip to actually wet the tape before putting it on the wall. We put a layer of mud, wet the tape in a bucket and then squeegeed it off with two fingers and then put it on the wall. It sticks much better both in that minute you’re mudding it and also in the long term. Our tape in our garage is coming off even though there’s tons of mud, we asked a contractor why and he said they probably dry-taped it.
Also, I’m sure you’re doing tons of research, but i was surprised to learn that the first layer of mud (under the tape) is actually different mud than the next 2-3 layers (over the tape). So we bought two different kinds.
Good luck!!
YoungHouseLove says
Thanks for all the mudding tips everyone!
xo
s
Stacey says
Looking good! I don’t envy you the mudding and sanding stage. In my own home you can see the progression of my husband’s mudding and sanding skills over the years, thankfully his skill set in this area improved with each time. Our next room to tackle is our family room(the one with the worst drywall) and I am going to encourage him to rent that lift, especially for the ceiling!
Michelle says
Looks good…after taking our kitchen down to the studs and having to mud and tape a very large kitchen with a vaulted ceiling I’m convinced mudding and taping is one of the worst things to ever do. I didn’t mind the sanding because hey who can’t sand, but the tape and mud just sucked.
Lynn @ Safebeauty says
This is a big project and hanging drywall is always the most dramatic/nail biting/sour words inducing episodes of Renovation Realities I’ve seen to date. If you can survive drywall your marriage can survive anything!
My best, Lynn
YoungHouseLove says
Haha, thanks Lynn! I always say if you can survive two hours in ikea with kids your marriage can survive anything.
xo
s