We just flew back from Boston (and boy are our arms tired, har-har) but since we shared our freshly painted bathroom with you guys this morning and we didn’t want to leave you hanging with just one post, we got this Reader Redesign together in the airport for ya (throughout all this travel, we’re doing out best to keep blogging as usual). I know we typically share full room makeovers, but this furniture upgrade had such a creative twist that we had to pass it along. We loved that Beth and Nick rescued this old to-be-trashed buffet with the help of some wood stain applied in an unexpected way. Here’s what Beth had to say about the project:
Hi guys! I love drawing with charcoal, and I decided that I was going to try the same techniques, only using stain on wood, instead of charcoal on paper. It came out so well, we just had to share it with you!
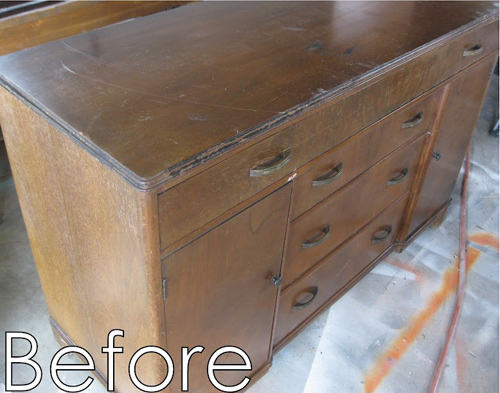
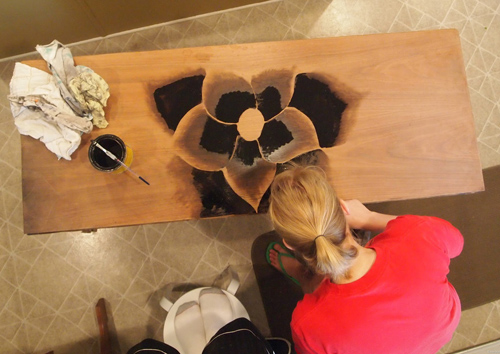
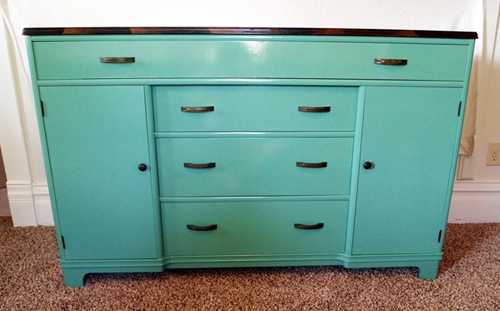
We pulled this buffet out of a burn pile, repaired the burn damage and fixed a structural problem, prepped, primed, and painted the body. Then I drew out some flower petals lightly with a pencil on the top surface of the buffet and began staining with Minwax Ebony. I started with the center petals and stained each petal, starting at the center and working my way out toward the tip of the petal.
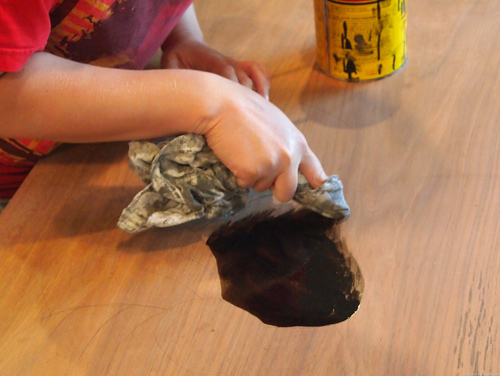
As you can see I didn’t stain all the way out to the edge of the petals, because I wanted that to be the lightest portion of my ‘shading.” Using a dry cloth and my finger, I wiped away from the stain to allow a smooth transition from the stained portion to the outer unstained portion of my petal. Rubbing it to create that shaded look. I continued to repeat this process on each petal as I worked my way away from the center of the flower.
I’m soooo super proud of myself. Hope you love it! – Beth & Nick
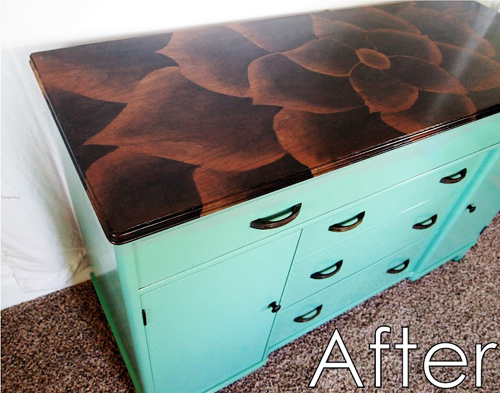
Isn’t that such a cool idea? For those who might shy away from the painted bottom, you could easily stain the front/sides of a piece and apply this treatment to the top as well. Makes me feel like such a staining novice. But now I’m kind of itching to think of a piece that we could try this on. And it makes me realize that if such an intricate design is possible, someone could attempt something like stripes or tiled triangles too (perhaps with the help of some painters tape?). So if you’re looking for more pics and details about the process, be sure to visit Beth and Nick’s blog, and if anyone else has tried something fun with stain we’d love to hear how it all went down.

Elaine says
loveeeeeeeeeeeeeeeeeeeeeeeee
Kristin says
That is incredible!!!!
Suni says
This might just be one of the coolest redesigns I’ve ever seen for furniture!! WOW!! I love everything about it. Thank you so much for sharing…now to find a kleenex to wipe the drool of my desk.
Maureen says
Holy Schmoly… THIS IS AMAZING!
Really, really beautiful!
Brenda says
What a fabulous, artistic result! So clever!
liz says
Oh wow.
THAT.IS.AWESOME. What a beautiful beautiful piece of furniture it is now… seriously – so awesome.
Emma (Broke Ass Home) says
I am stunned, jealous, and in love. Way to go, Beth!
kathy says
Wow. That is so insanely gorgeous! It looks like a custom piece!
I’m totally art-challenged so I’m sure mine would look like a toddler doodled on the top with a Sharpie.
Abby says
WOW!!! I am totally impressed and inspired. This is gorgeous!
Kenz @ Interiors By Kenz says
I LOVE Beth! She is so good at transforming furniture. She might as well be the furniture whisperer.
hannah gray says
This is one of the collest refinishing projects i’ve seen! I just stained an old mid centrury modern tv stand a few weeks ago and would love to try something a little more challenging like this, but I’m no artist! lol
andrea @ my kinda perfect says
are you serious?! that’s GORGEOUS!!!! what a creative way to use stain!!! =)
p.s. it was so awesome to meet you guys last night! highlight of 2012 for sure!
YoungHouseLove says
Aw, it was amazing to meet you Andrea! We had the best time! Thanks for coming out in the storm!
xo
s
Jenny says
Wow! That looks fantastic! And my favorite part of her write-up: “I’m soooo super proud of myself.” As she should be!
Amanda says
I am picking up four pieces this weekend from CL – you can bet I am going to try something similar to this on at least one of them! Awesome share!
Adrienne says
Holy shitake mushroom….this is cool!
CandiL says
I do not have the artistic ability or patience to do this…but oh my word this is awesome!
Michelle M. says
I mean, not sure really haven’t worked with stain, but if you wanted a different look thats easier you could try cheverons or circles or stripes… anything geometric would be easier and kinda subtle/cool. :)
Julia says
WOW that is AMAZING!!! I would buy that buffet in a heartbeat. She should consider doing this some more and selling her pieces!! I wish I had the artistic skill to pull something off like that, but I don’t, so I do like your idea of doing a more simple design! I’m curious how she got those clean lines around the petals?
YoungHouseLove says
They look so clean, right?! I studied the picture and it looks like she was using a small paint brush in some (maybe to get that crisp edge?).
xo
s
Cassidy says
Julia, I have been following Beth’s blog for a long time, and they do sell their pieces!! Either you can bring them a piece and tell them how to re-do it, or you can buy from her “in stock already completed” collection. She is awesome!
Robin @ our semi organic life says
So beautiful! Who know such creative things could be done like this!? not me.
Also I just found this out – you can make secret boards on Pinterest now. #hadtoshare
YoungHouseLove says
Oh yeah, so exciting!
xo
s
Jen says
whhhaaaat? secret boards?! I’m off to check it out
Emily says
You can?! How? I just got and have been staring at my boards for like 20 minutes trying to figure it out…
YoungHouseLove says
If you scroll down on the page that says “my boards” you can see three spots to add three secret boards. Hope it helps!
xo
s
Sarah says
Wow that is amazing…and she must be super patient! I think I would give up and just stain the whole thing :)
Cant’ wait to see y’all in Dallas!
Heather says
That is SO cool. I absolutely LOVE it! I love the turquoise and that top is so pretty & different!
We actually just finished transforming a mid-century dresser into an entertainment center. It was our first time using stain & I’m so pleased with how it turned out!
http://www.bakecreatelove.com/2012/11/our-newest-furniture-project.html
YoungHouseLove says
Gorgeous! I love the lines of that!
xo
s
Amanda T. says
Whoa! That is amazing!
Ali says
Beautiful! Way to go Beth & Nick! I would never want to sit anything on top of that design.
Anele @ Success Along the Weigh says
*picking jaw off the floor*
That is simply gorgeous!
Sara says
Wow! Stunning! What sort of prep do you have to do on painted wood to stain it? Strip and sand?
YoungHouseLove says
You usually just have to sand it down enough so that it’s not glossy anymore so the wood can soak up the stain.
xo
s
Michelle Kersey says
THAT’S AMAZING!!!!!!!!
Sunnie says
Beautiful piece, and I love that they rescued it from being destroyed. I would love to try this technique out sometime!
Careen says
Holy Cannoli! that is amazing. they could charge big bucks and sell items done in that fashion. gorgeous.
Krissy says
Wow, that looks fantastic! Really impressive. And I love that poppy color!
caroline says
That’s gorgeous! Can’t believe I never thought of this, but I would probably be too scared to try it. Mostly because I can’t draw and my flowers would be weird looking.
I did do something with painter’s tape and stripes on my 50’s cocktail cart though, you can have a look here: http://bunniesandstripes.blogspot.fr/2012/10/after-after.html
YoungHouseLove says
Holy cow, that’s gorgeous! I love it!!
xo
s
Tamrah Ryan says
WOWOWOW! I am so impressed. Very. Cool.
Katie says
That is ridiculously gorgeous. Amazing job, thanks for sharing!
Lauren says
nice! a leopard print would be awesome!
YoungHouseLove says
Ohemgee, someone do that and send me pics!
xo
s
Gretchen Brown says
Oh Em Geee! That is BEAUTIFUL!!!
elizabeth says
It’s like wood inlays for poor people… I LOVE IT!
Brandi says
Wow how creative! And she should be proud of herself. If I did that, I would beam with pride every time I passed by it.
Jenn says
I WANT IT. Wow!
steph says
In a world where pinterest has taken over making no idea unique, I must say, this is absolutely fabulous.
This is 100% unique and so cool!
What talent!
I wish I had somewhere to do this… or at least try.
Now…. off to pin this!
:)
Alice says
Whoa Nelly! Unbelievably amazing! The talent of people never ceases to amaze me.
Gabriella @ Our Life In Action says
OMG! That’s amazing!
I could never do that – seriously, I would start out trying to do a flower and would come end up with some sort of mangled sun looking thing….oh the horror!
Donna Jean says
wow! that is spectacular – and so much more awesome than the furniture redesign that my 2 yr old did this morning w/ our recliner and a pink highlighter! i wish i had the artistic talent to be able to do something awesome like that buffet – and i love the color they chose for the bottom of it, too. so gorgeous.
Allison Irons says
That is fabulous!
Teri says
I wish I were artistic. I think if I attempted it I would have stain everywhere!! Such an out of the box idea!!
Jennifer (iffles) says
ooooooh, that’s SO AWESOME.
Leyna says
Holy. Crap. A. Moly. That is incredible.
Amanda says
Wow, stunning piece! I wouldn’t even know where to begin to create a piece like that!
Marissa C says
That is super impressive. I’d love to try this on a headboard.
Katherine (@ KM Decor) says
AMAZING! I’m in awe! I LOVE this!! So beautiful!
Joy says
Gorgeous! This is why I am in awe of artistic people. My math-brain only does stripes and solids.
Kristi says
What an effective design – and, of course, an amazing technique.
mary says
Wow, what a great idea!! Was looking for something neat to do on my next little one’s dresser. We simply stained the drawer fronts and top on my boy’s and painted the body a Martha Stewart yellow-ish color… will definitely be pinning this for a future project idea!!