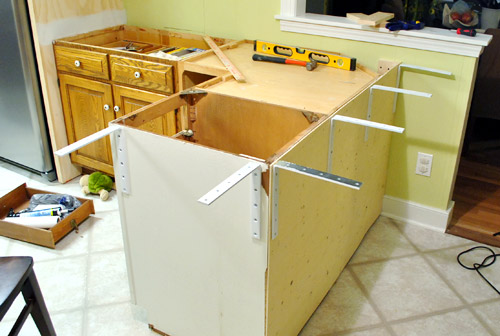
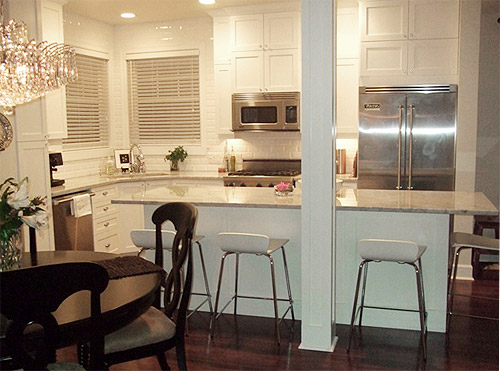
Archive for December, 2011
The Door-Turned-Desk-Turned-Tinier-Desk
When Clara came down with a case of the coloring bug a few weeks ago, it became clear that she needed an alternate surface for her artistry than the floor. You know, just in case she didn’t feel like tummy-drawing.

We talked about a few fun play tables over on BabyCenter a couple of weeks ago, but finally found the inspiration that we needed to DIY one right in front of our eyes. And no, it wasn’t this leftover-plywood-slash-side-table combo that Sherry rigged up in about 30 seconds of “hey, maybe this will work!” Sorry, Sherry. #playtablefail. Back to the drawing board…

Actually, this was our inspiration. The desk that we built with an old door for our first house’s office, that’s been getting the cold shoulder ever since we DIYed a newer, bigger desk for our current house’s office (which made this one look oddly tiny and cramped). It had been sitting at the opposite end of our dining room for a while – just waiting to somehow be repurposed (or craigslisted).

Well, this was its lucky day. It was too tall and too long, but since it was something that we cut to size the first time around, we figured… why not tweak it again? So we set off to create a miniature version of it. But we had a few requirements for it (like for it to be able to be used while Clara’s sitting or standing like a true activity table, to be big enough to seat a few other kiddos, to be sturdy and solid and safe, and to not be too precious – so it wouldn’t be the end of the world if Clara broke out a permanent marker on it one day). After chatting about a game plan with Sherry for a while (to figure out the right width for a few kids and the right height for standing & chairs), I lugged it down to my basement workshop and starting disassembling it.


Then I used the miter saw to cut the legs down a few inches.


Then I had to cut down the tabletop (aka, the old door). For this I broke out my beloved table saw.


With my top and legs trimmed down to kiddy sizes, I just had to cut down the support pieces (aka: the aprons) and screw everything back together again.

Oh and I did have to patch the open end of the door this time (when it was our desk we just left the end open because it faced the wall, so nobody saw it – and the room was so tiny that no one could get back there). But that wasn’t going to fly with little wandering hands around. So I cut a thin strip of spare plywood and nailed it into place. Once it’s all painted, it should look pretty good.

So with that (and zero dollars spent) Clara’s new coloring desk was complete. Well, mostly.

It still needs a fresh coat of paint. And we’re leaning towards (can you handle this?) white, so that we can make the $5 yard sale chairs the colorful accent instead of the table itself. Although Clara has done some crayon scribbling on the top that’s so cute it makes us want to tell her to go nuts and then use some sort of clear sealer to keep the doodles around forever. So we’ll have keep you posted if/when we make a decision…

There’s something really charming about the fact that it was made from an old linen closet door from our first house (where we brought Clara home from the hospital and raised her for her first seven months of life). That’s one sentimental table. And we love that Clara now has her own pint-sized parson’s desk when our adult-sized one (from West Elm) sits on the other side of the living room. It’s like a mini-desk for our mini-me.

Oh and you may remember these yard sale chairs that we scored back in the summer. We actually used them to build the desk at the right height for those chairs (and for playing while standing too – you know we like things that multitask). So it’s nice to have two chairs that already work. You know so if Clara’s baby BFF’s drop by we’re ready (we can also pull the desk away from the wall if kids want to face each other or we want to add more chairs in the future).

They don’t look half bad as-is (one has been stained yellow while the other was stained an evergreen color and they’re both pretty worn) so they might stick around like that for a while. We did debate painting/staining them someday, but it doesn’t seem to matter to Clara either. She fell in love with her new spot from the first second she laid eyes on it. Must be nice to wake up from a nap to something that was custom built just for you.

But seriously, look at that face. Does it not make you want to build something for her too?
We’re leaving the desk here in the living room for now because it was an empty spot and it’s convenient for her to color while we relax work on the couch/clean up/prepare dinner in the nearby kitchen, etc. But we made sure to keep the desk small enough so that it could also slip into her room, the future playroom, the kitchen, or just about anywhere else that we may want to place it as she grows.

Wanna know the best part of this project? Besides it being 100% free, we got the entire thing done in one day. From concept to completion. Man did that feel good. Especially with a certain other project that’s taking several months (cough…thekitchen…cough…cough). Although now that this is done, it’s back to cutting trim and sanding wood putty. More on that stuff for ya tomorrow.
Fab Freebie: Things We Love
***This giveaway is no longer accepting entries – see who won below!***
After an excitement and entry filled holiday giveaway we’ve crowned our big winner. Well, random.org has crowned a winner. And she is… Nina (who’s planning to soak up and celebrate the magic of the season with her toddler, babe, and hubs this week as well as do some gift wrapping, toy assembling, and cookie baking by the light of the tree). Congrats!
Oprah has Favorite Things. Martha has Good Things. We have Things We Love (okay, so maybe it’s not as catchy or scream-and-cry-on-national-TV-worthy, but we tried). The point is that we’ve rounded up five prizes that we heart, covering a whole range of topics that we love talking about ’round these parts – from art and tools to cleaning and ceramic animals. All in all, it’s nearly $750 worth of goodies for one lucky reader! So without further ado, here’s what one of your stockings will get stuffed with this week:

- An iRobot Scooba 230 – A compact floor washing robot from the makers of Roomba that’s small enough to get under cabinets and around commodes (worth $299!). Because less time spent scrubbing your floors means more time spent DIYing.
- An $150 gift certificate from 20×200 – One of our favorite spots for fresh original art, including the bicycle print that my sisters got me for my birthday last month. There are lots of ways to spend your $150, like splurging for a framed piece.
- Over $200 worth of Kreg Tools – The stuff that gives me the confidence to take on my woodworking projects (this set includes the Kreg Jig Master System and Multi-Mark as well as new stuff that I don’t even have: the Shelf Pin Jig and Square-Cut) – all worth $215!
- The ceramic pig speaker from West Elm – You already know that we love this often back-ordered guy, so we begged the folks at West Elm to put one aside for the winner.
- And A Very She & Him Christmas CD (or LP) and winter hat – You’ll need some music to listen to on your new pig speaker, right? And we’re loving these festive tracks from Zooey Deschanel and M. Ward.
So now that we’ve outlined the prize, here are the regular giveaway details:
- PRIZE: See above
- TO ENTER: Comment on this post with the words “HAPPY HOLIDAYS!” and tell us…
- BONUS QUESTION: … what’s on your holiday agenda for the next week? Do you have lots of last minute shopping / cleaning / cooking to do? Are you traveling? Or are you just sitting back and waiting for a certain red-suited man to hop down your chimney (like Clara)?
- GIVEAWAY CLOSES: Wednesday, December 21st at 8pm EST or at 10,000 entries (whichever comes first)
- NUMBER OF WINNERS: One
- PRIZE SHIPS: The 50 United States (although we do try to wrangle as many international giveaways as possible)
- DISCOUNT: Get 10% off on framed print orders placed at 20×200 through tomorrow December 20, 2011 with the code YHL10
- USUAL STUFF: One entry per e-mail address is permitted. The winner will be selected using random.org and announced on Thursday as an update to this post. That’s right, come right back here on Thursday for the announcement of our winner. Good luck…
Note: We aren’t paid or perked for hosting these giveaways, we just do ‘em to thank you awesome folks for stopping in. See our Giveaway FAQ page for more info. Pics courtesy of iRobot, Kreg Tools, 20×200, West Elm and Merge Records,
Stool Boom
John made me name this post that because of this video (which he requests that you all check it out so that you can hum the song while reading this post). Anyway, now in stool news… we got them for our peninsula! And we’re so excited about 1) where we found them, and 2) the price (because four stools can definitely be a budget breaker if they’re priced at $250 a pop). But first, let’s chat about the kitchen budget in general for a second…

We’ve actually spent some real money in certain areas like:
- new Corian counters (around $1700)
- new stainless appliances (around $2213 with the new microwave but not including a range hood that we still need)
- new cork flooring ($848 including underlayment)
- new backsplash tile (and lots of it, since we’re taking it to the ceiling on one wall – around $280)
- tearing down a wall to create an extra wide doorway into the dining room ($700 to the contractor plus $90 for the drywall/trim that we did ourselves)
- in-progress total for the big stuff: $5,831 (still need a range hood, new lighting, floating shelves, art, etc)
And like the majority of renovators, we’re also choosing areas to save, like:
- reusing our existing cabinets (they’re solid oak, full of interior upgrades, and in great shape)
- reconfiguring the layout ourselves (we had fun pushing the pantry around and building a cabinet to enclose the fridge)
- priming/painting the cabinets ourselves (we did it in our first house along with in the office for our built-in desk and really dig the finished product)
- installing as much as we can (like some of the new lighting that we have on the agenda, and those cork floors that we plan to lay ourselves)
- using as many discounts and coupons as we can (we stacked discounts when we got our appliances and our counters, along with using a coupon code on our backsplash tile, snagging clearance cork, and getting three contractor estimates to shave over 3K (!) off the highest one)
- selling things we no longer need on craigslist for money to put back into the makeover (so far we’ve sold our old kitchen table, our old granite, and the black over-the-range microwave that came with our house for a total of $815)
We still have a backsplash to install, cork flooring to lay, new lighting to buy/hang, and floating shelves + a range hood to go up – so admittedly it looks kinda crazy for the amount of money that we’ve spent (since many of the elements that we’ve purchased aren’t in yet). But in a month or two the kitchen should look significantly more finished and upgraded. At least that’s the plan! It’s all just a work in progress until then…

But weren’t we talking about stools? Back to that subject. First we debated something clear/acrylic but heard from a few people who said they really disliked how scratched and foggy theirs got with everyday use and only found a few options that we liked (all of which were over $100 a pop). So we went back to the drawing board, which basically meant examining a ton of inspiration rooms. Which (duh) allowed us to pick up on a pretty obvious theme. Apparently we have a thing for industrial metal stools. We also like that they’re not wood since there are a ton of wood-legged chairs in the nearby dining room, so a contrasting metal look is a nice variation (so not everything feels heavy and wood-y).
For functional reasons we decided that our stools had to have backs (so Clara’s booster seat can snap onto one, so bigger kiddos can more easily sit up there, and even for the added support/comfort they’ll provide for adults). So it eliminated some of the cool backless ones like the stools in this photo from atlantahomesmag.com (we’ve seen similar versions on overstock for anyone interested).

But that decision still left us wide open to cool science-y stools like these from Restoration Hardware. Too bad they’re $375 each, making four of them a budget breaking $1,500 (sniffle).

We also loved the look of the metal stools from this pic from Marie Claire Maison:

And these guys found in an image from Elle Decor:

And these two from a spread in Traditional Home:

And these three from a kitchen designed by Steve Giannetti found on Cote De Texas (look, there’s even a peninsula with a range hood & tile to the ceiling!):

So we set off to find some thrifty (preferably secondhand) options for our kitchen – hopefully at around $60 each or less (you know, in an ideal world where perfect $60 stools abound). We actually found an awesome vintage one at a local thrift store for 50 beans (it was even counter height and not bar height, which is what we need) but there was only one and we needed four. Wop wop. So we took to the internet to try to find some sort of industrial warehouse or bulk manufacturer who made science-y counter height stools in our price point. What do ya know, we found these guys on a school supply website of all places:

I know, I know – it looks more than a little nerdy in that pic (especially because they placed the backrest super high- it’s adjustable). And because it’s not in a delicious room like the other stools above (nothing looks as glamorous when it’s cut out on white). But oddly tall adjustable backrests and white backgrounds aside, there was just something charming about getting lab stools from a school supply place.
They’re admittedly not exactly the same (aka: not nearly as amazing in shape or finish) as the stools in the above inspiration images, but those were sadly (very) out of our budget. And we had a feeling in the right room these affordable guys could really be elevated (you know we’re all about mixing high and low, so things like the new counters, ceiling height backsplash, new appliances, pretty pendant lights over the peninsula, and cork flooring should really elevate them). And the price was riiight. They were $33 each (we got the fixed height 24″ ones). Which means for $168 (including tax and shipping) we got four stools delivered to our door. Here they are in our still very raw and completely unfinished kitchen (but just scroll up to see how metal stools can look pretty darn cool in more finished spaces).

As for their finish, they look nice with the stainless appliances, but once the room comes together more I’m not above tweaking them if I think they’ll look better that way (they were $33 after all…). I’ve definitely contemplated these four options:
- trying a deeper color, like the brown and oil-rubbed-bronze Elle Decor stools that are up a few photos (thankfully metal takes spray paint really well, and any painted metal chairs that you’d buy from a store are essentially just spray primed and painted in thin and even coats). I was thinking I could even upholster the seats with rough chocolate leather or something, along with using ORB spray on the leggier metal parts.
- spraying them all white with wipable leather or vinyl upholstered seats if we want them to gleam like the counters (we’re contemplating a deeper toned accent treatment under the peninsula behind them, so white could really pop – more on that in a minute).
- somehow roughing them up by scuffing, sanding, and maybe even tinting them with some sort of metal stain or glaze that would give them more of an aged/beat up look like some of the more expensive antique-ish stools out there (they could then be sealed with poly so they wouldn’t rub off on anyone)
- spraying them shiiiiiny shiiiiiny chrome like the ones in the Cote De Texas photo a few pics back

We’ll have to wait and see as the room evolves. You know we like to tweak/learn/figure it out as we go. Our house is like a big puzzle and I’m Nancy Drew… and maybe John’s Scooby Doo? Wait maybe Burger is Scooby and Clara is Nancy Drew. And I’m Angela Lansbury. And John is Mulder. Or is he Skully? I always forget which one is the guy. Update: the guy is Mulder. Thanks google.
Ugh- but those orange-y wood cabinets are really cramping our style. We’re actually working on trim and baseboards and puttying and sanding right now… which means priming and painting are just around the corner! So I know some of you might not “get” the stools at all right now (mom!) but I promise when the rest of the room starts to make more sense around them, you might come around. Just give us a chance to get the room a bit more developed. Pretty please? When in doubt, just remember that our first house eventually looked like this, but while it was in-progress it looked like this. Haha.

We especially love how the two adjoined spaces don’t look too wood riddled since we skipped wood stools for the kitchen and went with metal for some nice variety.

And although they look a bit light on their feet (thanks to the airy metal construction) these dudes are solid. Not wobbly. Not lightweight. They’re lab stools for goodness sake. So there’s no flimsy feeling because they’re made to last decades in classrooms with people/teens/teachers of all sizes sitting/beating on them. Most likely while using bunsen burners.
In the comfort department they’re actually really comfortable (there’s a bit of flex in the back rest, which is really nice). I mean it’s not like sitting in a padded armchair, but for stools at a counter we think they’re perfect. And Clara’s booster chair snapped right into the one on the end, so that was nice (it said it worked with any chair with a back, but it was good to have confirmation that she was nice and secure up there). Yup, that means we’ve all been eating (and generally hanging out) at the peninsula these days!

Look, here are Clara and John making cookies at the ol’ new peninsula (can’t see much of the stool, but she’s all strapped in and happy to help stir). More on what amazing concoction they were making here.
Speaking of Clara’s assistance, she also “helped” us assemble the stools. Check out our little leftie in action:

And now for a Burger photobomb:

He couldn’t resist getting in on the action too.
Once we have some amazing (we’re actively on the hunt) pendant lights hanging over them above the peninsula things should start coming together a little more. We sort of have something like this in mind, but we’re definitely not 100% settled yet.

And of course when those cabinets get painted and the backsplash / floating shelves / range hood go up it’ll really start to complete the picture. Oh and for anyone wondering, we’ve actually been debating a little rough wood accent wall on the back of our peninsula like this gorgeous kitchen from House and Home.

Just not sure if it’ll be too much going on (once we get the backsplash and the floating shelves up along with our grellow walls and some pretty pendant lights over the peninsula, etc). So it might be one of the last things that we complete after other things to come together and we can confidently make the call. Either way it’s safe to picture our new stools NOT in front of the unpainted plywood backing that we installed to box in the back of the peninsula (we’ve always planned to do raised paneling or some other decorative “layer” on top of that blah base to hide those brackets). Wherever we end up, we’ll keep you posted for sure!
Oh and speaking of the peninsula, a few of you couldn’t tell from the installation photos that we got the corners of it rounded, so here’s a pic from the top with a penny on the edge to show how they’re softly curved. Hooray for no sharp corners (for the bean’s noggin and our hips!).

But back to the stools (I’m all over the place today, huh?). Have you scored a deal from a school supply company or other unexpected source? Have you recently purchased new stools or chairs? Are you into the whole rough/ industrial mixed with fancy/polished look? It’s definitely not for everyone, but it’s funny how many of our inspiration kitchens are exactly that.
Psst- Ahhhhhh- who saw the Dexter finale last night? Don’t want to give anything away, but it was craaaaaazy! We’re still taking about it.
22 Holiday Hallway Tweaks
I warned you that I was really excited to go all out for our first “real” holiday in our new house, so it’s no surprise that I got giddy and decided to tackle an unexpected-ish space for holiday-ifaction. Was that enough hyphenated-not-real words for you? Anyway that space = the hallway. I actually switched out 22 frames (almost two dozen!) in our little hallway frame collection to make things a bit more festive. And it was free. Yeee-haw. Over the top? Maybe. But it makes us smile and was zero dollars. Holla. Let’s get on with the tour…
When you look at the hallway from a distance, the change isn’t overly obvious, which we like (one of our favorite things about the frame wall in general is that it draws people in, so you have to get closer to see what each item is really about).

But if you get a little closer you start to pick up on some of the things that we switched out (you can see most of the original frame wall art here)…

… like how the paint deck that used to hang on the pig hook was swapped with a little yarn owl ornament that I snagged on clearance after the holidays last year at Target (to the tune of 25 cents).
I also popped two old snowflake ornaments into those two shadow box frames on the left. And that clear tree in the frame on the right is a page from Martha Stewart magazine (framing pages from mags, catalogs, or calendars for your own personal enjoyment is totally fine – you just can’t profit off of those images, for example: trying to sell them as your own designs on etsy).

If you scoot a little further to the right of the wall, you’ll see a few other frames that we tweaked with new holiday-ish stuff.

The frame with the glitter ornaments and green trees is actually a Martha Stewart ad for her glitter line (also torn out of her magazine). And the blue star made up of ornaments to the right of that is a page from a West Elm catalog.

Beneath the glitter ad we have a page from Pottery Barn with some festive shakers and the frame right above our console table has some West Elm plates that say Cheers, Joy, and Peace (all good holiday reminders).

Here’s a close up of the West Elm page full of ornamets in the shape of a star. It’s my favorite:

I also framed a few more West Elm pages, like this collection of holiday mugs and ornaments (backed with a piece of green paper that we already had) and this page full of numbered and lettered plates…

… including a plate that says “Cookies for Santa.” Oh and don’t mind that carbon monoxide detector above (I’ve been meaning to stick it somewhere a bit less noticeable).

These are the frames with plexiglass and heavy duty velcro to keep them safe for Clara since they’re down at her level (more on that here). And since she loves Santa (more on that here) I figured she’d like the Santa cookies plate down where she could admire it. The verdict in her words: “I love you, Santa!” And when she walks by it, sometimes we hear her mumble “buh-bye Santa.” So sweet.
Here’s the rest of that wall from afar. See, not too obvious… until you get closer…

… and notice things like two big jingle bells that I hung in a backwards canvas (I love the raw wood frame that’s usually hidden when it’s facing the “right” way). As for how I hung the canvas backwards (which I did back when we originally hung all of these frames), I just hammered one of these little metal tooth-hook things for hanging pictures (from Michael’s) into the front (now back) of the frame so I could hang it over a nail. There’s also a photo of stacked firewood with some holiday pillows piled on top from a Pottery Barn catalog.

Now let’s move over to the other side of the wall. Here we have a bunch of holiday swaps going on.

Like the piece of cardstock that I printed with the words “Happy holidays, y’all!” with some red hearts above and below it, and a swatch of red wrapping paper that I stuck behind an already-framed peacock feather. I also slipped two small silver ornaments into a shadow box (which already had a calendar with our anniversary circled inside of it) and added another little 25 cent yarn ornament (this time it’s a bunny) above it.

In the bottom right of that arrangement I also worked in a page from West Elm full of graphic numbered ornaments with fun shapes that Clara likes on them (like a swan and a goose). She points and says “honk honk!” (every kid should have a reason to practice their goose impression, right?).

Here’s the other side of that wall with six more frame switches.

Like a Banana Republic ad (with a sweet pooch wearing a bow tie sitting under some mistletoe) and a funny Christmas sweater ornament that I taped into another backwards canvas. On the right we have a felt ornament from Target last year (which almost looks like an ornate paper cut-out when it’s framed).

I also made another little texty design that I printed out onto card stock (this one says “Ho Ho Ho, Merry Christmas”) and under that is an illustration of holiday cookies from Woman’s Day magazine (donated by John’s mom after I spotted it and asked if I could have the mag after she was done).

And in the top left shadow box I stuck more silver ornaments with some leftover wrapping paper as the background.

So there you have 22 quick frame switches, all of which can easily be changed back to their pre-holiday look once January rolls around. I kept all of the original art behind the new additions in each frame, so I can just put it back in front of the holiday stuff (which’ll live behind it until next Christmas when it moves forward again). Oh and for anyone wondering where we got the frames, they’re all from Ikea, Target (on clearance), or thrift stores. We just saved them up over time and actually had many of them when we moved here (they used to hang randomly in nearly every room at our first house, so we thought it would be fun to hang them en masse in our hallway instead of spreading them out again here).
Man, there’s something so satisfying about some free holiday festive-ness, especially in an often overlooked space like a hallway. Did you guys decorate any unexpected areas like a bathroom or a laundry room or a sunroom? Heck, even little trees on bedroom windowsills can be really cute. Oh yeah and on the subject of better-late-than-never holiday stuff, I spent some time making a page full of all of our seasonal/holiday projects & ideas that can easily be perused by picture. So you’ll hopefully have fun sniffing around for some last minute ideas.
You can click here to see it all and can also access it at any time by clicking the “Holiday Ideas” button on our sidebar.

Ho ho hope it helps!
Psst- We picked a winner for this week’s giveaway. Click here to see if it’s you.
Reader Redesign: A Welcome Change
Sometimes it’s so easy to forget little spaces like entryways, hallways, closets, etc. That’s why we love Mandi’s complete transformation of her entryway, which we originally discovered when Sherry pinned her awesome ceiling paint treatment over on her home away from home (yes, as a guy I still don’t quite understand the magic of Pinterest but then again Sherry doesn’t quite understand the magic of Angry Birds). Anyway, back to Mandi’s entryway makeover. Here’s her story:
I’ve spent the last week and a half making over my entryway and I am dying to show you! This is what it looked like before the makeover:

And here’s the after. I love it.

The hands down greatest thing in here is the tandem bicycle art by Jonathan from Olson Ink. All I did was tell him that I wanted a tandem old school bike in cobalt and white. He painted it on a 8’x4’x1” plywood with a wood veneer. The wood was stained a light Honey Blonde color before he started painting. Then when he was all done he cut it into 5 sections.

The credenza was a find that my mother-in-law spotted about a year ago for only $35.00. Its probably from the 50’s and not one thing has been changed on it. Sometimes you can really score a great piece that just needs a good wipe down! It is made out of metal so its really industrial but, helllllllo it’s teal. Its like a combo made in mismatched heaven.

All of the books and odds and ends as well as the lamp were found thrifting. The cute little stool was a $10.00 Craigslist find and it gives it the raw industrial push that the space needed.

And then there is of course the herringbone ceiling. Oh how I love it. But it would not be as awesome without Octy the Purple Chandelier.

Ol’ Octy is still one of the best thrifting finds I have ever happened across (painted in Krylon’s Rich Plum).

Thanks so much for, Mandi! Isn’t that such a fun space to come home to? I mean, hello – BIKE ART. Everything from the colorful spray painted chandelier to that killer herringbone ceiling is definitely smile-worthy. And $35 for that teal metal credenza = jackpot (and yes, that is the first time I have ever typed credenza). You can read more about the makeover on Mandi’s blog. And feel free to chime in with your favorite part. Mine is obviously the bike art. But that ceiling has Sherry doing all sorts of happy dances over here.
Psst- Clara met Santa! And it was quite the adventure (she apparently went through a roller-coaster of emotions from being nervous and excited to feeling some sweet affection for her cousin). More on that here.


