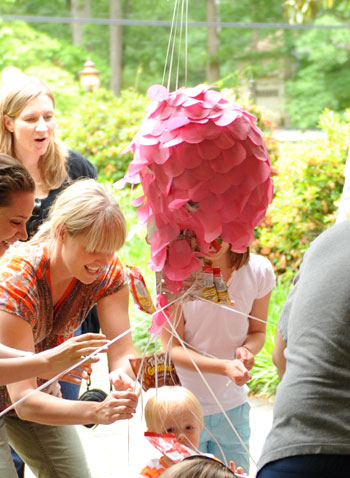
We had a bunch of requests for a tutorial on Clara’s pull sting piñata, so here ya go. And if you have no interest in this project but want to blow off some steam after work you could easily turn this post into a drinking game and take a sip every time I say the word piñata. But beware, you won’t be ok to drive afterwards. Anyway, I had never heard of a pull string piñata until I got some unsolicited baby party catalog with one and I instantly realized that it was a genius idea for wee ones. Clara’s not exactly strong enough (or coordinated enough) to whack a regular piñata with a bat, but she can definitely tug a string like the best of them. And the entire concept behind a pull string piñata is exactly what it sounds like: each kid holds a string and tugs on it so the piñata bursts open and treats fly out. Here it is in action for ya (you can also see the video here) and although Clara just ended up watching from the sidelines, she really seemed to enjoy the show:
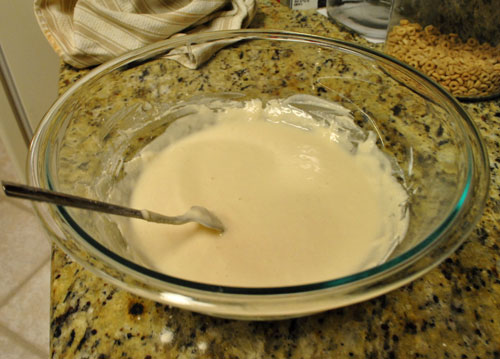
Who knew my weird homemade piñata would actually work? Anyone who saw Friday’s post saw that the first few steps left it looking a little questionable (I’ll recap those steps quickly so this post is a one stop shop for anyone who wants to whip up one of their own). And I’m sure there were some doubts that it would work out (mine included) but I guess this piñata was destined to beat the piñata odds. First we made paper maché (mixing approximately two parts water to one part flour)…
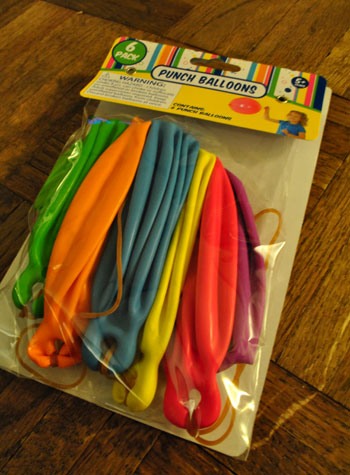
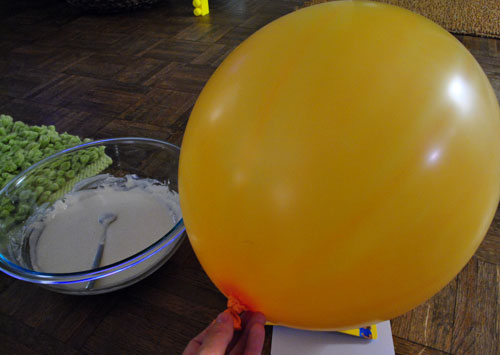
… and blew up one of these punch balloons from Target that wasn’t in our color scheme (the orange one)…
… and cut a bunch of newspaper strips…
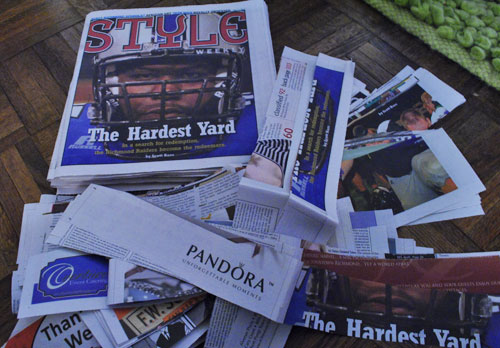
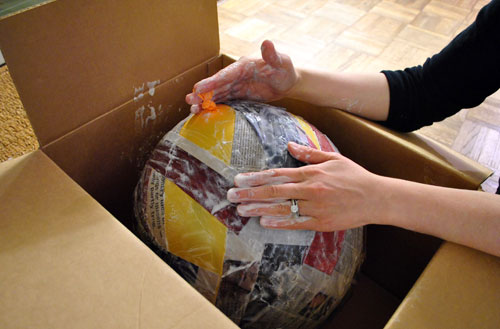
… which I paper machéd to the big balloon…
… which I then let dry a bit overnight and then hung outside in the morning to hopefully speed up the drying process (since it was still soggy and looking a bit like a goiter).

That didn’t help much because it was a humid day, so I brought it inside and thanks to some reader recommendations I actually opted to break out the hairdryer on that sucker. It worked really well (drying it out completely in about ten minutes for a nice hard shell).
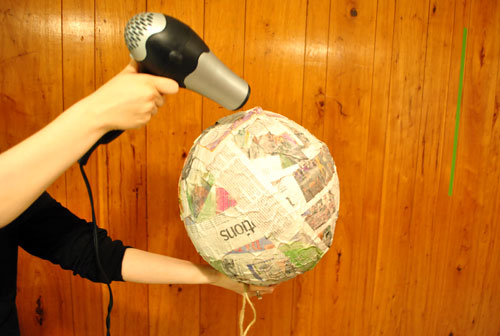
How about that orangey paneling in the background? Are you feeling inspired yet?
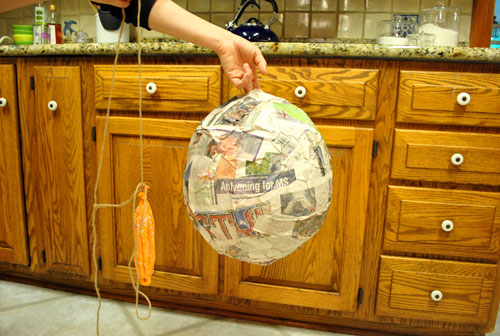
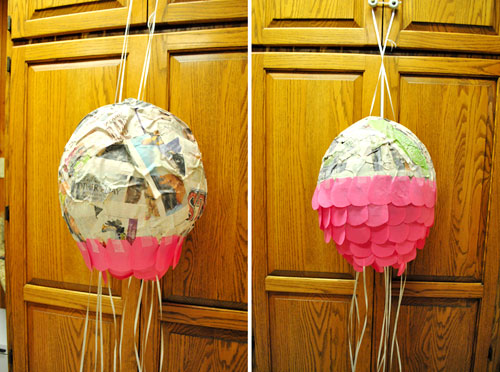
Anyway, then I popped the balloon which slipped out really easily, leaving me with a large hollow piñata-ish thing (which still wasn’t breaking any hearts in the looks department):
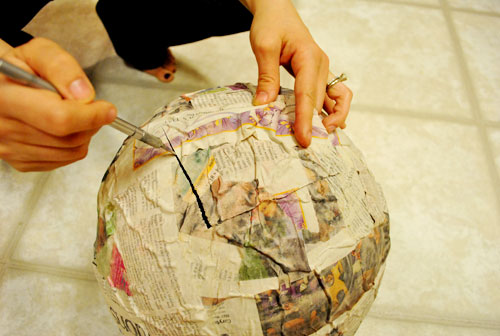
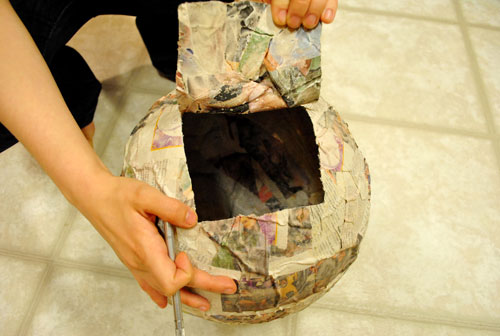
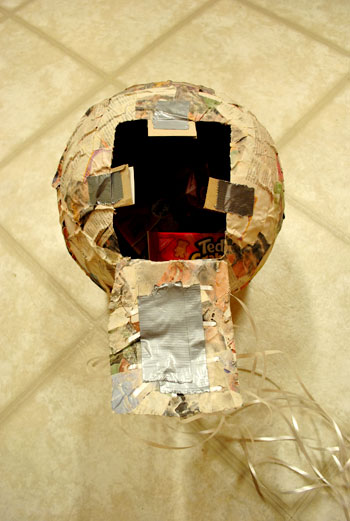
I turned it over (with the bottom of it facing up) and used an exacto knife to cut a little “exit flap” for all of the treats to fly out of:
Here it is opened so you can see what I mean:
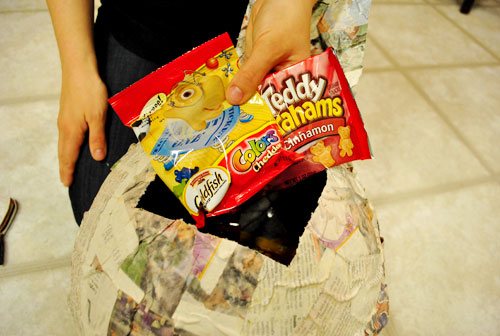
Then I added our kid-friendly treats. We didn’t want anything too small and choking-hazard-ish going on, so we went with crowd pleasing packs of Goldfish and Teddy Grahams.
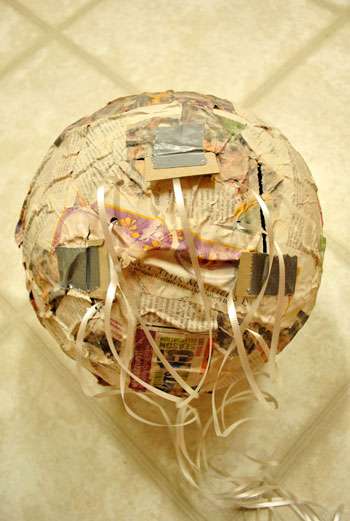
Once they were inside I used a hole puncher to make nine holes that I’d use to attach nine pieces of ribbon (since there would be nine kids coming who I figured might want to get in on the fun):
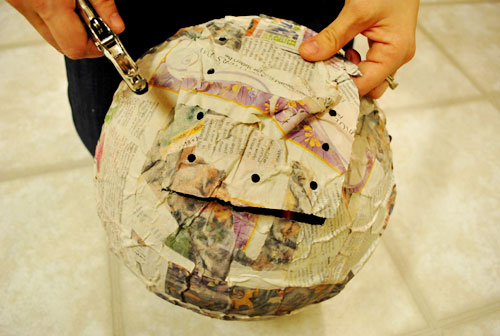
I cut nine 30″ lengths of curling ribbon and treaded them each through the holes so they could be duct taped down on the back of the flap.
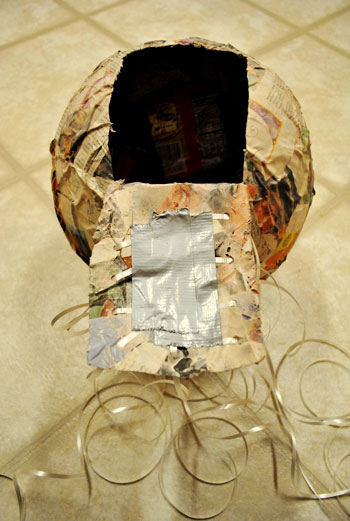
Then I realized that in order for my flap to stay closed with all the weight of the treats inside (since this was the bottom of the piñata and gravity wasn’t on my side) I would need smaller flaps of cardboard to hold it closed. So I used more duct tape to secure those smaller flaps to the opening…
… so that my large flap could be slid in behind them and held closed by those handy smaller tabs. It worked but I’ll admit it- at this point it was looking pretty grim. Have you ever seen an uglier piñata? I said a little prayer that tissue paper could cover a multitude of sins.
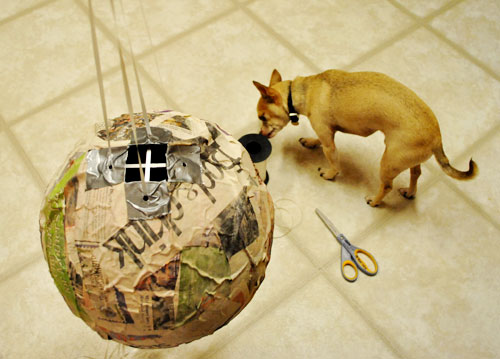
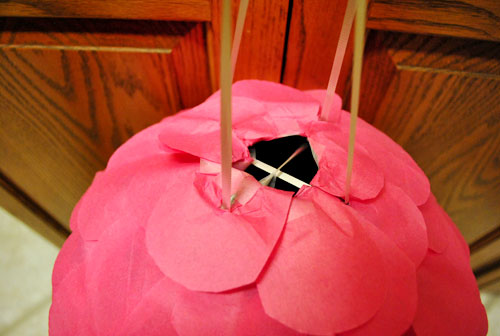
Since the balloon was no longer inside, I had nothing that the piñata was hanging from anymore, so I folded four 4″ pieces of duct tape around the top hole (to reinforce the paper maché shell) and then used my trusty hole puncher to create four holes through the duct-tape enforced areas. Then I used two long pieces of ribbon (which Burger was mildly interested in) and looped each one through two of the holes (the ones that were opposite each other) and tied them off at the top to create two long loops that were the same length. I figured that was stronger than trying to knot four of them inside of the piñata or something, and it really did turn out to be nice and secure.
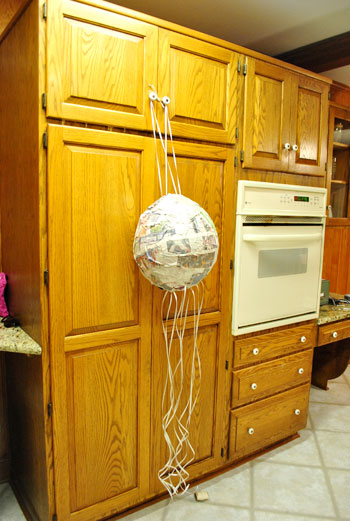
With my heavy duty string-it-up system going on, I looped my two long strings over those weird eyeball cabinets in the kitchen (so they could watch- more on those here). This enabled me to have two free hands to start adding little pink fish scales in the hopes of saving The World’s Ugliest Piñata.
It only took one 99 cent pack of pink tissue paper from Target, which I folded and then cut little scales out of (by folding it I was able to cut out a bunch at a time, and soon I was left with a big pile of them). Oh and on the subject of budget, that was all I purchased for this project since I had the ribbon already and the newspaper and paper maché paste (flour + water) were free since I had those in the cabinet and the recycling bin. Oh and the multi-packs of Goldfish and Teddy Grahams were $7 all together, so this whole project came in at under $8.
But on to the fun stuff – the fish scaling step. As I mentioned yesterday, the design was inspired by this one that I pinned on Pinterest a while back. So I figured that taping the scales from the bottom up would hopefully yield the same sweet (and semi-finished looking) results as my inspiration piñata (and yes, I just snickered at the use of “inspiration piñata” – what an insane sentence).
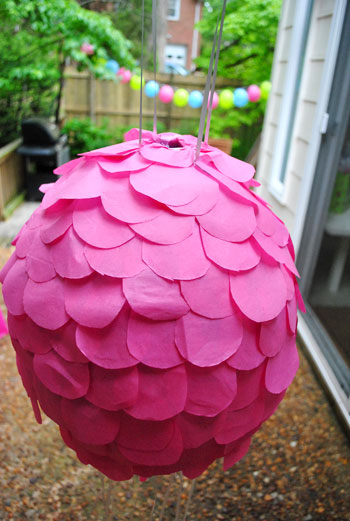
I just worked my way around in rows, gently twisting the piñata as I taped around it on all sides (using regular old scotch tape), and moving up from the bottom slowly – row by row. I was left with a pretty cute result. Definitely something at least 5,000 times easier on the eyes than the mess of newspaper and duct tape underneath it all. As for the top, I just folded the top scales into the hole and taped them to the inside for as polished of a look as I could manage (I knew it would be hung pretty high so no one would likely see the top, but I’m weird so I still tried to make it look ok anyway).
Isn’t she kinda cute?
It was definitely lots o’ fun. So that’s how I started out making a record-breakingly ugly piñata and then tried to course correct with some sheer determination and a pack of tissue paper. Hope anyone at home who decides to follow suit ends up with something at least this sweet (and most likely a lot sweeter).
Good times. Have you guys made piñatas or other homemade party games (cornhole? pin the tail on the donkey?). Share and share alike.
Psst- We’re over on BabyCenter sharing the play by play for making cheap and easy balloon garlands here. When it comes to festive party bang for your buck, it doesn’t get much simpler than those.

Cara says
I love the pull strings for young kids. Very cute!
Theresa says
For a baby shower that I hosted, I collected magazines and cut out different eyes, noses, mouths, and hairstyles and gave each couple a thick piece of posterboard and glue. Then they got to pick different features to put together of what they thought the new baby would look like as an adult.
It turned out to be really fun (and funny!) since I made sure a lot of the features were different sizes and threw some goofy-looking ones in there (Lady Gaga hair, anyone?). Then everyone voted on the best (wackiest) one for the prize :)
YoungHouseLove says
That sounds hilarious. I love it!
xo,
s
Colleen says
I love it. Cute idea!
Alison says
It looks kinda like a jelly fish! I love it!!!! I’m probably going to have to copy you.
Amanda says
I like Tuesday’s because we get three posts from you! :) Even though I’m not a mother, I still glance over at your Baby Center posts.
Did you keep the pinata for decoration in Clara’s room, or did it get killed … erm, broken?
YoungHouseLove says
It got pretty trashed but now that I know how simple it was to make I’m tempted to create another tissue-paper-fish-scaled creation!
xo,
s
Caitlin @ The Blog of the Chicken Wing says
This turned out absolutely adorable! I’m a fan of ruffly anything (should I have said ‘scaly’ here?), and this looks like a huge success! Well done, you!
Alex says
fun! hey – off topic – i was thinking of painting the top of our kitchen table with blackboard paint (and the legs just white or some other neutral). THOUGHTS?
YoungHouseLove says
I love high contrast furniture (with white legs or a white top and dark wood stain or black paint). My only question would be if you think eating on a table with chalk dust would bug you. I think chalk is non toxic anyway, but I wonder if you’d want to do it to the side of a cabinet or a play table instead of the one where you eat. If you eat at an island or in the dining room a lot and just use the table for drawing and homework it could be perfect though. Anyone else have thoughts for Alex?
xo,
s
Sarah M. says
Maybe if you used it for play time and then wiped it down with a wet cloth before dinner or put a table cloth over it for dinner time?
Amanda says
OOOR You could get a piece of glass cut to size of your table so you could cover your creations and have them last a while … you know, until you get bored of them and want to doodle again!
Alex says
oo i like the glass idea! Good point though – i don’t want chalky food. I’d also like to point out the humour in the one comment referencing “playtime”. Its just me and and hubby – and I like to doodle. haha. thought it would be fun. For my playtime.
YoungHouseLove says
Adult playtime is important too! Ok, now that sounded dirty and I so didn’t mean it. Haha.
xo,
s
Alex says
You may not have meant it – but it IS true…can’t deny it :P
Rebecca @This Nest is Best says
You could also get a large roll of kraft paper for your tables doodles instead of the chalkboard route. I love restaurants that use kraft paper and encourage doodling! I’ve seen them at Lowe’s for around $9 a GIANT roll in the painting area.
Katie says
The real question is where did you get your super cute sweater?
YoungHouseLove says
Aw thanks. That’s from the Banana Republic Outlet in Delaware (got it over Easter when we were out there with J’s fam).
xo,
s
Ali says
Love this tutorial. I might have to do this for one of my boys’ birthdays.
It made me chuckle because back when I used to teach Pre-K, I made NINE of these for our solar system unit (before Pluto got demoted :)) with a whole class of 4- and 5-year-olds! Can you imagine? Papier mache EVERYWHERE… tables, chairs, clothes, hair, carpet, walls. It was the messiest project we ever did, but man was it fun. :) Then we painted (which actually covers pretty well!) with tempera and hung them in planet order. :)
YoungHouseLove says
Wow- that’s dedication! You deserve some sort of teaching medal or something. Sounds like so much fun though!
xo,
s
Nancy says
When I taught Pre-K we made papier mache dinosaur eggs and painted them. Messy, but lots of fun.
Amanda @ Our Humble A{Bowe}d says
I love the pinata! It turned out really sweet. Kinda reminds me of this Martha lantern: http://thecraftsdept.marthastewart.com/2011/05/paper-lanterns.html oh I wish we had a girl to make frilly decorations for. Haha.
YoungHouseLove says
Oh yeah it looks just like them!
xo,
s
Amanda @ Our Humble A{Bowe}d says
I saw you’re considering making another for Clara’s room, maybe this would be a good solution? That way, you could actually pop a light in and it’s functional… A $7 IKEA run and tissue paper could be a nice focal point.
YoungHouseLove says
Totally could work!
xo,
s
Kristen @ Popcorn on the Stove says
I was just going to post that link! Glad I scrolled down a bit to check first!
I loved the way the lantern looked and it was so creative to turn it into a pinata!
Liz says
I love this, I want to make one just for fun now, the scales are the best part and seemed alot easier than I thought they would be to put on
Carrie says
My boyfriend is a woodworker and I have a sewing machine, so we’ve made three cornhole games now – one for us and a couple for friends. I feel your pain in the sewing arena – every time I have to make seemingly easy beanbags (8 per game set), I want to cry at how awkward and uneven my little bags turn out, while boyfriend’s perfect game boards are busted out in a couple of hours no problem. Ugly as my bean bags are, every party we host starts and ends with game after game of cornhole. (Our set, at least) was well worth the trouble!
YoungHouseLove says
Wow- that sounds sweet even if the bags aren’t perfect! It adds to the suspense of the game. Haha.
xo,
s
Lauren says
Sherry- this is a bizarre question but where is your sweater from? Its super cute and casual!
Also, I love how you kept Clara’s birthday party simple, sweet and Clara focused. It blows my mind when I see (on tv) couples who spend my entire college tuition on their kids 1-year-old bash- seriously. blows. my. mind. And not in a good way!
YoungHouseLove says
That sweater is from the Banana Republic Outlet in Delaware (got it over Easter when we were out there with J’s fam).
xo,
s
Heather says
Agree, I kept thinking “I love that sweater!”. Too cute. Thanks for the source!
Susan says
Beyond Cool! I love it! It actually looks kind of fun to make, too! :)
nita says
i loved this idea. may be i will try to do this for my sons 1st birthday coming up next month.
bettijo @ PagingSupermom.com says
Love this tutorial! I think it would be perfect for a dainty little girl’s party. I’m sharing this on our Facebook page!
syreena says
i LOVE it… uuuuhhhhhh, exactly how long did the entire process take? Loved all the super cute party details, arent you glad that we live in the digital age and it makes it super easy to have great pics to share with her when she’s older. B/c we all know that us mommies don’t get nearly enough credit from the little dudes for all the work we put into their parties and such…lol. Thank for the tutorial :)
Holly says
Sherry, I’m totally stealing all your ideas for when I have a baby! Clara is such a lucky girl to have loving parents like you and John.
And this is a little off topic, but how long did you have to wait for a Pintrest account? I’m usually very patient, but this is a difficult wait!
YoungHouseLove says
Ooh try dropping in on our Facebook page and requesting a direct invite from someone. People are usually really nice about sharing and then you don’t have to wait!
xo,
s
cafenoHut says
I don’t have any child:( But I want to make this… oofff. It is joyful..
Kelly says
love the pink scales! I chickened out of making one from scratch a few years ago, but I retrofitted a regular pinata to use the pull-strings. I threaded a dozen “dummy” ribbons into the pinata that would just pull out without opening it, and then there was one ribbon that was taped to the bottom so it would rip it open. Each kid got one pull at a time until someone got the real ribbon and the treats spilled out.
YoungHouseLove says
That’s a fun twist too!
xo,
s
heather s. says
Kelly – that’s the way I’ve seen them done as well. I’ve never seen where the kids all pull at once and all the ribbons open the trap door.
Love the ruffles…I pinned that pinata as well. ;)
StumptownMom says
We did a pull-string pinata for our 5 year old’s party this year. His fabulous uncle makes him a pinata every year but this year the venue insisted on only pull-string pinatas. This year’s was a robot – but past years have been a rocket, octopus and cow.
We did what Kelly describes with “dummy” strings and one that opened the hatch at the bottom. That way they all got a turn and the suspense of not knowing who would pull it open.
Sassy says
Best pinata story I’ve heard was a girlfriend who had grown up without being exposed to pinatas but was going to get one for her young daughter’s birthday party. Took a ton of bat swinging to get it to break — and when they did get it smashed, it turned out to be stuffed with paper, not treats: she’d bought the cutest one she could find and did not realize that they did not come pre-filled with treats. Very disappointed kids but she did save a lot of us from the same mistake with our own kids!
YoungHouseLove says
Oh no! That’s so sad (but kind of hilarious in hindsight).
xo,
s
Jennifer says
Loved the party, especially the fabric you created! I may have to try making a pinata for our next party, you made it look so easy! We just had a monster themed party for our 3 and 4 year old boys. Using an overhead projector, I made a pin the eye on the monster and an entire wall of monsters for the kids to color. You can see pics on my blog, http://nounces.com/2011/05/10/real-parties-monster-party/
YoungHouseLove says
Ok, that’s INSANELY FUN. LOVE IT!
xo,
s
Maggie Rose says
I made a whale pinata for my birthday last year, but I’m a bit of a perfectionist and the whole thing took so long that I didn’t even fill it and we didn’t break it! Whaley now lives at my parents’ house where it blends in nicely with some of their colorful Mexican art. Here’s my post about it (with my version of a tutorial, a little more involved!)
http://www.maggieroseonline.com/2010/05/18/put-down-the-pinata-and-walk-away-slowly/
YoungHouseLove says
Holy cow- er, whale! That is amazing.
xo,
s
Mary @ stylefyles says
the scales are SO pretty. I made the world’s ugliest pinata a few years back. It was for my adult women’s soccer team, so I painted a soccer ball design on it. It was horrifying, but did the trick for us.
Trey says
I know curiosity killed the cat and all, but what did it look like from Clara’s POV? is seems like she would have seen the newsprint underneath… if not, awesome. If so, i wonder if I could paint it the same color as the paper when we make one (thanks for the inspiration) for my daughter’s 2nd bday in a few months…
YoungHouseLove says
I did the same thing as I did from the top with the bottom. I just used loops of tape and stuck petals to the underside and then started my rows around that so it was all feathered and you couldn’t really see the newspaper at all. Hope it helps!
xo,
s
Jillian says
I laughed outloud at “cornhole.” We’ve always just called the game “bags.” Cornhole is so. much. better.
YoungHouseLove says
Haha, I snickered a little when I typed it too. I’m such a fifth grader.
xo,
s
Molly says
LOVE this!! I am deathly afraid of pinatas…all the bat swinging makes me so nervous. But this! this is perfect! I will be making one for my Ellie’s b day party coming up! Thanks for sharing!
julie says
it looks like a pretty pink capiz chandelier. love it
kristin says
heeey, i just made a pink inchmark pinata too! i had seen it back when she posted it, then repinned your pin when i started planning my daughter’s 3rd birthday party. they seem to be all the rage these days. i just posted my party photos on my blog today.
i didn’t have the heart to bust mine up, though. i’m going to hang it in my daughter’s room. inchmark pinatas are the new tissue paper pom poms. :)
YoungHouseLove says
Wow- what a charming party! I love all the little details and especially that skirt!
xo,
s
Bridget says
I just love your website… I have been following you guys for a year now and reading your blog is truly one of the best parts of my day. I find myself being more artistic than I ever though I could be! I picked up a 4ft by ft 4ft solid wood coffee table at Goodwill today for a whopping $15. Any suggestions on fun things to do to do to it? Ex. chalk board paint like the idea above?
YoungHouseLove says
Ooh yes chalkboard paint! And now it comes in all different colors at the craft store (there are even online DIY recipes to make it colored) so you could paint it with white chalkboard paint or even something like navy blue for an unexpected look!
xo,
s
Kat says
Very cute!!
Random question- what is the print on the left of your doorway looking at your kitchen table. (As seen in the pics on BabyCenter.)
YoungHouseLove says
That used to hang in our dining nook in the old house. It was from allposters.com a while back. Hope they still have it! Don’t remember the name or the artist though.
xo,
s
ALittleBite says
Pull string piñatas are actually typical here in Spain, but we usually buy them at the store. Plus, normally there’s a different colored string that’s the one that actually results in the piñata tearing and the sweets coming out… the birthday kid usually gets that, obviously. But when you’re little you don’t even notice that they’re different haha (at least I know I didn’t…)
YoungHouseLove says
That’s so cute!
xo,
s
Jules says
Totally unrelated, but I noticed you pinned a fabulous inside barn door on pinterest and I was wondering where you would put it in your home. Are you thinking of doing that from the inside of the office instead of french doors?
YoungHouseLove says
Nope I just love it, but alas there’s no spot for it in our house (nowhere for it to swing open and completely close with the built ins, etc). I pin lots of stuff I just like to look at. Even if I can’t make them mine. Haha.
xo,
s
Jen says
We saw one of these pull string pinatas at a child’s birthday party earlier this year. To make it more suspenseful (for older children) only one pull string was attached to the trap door to release the candy. All the others were dummy strings. So the kids could still line up and take turns taking a whack at the pinata by pulling one of the ribbons. It was a lot of fun and much safer than the traditional bat and blindfold method.
Mike Arndt says
I really like your idea of a pull string pinata! I was thinking how you could make it appropriate for older kids, and not be as dangerous as wacking it with a stick. You could have only one string attatched to the hatch, and have the rest of the strings kind of un-attached. Each kid would have a chance at pulling the lucky string that would bring forth the treats. I made my daughters pinata for her last birthday and it was a bear to make. I was trying to make a shaped pinata out of cardboard and streamers. Needless to say, when it came time for the party, the pinata was done completely on one side, with cardboard exposed on the other. I had to hold it in a way that the pictures would reflect the decorated side.
YoungHouseLove says
We’ve actually heard some are made that way for older kids. Sounds fun!
xo,
s
Jodz says
I have only made one pinata. I used far to many layers and the kids couldnt break it. It was so funny. It ended up on the ground with the kids beating it with a stick just trying to get in. Oh fun times.
YoungHouseLove says
I love that visual. Hilarious.
xo,
s
Jennifer says
Just discovered your blog recently and love it! I can’t remember what website it was on, but a while back I saw an idea to make little pull-string pinatas and use them for individual party favors.
YoungHouseLove says
That’s cute!
xo,
s
Lisa says
Oh my goodness! That is incredible!! I have to admit, it looks like WAY too much work, but my oldest is turning 4 in a couple of weeks so I might be tempted to give it a try…
The pull strings are the ONLY way to go….we bought a traditional pinata from a party store for my daughter’s birthday last year and that little group of 3-5 year olds kept whacking and whacking and whacking that thing to no avail!!!! (It was kind of funny actually!)…One of the Dad’s finally had to give it a good whack so that the kids could actually collect the candy…not exactly the way I had planned it!!! LOL.
Great job…you guys are so impressively creative!!!
Alie says
That’s genius! Amazing idea:). I love your blog, your writing. Thanks!
Heather says
Pinata was very cute! I have a daughter who is 11 now (my the time flys)! For her 4th Birthday she wanted a princess theme party so instead of pin the tail on the donkey I made a big green frog and we played pin the kiss on the frog. I made big red lips and put sticky (can’t remember what it is called kind of like play-doh) on the back of them for the kids. It was so cute and the kids had a lot of fun.
Love your blog by the way it has been very inspirational for me to get my house the way I want it but on a budget. Thanks!
YoungHouseLove says
That’s adorable! Love the twist on an old favorite.
xo,
s
Lori and Ethne at wom-mom.com says
For bachelorette parties for my girlfriends I would always make the “male anatomy” pinata. Of course the balls would always fall off, I would start crying from the stress. Since those days my husband has banned me from making pinatas, but I might have to give it another try! GREAT idea!
Lori
http://www.wom-mom.com
Cassie says
My mom and step-dad made homemade cornhole as a wedding gift which we used at our wedding under the redwoods. The bags were stitched by hand and given to us in an embroidered bag with our initials and the date of our wedding on it. The boards have a beautiful red stain! We use them all the time, such an awesome gift!
georgia says
Love the pinata, reminds me of a pink bee hive!
What isle of a supermarket do you buy goldfish and teddy grahams? I’m going to vegas in sept to get married, and I want some goldfish to snack on! Lol x
YoungHouseLove says
Haha we found them in the snack aisle at Target.
xo,
s
Georgia Rowe says
Im so googling to find out where Target is in Vegas!
Goldfish here i come… yummmm
Jamie says
My husband built a cornhole game for our bestfriends a couple Christmases ago and I painted it with the Georgia bulldogs logo but didn’t have enough time to sew the bags…and then forgot until we were cleaning out their garage last week and found it buried in the corner, useless. SO embarrassing.
LOVE the piñata! I want to try the fish scale pattern on a paper lantern in our living room ;)
Katie says
Ironically, we made a pinata this weekend for our daughter’s 4th birthday party. Bought a big beach ball at the 99 cent store, then wrapped it once in newspaper held in place with masking tape. Layered the paper mache newspaper on top and let it dry overnight. In AZ, there’s almost no humidity, so that was all it took. The newspaper layer under the paper mache limits the need to make multiple paper mache layers which otherwise would be needed for a bigger/heavier pinata to hold up. I decorated most of the pinata, then made a hole in the top and used a kid’s plastic coat hanger for a hook, and slipped the candy in that opening. Added another layer of paper mache just to that opening to seal it closed, then the morning of I covered that section. It was really easy with the coat hanger to loop a rope around it, then toss that over a tree branch. The kiddos were ages 2-5, and we let them take turns at it with a plastic t-ball bat. Birthday girl went first, then we started with the smallest kid and worked to the tallest. It was JUST strong enough that everyone got a chance to whack it and when my daughter got her second turn it broke. SO fun!
One tip, though: with paper mache based on flour, bugs will be attracted to it in some climates. You may want to consider that before making it a permanent indoor decoration.
YoungHouseLove says
Smart tip! Love the timing of your piñata too.
xo,
s
carolinaheartstrings says
What a great idea. No “stick” that suddenly starts heading for people. Great job. You could market that one!
Robin @ our semi organic life says
I can’t decide whether is is way cooler or not than the crazy shaped pinatas I had as a kid. Giant teddy bear (creepy), ballet slipper, train or other shape or animal. Somehow this seems much cooler. Way to go!
bethanyBlntn says
ok, so I know this is totally random to the post but if you don’t mind me asking, what is the green tape on the kitchen wall for?
Ok, now for the pinata, love it! it looks great and I think ALL pinatas look that ugly underneath. They wouldn’t make good people with the whole pretty on top ugly underneath thing but they make GREAT beating bags and pulling party fun!
YoungHouseLove says
We have had that tape up for months. It marks where we want the future doorway to be knocked into that wall- just so we can live with it and make sure we like the placement and width before doing anything too hasty that we’ll regret. Haha.
xo,
s
Diana Y says
Loved the pinata… and also quite impressed with how polite the children were after all the goodies fell on the floor! Sweet kids!
beth says
For my daughter’s 3rd b’day ….I blew up a picture of her into a poster and “pinned” the crown on her head. She loved being the princess. Adding some crown stickers to her friends pictures …made great thank you cards.
YoungHouseLove says
That’s such a cute idea!
xo,
s