In the midst of hanging our bedroom curtains last week, I snapped some pics of a little trick I use to control the mess of drilling holes into our walls (in this case to make room for curtain rod anchors). Some of you probably already do this, but I figured I’d pass it along to those who might not be in the know since we only joined the tape trick club about a year ago. And not many people think cleaning up drywall or plaster dust scattered below their work area is a fun way to pass the time. Including me. Anyway, the trick is crazy simple and looks a little something like this:
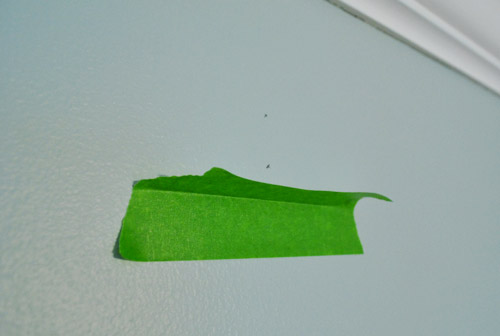
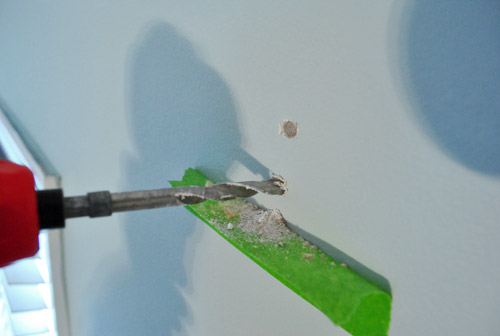
It’s just a piece of painter’s tape folded in half and stuck like a tiny temporary shelf below my “drill here” marks on the wall (I recently heard someone recommend doing the same thing with a post-it note, in case those are handier in your house). Either way, when your drill spits out a pile of dust, it gets caught neatly on the little tape “shelf” below. Which is better than landing all over the floor and whatever objects you didn’t bother to move below. See?
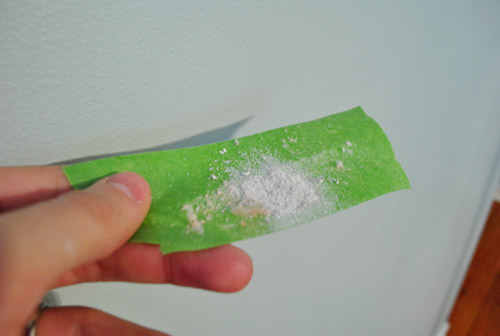
I debated switching to the post-it technique for a larger “shelf” surface, but decided to stick with tape (pun intended) because its sticky-all-around surface holds onto the dust more tightly (I’m klutzy enough that I’d probably dump all of the dust sitting on the non-sticky part of a post-it right onto the floor while removing it- but tape holds onto that stuff pretty well).
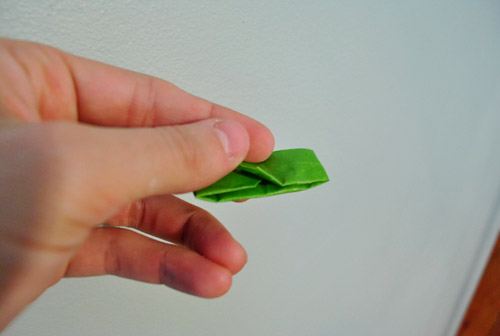
Plus I’m not gonna lie. My favorite part is wrapping up all the tape-trapped dust into a little burrito so I’m confident that the mess is permanently contained until I toss the little packet o’ dust in the trash.
There ya have it. Easy, right? I’m sure I’m not the only one to use some deviation of this method when it comes to avoiding clean-up, so feel free to share any alternate techniques for dealing with drill dust. Or any other quick tricks that you’ve used to make your projects easier, faster, or less messy. Speaking of messy- Sherry took on quite an unusual project today. Details soon.
Pssst- Best spam comment to date (well, maybe besides this one) left by some jumbled url under the name BuyLinks: “Man if I ever saw two raccoons fighting over a blog it’d be this one. Nicely done my friend.” Awesome.

Kana says
That spam comment is definitely worth posting!! I would love to see two raccoons fighting over your blog.. ;) “nicely done my friend”
Mrs. Jenna says
This reminds me way to much of the SNL skit “The Anal Retentive Chef” with Phil Hartman where all garbage and “refuse” gets put into a paper bag with the top folded over and stapled, then placed into the garbage.
But, that’s a good thing. :)
YoungHouseLove says
Haha, how we haven’t seen that?! Off to google it…
xo,
s
Sarah says
just watched the pepper steak clip—too funny! he would def be a fan of the tape trickery :)
Joy says
Mrs. Jenna is spot on. When I saw the painter’s tape folded up and the description, all I could think of was Phil Hartman’s chef routine! LOL
jen k says
Great trick! Thanks for sharing, I didn’t know that one! Btw, I vote for a play area for Clara behind your new super cool couch that looks perfect in the space!
Alicia says
We have also done the same thing but with a tiny (think jewelry box sized) box. Tape it onto the wall, it catches everything and you dump the box out in the trash. We save the box in the tool drawer with the drill.
YoungHouseLove says
Love that idea too! So smart.
xo,
s
Shannon says
Great idea, thanks!
Holly H says
Great trick! Now I won’t have to hold a dust pan under the drill while my husband drills the holes.
candace @ thecandace.com says
Thanks for passing this along!!
Alycia says
Nice, I’ll have to let my hubby know next time so I don’t have to spread the dust all over the floor so you don’t see it anymore, I mean vacuum up the dust! :)
Rene says
That is an awesome trick! Now if I could just get my husband to let me use the drill…..
rachel says
Buy your own and don’t let him use yours :) take that, husband!
jodi says
*love* the spam comment. hilarious.
and a great idea with the tape, too!
Katie says
Hmm, I always learned to just put the tape right where you’re going to drill. I drill right through the tape into the wall and there’s almost no dust.
Stephanie says
This is what I do too. It is especially helpful if you have crumbly walls to begin with, and the drilling through the tape helps make sure the walls don’t crack when you drill holes in them.
RebeccaNYC says
me too! works like a dream.
Charlotte says
Such a great idea! Never would have thought of it myself. Considering we are hanging curtains this weekend, it’s just in time! :)
Mike @HA says
That’s a good idea. Plaster/drywall dust is such a pain. Much better plan than doing it in your underwear ;)
Tammy says
Do you have any tips for measuring for placement of the rod brackets? Between drapery pins, the attachement rings on the rod rings, and the dimensions of the brackets, I often end up making 2 or 3 holes before I get it right.
Love your blog, by the way. I’m so glad you keep on writing.
YoungHouseLove says
John holds the rod up (by holding the brackets against the wall with the rod on top at different heights) and I step back and pick the height. Once I do he continues to hold those brackets and I mark the holes. Then he hangs it. Hope it helps!
xo,
s
Christy Panzarella says
I use a folded in half post it note.
GreenInOC says
I think that that SPAM commenter meant to write was:
“Man if I ever saw two raccoons sitting oddly on the toilet eating chocolate bars and fighting over a blog, it’d be this one.”
My trick for messes created by DIY projects is similar to Alycia’s, I wear socks and kind of “spread the joy” until I break down and vacuum later (much later)!
I think though now that I know about this trick, I’m going to combine it with Alicia’s trick and feel really fantastic about my cool self and clean socks!
YoungHouseLove says
Hahahahah, love it!
xo,
s
Niki says
You guys are so brilliant!
Shannon says
This will make my husband’s week…he’s a dork for (awesome)tips like these. And a burrito of any variety is always good.
Amanda says
Great idea, guys! I’ve also heard of drilling through a piece of painter’s tape. It’s supposed to keep your drill from making a dusty mess and avoid any sheet rock damage, too!
LittleMissEclectic says
Another handy way to keep dust away, if you have another person handy is to have them hold up a vacuum hose just underneath. Then all the dust gets sucked up right away!
Kim says
This is my suggestion to.
ffrost says
Same here, it’s really easy this way, almost no debris on the floor ever.
Reenie says
Kewel idea =)
William says
Lifehacker tip from a few years back. Save those return envelopes from credit card offers that flood the mailbox. Slice off the flap, crimp it into a pocket and tape it under the hole to be drilled.
Beth @ bethcooks says
I will definitely be using this trick tongiht while hanging curtains….great job you guys!
Julie says
Great idea – I’m sure I’ll use it soon! Speaking of tape… we took the plunge and decided NOT to tape when we painted our nursery Saturday (I’d asked you if you ever got splatters when John rolled). Sure enough it was actually MUCH easier for me to cut in since I had a better view of what I was doing and the trim and NO SPLATTER! Do you realize that that will change the way we paint forever? SO glad to be able to skip that step from now on – thanks!
Anne Alexander Sieder says
We actually hold the vacuum hose under the drill – whooosh! everything’s gone!
Christina says
We’ve done this too, but with lint roller squares. They work just as great, and give you a bit of a bigger surface to catch all the dust and wall particles.
Julie @ Another Chance Ranch says
What a great idea! Thanks for sharing!!
Ruth Ziegenmeyer says
Dude, that’s freakin brilliant! I mean brilliant! Also, its pretty smart
Amber says
Usually my husband and I work together and I hold the vacuum attachment from our hand held vacuum up near where he is drilling and it sucks up all the dust as he drills. No mess!
Sarah says
ahhh. proud new member of the tape trick club. so simple. awesome!
Anna @ Take the Side Street says
Best idea ever. It’s so simple, I can’t believe I’ve never thought about it. My crappy Wednesday has been transformed! Now to go find a reason to drill some holes…
skye says
Great idea – thanks for passing it along! :)
Erika says
Thanks for sharing this awesome trick. It’s so simple – why didn’t I think of this before?!
heather says
You can also use the “tile tape” trick on walls. A couple layers of tape, mark the dot where you want to drill on the tape, and drill right through it. It discourages chipping of the wall and if your drill slips – no scratch in your paint. This is how you drill tiles, but I’ve seen it done on walls as well. :)
Lesley says
LOVE this! I will have to show my husband since he lets it fall to the floor for me to vacuum later….whenever I notice!
LauraC says
I thought my husband was the only one who did that. So nice to know I’m not alone!
Ashley @ Simply Creative Things says
ditto!! i sometimes think my husband just enjoys making messes so i can clean them up :P
Patti says
Yes that Phil Hartman chef bit was so funny! He was imitating an actual tv chef, i forget his name, but he was always so careful about getting rid of “kitchen refuse” and made sure the viewer knew how to get rid of the waste “properly”. Anyway, I know I’m totally out of the loop on this but hope you could elaborate…what is the objective of “spam” commenters? Is it to get free stuff on your giveaways? I don’t get it.
YoungHouseLove says
We don’t get spam comments either! Sometimes it’s to try to hack in (but we have a lot of blocking software to protect us) and sometimes it’s just to get people to click their link so they get money for impressions. I just don’t know who would click a link attached to a comment like that. Haha.
xo,
s
Loquaciouslaura says
Any tricks for hanging framed items side by side and making sure you line them up well? I already do a lot of measuring (between the items, down from the ceiling) and using a level once I get my marks up, but somehow once I stand back to look at them, they’re not well aligned or even slanted (if there are more than two hangers involved).
Maybe it’s your level of experience, but you guys don’t seem to have that problem ;) Do you ever have to put up hangers or shelves with multiple tries? Any tips?
YoungHouseLove says
We just make a million holes in the wall for every picture we hang. Haha. Just kidding. But sometimes it does take us a second attempt to line things up in a super orderly line. A level and a yardstick usually do the trick though. Hope it helps!
xo,
s
Marge says
@Loquaciouslaura –I’ve had a lot of success with a laser leveler (I usually double check it with a old school level, too). It’s especially great if you’re hanging heavier things that require a drywall anchor, since I’d hate to have to redo that intense drilling if my measurement was a little off. This is the one that I use: http://www.lowes.com/pd_163073-70-BDL170_0__?productId=1039233&Ntt=laser+level&pl=1¤tURL=%2Fpl__0__s%3FNtt%3Dlaser%2Blevel
Felicity @ Our Little Beehive says
Hey Loquaciouslaura – we posted a tutorial for hanging frames vertically with this issue, but it works the same for side-by-side:
http://www.ourlittlebeehive.com/2010/06/multiple-frames-hung-with-precision.html
Melissa says
Here’s a trick: Hang your first painting at the height you want. Then for the second one, you put a nail through the end of a wooden paint stirring stick and hang the picture on the nail. The stick points up like a handle and you hold this to place your frame, while your partner stands back and eyeballs it against the first frame that you hung. Keeping the stick against the wall, remove the picture, give the nail a tap to mark a hole in the wall, then hammer in a new nail.
Susan says
oh my gosh, how did i not know about this trick? this would have saved me so many times before. oh well. now i know! thanks for sharing! :)
Mia says
Great idea! Wish I knew that one last week when my curtains went up. Oh well :) I did use tape though to hold up picture frames while I was arranging them for a big wall collage. Good stuff:)
Jen @ The Decor Scene says
Love the tape trick! I’ll have to use that next time. And I loved the spam comment. LOL!
Minnesotamom says
Best tip I’ve seen today! Thanks for all your little how-to’s. :)
karen @ our slo house says
Ingenious.
My husband is the one who does the drilling and the clean up. And then I’m the one who does the clean up after the so-called clean up. ; )
I’m going to have to share this trick with him…
emily @ the happy home says
you crazy kids are so smart! i’m still cleaning dust off my desk after my honey installed shelves for me above it. while i’m appreciative of the favor, i wish he’d moved my external hard drive before he started drilling!!
Paula/adhocmom says
I totally love tape. And when Clara is older, seriously, a toddler can be amused with a role of tape long enough to hang like three pictures.
Gloria says
You can also just put the tape over where you are gonig to drill the hole. Then when you drill, no mess! And no damage to the paint surrounding the hole either!
Jen @ das Sushi says
We go full dentist. One of us holds the vacuum hose to the area while the other drills. Sucks it all right in! Also works for sanding spackle…
linda says
great idea! we ust the “dust buster” method…. i hold the dust buster just under the drill while he’s drilling…. it sucks in the powder…. you idea seems much easier!
linda says
i made lots of typos… but you get the gist! lol!
Chelsea in Richmond says
Awesome tip! Wish I had known about it before last weekend when I made about a gazilion holes in walls throughout our house hanging pictures, shelving and shades. I’ll remember next time though!
Beth@Just{Heart}It says
Wow, that is such an awesome tip! I’m in the midst of removing “popcorn” from my ceiling – do they make tape that big? ;-)
marissa says
When we took that on, we put down sheets of that big brown paper that comes in rolls from the hardware store. It protected the floor a bit better than nothing. Then we shop-vacced like crazy. There must be a better way, though. Giant sticky paper would be way more fun!
kyla says
Speaking of “tricks”…what do you use to clean your paint brushes? (Latex paint brushes and rollers, I think you’ve mentioned it before)
YoungHouseLove says
We just use water for latex paint. And lay them flat to dry. Hope it helps!
xo,
s
kyla says
Something different for enamel? I remember a mineral product? I may have been having DIY dreams again…
YoungHouseLove says
We use mineral spirits for oil-based paint, but have heard olive oil or vegetable oil can work (and it’s even more natural).
xo,
s