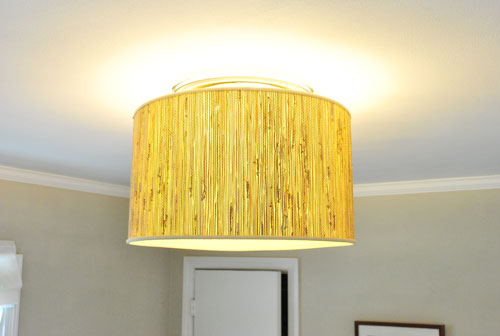
We did it! We DIYed an awesomely oversized light fixture for the office and we only spent… wait for it… $32 from soup to nuts. Which is pretty darn exciting considering it reminds us a lot of this pricey $412 version. Gotta love saving $380 with a homemade solution. Here she is in all of her glowing glory:
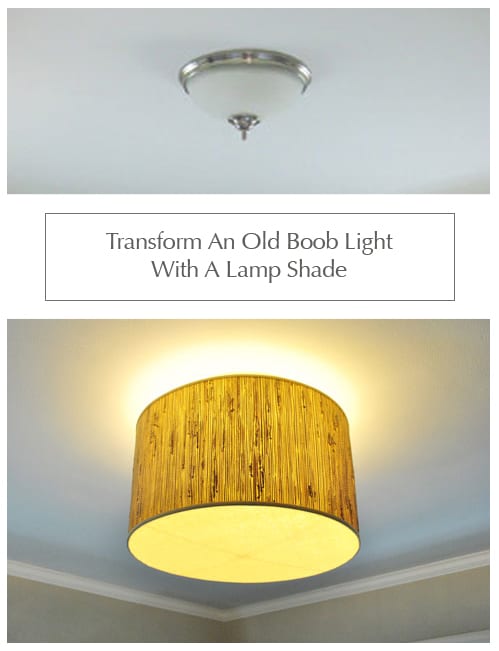
But let’s back up. Here’s the basic fixture that we started with to serve as something of a before shot (although you all know there’s no longer a bed in there since we upgraded to a sleeper sofa and built a DIY desk).
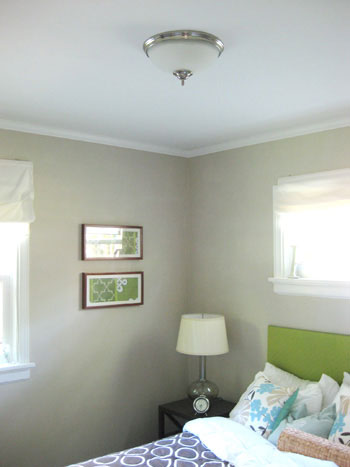
And now that we’ve easily been spending over 40 hours a week in this ever-evolving office/guest-bedroom/playroom, it’s probably understandable that we wanted something a little more inspiring and interesting hanging overhead to complement our things-they-are-a-changin’ surroundings.
So we hit up one of our favorite local lighting spots (The Decorating Outlet here in Richmond) and came home with this amazing – and amazingly huuuuge – 20″ lamp shade for just $29. It was actually on clearance since it was labeled as “dented” but we studied every inch of it and couldn’t find so much as a tiny flaw. Maybe it had been squished but the indentation later popped back out? Either way we were sold! We knew we’d need to figure out how to create a diffuser for the bottom of it, and we also assumed we’d need to buy a lighting kit at a hardware store to hang it, but we figured those things would probably only run us another thirty-five bucks total (which still meant we’d end up with a polished looking pendant for just over $65). Not bad. Then we caught our first break when we removed the glass hemisphere from our old light fixture and realized that there was already an existing rod that might work for hanging our new pendant…

And sure enough, there was no lighting kit necessary…

… we just slipped the shade onto the rod protruding from the ceiling and used the finial (leftover from the previous light fixture) to hold it in place.
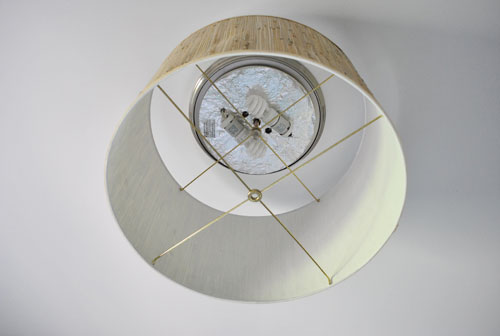
Here’s a closer look for all you detail oriented people:
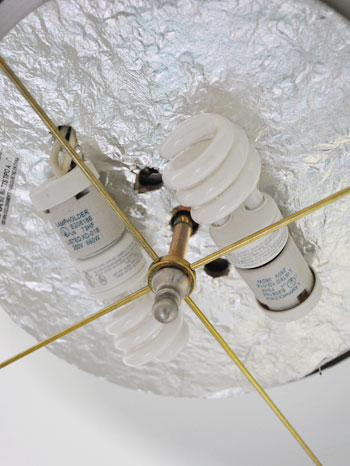
Of course the view from the bottom left a lot to be desired. So with our how-will-we-hang-this-lamp-shade-from-the-ceiling question answered, it was time to figure out how to create a diffuser to block the ugliness without blocking too much of the light. I should mention that we’ve never tackled diffuser-making before, but we just did what we do for so many other projects: attempted to figure things out as we went along. First we pondered materials that we could use to create this much-needed diffuser. We could get a piece of plexiglass cut to size and spray it with frosting spray to obscure those ugly ceiling bulbs. Or we could get some sort of thick acetate (or another weighty paper product) and try to work with that. It was around this point in our brainstorming exercise that we decided to pad into the dining room and check out the diffuser situation on the pendant light hanging above our very own dining table. Lo and behold it was just some basic cream colored fabric. Genius!
Now here’s the safety warning: you obviously don’t want to use paper or fabric as a diffuser if your bulbs will be very close to it or if there’s no room for the heat that may build up inside the lampshade to escape. Luckily by hanging our shade from the ceiling on the already-existing rod from our old fixture there was about 4″ of space above the shade (since the entire top of the shade was open and was not mounted flush against the ceiling) for any built-up heat to escape. Plus we use compact florescent bulbs, which are known to burn a lot cooler, so there’s even less of a heat issue. Not to mention that the bulbs are over 18″ from the base of the lamp, where we added our little fabric diffuser, so they’re definitely not in too much of a close proximity.
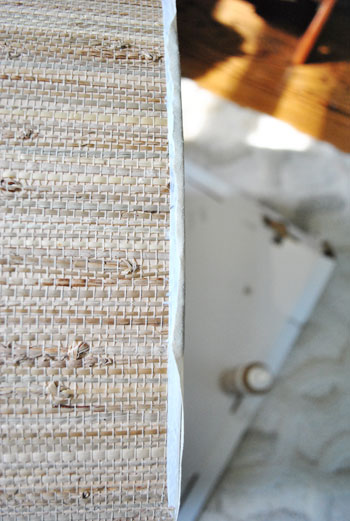
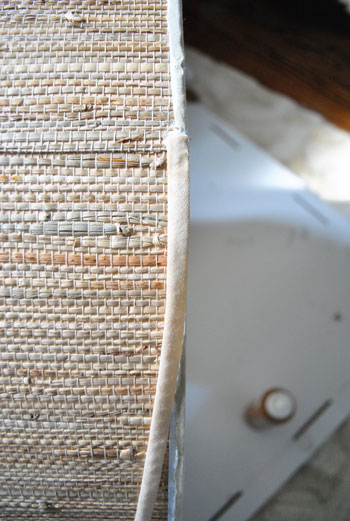
But back to the DIY process. First we removed the fabric band that was glued around one edge of the drum shade.
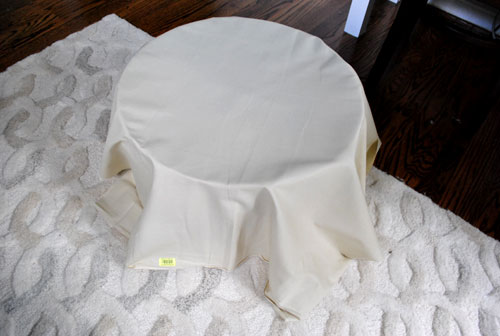
Then we draped our cream colored fabric (scored for under $2 at Joanne Fabrics) over the shade so we could see where to cut it to create the beginning of our diffuser panel.
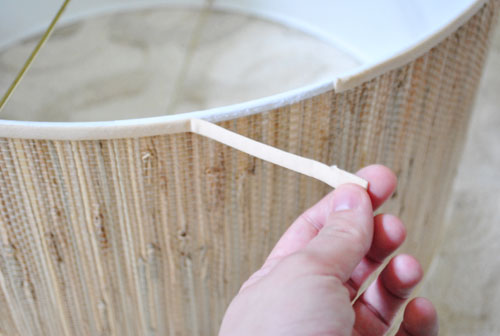
Then we just held the draped fabric in place and used a scissors to cut around the rim of the shade, leaving about a quarter-inch of fabric hanging over the edge.
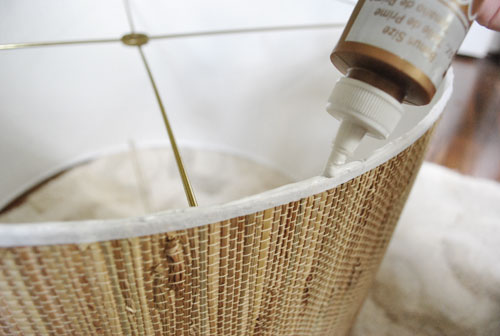
Next we used some Aleene’s Tacky Glue (some cheap already-on-hand craft glue) to coat the rim where I’d be sticking that round panel of fabric. Note: be sure to do this on the rim where you removed the fabric band and not the other side.
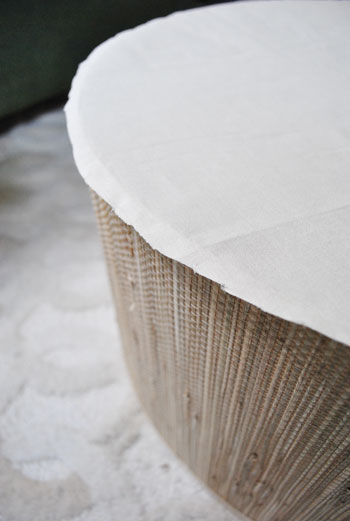
Then we simply flipped the shade over, so it was facing down, and placed it directly onto the fabric circle that we had cut out (with that quarter-inch of fabric hanging over the edge on all sides) so the glue would bond the shade and the fabric. Oh and it’s smart to iron your little fabric round before the gluing process if there are any creases in it.
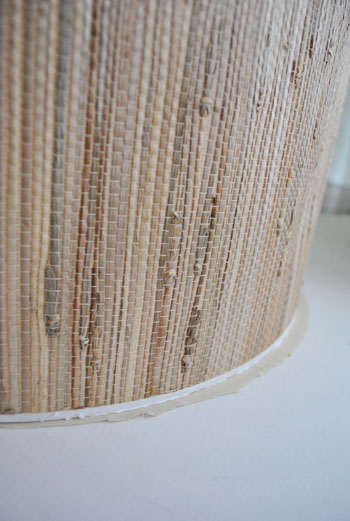
Then we just had to use a little more glue to secure the smidge of fabric overhang around the outside rim of the shade. Note: you don’t want your fabric to overhang too much or it’ll protrude past the fabric band once you re-glue that in place around the base of the shade. So trim your extra fabric if it’s any longer than ours is in the photo below:
Then we just waited about ten minutes for that to dry and re-glueed the fabric band in place. You know, the one that we removed at the beginning of the project? Easy peasy. In fact, speaking of easy, the entire process took less than 15 minutes of actual work (and about 40 minutes if you count the breaks for glue-drying).
And voila…
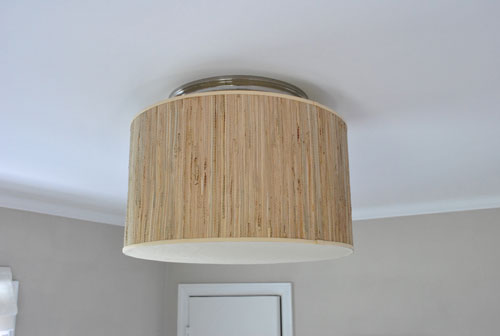
… a light with texture, charm, and loads of presence thanks to the oversized proportion. We just love giant shades in small rooms (like this 12 x 12.5′ space) to give them more of an elevated and polished look. Plus we’re of the school of thought that bigger items in small rooms actually make it feel larger and more luxe (whereas a bunch of small-scale pieces in a modestly sized room can make it feel smaller and more cluttered).
But back to our DIY light. We’re thrilled to no end now that we can no longer see those ugly bulbs from below. Plus the smidge of silver that peeks out over the top makes it look like a pricey flush mounted pendant (as opposed to a cheap-o lampshade that we retrofitted onto an old $10 fixture’s frame). And the fact that we only dished out $32 for the big office lighting upgrade – especially when we initially estimated that we’d spend around $65 retrofitting things – is the icing on the cake. Or should we say it’s the diffuser on the shade? Nope, we’ll stick with the icing on the cake.

Oh and changing the bulbs is simple since we can easily remove the shade from above (that gap between the pendant and the ceiling is key) so even though you can’t see the bulbs from below they’re not quarantined forever behind the fabric diffuser. So that’s the latest office news here at Casa Petersik. What have you guys been up to this week? Did anyone else tackle a lighting makeover or another office upgrade that made their room a little more interesting, stylish, or functional? Spill the beans.
Wanna follow the entire office/guest bedroom/playroom makeover? Click here for the intro post, here to read about the big sleeper sofa hunt, and here for the DIY desk play-by-play.
Update – Wanna know where we got something in our house or what paint colors we used? Just click on this button:


Ruby says
That is seriously fabulous! I’m totally inspired to make one for the horrible light fixture that resides at the top of my staircase. Beautiful!
liz @ bon temps beignet says
Y’all find the coolest stuff at the best prices. I’m jealous.
amyks says
Great light, but a quick question…do you guys have enough room to change out the lightbulbs? It looks like it could be tricky.
YoungHouseLove says
Linda and Amyks- Good question! We actually can easily remove the shade to change the lighbulbs from above (of course we need to stand on a chair, but that’s usually necessary to change all the ceiling bulbs anyway).
Janine- It’s 20″ wide. Hope it helps!
xo,
s
jo says
What a great idea. Can’t wait to see what you do next!
Janine says
Love this!! I want to create something similar for my “under-construction” office! What size shade is that? My room is a similar size and I want to make sure I get the scale right.
I love that you both are doing an office decorating project just ahead of me – so much inspiration. Love you oodles!!
Linda says
Love the result but how do you change the light bulb?
Kathi says
Hey guys – way cute fixture! One question, how do you get to the screw to remove the shade when you want to change the bulbs?
Thanks!
Kathi says
oops – nevermind – I see you answered my question already!
shanna says
Love this! It gives me hope for updating my kitchen light fixtures which are very similar to the one you had in your office/former guest room. As for me, I just made a copycat of a gorgeous iron & crystal PB chandelier. I’m pleased as punch with the results!
Sophie says
It looks AMAZING guys! I’m redoing my bedroom at the moment, now I’m thinking of doing one for myself.
Amanda@OurHumbleA{Bowe}d says
Great idea and greater light! I just received my new CB2 pendant. We still have to retrofit the wiring (this one is meant to be plugged in) to hardwire it for our dining room. But I’m so excited about it! I’ll make a post on my blog (ourhumbleabowed.wordpress.com) when it’s done. Thanks for the great work!
Nichole@40daysof says
I love your fixture. You guys are so lucky that you could use the existing fixture. My lighting projects never go that well and in fact cause my husband much annoyance. :)
http://40daysof.wordpress.com/2010/06/08/beware-the-fancy-pants/
julia says
The light looks great! That is really creative! Did you guys paint the ceiling a light blue/gray color? It looks like it in the pictures when the light is on.
Kristen says
Decorating Outlet – is that the in the shopping center right before Robious?
YoungHouseLove says
Kristen- Yup, it’s right there on Midlothian past the Car Pool and before you hit Robious.
Julia- Nope, the ceiling is still bright white in there but you know we love a painted ceiling. Someday…
-John
heather s. says
Looks great! I also wondered about changing the bulbs since the gap between the shade and the ceiling doesn’t look very large in your pics so I’m glad to hear you can easily swap out the bulbs.
I’m trying to decide between a drum shade or a chandelier in my office but I haven’t found the perfect fixture yet.
Amanda says
This is one fantastic makeover! I am certainly going to steal this for both our bedrooms which currently only have the builder grade “boob” light as we so fondly refer to them. I also have to agree with your comment about larger scale items in smaller rooms. We recently completed our bathroom renovation and we chose to replace the existing 18″D x 30″W vanity with a custom built (by my husband) vanity that extended from the toilet to the wall. Ended up being about 7’L and 30″D. It made the whole room look twice as big. Amazing!
Amy E. says
awesome idea! though i’d recommend instead of cutting your circle first and then gluing, that others attempting this tutorial should lay down their fabric and use the excess to help them stretch it taut during the gluing stage. then, once the rim of glue is dry, they can cut their little bit of overhang with way better confidence and accuracy all the way around the edge. after that, just continue on with the rest of your tutorial. this should help eliminate the fear of cutting incorrectly and also help the fabric from sagging over time.
Beth @ bethcooks says
OMG! Great job you guys! I love the look of that shade…it’s perfect for your house :)
Melissa says
What a great project! Can you share a picture of the overall look in the room? It’s a bit hard to tell the scale. I love that shade to begin with. If you are ever looking for shades for super cheap, Ross Dress for Less of all places often has great deals on shades. They don’t really have many lamps though which is a bit odd! I also wholeheartedly agree with the bigger is better theory. I did that with my kitchen pendant lights and they really make a statement instead of just being wimpy glass pendants. Lots of pics of my kitchen here – http://www.houseography.net.
YoungHouseLove says
Hey Melissa,
Stay tuned! As we continue to transform the room we’ll share more panned out photos of the space…
xo,
s
Alexis says
Love the texture of that shade. I have similar shades on the lamps in our bedroom. the light diffuses so nicely from that material.
Can’t wait for the big office/guest room reveal!
Jessica @ How Sweet says
That light is just too cool! I love it.
Jason says
That’s awesome!
The fabric diffuser would work so well when adding a shade to a ceiling fan as you did in your den, if you can find the room to take it down later.
Maybe you could glue the fabric to a hoop and use magnets on the shade and the hoop????? That way it’s removable?
I thought about doing this same idea in my foyer and kitchen, using a drum shade on a ceiling fixture and then covering the bottom some how, never thought of fabric!
But – I ended up finding fixtures for a great price online.
However, I think this is again perfect for putting a ceiling fan in my kitchen and updating the one in my breezeway with drum shades!!
Drum shades and fabric and magnets??? oh my!
YoungHouseLove says
Hey Jason,
Great idea! The only issue with making any sort of diffuser for the fan is that the pull chains come out from inside the shade, so any sort of cover would hinder the use of the chain to turn the fan on and off. Oh well, there’s only one bulb in there (and we got a pricier compact florescent bulb that looks like a normal bulb) so it’s a lot less of an eye sore than looking up into the office fixture. Hope it helps!
xo,
s
Megan says
I love the idea for a ceiling fan as well – if it is hard wired for light/fan then you wouldn’t have to worry about the pull chains!!!
Maddie E says
I love the look! I’m always on the look out for these large shades, but haven’t been able to find a deal like that yet! Hopefully soon!
ps- I love that you call your daughter Bean. My sister-in-law-to-be is a Bean too. She picked up the nickname as an infant who wouldn’t sit still (a jumping bean, if you will) and it stuck! At nearly 10 years old (and much calmer) she’s still our Bean :)
Ashley @ The Design Thief says
Love it! You guys did an awesome job! That shade is going to add such lovely and soft light to your office.
Nancy Wyant-Barr says
Love the shade I may just have to try that in the next room I am doing! (Guest room #2) Love your website and all of your creativity!!!!
Laura@JourneyChic says
It turned out great! Last night I broke out the hot glue gun and embellished an old lampshade to make it more fun for my son’s nursery. It took all of 15 minutes to do! Will post pics on my blog soon.
Jacquelin Seybert says
This looks great! I can’t wait to see the room when it’s finished!
Jen says
My lighting update story: I have one lonely builder grade can light in my kitchen above the sink that has been on my redo list since moving in but the cost of an electrician to rewire it for a pendant wasn’t in the budget. But what did I stumble upon at Lowe’s this weekend? A can light conversion kit! It simply screws in like a light bulb to the existing can light. It installed in less than 10 minutes and the best part—no electrician required. So for less than $35 (kit plus cost of globe) I now have a lovely pendant light over my sink.
emily @ thirtyeight20 says
I’m curious about your opinions on ceiling fans. I personally think they are totally and unredeemably hideous, but we installed them in our bedrooms because they help cut energy costs. (Our bedrooms are on our 2nd floor though, so that’s an important side note.) I care a lot about design, but in this case the aesthetics of a nice pendant light (nice job on yours, by the way!) lost out to the energy efficiency of an ugly fan.
I don’t have the exact stat in front of me, but a ceiling fan can make a difference of 4-8 degrees in a room at next to no expense. I know you guys are all about being energy efficient, so I am sometimes surprised that you don’t seem to have them in your home. Is that simply an aesthetic decision (which is understandable), or do you just not feel they are very useful in your ranch-style home?
YoungHouseLove says
We actually have ceiling fans in our sunroom and our den (we agree that they definitely cut down on energy costs and because we spend a lot of time in those spaces they definitely make sense to us). We did remove them from our bedrooms because they’re smaller spaces and the low-hanging fans made the rooms feel cramped, but we brought in high quality table fans that work really well to keep the nursery and our bedroom cool so we didn’t lose much function at all. Hope it helps!
xo,
s
Taylor (The House on Penny Lane) says
Love this. Now I want to take a peak in all of my ceiling mounted fixtures to see if they have this same hardware (the one in my dinette area just might).
I’ve done my own creative light fixture craftiness in my dining room, which I wrote about and videoed on my blog (http://thehouseonpennylane.wordpress.com). It was actually very similar to one of your earlier attempts for lighting on your porch.. I may have even commented about here before, oops :)
It involved a pendant light kit from Home Depot and the creation of a string shade using a 36″ balloon, yarn and fabric stiffener. Unfortunately, after a couple of months, the shaded started collapsing on itself, so I had to toss it. I did, however, find a HUGE paper lantern to replace it. I really should blog about that, too.
Anyway, the cost for each of my dining room light fixtures was less than $50, while a fixture bought at a retail store of the same size would have been at least $200. I’m thrilled.
Jessie (Bites and Pieces) says
That light fixture is awesome. You guys are so creative, I love it!
Christine says
Wow, I love this!! I’m sure it’s such a soft, beautiful glow!! How inventive, I’ve always seen shades and wondered if it was as easy as popping it up there!! Thanks for the tip!
Lesley H says
Absolutely brilliant! Love the project and the final look is stunning. Off to scout my local WalMart for cheap shades to do this in my den. Thanks for sharing!
Jamie says
You guys never cease to amaze me with your creativity! Thanks for all of the inspiration!
Karen J says
Where do you come up with these ideas?!?! Such creativity and imagination. I love it. Nice, real nice.
Katie says
You guys never cease to amaze me. I can’t stop checking out your blog, on a daily basis after I discovered it through Knock-Off Wood a few months ago.
There is just so much that you have done and I can’t wait to do it in my own home. I am going to try and tackle the door-made-a-desk project this weekend. I can’t believe we actually have an old door lying around that would work for our family room/office area, and have been pondering a new desk for months. I love free! And now this? A great lamp shade, turned light. My poor girls have had these horrible 1970’s fixtures in their rooms for 5 years now. I am now going to be on a lookout for frilly lampshades, that I normally wouldn’t have purchased to use for their main light!
I have, unfortunatley, found that I am not able to find, anywhere, the Capiz Chandelier that you have in your master. Do you think that would be something that could easily be made? Would love to do a mocha one for our master.
Thanks for posting such wonderful ideas. Keep up the great work.
YoungHouseLove says
Hey Katie,
Have you checked out World Market? They have a super similar chandy that’s really inexpensive. You also might want to try ebay! Otherwise DIYing one would probably take a while (it would be tedious to attach all the capiz rounds to fishing wire or string) but it would probably end up looking amazing. Good luck!
xo,
s
Lindsay says
Love this idea!! We’re slowly making our way over to the drum shade side of the force and I think diffusers are soooo important with drum shades (ya know, because they’re so *open* at the top) – I just might have to use this little tip!
Great job!!!
xxoox,
Lindsay
kristiina says
I think my favorite part of this post (aside from the ultra cool and inexpensive lighting solution) is how excited you guys are..it really comes through in the writing and I was smiling the entire time I was reading–you guys are the real deal ;)
Megean says
Hey Katie – I was able to DIY a capiz chandelier by using the base of the existing light fixture in my bedroom. I detailed the process on my blog at http://thewantedlist.blogspot.com/2010/02/wanted-diy-capiz-chandelier.html
Let me know if you have any questions – it was much more affordable than purchasing a ready-made one, and I could customize the length to fit my room!
Erica says
Wow! That is an AWESOME idea! I will HAVE to do that one day! Thanks for sharing!
maria says
that is a genius idea, but it looks like it makes the room look really dark… is that the case or is is just the picture? PS i just helped my sister create the headboard you guys have a tutorial for. i did it for my self a while back and she just loved the results. such a great idea. i also added stripes to my hallway using your tutorial! thanks for all the great ideas
YoungHouseLove says
Hey Maria,
It’s just the picture. The fabric is pretty thin and very light in color so it lets a lot of light shine through. We also have a desk lamp to add a bit more light though, just because we believe that every room needs more than one light source. Hope it helps!
xo,
s
Katrina says
I love pendant shades – we have them on our dining room and bedroom the larger the better they make the space look – I so agree with you!!
I loved that your DIY a diffusers, its makes the biggest impact with lighting love soft glows!!
Laura @ youngDCliving says
Super impressive! Wow..you guys are really inspiring. I feel like light fixtures always seem like an impossible DIY task, but you seem to make it sound easy :)
Johnna says
AWESOME! And TOTALLY inspires me to do the same with a similar fixture in our entry way that has been MAKING ME NUTS-O!
One question – where’d you guys get the shade from?! I REALLY REALLY apologize if you have already answered this question or if I missed it when I read the post…I did look through all your responses so I don’t THINK I am double asking you…anyway…Thank you!!!
Johnna
YoungHouseLove says
Hey Johnna,
We got it from a local lighting outlet here in Richmond. Here’s the link: http://www.shadesoflight.com/SOL_Retail.php?SOL_Store=OUT
xo,
s
maryann says
@ Emily re: ceiling fans.
We have a Cape-style house & installed an attic fan last summer. The difference is unbelievable. (It sets itself to turn on when the attic is 90+). The temperature inside our house, especially the upstairs bedrooms, is much much cooler. In addition our central a/c doesn’t turn on as often & with less water (humidity) coming out as well.
We had a ceiling fan in the boys room but had to take it out when I found out what they were doing with it…LOL.
Kim @ Don't Kid Yourself says
You guys are so creative when it comes to home decor! Can I borrow your brain for a day?? haha
Emily P says
what type of shade has a support at the top and the bottom? i’ve never seen this before.
YoungHouseLove says
Good point! It came that way, but you’re right that they don’t usually have double supports.
xo,
s
Melly says
Excellent! I’ve wanted to do this with that same light fixture in my home but couldn’t figure out how to make a diffuser. Thanks for solving this for me!
Samantha says
I think you missed the mark with this one. That light fixture is U-G-L-Y. Just because you can DIY-it, doesn’t mean it’s worth having.
Tezgah says
This is such a fantastic idea. It looks very beautiful and has inspired me to finally change some of our standard renters fixtures in my apartment.