We did it! We DIYed an awesomely oversized light fixture for the office and we only spent… wait for it… $32 from soup to nuts. Which is pretty darn exciting considering it reminds us a lot of this pricey $412 version. Gotta love saving $380 with a homemade solution. Here she is in all of her glowing glory:
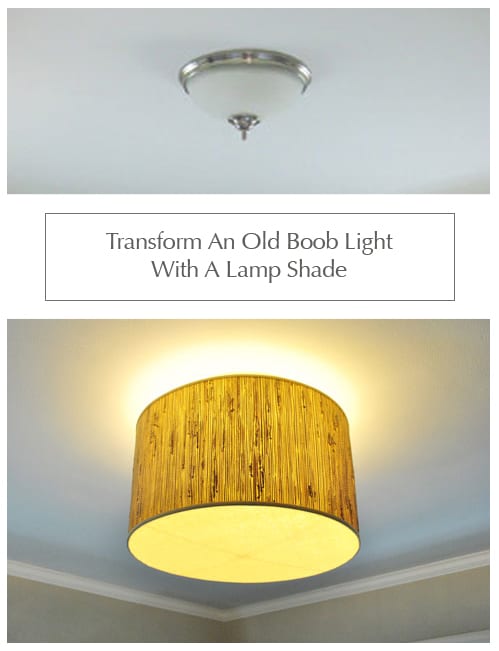
But let’s back up. Here’s the basic fixture that we started with to serve as something of a before shot (although you all know there’s no longer a bed in there since we upgraded to a sleeper sofa and built a DIY desk).
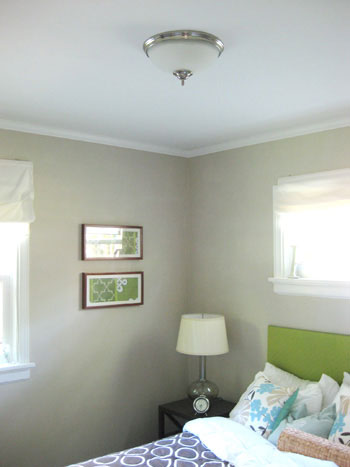
And now that we’ve easily been spending over 40 hours a week in this ever-evolving office/guest-bedroom/playroom, it’s probably understandable that we wanted something a little more inspiring and interesting hanging overhead to complement our things-they-are-a-changin’ surroundings.
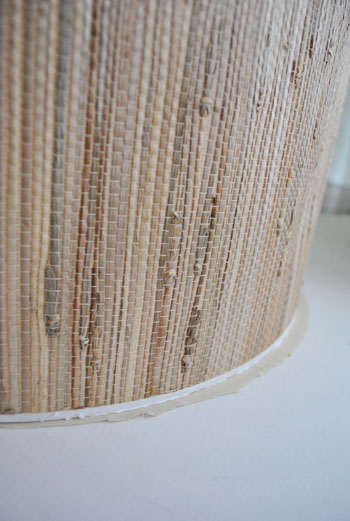
So we hit up one of our favorite local lighting spots (The Decorating Outlet here in Richmond) and came home with this amazing – and amazingly huuuuge – 20″ lamp shade for just $29. It was actually on clearance since it was labeled as “dented” but we studied every inch of it and couldn’t find so much as a tiny flaw. Maybe it had been squished but the indentation later popped back out? Either way we were sold! We knew we’d need to figure out how to create a diffuser for the bottom of it, and we also assumed we’d need to buy a lighting kit at a hardware store to hang it, but we figured those things would probably only run us another thirty-five bucks total (which still meant we’d end up with a polished looking pendant for just over $65). Not bad. Then we caught our first break when we removed the glass hemisphere from our old light fixture and realized that there was already an existing rod that might work for hanging our new pendant…

And sure enough, there was no lighting kit necessary…

… we just slipped the shade onto the rod protruding from the ceiling and used the finial (leftover from the previous light fixture) to hold it in place.
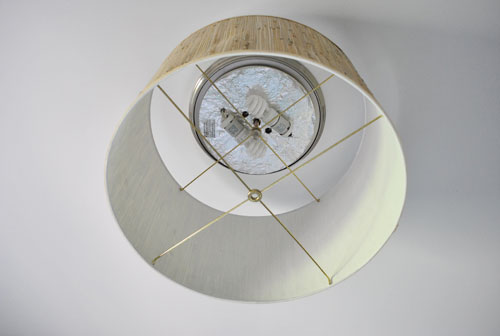
Here’s a closer look for all you detail oriented people:
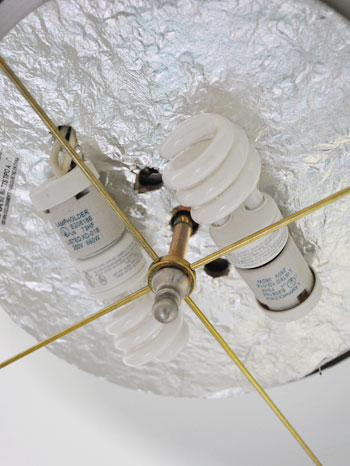
Of course the view from the bottom left a lot to be desired. So with our how-will-we-hang-this-lamp-shade-from-the-ceiling question answered, it was time to figure out how to create a diffuser to block the ugliness without blocking too much of the light. I should mention that we’ve never tackled diffuser-making before, but we just did what we do for so many other projects: attempted to figure things out as we went along. First we pondered materials that we could use to create this much-needed diffuser. We could get a piece of plexiglass cut to size and spray it with frosting spray to obscure those ugly ceiling bulbs. Or we could get some sort of thick acetate (or another weighty paper product) and try to work with that. It was around this point in our brainstorming exercise that we decided to pad into the dining room and check out the diffuser situation on the pendant light hanging above our very own dining table. Lo and behold it was just some basic cream colored fabric. Genius!
Now here’s the safety warning: you obviously don’t want to use paper or fabric as a diffuser if your bulbs will be very close to it or if there’s no room for the heat that may build up inside the lampshade to escape. Luckily by hanging our shade from the ceiling on the already-existing rod from our old fixture there was about 4″ of space above the shade (since the entire top of the shade was open and was not mounted flush against the ceiling) for any built-up heat to escape. Plus we use compact florescent bulbs, which are known to burn a lot cooler, so there’s even less of a heat issue. Not to mention that the bulbs are over 18″ from the base of the lamp, where we added our little fabric diffuser, so they’re definitely not in too much of a close proximity.
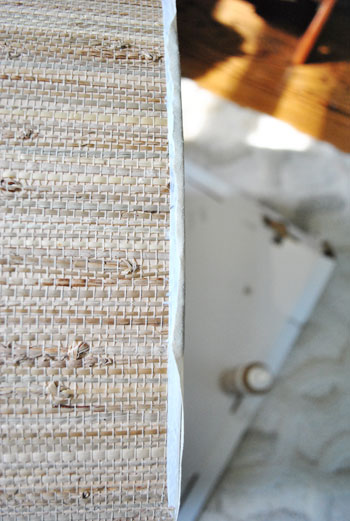
But back to the DIY process. First we removed the fabric band that was glued around one edge of the drum shade.
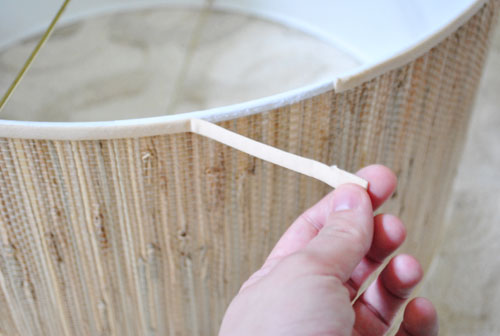
Then we draped our cream colored fabric (scored for under $2 at Joanne Fabrics) over the shade so we could see where to cut it to create the beginning of our diffuser panel.
Then we just held the draped fabric in place and used a scissors to cut around the rim of the shade, leaving about a quarter-inch of fabric hanging over the edge.
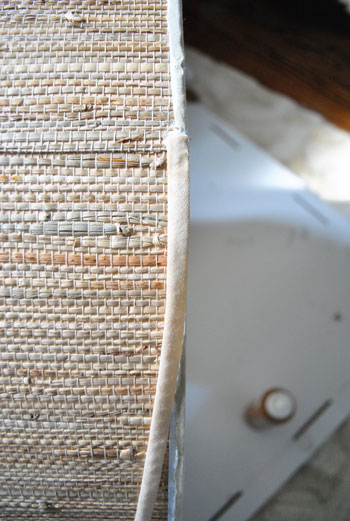
Next we used some Aleene’s Tacky Glue (some cheap already-on-hand craft glue) to coat the rim where I’d be sticking that round panel of fabric. Note: be sure to do this on the rim where you removed the fabric band and not the other side.
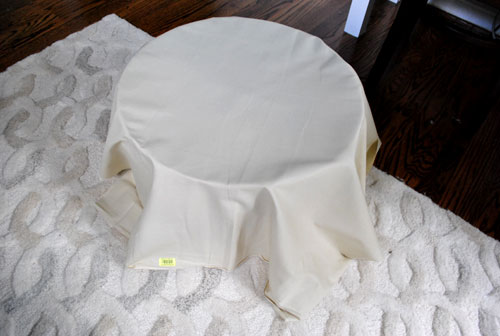
Then we simply flipped the shade over, so it was facing down, and placed it directly onto the fabric circle that we had cut out (with that quarter-inch of fabric hanging over the edge on all sides) so the glue would bond the shade and the fabric. Oh and it’s smart to iron your little fabric round before the gluing process if there are any creases in it.
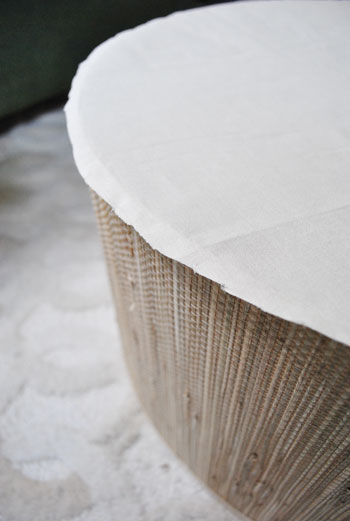
Then we just had to use a little more glue to secure the smidge of fabric overhang around the outside rim of the shade. Note: you don’t want your fabric to overhang too much or it’ll protrude past the fabric band once you re-glue that in place around the base of the shade. So trim your extra fabric if it’s any longer than ours is in the photo below:
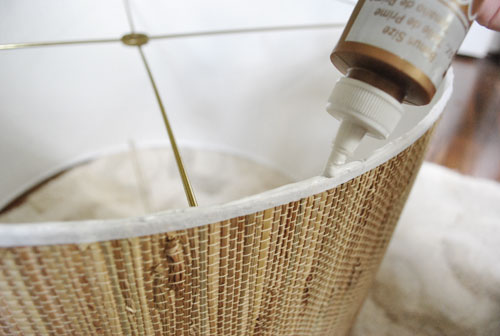
Then we just waited about ten minutes for that to dry and re-glueed the fabric band in place. You know, the one that we removed at the beginning of the project? Easy peasy. In fact, speaking of easy, the entire process took less than 15 minutes of actual work (and about 40 minutes if you count the breaks for glue-drying).
And voila…
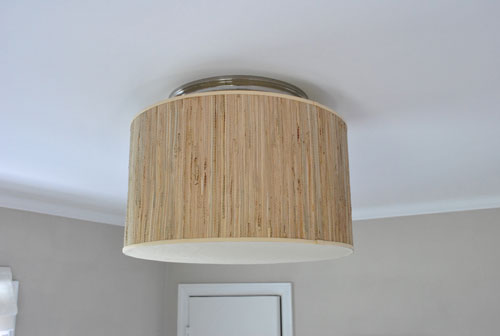
… a light with texture, charm, and loads of presence thanks to the oversized proportion. We just love giant shades in small rooms (like this 12 x 12.5′ space) to give them more of an elevated and polished look. Plus we’re of the school of thought that bigger items in small rooms actually make it feel larger and more luxe (whereas a bunch of small-scale pieces in a modestly sized room can make it feel smaller and more cluttered).
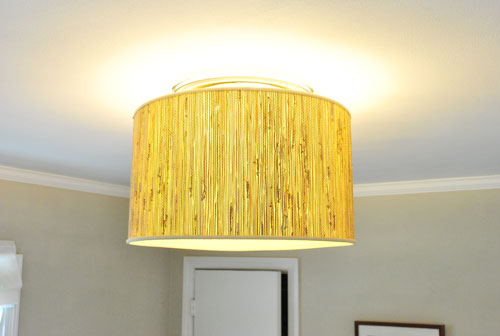
But back to our DIY light. We’re thrilled to no end now that we can no longer see those ugly bulbs from below. Plus the smidge of silver that peeks out over the top makes it look like a pricey flush mounted pendant (as opposed to a cheap-o lampshade that we retrofitted onto an old $10 fixture’s frame). And the fact that we only dished out $32 for the big office lighting upgrade – especially when we initially estimated that we’d spend around $65 retrofitting things – is the icing on the cake. Or should we say it’s the diffuser on the shade? Nope, we’ll stick with the icing on the cake.

Oh and changing the bulbs is simple since we can easily remove the shade from above (that gap between the pendant and the ceiling is key) so even though you can’t see the bulbs from below they’re not quarantined forever behind the fabric diffuser. So that’s the latest office news here at Casa Petersik. What have you guys been up to this week? Did anyone else tackle a lighting makeover or another office upgrade that made their room a little more interesting, stylish, or functional? Spill the beans.
Wanna follow the entire office/guest bedroom/playroom makeover? Click here for the intro post, here to read about the big sleeper sofa hunt, and here for the DIY desk play-by-play.
Update – Wanna know where we got something in our house or what paint colors we used? Just click on this button:


April says
I love this idea!! I rarely use my overhead lighting because it just looks so harsh, but a fixture like this softens things up so much.And it looks like it would be easy to install. Of course, it always looks easier when the professionals do it ;-)
JenWoodhouse.com says
I was just in The Decorating Outlet the other day and fell in love with all their discount-priced shades! Lovely, lovely, lovely. And best of all… the price tag! It looks like a million bucks… nice work guys!
amc says
I just did this at my house too, but mine doesn’t look as good yet. I got a $3.50 drum shade and actually used some wire to hang it from and around the existing fixture. All I need now is a filter at the bottom to cover my not-so-handywork. Fabric may be just the solution.
Thanks YHL.
carmen says
Great project and great results. It looks very classy and looks very similar to Sarah Richardson’s and not the price tag that she paid for it. I was wondering if you guys consider writing some posts about diy project (furniture etc.) for apartments. Its great that you have a beautiful home and I would love to do them, but how do you sand a dresser if you live in an apartment? Thanks and looking forward to the big reveal.
YoungHouseLove says
Hey Carmen,
We definitely lived in apartments for the long haul while we were in NYC so we know all about how hard it is to sand a dresser in an apartment (in fact we spray painted frames on a bunch of broken down boxes on the sidewalk once). The good news is that if you check out our How To page you’ll find tons of DIY projects that you can do in an apartment (upholster a chair or headboard, switch out the hardware on some furniture, make your own art, etc). Plus there’s more where that came from so stay tuned…
xo,
s
Jennifer says
Love it! Any thoughts on doing this with a ceiling fan light? I’m concerned about air needing to blow past it – not that I use this fan a lot. Perhaps leave the diffuser off? Use a smaller shade?
YoungHouseLove says
Hey Jennifer,
We actually tackled a similar project with our den’s ceiling fan (without the diffuser like you mentioned). Here’s that post: https://www.younghouselove.com/2008/01/fan-tastic/
xo,
s
Amy says
We did a similar lighting project a few months ago. We actually made the light fixture out of a $2 bamboo bowl we found at Christmas Tree Shops for a total cost of $3 ($1 for the lamp kit). You can read more about it here on my blog! http://wecanmakethat.wordpress.com/2010/01/19/let-there-be-light-fixtures/
Brenna says
Really cute! At first I thought the fabric was Joel Dewberry’s Wood Grain. But even better that you didn’t have to do any extra work recovering the shade.
I’m curious about one thing: it doesn’t look like there’s much room between the top of the shade and the ceiling. So how did you attach the finial once the diffuser was glued on?
YoungHouseLove says
Hey Brenna,
It’s just the perspective of that shot. There’s actually enough room between the top of the shade and the ceiling for us to reach in and screw in the finial (and change those bulbs out whenever need be). Hope it helps!
xo,
s
tasha roe says
you guys always have the greatest ideas!
Melly says
They’ve featured this project over on Apartment Therapy!
Vickie says
Yay for an Apartment Therapy feature!
http://www.apartmenttherapy.com/chicago/inspiration/make-an-oversized-ceiling-mount-shade-for-cheap-118959
Dipal says
AT just picked up this post on the main page! no big deal.
YoungHouseLove says
Sweet! Thanks so much for the heads up.
xo,
s
Jocelyn Stott says
I am constantly amazed on this site. Nice work!
Erika says
Thanks for sharing this info! I have been looking for an extra large drum shade chandelier for our dining room, but I cannot find any that are not super expensive and I have been thinking about trying to make my own. Can’t wait to check out that lighting place you all mentioned.
Thanks! The finished product looks incredible- great job!
Amanda Z. says
Very elegant! I have a pet peeve about seeing light bulbs – all of our ceiling fixtures are “shades up.”
Jodi Anderson says
This is a pretty damn cool idea. I loathe the fixture in my dining room, which is pretty minimalistic and I think that a retro shade would work wonderfully. Thanks for the idea.
Mallorie says
How timely! My husband and I tackled a similar quick DIY project last night. I yearn for an elegant dining room with a dramatic chandelier ,however, cannot abandon all practicality when living in a home without air conditioning. This was my compromise. The ceiling fan in our dining room went from this:
http://i931.photobucket.com/albums/ad159/OldHouseYoungOwner/Dining%20Room/DSC_0185.jpg
to this:
http://i931.photobucket.com/albums/ad159/OldHouseYoungOwner/Dining%20Room/DSC_0186.jpg
At first I was a little nervous that the shade was too large, but it’s grown on me. Have to get the drama in there somewhere!
Freida says
Add me to the can’t-believe-what-you’re-doing-with-a-newborn-in-the-house crowd! Sounds like you got lucky with a really good first baby! But you know… it’s all just a set up, that second one won’t sleep a minute for the first year!! lol lol
Natalie says
Great transformation!
Question: Are you worried about the diffuser getting too hot? My dad never let us put scarves on our lampshades because he thought they’d catch on fire. Is this just an old wives’ tale?
YoungHouseLove says
Hey Natalie,
Here’s the safety warning: you don’t want to use paper or fabric as a diffuser if your bulbs will be very close to it or if there’s no room for the heat that may build up inside the lampshade to escape. Luckily by hanging our shade from the ceiling on the already-existing rod from our old fixture there was about 4? of space above the shade (since the entire top of the shade was open and was not mounted flush against the ceiling) for any built-up heat to escape. Plus we use compact florescent bulbs, which are known to burn a lot cooler, so there’s even less of a heat issue. Not to mention that the bulbs are over 18? from the base of the lamp, where we added our little fabric diffuser, so they’re definitely not in too much of a close proximity. Hope it helps!
xo,
s
Freida says
Sorry…forgot my actual question! I’ve never seen a shade that has two of those things. Is it that way in all the bigger ones, or is that something special? Or could I just turn it upside down?
YoungHouseLove says
Hey Freida,
You’re right, it’s rare to see a lamp with two fittings like that, but the good news is that as long as you have a lamp with one (which you’d use at the top to mount it) you’re a-ok. It had nothing to do with making the diffuser at the bottom (we didn’t use it for stability or anything like that, just glued the fabric to the lip of the shade) so as long as you have a shade with one fitting at the top you’re good to go. Hope it helps!
xo,
s
Emily says
Love what you guys did! We have that exact silver light fixture in our nursery and I have been looking for something like this to replace it. I’ll be looking for an oversized shade this week! :)
LindyFrill says
Maybe the double support was the “dent” that made that lampshade clearance – otherwise, how would you get it onto the lamp?
I will throw in my kudos too. I attempted to make a diffuser with vellum once, and it was pretty much a big fat fail.
YoungHouseLove says
Never thought about that. It’s a definite possibility!
xo,
s
Suzy8track says
I just saw this on Apartment Therapy and had to check it out! You did a fantastic job! I love the shade that you used too! May have to steal this idea and use it in my home. Thanks for the inspiration.
Apartment 528 says
Love it! I’m a huge fan of DIY ceiling fixtures and big shades. The best part, your project was affordable and easy!
Kiyomi says
I have the perfect shade to do something similar that I got at Home Sense which is Canada’s version of Home Goods. It was $12. My question is, there is a seam along the side of the shade. It’s like a linen fabric shade so the seam is obvious. Any suggestions on how to hide it? We were thinking of just facing it towards the side wall since you won’t see it lying in bed or walking into the guest room.
YoungHouseLove says
Oh yeah, just face it towards the wall! Nearly every shade has a seam like that so it’s no biggie if you hide it that way (heck it’s no biggie if you can’t hide it either). Hope it helps!
xo,
s
laura Durrer says
So i recently designed my own hanging pendants for my kitchen from table lamps turned upside down http://www.oliveandlove.com/2010/06/upside-down-table-lamp-pendants-part-2.html
I would also like to hide the bulbs. I was considering velum but your fabric idea sounds cute. I might even do it in a fun print. I’m wondering however, if it would look weird to have the black ‘nubben’ still screwed into place. It’s important as it holds the lamp shade in place and ties together with the base. what do you think?
laura Durrer says
(previous post entry is mine) ….oh hmmm… Reading through your comments here… perhaps my light bulb is too close to where i would place vellum or fabric and would pose a fire hazard. details details ;-(
YoungHouseLove says
Hmm, the safest (and cleanest looking) solution we can think of with the bulbs down there and that black finial in the middle of the shade base would be to get plexiglass cut to fit the base of your shades (with a center hole drilled to accommodate the finial). Then you can spray it with frosting spray to hide the bulbs without blocking too much light. Just look for a plastics place in your yellow pages or google around for where to find plexiglass. Hope it helps!
xo,
s
foo says
I love this project and I love that shade.
I was thinking, if the material starts to sag over time, you could add a pretty button sewn on the outside of the fabric diffuser and attached to the little circular metal piece on the inside. =)
YoungHouseLove says
Great idea Foo! The fabric is pretty taut (and it’s not a stretchy material) so we’re thinking it’ll be ok, but it’s definitely good to have a backup plan!
xo,
s
casey says
Love this! Looks so high-end!
design actually says
This is a fantastic project! Why have I never thought of this before??? Great job!
Allison says
LOVE this. I have two of those, old lights in the hallway leading to the bedrooms in my house. I cannot wait to find some great lampshades and try out your project!
tara says
Super Cool, I knew if I waited long enough you guys would tackle learning how to diffuse the light and seeing the bulbs! I still have not hung all my linen shades I got from the pottery barn outlet yet! I will now! Thanks guys. P.S. Clara Bear is soo darn cute! I love all the cool backdrops and photo shop ideas. We are expecting this fall and just found out Thursday it is a Girl….
Bromeliad says
That is a very practical DIY. I’ve got some big shades that I did not know how to “diffuse”. Thanks for the tip.
Amy S says
I just tried this project– had been contemplating something like this for a while. I mounted mine closer to the ceiling so fabric wasn’t an option. I found acrylic (polystyrene) lighting panels at Home Depot made by plaskolite. They are textured clear plastic and work great as a diffuser and cost between 5-8 dollars here. The material is also light enough that the lip of my drum shade created by the wire held the diffuser in place!
YoungHouseLove says
Sounds like a great solution. Well done!
xo,
s
Moji Shabi says
This is something I totally want to do with my kitchen ceiling fan/light fixture. It never had a cover so the bulbs are always exposed. I don’t understand one piece of this project. You found a lampshade with TWO rings with a washer? Don’t most shades only come with ONE at the top of the shade?
That has been my issues. I would have to turn a shade upside down to cover the bulbs but don’t know how to connect it to the rod.
As I type this I just had a thought Does there exist some sort of connector that would help extend the rod from the ceiling so it could reach the top ring of an upside down drum shade?
YoungHouseLove says
Yes, most shades usually only have one piece of hardware on one end, but the one on the bottom is completely unnecessary. You just need to attach the top one to the ceiling. At least that’s what we did since our existing ceiling fixture held it in place thanks to that existing rod. Here’s another lampshade makeover that we tackled with our den ceiling fan. Perhaps that method will work better for you. Hope it helps!
xo,
s
Abby says
I looove this idea but am having problems with the execution! We have a “boob” light almost identical to yours in our guest room. I picked up a drum lampshade that’s perfect except for one aspect- the inner diameter of the hole isn’t large enough for the thingy from the light fixture to fit through! After searching at Home Depot for some sort of hardware solution, I came up empty. Anybody have a brilliant idea of how I could mount the lampshade to the fixture? Alternatively, could you provide any more specifics about the lighting kit you were originally planning to use? Thanks, and love your blog!
Abby
YoungHouseLove says
Just visit any local lighting store and ask for a “light kit” which should be under 10 or 15 bucks. It’s basically a cord that can be hardwired into a ceiling fixture and passed through that tiny hole in your drum shade (so the bulb will hold the lamp shade up). You won’t need the boob light at all for that installation, but you will need to grab a ceiling canopy (which are sold for a few bucks at Lowe’s and Home Depot- it’s a super easy job. Good luck!
xo,
s
Stephanie says
Love this idea and, I too, am going to steal it for my hallway lights – only in smaller dimensions. Even got the 3 ‘boob’ lights on sale for $1.50 each. To add my 2 cents, I was in Home Depot the other day and found replacement rods in all different lengths – up to 3 feet long. Instead of all your hard work of taking off the banding, gluing and re-taping the fabric, I thought maybe cutting some thin plexi a bit smaller than the width of the shade, spray frost it and, using the long rods (cut to size) – I can then cut a hole in the centre of the plexi, feed the rod through and then screw the finial onto the under side of the plexi – making easier access to the bulbs (for a short person like me – no arm length to go up and over). If I could find shades like yours here in Canada with the cross-bars both on top and the bottom, your fabric idea would work here too as it would be sturdy enough feeding the bar through both the top and bottom of the shade. Love your site!
Erin Walsh says
Your blog is so inspirational! This is such a clever idea. I wanted to get your thoughts – do you think I could pull this off using this similar shade from PB (it’s on sale so figured it was worth a try)!
http://www.potterybarn.com/products/rope-trim-tapered-drum-lamp-shade/?pkey=call-new-sale
YoungHouseLove says
Absolutely! We’re crossing our fingers for you!
xo,
s
Jennifer says
Great idea. Can I ask you how high your ceilings are? I would love to do this in my hallway but the hubs thinks it will hang too low. My ceiling is 92 inches tall.
Thanks a ton.
Jennifer
YoungHouseLove says
Our ceilings are a standard 8′ height. Hope it helps!
xo,
s
Cindi says
Do you think I can pull this look off in a hallway? thanks.
YoungHouseLove says
Yeah Cindi, just be sure to be careful with scale so it’s not too large for the hallway (keep it a few inches from any of the walls and obviously give plenty of room to walk under).
-John
Sarah says
I’m obviously a newbie and playing catch-up on some old posts.
My question is, after you covered the shade with fabric and blocked the bottom, how did you screw in the piece at the end of the rod to hold the shade in place? Did someone’s hand sneak in through that 4″ gap?!?
YoungHouseLove says
Yup, a hand could slip in there to screw it in and change the bulbs. We also learned through some experimentation that the bottom bolt could be attached to the metal ring holder on the bottom of the shade with duct tape and then the whole shade could be screwed into place by rotating it on the rod coming down from the ceiling. we just twisted it until the bolt attached snugly to the ceiling rod. Hope it helps!
xo,
s
Kim Hamblin says
Thanks for this d.i.y.! My husband and I are remodeling our home room by room and we just did this project in our studio! It worked out great! Thanks!
)eannie says
Finally a decent solution to those ugly lights. Having recently redone the bedroom I’m going to hack the ceiling light. Thanks for this great idea!
The Thriftress says
I just googled DIY drum pendant and found your excellent tutorial. I have the same light fixtures that you originally had in my hallway and I’ll be replacing them with fab drums soon thanks to you!
Sarah
Louise says
Hi, Just discovered your blog. How inspiring. You make me want to renovate our 1930’s red brick & tile even though we are going to rebuild one day. One thing I can do now is replace hanging light bulbs with something a little prettier. Thanks for the idea! Louise – Sydney, Australia
Maria says
I was so excited to find this! I did (almost) the exact same thing over the dining table in my apartment with a lamp shade from Salvation Army. I went to checkout with the whole lamp, one of the ugliest I’ve ever seen (heavy, dark carved wood with dust in every crevice!), and asked the cashier if I could pay for the whole thing–$2–and “re-donate” the base. She looked at me weird but agreed. People love this “new” fixture and often say it looks like one from Pottery Barn, and that’s WITHOUT a diffuser. I’ve been mulling over that problem for a while and was tickled to stumble upon your answer! (My best idea so far had been vellum.) Thanks!
Charlotte says
I used your tutorial (I actually bought the shade at the outlet before ya’ll, and mine has a miniscule dent in it so it was uber cheap!) http://charlotteannette.blogspot.com/2011/08/diy-drum-lamp-diffuser.html
Thanks for the idea!!
YoungHouseLove says
Love it!
xo,
s
Teresa says
Hey, I know this is an old post… but I am dying to do this, even bought the shade, but when I put it over the light just to see how it would look, the room is super drak. My shade is a bit longer than yours, but how did this light the room? Did you find it to be dark?
YoungHouseLove says
Hmm, maybe go with a thinner fabric? You want the light to come out and just be diffused a little. Our room wasn’t very dark but I don’t remember there being much of a difference at all- so maybe our fabric was super thin?
xo,
s
Teresa says
That could be it, the shade is rather old (Habitat ReStore find) and has a peice of chipboard on the inside that doesn’t allow any light to escape through it. I may have to go the plexiglass route with fabric over it. That does answer my question though.. light comes …through… the shade. :)
YoungHouseLove says
Haha- good luck!
xo,
s
Brittany says
Used your idea over the weekend!! Thanks for this, looks great and super inexpensive!
YoungHouseLove says
Yay! So glad!
xo,
s
Ariane says
Just wanted to thank you for the great light tutorial! I wanted to mention that I put a link to your tutorial on my blog, ourfamilyhouseandhome.com, so other people can see where the wonderful idea came from!
Thanks again!
YoungHouseLove says
Aw thanks Ariane! Looks great!
xo,
s
Ashley says
I know this post is an oldie, but I just wanted to say how helpful it was! I just completed a similar project following your tutorial and linked to it on my site.
Thanks!
YoungHouseLove says
SO glad!
xo
s