When we say we’re “tackling a room” it’s usually a figure of speech, but in this case it’s pretty close to being a literal description of our big bathroom demolition weekend (check out this post for more info on why we’re doing it and this post for our plan for the space). The biggest surprise from our weekend of knocking stuff out and gutting the room? Well, the bathroom sorta tackled back.
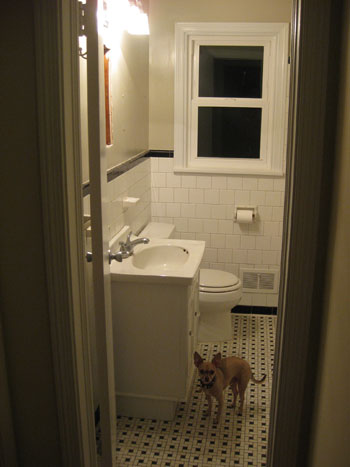
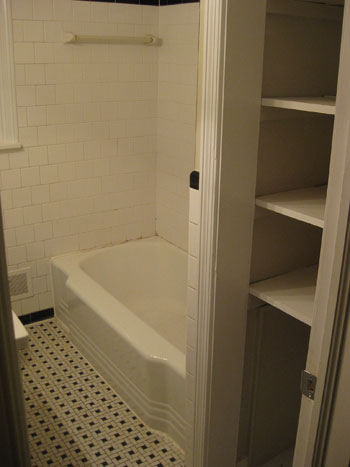
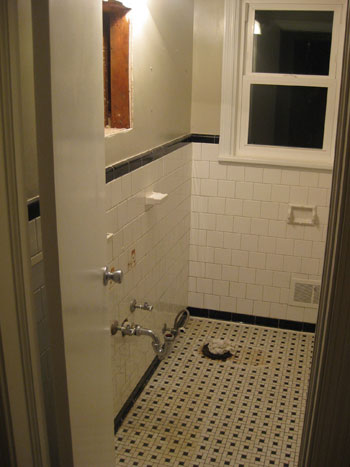
Before we could be all “in with the new” we had to take care of that pesky “out with the old” part. Here’s what the bathroom looked like once we cleared all the simple stuff out (baskets, shower curtain, mirror, rug, etc). We told Burger to say goodbye and he wasted no time…
Then Sherry helped me remove all of the fixtures (toilet, vanity, faucets, shelves, shower curtain) and it was up to me to demo out the tiled portion of the walls and the entire floor (since Sherry’s busy doing other important things these days). And demolishing wall and floor tile was actually something I’d never done before (neither had Sherry, and boy was she sad to miss out on the fun). But how hard could smashing stuff up really be? Famous last words, right? After some online research and chatting with friends and family, we readied ourselves with the necessary demolition supplies. They fell into three categories:
- Tools for dismantling and generally busting stuff up (hammer, sledgehammer, small crowbar, screwdrivers, wrenches, razor, drywall saw, etc)
- Supplies for managing the mess (broom, dustpan, rags, buckets, trash cans, heavy duty contractor trash bags, painters tape to cover drains, a shop-vac, etc)
- Items to protect me and/or the house (goggles, gloves, gas mask, old clothes, cardboard and a cloth tarp to lay over the tub, and a plastic drop cloth to seal off the room).
Who knew knocking down a bunch of tiles took so much prep? But in the end I was thankful for (and used) every last item. Here’s the three-day fully detailed rundown.
****************************************************************
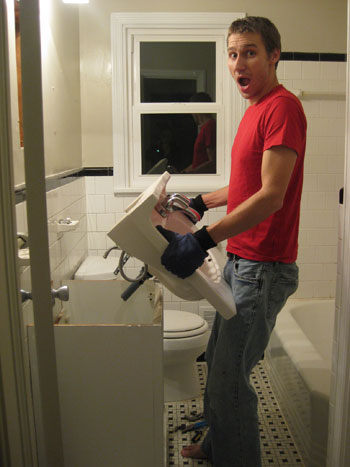
Day One: After shopping for all of this stuff last Friday evening, we returned home to do the basic – and cleanest – tasks first. We worked together to remove the old vanity by simply turning off the water, disconnecting the plumbing with a wrench and unscrewing the vanity and sink from where it was attached (both to each other and to the wall). After that it just took one strong tug to lift the sink off and carry it out of the room (quickly followed by the base of the vanity).
With that gone, we turned our attention to the toilet – which we actually plan to reinstall afterwards since we replaced it just a few years ago when we moved in. It was a similar process of turning off the water, then disconnecting the plumbing, the seat, the tank and the bowl one-by-one.
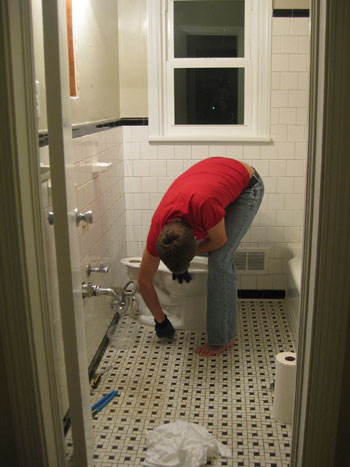
And of course we plugged up the sewage opening with an old rag to prevent any nasty fumes from escaping (and to keep debris from entering later).
With those big items gone- followed by simply unscrewing the shower fixtures- the room was entirely clear and it was time to get rested up for Saturday.
****************************************************************
Day Two: We woke up bright and early thinking that Saturday would be the only demo day. I, the non-pregnant member of our household, was going to be a one-man wrecking ball while Sherry kept her distance from the mess and the dust (trust me, she wasn’t sitting around eating bon-bons she was hovering and wishing she was the one with the sledgehammer). But with our house being built during the era of lead paint, we were EXTREMELY careful about keeping Sherry away from the demo zone AND keeping the demo zone away from Sherry just in case there was any lead paint lurking behind the newer coats of latex (i.e. I didn’t wear my dirty clothes outside of the room, we sealed off the doorway with a thick plastic drop cloth, and any wayward dust or dirt was immediately cleaned up with a wet rag and TSP cleaning solution- which is recommended when dealing with potential lead-paint dust). And of course I was all decked out in my protective gear for added safety (goggles, gas mask, gloves, old clothes that we disposed of afterwards, etc).
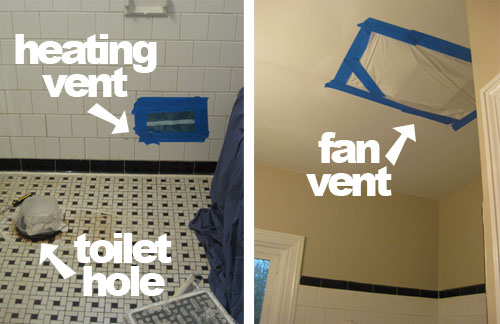
Oh and here’s a tip whether you’re dealing with lead dust or just regular dust (which is also nasty and will permeate every cranny of your entire house if you let it). It helps to seal up heating vents, bathroom ceiling fan vents and even to cover your “toilet hole” (yes, that’s a technical term) to keep nasty debris from invading those alcoves (and potentially spewing all over the place once the heat/fan is turned on). Plus you don’t want to clog up your sewer with fallen chunks of wall tile.
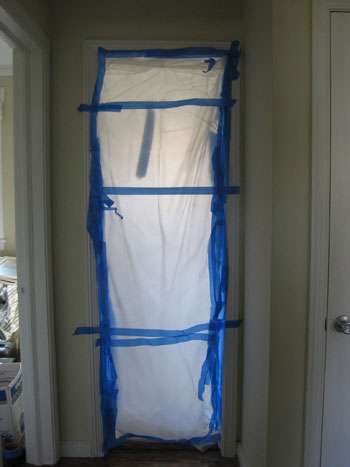
Speaking of sealing things off, here’s a view of the heavy duty plastic tarp that Sherry stared at all day, constantly asking me what was going on because she just heard banging, crashing, and probably a fair amount of muttered profanity. It’s just a heavy duty plastic drop cloth, but when taped in place it’s really an amazing way to keep everything nasty in the room… and out of the rest of your home.
But back to the view behind the bubble. As mentioned, I entered looking like a confused comic book character (the googles paired with the gas mask created sort of a pathetic villain vibe) and thanks to all my prep work the night before, I quickly began knocking off those wall tiles. I was implementing a simple crowbar-laid-at-a-tile-edge technique, followed by a few strikes of a short handled sledgehammer. Let’s just say it was slow going. As in, it broke loose a tile or two for every four or five swings of the hammer. Very quickly, the sheer amount of work this would take me started to set in. Not to mention what I discovered behind the tile was NOT modern backerboard or drywall (which I was hoping to saw out) but rather two inch thick concrete mortar sandwiching a sheet of thick mesh-like metal. It was an older tiling technique that I had read about online but somehow never realized could be found in our older home. D’oh.
But having committed myself (by way of heavily sealing myself into the room and already being quite dusty) I decided to plug away. After all, the “hit it as hard as I can technique” was working – just ever so slooooowly.
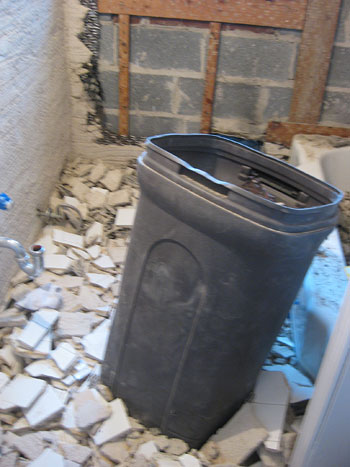
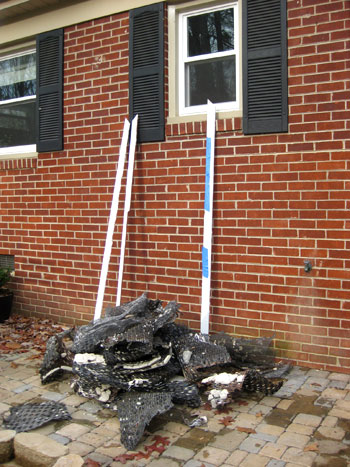
Fast forward six sweaty hours later (not sexy-sweaty, gross exhausted-sweaty) and I’d finally managed to get all of the tile off the wall. Even with the floor tile left on my to-do list, at this point I would have thrown my arms up victoriously… but I barely had enough energy to move them. Plus, the amount of tile rubble surrounding me made any fast movements a risk to my balance. I never imagined how much trash our tiny bathroom would create (it could have something to do with the fact that someone decided to tile ALL THE WALLS) but I was very grateful that we invested in a large box of heavy duty contractor trash bags. Note: don’t fill the bags with more than you can lift because I don’t know anyone who can carry a trash bag full of rocks (even a weird gas-mask-and-goggle-wearing comic book character).
But before turning to clean-up, I decided to power through two more hours of work (basically as long as my bladder would last – oh the irony of spending the day in the bathroom but having nowhere to “go”). Sure all the wall tiles were down, but I now had to demo out the stuff behind them to get down to the studs (and cinder blocks, I soon discovered)- which mainly consisted of a few inches of serious mortar with that maniacal metal-mesh sheeting nailed to the studs behind it. With my supposed “one day” of demo quickly looking like two (or three?) I wanted to at least make a dent in all of the thick metal mesh and mortar that taunted me from every angle. This involved smacking it with a hammer to knock as much of the mortar off (and often using the back of the hammer to pry it). Then, once that nasty metal-mesh was mostly exposed, I used the back of the hammer to pry it off of the wall (it either pulled it off of the nails in the studs/furring strips or pulled the nails right out along with it when I used enough force). And that’s when I discovered the cinder blocks (!) behind the window wall…

I got two walls completely stripped down to the studs/furring strips before my arms (and bladder) nearly gave out and it was time to call it a night. And since the gym was closed (where I’ve been showering) and I was coated with debris, I had to rinse off all the dust I collected over my eight hour workday outside with the hose in 40 degree weather. Sherry did bring me some hot water with a washcloth and a bar of soap in the end, but I was still standing barefoot on the patio freezing my sore bum off. Yeah, I don’t want to talk about it.
****************************************************************
Day Three: Sunday kicked off early with sore muscles, cramped hands and the removal of all of Saturday’s trash by way of dozens of heavy-duty contractor’s trash bags (I left about ten inches of demo’d tile on the floor the night before, so getting it out to the garage was important since balance is key when holding sharp objects like a crowbar). Oh and we started a pile of trash in our garage that we’ll haul away once the project is 100% complete. We plan to rent a $19-an-hour pickup truck from Home Depot and pay about $8 to drop everything off at the local dump (which ends up being much cheaper than renting a dumpster although it’s a bit more labor intensive since we’ll be hauling stuff ourselves). Just carting out all that smashed up tile, mortar, and metal sheeting took about an hour or so, followed by another four hours of metal mesh removal and then another round of clean-up. Why clean up again? Because I had to clear the way for my next assignment: the floor (so first I had to find it again). Here’s that intense metal mesh I’m talking about that was behind all the tile and a few inches of heavy-duty mortar. Yeah, it’s not chicken wire:
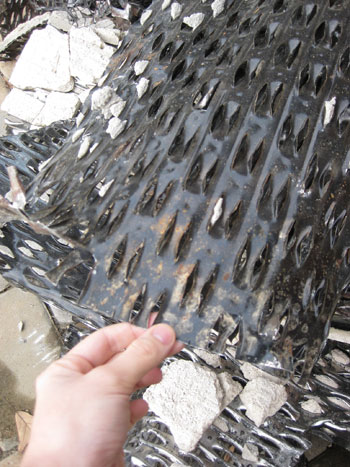
Seriously, our bathroom could have doubled as a bomb shelter.
Anyway, after having gone through all of this on the walls (and it being about 4pm on the day before I had to go back to work), I knew I could/had to do the floors more efficiently. We had actually chipped away a section of flooring before starting demo work, so we were already aware that our worse-for-wear-basketweave tile was also set in mortar atop metal mesh which rested on diagonally placed subfloor beams (the fact that the mortar and metal sheeting was also in all the walls of the bathroom was the added surprise). So, thanks to some googling ahead of time, I already knew that a demolition hammer was my ticket to getting ‘er done. And thank goodness hardware stores like True Value rent those suckers for about $60/day. Remember they gave us a place on their DIY Blog Squad along with a generous gift card? It certainly came in handy, so from the bottom of my heart, thank you True Value, for saving me from what I can only guess would have been ten more hours of hard labor.

But back to my new favorite power tool. The demolition hammer is like a mini-jackhammer and is by far the biggest powertool I’d ever used (that’s not saying much for me, though). So I trepidatiously placed the chisel against a grout line on the floor and pulled the trigger. With a few sharp pounds of force, up came a section of tile (and the concrete beneath it). Victory! Now somewhat reinvigorated by my trusty destruction device (and feeling more like a cool superhero instead of a disheveled goggle-and-gas-mask-wearing weirdo) I was able to break up the entire floor in about 90 minutes. Kinda made me wish I had used it on the walls. Sigh.
Speaking of which, I have to admit that this whole demo adventure was a little bit of a roller-coaster ride for me. There were times when I felt like giving up because the task seemed insurmountable and there were times that my body just wasn’t up to the challenge (after a few of the more challenging hours). But then there were other times – like as I pried up the last of the metal mesh on the floor to expose the raw bones of our house – that I was excited by the amazing transformation I was bringing to our bathroom. I mean, it’s kinda awesome to stare at the basic structure of your house…
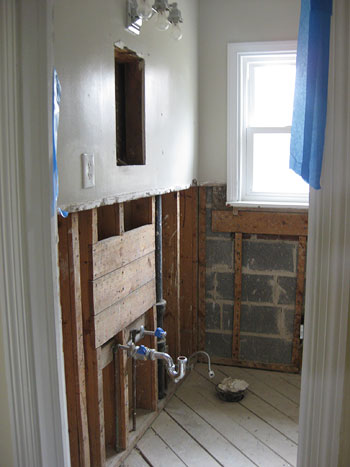
… even if it includes an area of rot next to the tub (more on how we remedied that in a later post).

And happily, my roller-coaster ride came to an end around 11pm on Sunday night. There’s nothing like eking things out when it’s down to the wire. I had finally removed all the last bits of trash and rubble, dusted and shop-vac’d as much of the remaining dust and dirt as I could and even wiped down most surfaces and tools with a rag moistened with TSP cleaning solution (again, trying to be sensitive to potential lead issues). Amazingly, the demo was complete – just in time for me to get about seven blissful hours of shut-eye before dragging my weary body off to work the next morning. And yes, there was another cold outdoor shower, but this one didn’t seem half as bad…
*Now for a little safety suggestion: wear proper closed toe shoes when taking on projects! We don’t know what we were thinking in those two barefoot photos but we definitely recommend keeping your feet protected, especially for those heavy duty tasks. Safety first!
Psst- Wanna check out Chapter One of the big bathroom redo? Click here for those deets.

Kate @ Twenty-Six To Life says
Wow! That looks like a ton of work – great job! It’s going to look so great when it’s all finished.
Amanda V says
Wow John! It’s awesome you survived the crazy weekend! Can’t wai for the post about the rot spot. Sometimes crazy things like rot just appear and almost ruin your day.
Can’t wait for the big reveal either!
Jaya says
omg john! sherry you have got a total keeper on your hands!
YoungHouseLove says
Isn’t my hubby the best?! So glad you guys are digging the latest chapter in our crazy bathroom reno. And here are some answers for ya:
Julie- Supposedly you can use demolition hammers on floors and walls. But in such a small bathroom leverage would have been a real challenge (not to mention avoiding all of the many pipes and wires behind the walls) so although doing the walls by hand took forever it was probably the most fail-safe solution in our specific case.
Janice- We came to discover there wasn’t! The funny thing is that our house acts like it’s extremely well insulated (we use less heat and air conditioning than everyone we know because our brick house is built like… well a brick house). Very sturdy and air-tight. So I guess since wind doesn’t whistle through it like it does on some wood or vinyl-sided homes, the cinder block over brick technique seems to work if it’s done well. And our attic is really well insulated to keep the heat/air conditioning in which probably also helps too.
Abby- Very funny. Good thing we have a half bathroom that’s available. Whew.
xo,
s
Julie says
Wow!!! That was an incredible amount of work you did in just one weekend! Could you have use that tool on the walls?
It looks great!!
Meghan says
Ugg. This is exactly what I am worried about when we decide to replace our tub- what’s underneath the 109 year-old house parts… I think that it may be a job for the summer seeing as we have but the one bathroom and cold hose showers are only for crazy comic book types.
Janice says
Holy schmoly, what a job. Well done.
There’s no insulation in your exterior walls?
Erin says
WOW! (That’s all I can say) Our basketweave floors and tile walls are definitely in for the long haul after this. (Especially since I know we have the mortar and wire mesh behind them after a window sill replacement) Thankfully, everyone remarks on how the tile is in “excellent shape”.
Jenny @ Words On Wendhurst says
Wow, that is a ton of work, especially to tackle singlehandedly! We’ve been demo-ing our finished basement for the last several months, doing it in sections to manage the amount of garbage and to save our sanity. :-) Hopefully we’ll finish that up this weekend.
Heather M says
Way to go John! I’m pooped just looking at the pictures of all the hammering you had to do. And I’m sure Sherry was just going crazy wanting to dig in (literally). I’m so excited to see the next step. We’re going to be re-doing our half bath in about a month or so, but thankfully don’t have to remove any tile. But if I start complaining about the work, I’ll just think about how lucky I am to not have to deal with tile removal!
abby says
Hey, I’m in the neighborhood. Can I use your bathroom?
Caroline says
John you are amazing! Congrats on all the hard work, even if it did make me feel rather lazy. I guess painting the study over my xmas holiday from work is doable afterall…..
Katie @ Making This Home says
I recognize that tub. We had to move one just like it. Three strong men barely could… so I am glad it’s not on your list. It is amazing how well it’s built, though. The one we have is the exact same age as my dad.
Looking good!
Katie
Carrie says
Congrats to you, John, on some AMAZING determination! You guys are inspiring. Can’t wait to see the next step!
Rebekah says
You deserve a round of e-applauding… sheesh!
Mary says
Are you planning on insulating your walls?
Jason says
Way to go!!! You know I commented before on my yellow and black version of your bathroom and how I was trying to keep it, I am even more sure I want to now! I wish I had commented on the mortar/mesh I am aware of that from past experience and what some neighbors have gone through. In the 50s you got that or plastic tiles glued to the wall – so what you had was way better except for demo time!
My heart goes pitter patter at the sight of those same subfloor 1x that I have in my reno-ranch:) I’ve seen it in my kitchen – but the old parquet over vinyl over ancient ply was easier then tile I’m quite sure but not easy! Cinder block construction was common in the 50s especially with brick or stone, unless you have veneer decor brick like I do under the living room windows and then it can be leaky.
The point is good job and you both take to heart what a wonderfully strong, well built home you have. You couldn’t get anything like that today for you and your growing family! Awesome to look back 50 years and see what those hard working guys did back then!
DE – J
Kasey at Thrifty Little Blog says
This brings me back to September when my bathroom was torn apart. The people who built the place wanted everything to stay put so used about three times as many nails as were needed. Needless to say, it took much longer to do the demo than was in the plans!
YoungHouseLove says
Mary- We were totally shocked when we came to discover that there wasn’t insulation in our walls! The funny thing is that our house acts like it’s extremely well insulated (we use less heat and air conditioning than everyone we know because our brick house is built like… well a brick house). Very sturdy and air-tight. So I guess since wind doesn’t whistle through it like it does on some wood or vinyl-sided homes, the cinder block behind brick exterior technique seems to work if it’s done well (which led us to decide that adding insulation wasn’t necessary since our casa is extremely well insulated even if it’s not full of the fluffy stuff!).
Jason- You’re right! This demo has not only taught us that our bathroom could easily have doubled as a bomb shelter, it also has given us an appreciation for how solidly built our 50’s ranch really is! So grateful.
xo,
s
Meghann Spagnuolo says
Wow! Good job John! You guys never stop amazing me. I can’t wait to see the finished project. Good luck.
Pamela says
Sherry, I had forgotten about your half bath (reminded in your comment above) and was going to ask how a pregnant lady was doing without quick access to a toilet!
And that subfloor is in amazing shape considering what was adhered to it. I can’t wait to see how you fixed the rot because we have that ahead of us in our bathroom reno. At least we’re not pulling up tile, just laminate (I think)!
Sue says
Wow, way to go, John! That looks like a TON of hard work!
Katie says
John, you are a very, very good husband.
Jason says
PS – you may find that there is thin(it was all thin in the 50s) insulation between your furring strips under the drywall on the outside walls. It would not have been behind the tile even if it was under the drywall. If you do have it, that would have been considered over kill in those days!
Briel K. says
Wow great job John! Sounds like a LOT of work but, as I’m sure you know, it will pay off for you guys in the end! Can’t wait to read about the next chapter. :)
Lisa says
Great job John!! Sounds like you and Sherry need a hot tub to soothe those aching muscles!
Your bathroom is going to look gorgeous!!
Katie J says
Awesome job! I can’t say with confidence that I would have been able to do it all in one weekend. Hopefully the hard part is over, but it almost never is when your renovating. Good luck with everything and I can’t wait to see the finished product!
Audrey says
um, wow john, i’m highly impressed! can’t wait to see what the next chapter has in store!
hishouse;herhelp. says
oh my gosh you seriously took a cold shower outside? that sounds like my worst nightmare!
kate says
Wow…I’m impressed! Although I must admit, it makes me a little nervous seeing what all goes into a bathroom reno. Ours looks like a mirror image of yours…tiled walls and all. I’m almost afraid to see what lurks behind our tiles! Can’t wait to see the next chapter…
Ashley M. [at] (never home)maker says
Wow. That looks majorly intense. All that tile!
Thanks for the tip about covering the vents. We’re actually planning to remove a plaster wall sometime in the next month or so . . . and I’ve heard it’s going to be pretty dusty. We’ll have to follow this method.
tom says
In the very last pic next to the tub, it looks like there is a hole in the subfloor… are you replacing just those boards then covering them with backerboard?
YoungHouseLove says
Hey Tom,
Yup, we’ll show you how we dealt with that rotted subfloor in the next chapter of our bathroom project. We basically removed the bad boards, replaced them with new ones, covered the entire floor with 3/4 inch plywood to add some serious stability and then put backerboard over that. One of the perks of having all that thick plaster is that you can use thick materials to build things back up without having a raised floor at all in the end (since the old floor was that high too). Hope it helps!
xo,
s
Carolyn says
Wow! You’re seriously giving me flashbacks. This is what we did at my old house (now our rental). We didn’t have the mesh, though…we just sledgehammered the tile wall after discovered it was nearly impossible to chip off. We also had a lot of rot around the toilet and had to fix the floor before tiling it.
Amelia says
craziness! i can’t imagine how poor John’s body is feeling today. It’s amazing to see the bathroom all cleared out and cleaned up to its bare bones! Must be so exciting as the next stage is putting up all the new stuff!!
can’t wait to see Chapter 3!
Jill Stigs says
WOW–great work John. I know Sherry was probably going nuts not being able to help. But, she is working hard already. Can’t wait for the next chapter!!
Remodelaholic says
As silly as this sounds, I love seeing the cleared out room. There is so much potential and the excitement of the project really begins to come alive! And then with each new installation you get to watch it come together and it is even better… for example, who knew a new sub floor could be so wonderful?! (no wonder we all love doing this work so much!)
YoungHouseLove says
Haha, it’s true! We’re all addicts and home reno is our substance of choice!
xo,
s
Nicole C. says
You guys are so inspriring and are hands down my favorite blog! I check it out everyday!
Although it meant more work for you – :( – I’m kind of glad to see it took you longer than expected to demo the bathroom. None of my projects ever go according to my plans, no matter how well thought out I thought they were! It’s good to see you guys have similar problems and makes me feel a little better! Right now I’m racing to finish up some projects in my Living Room that were started at the end of October! Oh my….
Anyway, just wanted to say thanks for all your great posts, all the advice, inspriation and laughs. Also – “trepidatiously” is my new favorite word!
Can’t wait to see more about the progress of your bathroom!
Sandra says
Oh man, I was hoping you guys were spared from the tile-laid-in-mud nightmare. We have a same era rancher with the same tile pattern (but not colors, ours were pink and black) but in Michigan. We’ve been told that all of the homes in our area are set in that nasty concrete, so rather than demo we decided to pay to have them all resurfaced. We only have one bathroom in the house too, and I’m not the “shower outside in 40 degree weather” type. :P
It only took about a day and $800, but all of the small cracks were obscured and the pink tile was turned to white.
Probably not a permanent solution, but I couldn’t stare at pink tile for one more day I promise you!
Kathleen says
I feel your pain. The first thing we did when we bought our historical home was demo the bathroom. We discovered rotted out subfloors, lead pipes with holes in them… all sorts of unexpected fun stuff. It took us a month to repair, retile and we installed the toilet the DAY before moving in.
I would like to redo the shower / bath tile but this post is reminding me how much work it is.
schmei says
John, you’re a total hero! Looking forward to the next chapter.
Megan says
Awesome job, John. i feel like this earned your at least 50 man points.
If you had known about the metal sheeting on the walls beforehand, what would you have done differently? My husband’s grandmother recently demolished her bathrooms and instead of knocking down all of the tile, they just tore down the entire wall and put up new dry wall. Would this have been an option for you guys?
YoungHouseLove says
Megan- If we knew then what we know now, we would probably have approached the demo the exact same way (except with lower expectations of it being done in one day). Thanks to all the pipes and wiring that runs through the walls, we wouldn’t have felt comfortable sawing out entire walls (although we did tear out all of the walls behind the tile to the studs where the tile was and install new drywall or hardibacker depending on the placement- but doing it manually gave us more control and therefor helped us avoid any potential plumbing or electrical nightmares). Hope it helps!
Sara- Our tub is an old cast iron five million pounder, and although the finish is a bit worse for wear, the tub is just fine. We plan to hire a professional to reglaze it once we’re done putting the room back together (we did some research about DIY reglazing and heard nothing but bad things in the long term so we have no problems hiring a pro to get the job done right). Hope it helps!
Eric- Thanks for the Craigslist tip! We actually thought about going that route but decided that renting a $19 truck and paying the $8 dump fee was even cheaper than hiring out cheap labor on Craigslist. And you know we like to do things ourself- to a fault actually! But who knows, maybe after all this work we’ll be happy to pay someone a bit more to do the dirty work for us!
xo,
s
Travis says
Get ‘er done!!
Great job John. Very tough assignment and one I would have probably done with a friend. Even if the friend just sits there and eats donuts and drinks coffee, jobs like that are always best when tackled with a buddy.
As sore as you probably were after, you will feel twice as good when this project is complete! Its going to be awesome you two!
Carol N. says
I’m just amazed at how much work is involved in a demo like that. My husband and I are past the age where we want to tackle big things like that ourselves (plus, considering we want to actually add on to the house we feel we need professionals). We still like the smaller projects and plan on putting in some open shelving in our basement bathroom soon as well as painting and changing light fixtures and such. This looks great so far John and good luck with the rest. Can’t wait to see the end product!
tom says
awesome…that will be a heavy duty floor with no room for flexing
Sara says
Sherry,
What is your tub made out of and what are your plans for it? Is it in good shape or are you going to reglaze it? Mine is enamel over steel (or cast iron) and I’m trying to decide whether to reglaze or get a bathfitter for the tub only. I heard bathfitters are better in the longrun but I just don’t really like them.
Thanks!
Sara
Eric says
Wow, what a job!
I’d like to suggest you check out Craigslist in your area for guys who haul away junk and garbage.
When we were doing our bath, we found it was cheaper to hire a guy who already had a truck, instead of going it on our own. He came by loaded up the bags of tile, and old cabinets and hauled it off for like $60.
Amanda says
Sheesh. That brings back some serious memories. It almost always takes longer than you plan on- but hey, you gotta start somewhere. And it’s funny, all those with no renovation experience always think the “tearout” is fun and easy- just go in there and swing a hammer a few times. It’s the worst part! I can’t wait to see what’s next!
Allison says
John you are such a trooper! You did an amazing job and all your hard work will be worth it once the bathroom is complete.
Heather says
So much of this sounds familiar! Washing with cold water, things taking much longer than expected, the garage full of garbage waiting to be carted off… the phrase “insurmountable task”. :)
Glad to see the nitty-gritty sometimes! I know our renos aren’t all rainbows and sunshine. ;)
Michelle V. says
I haven’t commented before but just want to thank you for posting the step by steps! My husband and I purchased our first home this summer (a 1925 bungalow) and will be taking on A LOT of the same projects that you are in our nearish (when we can afford them!) future. We are learning a lot from your basement and bathroom posts-both things we need to do!
I read your comment about reglazing your tub. . . my mom had hers done professionally about a year ago and it is already chipping. . . just wanted to give you a heads up to talk to customers of whatever professional you are using. . I would hate for your tub to look like my mom’s one year later (but I’m sure you were already planing that!)
YoungHouseLove says
Hey Michelle,
Yup, we definitely plan to get lots of references, look online for reviews and pay top dollar to the best man (or woman) for the job. Our tub was actually reglazed about a decade before we got the house and it held up pretty well in that time (but of course with demo and all that it’s looking worse for wear now). The good news is that makes us confident that we can find someone with a warranty and a good reputation to give us a nice looking tub for the long haul. Hope it helps!
xo,
s
Oonafey says
I know Sherry was itching to get her hands that sledgehammer, but if it was me, I’d be thanking my lucky stars that I was preggers and unable to help. My fiance doesn’t work well with others anyway, so my laziness comes in handy!
denise @ little ant design says
That looked like a seriously big job – would you do it again or would you hire out? I imagine it was a great sense of accomplishment to have done it yourself and I’m sure you saved a ton of money but was it all too much for one or two people to do?
We have a bathroom we need to tackle. Sometimes I’m feeling very superwoman like and think we can handle it other times I feel like maybe it’s biting off more than we can chew.
YoungHouseLove says
Hey Denise,
Well, I know I’m speaking for John here, and he’s the one who did all the work, but we were both just laying in bed saying how satisfying DIY can be. You feel on top of the world when it’s all said and done, even though it takes a lot more sweat equity than hiring it out. So in our case we would definitely do it all again as opposed to hiring it out. It’s totally about personal preference, and there’s nothing wrong with calling in the pros or giving yourself a break. But in our heads, any project that we are capable of doing ourselves means we’re up for the challenge. And anything that is above our skill level (like advanced electrical or plumbing work) is happily left to hired help!
As for your bathroom, the good news is that you can try and see what you can do yourself. If at any point it gets to be too much then you can just call the pros in for backup. That’s how we approach a lot of things that feel daunting. We just assume we’ll try to do it and if we can’t there’s no shame in calling someone to swoop in and save the day! It takes the pressure off and really gives us the confidence to move forward. Hope it helps!
xo,
s