So the basement has made it known that it’s not going to cooperate without a fight. The current score is something like this. Basement: 3. John and Sherry: 1. Good thing we love a challenge. Here’s where we are when it comes to our big underground overhaul…
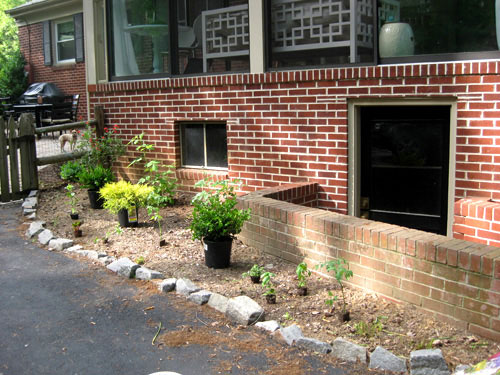
Many people requested more nitty gritty details about how we go from before to after. Not just a source list and a budget breakdown, but our actual thought process when it comes to figuring out what functions are most important to us, brainstorming a workable floor plan, detailing the pitfalls that we encountered along the way, etc. So we’re not planning to spare a single detail when it comes to transforming our bleak cobweb filled basement into a more finished and functional storage room fit for a king (or at least our beloved extra furnishings, bikes, accessories, and seasonal decor that we wouldn’t want covered in spiders and mold). First the details about where our basement is actually located: it’s directly below the sunroom off the back of our house (accessible by descending a little brick staircase which you can sort of see here in this old photo from when we planted our edible garden).
At 19′ x 13′, it’s a generously sized room (actually the biggest in our house, along with the sunroom above it of course). But that’s about where the positives stop. The challenges in this room far outweigh any other space that we’ve tackled, from the flooding issue (we’ve seen inch-deep puddles down there after a raging storm) to the insane spider situation (webs galore doesn’t even begin to describe it). And then there’s the mildew problem- it’s on the walls, the floor and anything we store down there (we tossed two extra wood chairs down there and were horrified to notice them covered in gross mildew a few weeks later). We also have a giant unsightly water heater in the middle of the room…
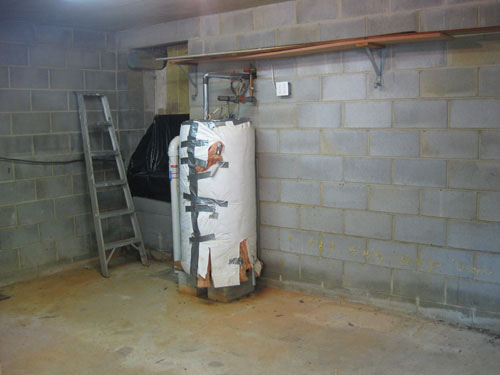
…a radon mitigation system to work around (that white pipe to the left of the water heater in the photo below), a strange trap-door in the wall that leads to the crawl space…

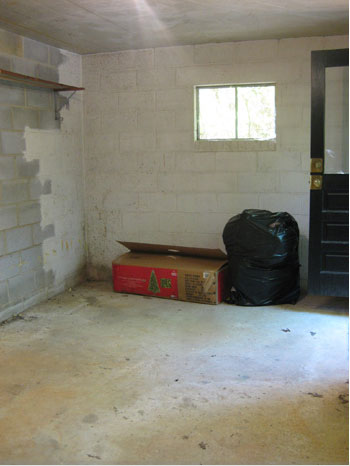
…and just two tiny windows to let light into the cavernous cinder block dungeon of a room. Not such a good starting point.
But we’re determined to turn all of those cons into pros- or at least minimize them while gaining a lot more function and form from the soon-to-be spruced space. As we mentioned, because the room has a separate entry from the rest of the house, it will probably never be an area that we use as actual living space, but we’re psyched to turn it into a massively convenient storage room where we can stash things without a second thought… and we have higher expectations than unsightly wire shelves and bowed wooden boards so stay tuned for a room that we hope has more of a built-in look than a tossed together hodge podge of shelving systems. But before we move onto sharing our layout ideas and storage solutions, we had to tackle the issues that made the room completely unworkable. The wetness problem and the mildew invasion, which are actually stemming from the same issue: nasty moisture that gets trapped in our little underground lair.
After a bit of research we learned that there were three major things we had to do to address the water/mildew issue:
- kill the mildew for good
- seal the cinder block walls and the cement floor so the raw stone could no longer absorb up to an inch of water in a bad storm
- keep moisture and mildew from coming back by bringing in a dehumidifier to keep things nice and stable down there (preferable something Energy Star rated so we don’t have to spend an arm and a leg running it during the moister months).
After a bit more research (thanks google!) we learned that the most often recommended way to seal cinder and concrete basements is Drylok, a thick milkshake-like paint of sorts that goes on slowly and stinkily, but after two heavy coats it really does the job. As in no more moisture seeping through the cement and the cinder for at least ten years or more. It even claims on the can that it can stand up to a 22 foot high wall of water. Is that not downright heroic?
But the stuff isn’t cheap. Thank goodness for our spot on the True Value DIY Blog Squad.

Remember we promised we’d be blogging about a series of DIY projects that we would undertake over the next few months using a $1000 gift card courtesy of True Value? Well, their generousity really came in handy when we realized we needed to purchase at least nine (count them, nine!) gallons of $25 a pop Drylok just to seal everything up down there. Yup, that’s at least $225 spent just to solve the seepage problem alone. But doing the work ourselves really saved us a lot more cash-money. By filling any cracks beforehand with exterior caulk and cement crack filler and then rolling the two thick coats of stinky stuff on ourselves, we probably saved at least 1K and up to 3K (based on the estimates we got when we called around for basement experts who come in, caulk, and roll on the Drylok for ya). Not bad for a few days of sticky messy work, eh?
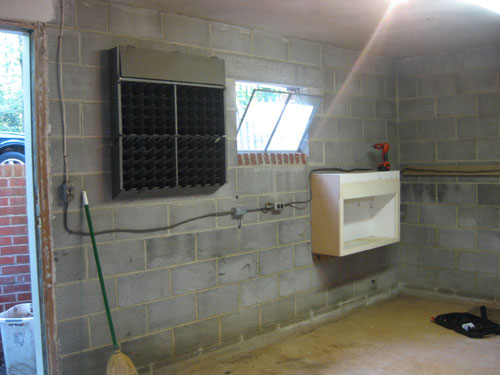
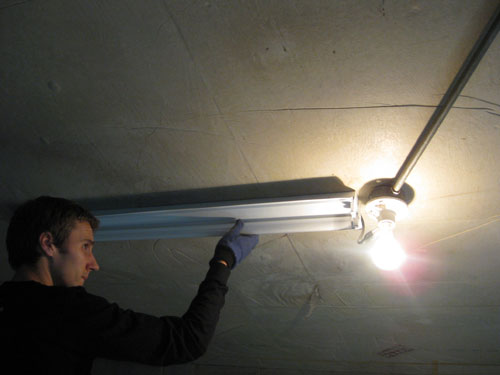
But first we had to prep the room and remove anything we didn’t want in the space so we could Drylok behind it for a seamless look. This meant removing the strange extra light fixture on the ceiling that looked a bit less than symmetrical…
… and taking down the quirky little metal time-card-slot thingie that the previous owner used as a tool organizer (which we freecycled- we have bigger plans for maximizing that wall)…
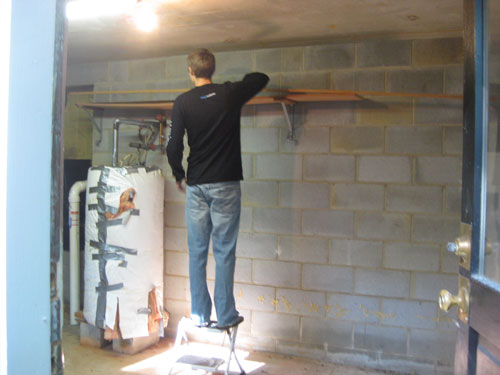
… and pulling down the old brackets that ran across the opposite wall with a few ancient pieces of bowed wood resting on them…
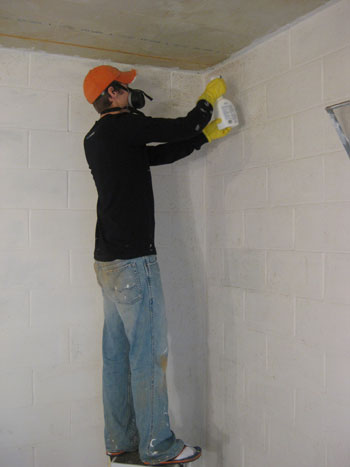
Then it was time for sealing up any and all cracks with concrete filler and exterior caulk and moving on to the messy Dryloking process. And in working with Drylok we learned a few things. It actually comes in two different varieties, one that’s oil-based and one that’s latex-based. It also comes in a range of colors if you select the oil-based option (white, beige, blue and gray) while the latex-based one is only available in white.
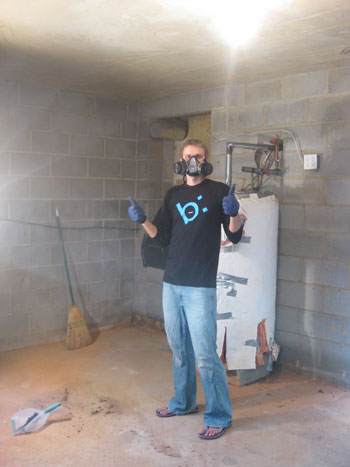
The oil-based stuff is muuuuch muuuuuuch stinkier (with all sorts of crazy warnings about brain damage and death on the label) while the latex-based stuff is supposedly just as good (although some skeptics aren’t convinced) and even though it also stinks to high heaven it’s about half as bad as the crazy oil-based fumes. We actually did our first coat in the latex-based stuff, and even though it’s the lower odor option of the two it still had us nervous so we actually threw in $30 a pop for our health and purchased high-grade gas masks to block 100% of the fumes and toxins from entering our lungs and brains. Thank goodness we did! That stuff would have brought King Kong to his knees. And we just can’t bear to spare any more brain cells, especially when we’ll need them to overcome the rest of our issues in the basement after we have this moisture/mildew thing under control…
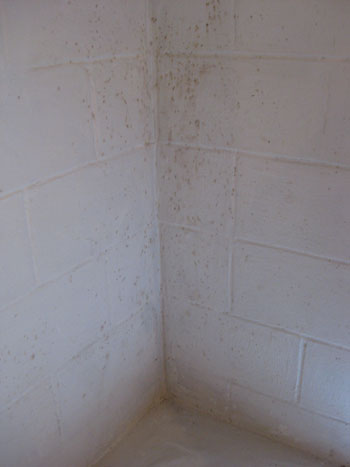
Now here’s where the basement earned its “won’t cooperate without a fight” reputation. No sooner had we brushed on our first coat of white latex-based Drylok (to the tune of $125) when we noticed little tan dots slowly coming through our snowy white finish. It was mildew and it was popping up in every corner and even along some expanses of wall even though we had sprayed it down with a 2-parts-water-1-part-bleach homemade spray beforehand (which seemed to kill it for a while, but then we added the Drylok and bam, it was back). Needless to say it was a bit demoralizing to realize that our über expensive paint job was blocking exterior water seepage but not quite solving the mildew problem (and we know getting a dehumidifier will also help, but we were intent on killing off all the mildew before finishing our paint job).
So then it was time to pull out the big guns. We decided to do the necessary second coat of Drylok with the oil-based beige option instead of the white latex-based version. We learned that painting Drylok is not recommended since you can’t re-Drylok over it ever in the future (so if in 20 more years we wanted to reseal the basement, Drylok wouldn’t work if we had painted the walls down there). This made us opt for the tinted version since it’ll hide more dirt and the occasional singular spiderweb better than a blindingly white backdrop… it’s sort of like paint and Drylok in one step.
And everyone knows we don’t have a white wall in the house (hey, how else would all our white ceramic animals and painted pedestal tables pop?). Plus one of the experts at True Value recommended the oil-based variety since it may even block more mildew and create an even stronger barrier against moisture and future mildew growth, especially when paired with a dehumidifier. We’re planning to get that last coat on the walls tonight and tomorrow night (gas masks in tow of course- we’re prepared for quite a stink-fest) and then we’ll be back to share the hopefully mildew-free and much-more-polished-looking results. ‘Cause the leopard print look just isn’t doing it for us. And we’ve even sprayed down the mildew one more time with our homemade watered down bleach cocktail and given it a good ol’ scrub to be extra thorough before our second coat goes on later today (note: check out John’s patented socks-with-flip-flops approach, which protects him from spatter without causing him to sacrifice a pair of shoes that he actually likes).
Oh and for those who wondered how we chose beige as our color among the other options (blue and gray), we thought gray would just make the room look like a cinder block fortress (which it is, but we’re trying to play that down) and the blue was just a bit too pastel for our tastes- meanwhile the beige is a nice neutral color that will really work with the white storage systems we’ll be bringing in for a light and airy look. So that’s how we made that call. And the ceiling will also go beige for a seamless look while the floor gets a nice coat of chocolate floor paint (leftover from this project) for a bit of definition. Here’s hoping we’re on the right track…
What about you guys. Any basement projects looming on your to-do list? Any previous experience with nasty mold and mildew or moisture issues like flooding? Let’s commiserate. And of course we’re open to any and all basement conquering advice as we charge ahead. Fingers crossed that we can score a few points in the next round…

Miki says
GROSS! I’m so impressed that you are attempting to tackle this on your own. One look at mold and I’m running in the other direction!
Gail says
I can’t say I fully appreciated the problem of water in the basement until I owned a house myself with that issue. I kind of remember my eyes glazing over when others talked about water in the basement. And THEN…
We lived in a neighborhood on a high water table, and the three instances where our basement flooded, and I mean really flooded, were: 1) the first time we went away on vacation, and came home to an inch of water nearly everywhere that destroyed every item we’d put on the floor, 2) the night before we hosted a big party for our friends and neighbors and 3) the night before our daughter’s christening, and we were having the party at home. SO… We paid five grand to get the thing French drained on ALL four sides, install a sump pump and have the basement waterproofed with a written lifetime guarantee. Result: A truly completely dry basement, and we both stopped twitching every time the forecast called for rain. I would have loved to use that money to update our 1960s bathroom, but I just couldn’t stand the stress of a flooding basement.
Good luck with this project. Looks like a biggie!
KD says
What a timely post! We are facing the same problem with our basement…standing water with heavy rains. However, ours is accessed through our kitchen, has a half bath, and houses the washer a dryer. We want to use half for utility and storage and have the other half as a second tv area or play area for future kiddos. Thanks for sharing….I’ll be following this project very closely.
Steph says
This is so weird but I’ve been actively looking forward to basement updates. As in, I’ve actually thought of it when I’ve been away from the computer. OMG, I need help! Thanks for posting!
I think the beige will look especially great as it’s in keeping with the pale sandy tones in some of your rooms.
The leopard spots are scary – coming through walls… *shudder*
Jaimie says
As another poster mentioned, this post is very timely for us as renovation has just begun on our own horrible basement! John and Sherry, you can take comfort in the fact that our basement is a million times worse than yours — old, crumbling cement floor, moldy walls, ceiling height of just over six feet, and not only spiders but a CENTIPEDE population that would make your heart stop! We refer to it as The Serial Killer’s Lair.
The only way to make it a habitable space (which we need to do to expand square footage in our small house) is to dig it down and waterproof it, which is beyond the scope of our DIY skills.
I look forward to seeing the progression of your space, and what you have planned for storage!
Brandon says
Just curious — did you ever dig down your basement to make 8′ ceilings?
Carol in Indian Springs Alabama says
We had to buy a de-humidifier many years ago for our basement. We got the largest they had for residential use at the time and emptied the water 3 times a day (!!) When we decided to finish the basement we had a de-humidifier built in and it solved the problem quickly. Now we have a finished, dry and comfortable basement area. We also used the Drylok before doing any finishing work and have had narry a wet spot since then. Can’t wait to see what you do down there.
tiffany says
I’m with Steph…I’ve thought of it while away from the computer. I can’t wait to see what yall do!
Nicole says
Gail brought up a great point. Is your basement only going to be truly moisture free if you add french drains?
This is my fear in our house. When we purchased it, the basement had been newly painted (or is it Drylock? I need to look into whether it was actually paint). Since then, occasionally after a good rain it smells damp. We haven’t had any issues, but that doesn’t mean we won’t have them.
Good luck!
Jessie (Vegan-minded) says
That basement project looks like a lot of hard work, but it will be totally worth it in the end. I can’t wait to see how you guys transform it into something more functional and attractive :)
Sue says
Just an FYI (which you probably don’t want to hear) . . . bleach doesn’t kill mold. But maybe mildew is different? I’m not really up on my fungi.
http://ezinearticles.com/?True-or-False—Does-Bleach-Kill-Mold?&id=1075538
Best wishes with your basement project – it looks like a great space for storage!
YoungHouseLove says
Hey Sue,
We have heard that about bleach and mold but apparently some experts (like the guys over on One Project Closer) think that it can do the trick on mildew if it’s watered down enough not to shock it (apparently shocking it makes it close up momentarily but come back stronger). Here’s hoping the dehumidifier and the oil-based stuff does the trick.
xo,
s
Jessica M says
Spring 2008 (just a few months before our daughter was born), we paid a local company to encapsulate our crawlspace. It was a HUGE project ($-wise too), but after getting estimates from several different companies), we knew we needed professionals to tackle the mold problem. There is a perimeter trench/drain with pump, dehumidifier, and very thick lining/vapor barrier (like a pool liner). I hope your solutions work. We can’t stand up in our crawlspace, but now it’s a great spot for storage of plastic bins of holiday decorations and outgrown baby clothes.
Hillary says
DRYLOK works wonders! We recently sealed off a wall with cinderblock in our basement, and after the first few heavy rains, I was mortified by the water absorbing through from the outside. 2 coats of this stuff and I am happy to report that after this past weekend of constant rain (dumb nor’easter) there is absolutely no moisture coming from this wall any longer…. now if only the rest of the walls would cooperate- we too are having mildew issues on the remaining walls that are “truly’ underground. I look forward to seeing you guys even the score with your basement!
YoungHouseLove says
Hey Hillary,
So glad to heat that Drylok has been the silver bullet for you. With just one coat on the walls and over a week of rain our basement is still blissfully moisture free, so we’re sure once we get that second coat on there it’ll be a veritable rain fortress. Wahoo. Now if only we could master that mildew…
xo,
s
Gloria says
This is what happens to my car when it rains. I have a convertible that leaks and develops a little pond in the back. I call it the fishtank cause it sloshes when I go around the corner. I’ve already paid $500 to have it “fixed” to no avail. Wonder if they make drylok for cars…..
Alli says
Make sure you check that the water seepage problem isn’t more of an issue than you think. It’s coming from somewhere, so you should make sure the exterior of the house has all the water draining the right way. It’s definitely a pain, but waterproofing from the exterior is usually the best way to go. I’m not too familiar with Drylock though, so i hope that works!! We thankfully have a poured concrete basement that so far is quite dry! There were some big rains a few years ago before we bought our house, which was kind of an advantage to looking since we could see what houses leaked or had major water damage.
Anyway, congrats on tackling such a major project! Hopefully I’ll be able to send you pictures of when we hopefully turn part of our sub-basement into an office area!
YoungHouseLove says
Hey Alli and Nicole,
No worries, we know that our water seepage issue is just due to unsealed cinder block walls (which are like sponges, they absorb a bit of water) since we’ve had ranging storms for weeks in the past and only seen moist spots on the walls and about an inch of water just puddling in a few spots on the floor. Most of the basement is completely underground, so it would probably take on feet of water if there was actually an issue with installing proper drainage. And after 3+ years of monitoring it, boy are we glad about that! It’s more that we don’t like the idea of things getting a bit moist on the ground and the room taking in any moisture to help that mildew thrive, so we’re all about sealing things all the way from the ceiling to the floor, which so far (with just one coat of Drylok) has worked like a charm with tons of rain that has been going on (not a drop of seepage with just that one coat). Hope it helps! Now we just have to show that mildew who’s boss…
xo,
s
Kara says
The picture of your radon mitigation stole my heart… we have a similar contraption in our basement (which I guess I’m thankful for?!) but has always stood out as something that would be a bear to decorate/organize around. I can’t wait to see what you end up doing with the whole basement and especially around the water heater and other obstacles. But please, for the sake of your readers, don’t ingest too many fumes… we need you guys!
YoungHouseLove says
Hey Kara,
No worries! We’re loving our gas masks (and as you can see from the pictures) we’re pretty much wearing them whenever we’re at work so we’re happy and protected. It’s amazing how much they can block out!
xo,
s
Vanessa says
I agree with Sue about the mold issue, we researched this when working on a drain pipe in my parent’s home and were disappointed to learn the water content of bleach is a deterrent to mold eradication. I’m hoping you’re only dealing with mildew and not the dreaded black mold!
What you do have going for you are a window and a door (I have neither) for ventilation, and at least some natural light during the day to dry that sucker out!
Kristin says
Great project! I can’t wait to see the finished room and all the single steps on the way!
Just be very careful when it comes to mold, especially as Sherry is allergic. We lived in an apartment with lots of mold under the flooring and my fiance developed a mold allergy – when we moved out (in a hurry, once we found out) and removed the PVC flooring, he could not set foot into it without having an asthma attack anymore.
YoungHouseLove says
Hey Vanessa and Kristin,
We definitely feel super fortunate that we’re just be dealing with soft tan colored mildew and not a spot of black mold. It’s probably due to the windows and the door which let light into the room to keep things drier than they could be as Vanessa mentioned. Here’s hoping we can beat that stuff too since it’s proving to be quite stubborn!
xo,
s
Kelly@TearingUpHouses says
I live in Florida, so I am jealous of any and all basements, mildew-y challenged ones included. It looks like you guys are having fun tackling this — won’t it be nice to have the extra square footage?!
Can’t wait to see how it turns out…
(By the way, I’ve been craving a gray or a blue-ish gray room myself, but I agree that cream was a good color choice!)
Kelly
Heyruthie says
Big job! We also have a water problem in our basement–which is “finished!” We have a sump pump down there, but apparently it was not installed in the right place, so we still have an area with a little “river” that flows over to the sump when we get a really big rain. I don’t know if Drylock alone could fix this–I think we still need a pump–did the guys at Ace talk about anything like that?
Do do you NOT paint the floor with Drylock? Just the walls? Is that why you’ll be able to paint the floor chocolate brown? Thanks!!
YoungHouseLove says
Hey Heyruthie,
It doesn’t sound like Drylok alone can solve your issue since your sump pump is in the wrong spot (it really only helps when the moisture issue is due to porous walls like cinder block ones but there’s no other leak issue in your space). We would definitely recommend asking a pro at your local home improvement store or even calling some experts in just for an estimate to see what they think will solve things. As for the floor, we did Drylok it (and will apply our second coat tonight) but because it’s concrete and not the spongy and super porous cinder block material that make up the walls we’re confident that two coats of Drylok followed by one or two coats of exterior porch and floor paint will seal it for good (as opposed to cinder blocks which may need touch ups every decade or so). Hope it helps!
xo,
s
Amy @ Renovation Innovation says
Great job Youngsters! I have a quick question for you – how did you get rid of the spiders and cobwebs before Drylocking? Did you just use a broom (a la Snow White whistling while she works) or did you use some pesticide to keep them from coming back?
YoungHouseLove says
Hey Amy,
We’re a pesticide/insecticide free family so we just whistled while we worked and got to business Snow White style. It worked like a charm and after our first coat all was bugless. Hope it helps!
xo,
s
Amy @ Renovation Innovation says
or did I mean insecticide? :o)
Rachel says
This makes me so happy to not have a basement thanks to living in California. Good luck getting this finished. I applaud your effort.
Sara says
Good luck with the Drylok. Our basement is sealed with it all around and we still get a pretty good amount of water coming through the walls. But like you said, we don’t intend it to be a living space, so we use a dehumidifier and don’t leave anything that can be ruined on the floor.
YoungHouseLove says
Hey Sara,
It sounds like you might have an actual drainage issue (installing some french drains could help) since you’ve sealed things up with Drylok, have a dehumidifier and still have some wetness coming in. Hmm, we wish there was a DIY tutorial we could share on that but we have no experience with that level of handiwork. It does make us super thankful that just our one coat of Drylok has stopped moisture from coming in (we had about a week straight of rain and nothing came through) and we still have another coat to go- just to be thorough. Although we still have that darn mildew to contend with…
xo,
Sherry
Jenny @ Making the Most of Money says
Ahh! I’m so excited for you to finally tackle the basement! It’s great that you’re letting us in on your thought process, starting with the beginning. I think it’s all too easy to get caught up in the fun ‘design the storage’ mode and forget about protecting stuff from water damage. That would be a disaster!
I can’t wait to see the stylish storage! I’m sure you guys will make even a cinderblock dungeon look fantastic!
Mike at The Big Stick says
There are a lot of good products out there now to deal with leaky basements. There was a whole show about it on HGTV awhile back. I can’t remember what it was called but I DO remember is was all shot in Canada because everyone kept saying ‘aboot’ instead of ‘about’.
I believe one of the main things you want is something called a weeping wall. You will have to give up a little bit of sq fotage but it will keep things high and dry.
Heather M. says
Wow you guys are determined! Good for you, you’ll get the best of that basement yet! It will be a while, but we have a full unfinished daylight basement (about 2200sq. ft) that we want finish. No mold or leaks, but I’m going to need a lesson in drywall installation to tackle it. Maybe by the time we get to it, you’ll have a “how-to: drywall” post. Better yet, you could help us, then add it to your “how to” page. Best of luck in you battle!
Loren says
I’ve read that nearly straight vinegar can kill mold. Any chance you guys would try that so I would know if it would work on the ceiling of my bedroom closet?
Even if I pull out all my shoes and clothing I’m still real nervous about spraying bleach water in the confined spaces of my closet.
YoungHouseLove says
Hey Loren,
We’ve heard that too! The white kind specifically. It’s definitely worth a try if the mildew seeps through our second coat of Drylok…
xo,
s
Elizabeth says
I live in an apartment building & am not even close to having a house with a basement, but this project is fascinating to read about!
Donita says
WOW so sorry to hear about the mildew problems……..I can so hear ya…..have battled mildew and BLACK MOLD for 20 years, here in the good old WET DAMP Washington state. UGH!! There is a less expensive way to get rid of the moisture/dehumidify. Walmart, trailor sales places, hardware stores, sell something called Dry Z Air, *may have other names*. They are about $10.00 each and are sold for camp trailors/motorhomes. You have to empty them periodically, but they work to keep the air dry. You can also use bbq briquets in a coffee can. They will actually take the moisture out of the air too. Both of the are alot cheaper fix.
We have also use peroxide for the mold/mildew.
THE SPIDERS!!! We have the greatest fix for MICE/SPIDERS. Years ago, my MIL told me to put mothballs in a coffee can, turn it upside down, poke holes in it, put under the house. You could just sit it somewhere outside. I am TERRIFIED of wee little mice. LOL It works GREAT for keeping the mice away…….AND I also realized we had NO spiders, or alot less some years. SOOO I put them in the corners of my windows on the outside. We also put them around our gardens, flower beds. THEY WORK AMAZING, we had less neighbors cats too, and they do not eat them. Juat a few helpful hints. Hope it works!! hee hee
LOVE YOUR BLOG!!!
Donita says
I meant HOPE IT HELPS!!! GEESH I should have proof read also!! ;-)
Abby says
I HATE our basement. It’s huge and could be a great usuable space, but since we only recently started building a garage, it was the collection place for all of our tools, patio furniture, etc. We cut tile down there when we were renovating our bathroom last winter and never really cleaned up the mess. There is a moisture problem and a bug problem. We have an old (almost 100 years old) house and the basement reflects that. We hope to spend some time this fall moving tools to our newly finished garage and giving it a good cleaning.
Lauren says
Ha ha- I think we have the same Christmas tree in our basement!
Amanda says
I’m so glad you posted this! My house came with an unfinished basement- but worse than unfinished, it also had mildew from window leaks/no gutters, AND the previous owners had (sadly) locked their dogs down there so the few walls that were there were scratched to high heaven, and the smell was unbearable. (Even the rooter man I hired could barely handle it, and he works with sewer lines all day for a living!) And to make matters worse, it was a HUD home and for some reason they had come over and painted the concrete floor before I closed, covering all the dirt and stink with an annoying layer of paint. We used a paint sprayer to apply Kilz, and that stuff stinks too and is dangerous. People have been known to pass out without proper respirators. The smell is much better, but I do wish I would have been able to pressure-wash and bleach the bare concrete first. I may be applying a thin layer of concrete over it anyway, to level out the floor, so maybe that will be the best permanent fix to seal all that nastiness underneath.
Dani says
I close on my first house tomorrow (same day as your nephew’s expected arrival!) and the basement is covered in mold. We definitely have water issues too, but that seems to be coming from poor plumbing and not the outside. The first thing I’ll do when I inherit this basement is call in the mold specialists who will clean the walls (and HVAC system – that stuff can spread into your house!) and seal the entire thing. Not sure if they will use drylock, but I feel better knowing it’s professionally done. There are certain things I just can’t do myself – roofing and plumbing, for example. Plus, I’ll be far too busy picking out paint colors and home decor. Keep up all the great work, Sherry and John! Can’t wait to see the finished product.
Cindy says
Sounds like you’re right when you say it’s just a cinder block issue. Last year my mom got rid of the mold in hers but hers was a weeping tile issue as well. I believe she used a product like drylock and now, with the addition of a dehumidifier, it’s nice and dry in her house. So dry in fact, she had to start turning it off once in a while, cause he plants were dying.
As for us, we’re in a new build, and hope to start tackling our unfinished basement next year. I’ve already started sourcing and working on my plans!
Jenny @ Words On Wendhurst says
I didn’t read through all the comments so I am not sure if someone has already mentioned this. We live in rainy upstate NY (where we get less sun than Seattle) so mold on the outside of the house is a common. We have a stucco exterior, and we used a solution of TSP, bleach and warm water to kill the mold and mildew growing on the stucco. The TSP is available in a box (near the paint) at Home Depot, and I think they had some kind of spray too.
Here is one of the links that we used for research http://www.rsmhomeimprovement.com/Stucco/Cleaning-stucco-method.html
Our house is still a little dirty (stains from the dirt) but the mold is gone, and so far hasn’t shown any sign of coming back. Might be worth a try! You could do it before painting this afternoon.
YoungHouseLove says
Good to know Jenny! Thanks for the tip! So far we’ve heard vinegar, peroxide, Concrobium and TSP so it’s incredibly comforting to have a backup plan for that annoying mildew.
xo,
s
Marcy Tate says
Did your eyes get irritated at all from the Drylok? How long has it taken you so far?
Cate says
We had some flooding issues in our basement too, but they were due to poor grading rather than seepage. Our basement had been Drylocked, but as you know, that’s not much use when the water comes in the back door. We regraded and installed a green driveway, and so far, that seems to have fixed the issue (knock virtual wood!)
I used vinegar and tea tree oil to combat mold and mildew, but have found that Concrobium really stops the nasty stuff cold! And it’s supposed to be completely non-toxic. Might be worth a try if your mildew spots come back. I have no connection to Concrobium, but have been impressed with the product so far.
I look forward to seeing your storage ideas.
Jenny says
And I thought my basement was going to be a lot of work. Not even close after reading this! *We* (my husband mostly) are working on our finished portion of the basement. *We* tore up the old nasty carpet to find the yucky glue, so that had to be scraped and now sanded away to create a smooth surface. Next *we* will use a chemical adhesive remover to get the edges where the sander wouldn’t reach. Next is a cleaning process that could take up to 3 or 4 times to make sure the concrete is completely clean then we will attempt to stain it! Its been a process and more so since we haven’t been home consistently lately and have to work here and there to get all the steps done, but I know it will be well worth it when it’s finished! Hubby’s doing a fantastic job!!!! =)
Meredith says
I have a 79 year old house with a (partial) cinder block basement accessible through a trap door in the laundry room floor. I only wish I was kidding. Within the first month of home ownership, there was a heavy rain and the basement flooded with a foot of water. I had a french drain with sump pump installed, so no more floods, but I still have the weeping cinderblock walls that you are dealing with. However, even with this issue, it’s really dry down there and to anyone who has real moisture problems, I highly recommend the french drain solution. This very informative drylock post has helped me to conclude that this is clearly NOT a DIY project for me. In fact, if I ever find someone crazy enough to do it for me, I’ll be sure to live elsewhere until the fumes have dispersed. Yikes. Wonder if they have those little masks for dogs…
YoungHouseLove says
Hey Meredith,
Haha, little dog masks would be adorable (and functional too). We’re lucky that our basement is completely detached so none of the smell permeated into the rest of the house. It’s a dirty job but thank goodness Burger didn’t even get a whiff of it!
xo,
s
Jennifer says
Great post. Will you be Dryloking the ceiling? What is the ceiling made of?
YoungHouseLove says
Hey Jennifer,
We will be doing the second coat of beige Drylok on the ceiling just to keep the color consistent with the walls for a more seamless look so it doesn’t look too broken up down there. The ceiling, like the floor, is made of concrete but it’s above ground level so it shouldn’t have any moisture issues so the use of one final coat of the beige Drylok is purely for looks. Hope it helps!
xo,
s
Kylee says
I’ve been looking into Drylock for my basement walls for a couple of months now. It sounds great. My only concern is that when you read the brochure it says you can use it over painted walls but then the 10 year guarantee isn’t valid. My walls are already painted from a previous owner so if the guarantee isn’t valid is it really going to do the job it’s supposed to do and be worth the money. Just wondering if you might have any info from the True Value guys on that one. Thanks!!!
YoungHouseLove says
Hey Kylee,
Hmm, we have also heard that painted walls can’t be re-dryloked with as much success so maybe that’s a question for the paint pros at your local home improvement store. Hope it helps!
xo,
Sherry
Sarah @ Dream In Domestic says
Sherry, did you have a cursing fit when you saw the mildew seep through? Ha just kidding! That’s too bad that your mildew-killing remedy didn’t work the first time, but I hope it worked the second time around! I can’t wait to see what the beige second coat looks like. This is a great project – can’t wait to see the finished results and absolutely love the step-by-step breakdown!
YoungHouseLove says
Haha Sarah. Yup I was all bleeepity bleeeep bleeeeep bleeeep.
xo,
s
Briel K. says
Sounds like you have your work cut out for you! Good luck battling the problems!
micah says
Wow, that’s a lot of work! I’m sure it will look great when it’s done!
Rachel says
CRIB ME! I love to read Bear Snores On to my kids.
Karen says
Psst – your links to True Value seem to be not working …
YoungHouseLove says
Thanks Karen… fixed!
xo,
s
Jennifer says
Glad to hear that other people have creepy basements like ours.
On top of having our basement flood, rickety stairs, a sump pump smack in the middle of the floor and a heater with creepy octopus arms, we also have had a sewgae problem where everything leaked into the crawl space where the basement sewage monsters live. It was gross. Despite all of our problems my husband still insists on having poker down there!!
Check out our basement pics here:
http://s6.photobucket.com/albums/y225/momentary_changes/house/
Sarah says
We are planning to refinish the basement within the next year as well. It is actually 50% finished… already have the ductwork, electrical, and most of the walls are already studded for sheetrock… the house is 10 years old, and as far as we know hasn’t flooded other than from a pipe burst, but I did want to seal the walls before we went any further. This post was very insightful on the process. We do have some moisture & mildew down there…
Kate says
Hey I didn’t know what you guys are planning to do to cover up your hot water heater, but my parents did something really cute when they turned their garage into a den. My dad used beadboard to create a three sided “box” that encloses the water heater. It’s easy enough to pull it away from the heater if they need to access it. They painted it the same color as their walls and it blends in pretty nicely considering they’ve put some decorations on the top and used it as kind of another architectural detail in the room.
Just an idea:D
YoungHouseLove says
Hey Kate,
What a cute idea! We definitely have an idea or two up our sleeves, but who knows what we’ll end up with in the end…
xo,
s