Ever since we spotted a rain barrel in action on our visit to Matt & Kristin’s house last fall, Sherry and I have been itching to harness the power of our own otherwise wasted rainwater. So we participated in a recent rain barrel making workshop offered locally and we’re here to pass along the play by play.
First things first – why rain barrels? Well, placed under one of your downspouts, rain barrels conveniently collect rainwater that you can use to water gardens and lawns, wash cars or even fill birdbaths and ponds. A 1000 square foot roof yields about 600 gallons per inch of rainfall, so that’s a lot of water (and money) to be saved. We’ve even seen ’em hooked up to a soaker hose for easy and free garden watering. Novel idea, eh?
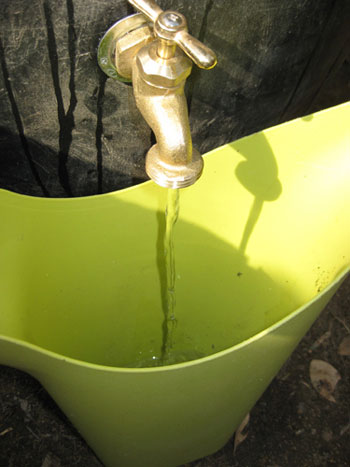
Rain barrels are relatively easy to make, but finding the barrel can be a challenge. Which is why many people will purchase them already assembled for upwards of $120. Needless to say, we were thrilled to find a local workshop that provided the tools, equipment and instruction for only $40. They provided everyone with a 50 gallon food grade plastic barrel… that just happened to have a previous life as an olive shipping vessel. Funny, huh? Sherry said it made her mouth water.
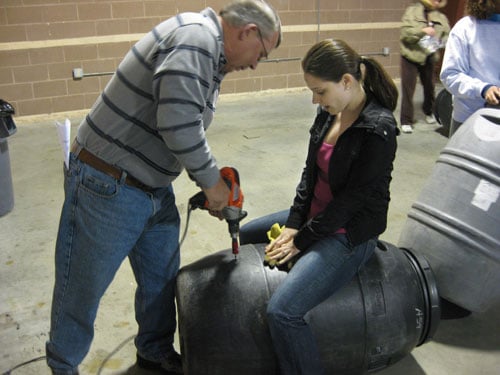
The first step was drilling the hole for the faucet. You’ll want to drill it as low as possible (since the water below the hole won’t flow out) but not too low that you can’t attach a hose or place a watering can under it (which obviously would be no good). Here’s Sherry sitting on our barrel to keep it from rolling while one of the volunteers operated the hole saw (a regular drill with a hole-cutting attachment). In less than 20 seconds, we had a hole for our faucet.
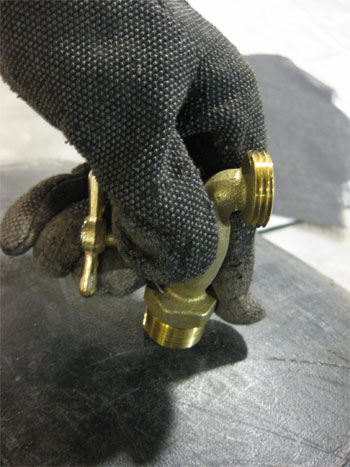
You’ll want to keep the barrel on its side and then use your faucet (or “hose bibb”) to thread the plastic edges of the hole. You’ll do this by screwing it all the way into and back out of your newly made hole once. It may take a little bit of force to get the faucet threads to catch, but be careful not to push it so hard that you damage the plastic threads you’re creating. In under a minute we had made our threads and removed the faucet for the next step…
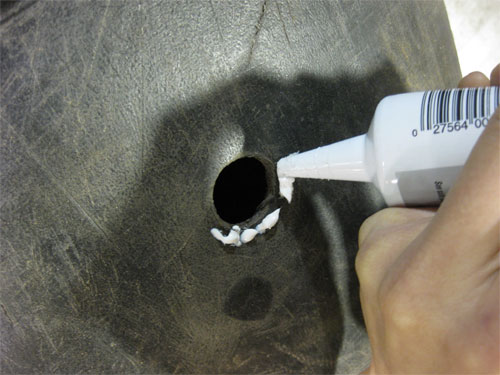
Once you’ve unscrewed the faucet, you’ll want to apply a thin line of caulk around the edge of the hole:
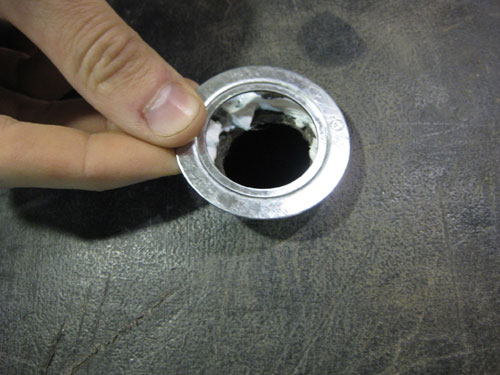
Then you’ll place a reducing washer over the hole, with the caulk acting as the adhesive. Reducing washers have a raised lip on the inner rim, and that raised portion should go against the barrel.
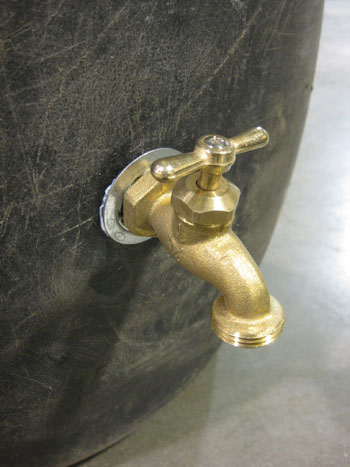
With the reducing washer firmly in place, you can screw your faucet back into place for good (this will be a lot easier since you’ve already created threads by screwing the faucet into the hole and removing it a few steps back). When it’s firmly in place, it should look something like this:
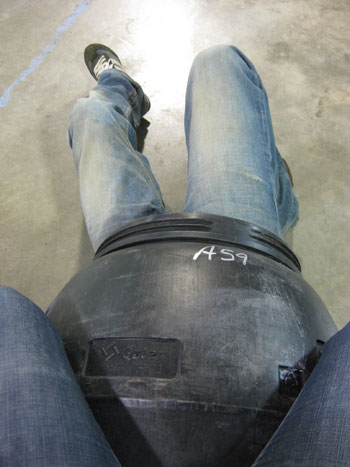
Now that you’ve created a watertight seal on the outside – here comes the fun part – you’ve gotta do the same on the INSIDE. Yep, time to crawl inside the barrel. You’d think this would be the perfect job for a petite person like my 5’2″ wife. Nope, somehow I got that assignment (and Sherry kept her job as barrel sitter to keep me from rolling away).
Inside the barrel, you’ll be repeating the process with the caulk and reducing washer – so remember to bring those with you when you go in. You’ll also want to bring a flashlight, because it’s dark in there (and it may smell like olives). Once you’ve got your washer caulked in place, you’ll screw on a locknut to secure the faucet. You’ll probably need the help of some pliers to ensure you’ve got the locknut on there nice and tight.
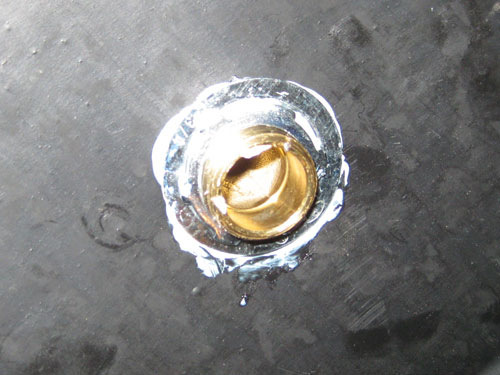
Your partner should stay sitting on the barrel to keep it from rolling away throughout the process. Or if you’re Sherry, you could use the opportunity to snap photos of your husband looking like, and I quote, a “California Raisin.” All I needed were some oversized gloves and a saxophone.
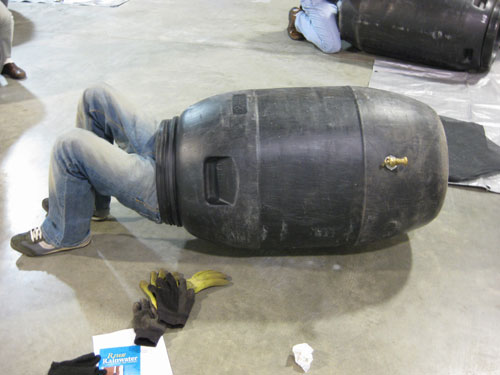
That completes the process of attaching the faucet. We did have the option of repeating the process at the top of the barrel with a “rigid nipple.” Basically, it’s an overflow spout that you could use to connect multiple barrels together. Since we’ll be a one barrel family for now, we’ve just opted for the overflow to come out the top (meaning when the barrel fills up with water, the excess spillover will do just that- spill over the top).
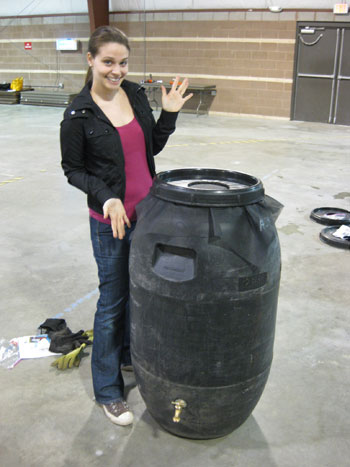
Speaking of the top – the barrels we were provided already had 6″ holes drilled in their lids. So all we had to do was screw the lid on over a tight mesh mosquito screen to keep any standing-water-lovin’ bugs out of our barrel. Here’s Sherry with our finished product:
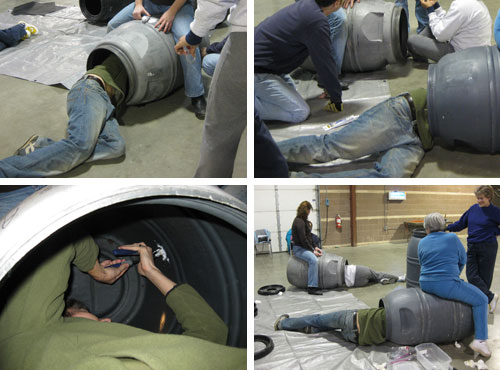
That would’ve been the end of our workshop adventure, but I guess some other people working near us took note of my locknut-tightening skills. Before I knew it I was climbing into not one, not two, but three other barrels to help other barrel-makers ensure that their faucets were secure. And should we be surprised that Sherry seized the opportunity to take more photos of me in those barrels?
Once I finished barrel diving, we got the thing crammed into the backseat of our car and took it home for placement in our backyard. We picked a downspout at the edge of our driveway that was completely hidden from the front of the house, and mostly hidden from the side (let’s be honest, rain barrels don’t scream curb appeal). Luckily the placement will be super convenient for Sherry’s new back garden (stay tuned to see what sorts of edible goodies and purty bloomers she’s planning to grow).
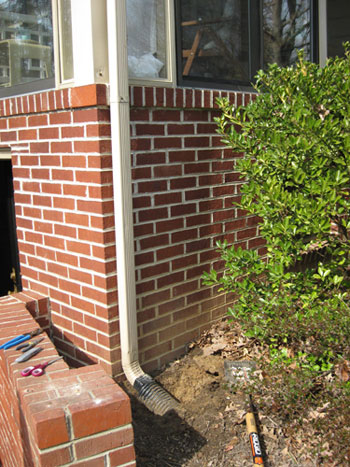
Then we just had to adjust the height of our downspout so it would spill into the top of the barrel. We detached the elbow at the bottom of the spout and dug out the underground plastic tubing that had been in place (and because we didn’t have any fancy metal snips with us, we broke out a box cutter once we figured out our desired height). Here’s Sherry making the cut while I stood by and watched. She’s hardcore. Maybe she was trying to make up for all the barrel-crawling I did?
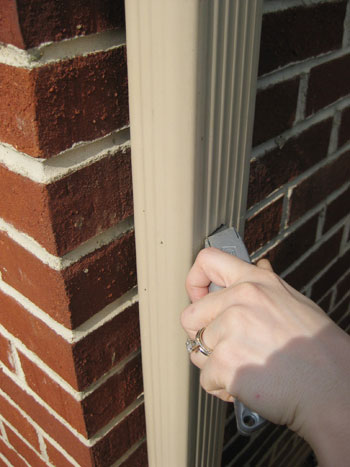
It did the trick, and with the gutter cut to the right height we just reattached the existing end spout and slid the barrel into place underneath it. Voila. Bring on the rain.
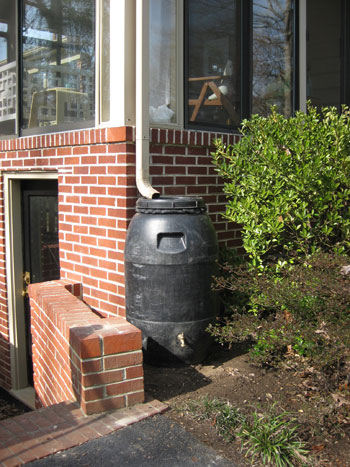
We should note that it’s extremely important that the barrel sits on level ground (you may want to use a shovel to level the ground and even lay some sand to be sure). A full barrel can weight up to 450lbs so you don’t want it tipping over on you. Of course we’re going to have to do a few more rain dances before ours will get that heavy. Bring it on Mother Nature.
Do any of you guys already use rain barrels? Any advice or tips for us newbies?
If you’re in Richmond and are looking to make a barrel of your own, check out upcoming workshops through Chesterfield County ($40) and Tricycle Gardens ($75).

heather s. says
I’m jealous of your workshop! I’ve been wanting to do this for a year now and am planning on getting on this spring so I hope they put on workshops in SE Michigan as well.
I just noticed the door to what appears to be a basement. I don’t recall y’all ever mentioning a basement. Do tell, what’s down there? :)
YoungHouseLove says
Hey Heather,
We do indeed have a separate entry unfinished basement. And it’s full of….. nothing! We actually use it to store out Christmas ornaments but not much else. Someday we plan to seal it with waterproofing paint (it’s a bit damp because when it rains the cinder blocks “sweat”) and maybe even make it into a place that could function as more livable square footage. Someday…
xo,
Sherry
tab says
you can paint your barrel to make it a little more pleasant, or screen it with trellis and climbing plants
JenM says
We installed a rain barrel a few weeks ago. It’s on a stand, which takes care of the tap being high enough to fit a bucket underneath. It also has an easy to fit water diverter, so once it’s full the water continues down the downspout into the drain rather than the barrel overflowing. You can see it here: http://tinyurl.com/df75ms
Mel says
I agree, the barrel has to be raised so the gravity will feed the water…we learned – oops – the hard way…but what fun and energy savings we have enjoyed
Liv says
That’s such a great idea. I’m thinking my house could use one of those rain catchers. Looks like another project to add to the list!
Laur says
this is just what I need for this summer. . . now I just have to find a giant olive barrel. . .
Nicole Greene says
Sherry-
As a fellow Richmonder and this post stated that you crashed a pad in Charlotte, HOW can WE get that to happen as new 1st time homeowners for only 1 year??????
YoungHouseLove says
Hey Nicole,
Howdy neighbor! We crash houses that we hear are amazing through friends and word of mouth (and actually enjoy traveling to see homes that make us swoon) but if you think you have a house that will make our readers salivate feel free to email us some pics!
xo,
Sherry
Courtney D says
Thanks so much for sharing your workshop experience. My husband and I have been talking about making a rain barrel for a while, and now we have the know-how to make it happen. You guys are such an inspiration!
megan says
So awesome! As soon as we have a home we are going to have a homemade compost and rain barrel, and I know exactly where to go to find the ‘how to’. Thanks so much!
p.s. I would have taken the ‘in the barrel’ photos as well. Great job John!
Amie A. says
I always wondered what I could do instead of have the water drain so near the house! Hey, where did you guys get the idea of that extra black tubing (and what is it exactly) the you had on the downspout prior to putting in your rain barrel?
YoungHouseLove says
Hey Amie,
The previous homeowner attached that black plastic piping to direct all the water far away from the house. I think it’s readily available at places like Home Depot and Lowe’s and all you have to do is attach it to your downspouts and either let it drain water away from your house above ground, or dig a trench to hide it so it can carry all that water away from the foundation in secret. Hope it helps!
xo,
Sherry
heather says
its called Drain TIle. Sold at Home Depot with all the needed attachments too. you can get it perforated or solid. we use solid for a good length to get it away from the basement then perforated so it distributes in the yard. :)
Lee says
I have a rain barrel and my only caution is regarding the mosquito breeding ground, but your screen idea seems to solve that. Though you’ll have to be vigilant about cleaning out the leaves and whatnot.
I also love the idea of putting it up on a stand so you can put the faucet at the very bottom (or have it up higher so you can fill a larger vessel).
Mike says
You can get tablets to kill mosquitoes that are not harmful
Alison says
Hi guys,
I love this! I was just looking into getting a rain barrel for our house, but I was less than thrilled at spending $100 on one. This is great that I now have DIY instructions. Any ideas on where we can acquire an affordable old olive barrel (or anything else that would work)?
Thanks,
Alison
YoungHouseLove says
Hey Alison,
Since we wanted to publish a tutorial for everyone we were happy to take a class that provided all the supplies and the know-how. But now that we understand how to make a rain barrel, we’d totally just hunt down a food grade 50 gallon barrel and DIY it! Iwould try googling “food grade barrel” or “50 gallon barrel.” Or maybe call up a vineyard or farm in your area to see if they use barrels to ship things and would give one to you? Maybe you could offer them $20 for it? I don’t really have much advice since we just took the class this time, but definitely get creative and you’ll surely be able to track one down. Maybe even on ebay? Or how about posting a “wanted” ad on craigslist? Happy hunting…
xo,
Sherry
bungalow_bliss says
This is so awesome! I am registered to attend a rain barrel workshop in a few weeks, but I think I might just put the money toward my supplies. What a perfectly-timed post. Thanks for the how-to!
kati says
We just bought our daughter’s classroom art project at her school auction: a decorated rain barrel :). I think paint for plastic was used to spray paint the barrel (it’s a blue barrel with silver fish that the kids made). So, it’s not only functional but pretty cute.
Katherine says
I think rain barrels are a fantastic idea!
I have to brag a little bit about my city though. Here in Milwaukee, the Milwaukee Metropolitan Sewerage District sells pre-made barrels for only 30 bones! It’s such an awesome initiative they’ve created and they’ve sold over 8,000 barrels in the past couple of years. That’s over 440,000 gallons of water recycled in just one fill of the barrel! Yay us!
We painted ours to blend in a little more and it sits about 2 feet off the ground on cinder blocks for better spout access and increased water pressure. We plan on buying another one this year for added savings to our water bill.
Enjoy your savings and the great feeling you get helping out the planet!
Amanda says
I love you.
Thanks for this! Off to search for a barrel today!
Amanda says
Katherine! I am in Racine. I am going to google MMSD and see if I can come buy one. One less project on my list if I can get it pre-made!
Timothy says
Thanks for this great step-by-step. Rain water collection can go a long way on conserving and helping you maintain a healthy garden or supply whatever water sources you may need.
Some folks also put rain water to use within the plumbing system of their own homes.
Sammy Jenkins says
55-gallon barrels are often available from bottling plants or food processing plants for free or for a small fee.
& try your county extension agents -they may have a rain barrel program.
Katherine says
Yay Amanda! Glad I could help. Anyone in the state can buy them, you just have to go to Milwaukee to pick them up!
Joni says
Thanks for the belly laugh – loved the photos of John in the barrels!
Emily says
Thanks for this post. We are planning to get a rain barrel this spring. The water district in the city we live in sells rain barrels at a discounted price…$45.. so we are planning to pick one up and cannot wait to see how it works out.
Rowan says
it is sad to note that in a number of states it is illegal to harvest rainwater. namely, colorado, utah, and washington. rainwater belongs to the state and a roof is considered a tributary. storing it in rain barrels and cisterns is considered stealing it from the groundwater sources used by farmers.
study at google university for more info. personally i think the states are lacking in commonsense. there are currently some attempts being made to change the laws in these states.
harvesting rain in a barrel or two for use in a garden makes complete and total sense. i watched as millions of gallons were washed out to the pacific this winter rather than being stored for use during the drought here in the west.
Karla says
Love this idea! But I’m in Seattle…which, according to the previous comment, means we can’t collect rainwater! I’ll have to check into it more.
Hey! Did you guys see that you’re on Charles and Hudson today? :)
~Karla @ It’s The Little Things…
YoungHouseLove says
Hey Karla,
We have heard of a bunch of our Seattle friends having rain barrels so maybe it’s one of those old rules that has been on the books for eons but isn’t enforced anymore? I sure hope so! Thanks for the heads up about Charles and Hudson, we’ll have to check it out!
xo,
Sherry
Rowan says
here is info specific to the state of washington. as i said, there are currently attempts being made to change the laws regarding use of rain barrels for residential gray water.
here is a link with links to all the states water regulations sites
Laura at Emmy Lu says
Wow – This was an eye-opening article. Thanks John and Sherry for keeping the good (and thrifty) ideas coming!
Heather says
Karla,
You may definitely want to check into it more. We’re allowed to collect it here in Idaho, but we have only been allowed to for about the past 2 years. You probaby won’t get in trouble for just having a barrel, but here people actually have the installed systems and concealed gutters, so it was more obvious and easier to enforce (and they did!)
Robin says
Wow, I love it. My sister and I are having a “garden smackdown” this year (we blog it) and it may just be what I need to get the edge!
kim says
Thanks for the nudge. I’ve had a single barrel for a few years and keep forgetting to sign-up for another class to make another one. Yeah, I could make the second on my own, but I think it’s actually cheaper to go to the class and it benefits a local non-profit. Plus, it’s fun to help the people who’ve never touched a power tool. I’ve never heard of climbing inside for the assembly though. I think they just made you do that so they could have a little fun. :) Information for any readers in the KC area: http://bridgingthegap.org/egap.php?id=133
The best advice I can give is to elevate the barrel(s). Then you can put the spigot down way low and you get a bit more water pressure with the help of gravity. Just signed up for the class and can’t wait to grow my chain ‘o barrels!
Vesna says
I saw rain barrels for sale today at Lowes for $79, I think. Not sure if it came with the spigot. It was brown plastic, not quite as cute as an olive barrel, but I suppose it would work just as well. If you want something fancy (but a little pricey), this link has urn-style rain barrels with planters on them:
http://www.cleanairgardening.com/agua-rain-barrel.html
Aliya says
I’m not sure what I love more: this post, or that there’s someone else in Racine, WI who reads this blog! Small world. Amanda: did you know you can pay $45 at City Hall downtown and get a rain barrel installed for you? That was on this week’s to-do list but now I’m going to investigate MMSD as well. Where do you live? (Seriously — Racine!?)
Amanda says
When you first install it, fill it yourself at least half way with a hose if it’s windy.
Our 2000 litre tank tipped the night we moved into our new home, snapping one of the connections. We were told to keep water in it until we were able to properly secure it to the house.
YoungHouseLove says
Great tip Amanda! We actually filled ours about half way just for fun to get it going. It really helped to hold it in place and ensure that it was on solid, level ground.
xo,
Sherry
Anthony says
Rain Barrels are a great idea and are starting to gain popularity here in Baltimore. Thanks for the DIY post, too. We were looking into signing up for a class put may just make our own now! One word of caution for your set up though. You don’t want to have a full tank constantly just over-flowing the top. That would put an awful lot of water running down the sides of your barrel-eroding the dirt it’s sitting on and also putting a lot of water right along the foundation of your house (which is why the previous owner used the black tubing to run the water from the downspout away from the foundtation). Water seeming in through the foundation would put a told up on your dry basement plans. You might want to go back and attach an overflow tube that would carry water away from the barrel or make sure you use enough water periodically through the year and make sure it’s never full.
YoungHouseLove says
Hey Anthony,
Good point! We actually meant to mention in the post that we have been told that we should use the water in the barrel extremely regularly (since standing water can get bacteria in it that’s not good for watering plants) so we plant to empty/use the water in our barrel as often as possible so we don’t run into an overflow situation! Hope it helps!
xo,
Sherry
Bridgett says
Wow! Illegal to trap rainwater. As my mother would say – I think I’ve heard it all!
I wish we had a workshop for that around here. What a fabulous project. Thanks so much for posting it. I think I am going to investigate the possibility of getting something going here in Cincinnati.
Have a great time with your garden!
sammyw says
love this idea – perfect for our home – seattle :)
stellaboo says
Hi Guys-
I love your site! My husband made 2 barrels last year and they are awesome. One thing I haven’t seen mentioned is that the higher up you can have your barrels (within reason), the more water pressure you will have, so that you can attach a hose, etc. We used the water from one everyday for all of the pots on our patio on one side of the house, and from the other one for our vegetable garden. By the way, we got our barrels for free from our town recycling center. We live on Long Island. Thanks!
Kim says
We are actually planning to have one this year. Our city has an awesome program where they give you a rain barrell if you use it in an approved rain garden. Plus they pay us $4/sq foot for planting a rain garden. Pretty sweet deal – esp. since we wanted to landscape there anyhow. So, we are going through the approval process to use native plants and water it with our rain barrel. It’s definitely worth the little bit of work – good for the environment and the water bill.
Molly says
Cool! I want to make one now…thanks for the useful tips and the how-to instructions. Now for tracking down a giant barrel! :) Or heck, I’m hoping that someone in the Dallas area offers a class, too!
mallory says
I love this idea! I too am from Washington and am forced to ask: is that law really stopping anyone? I highly doubt the cops are going to come tromping through your backyard and bust you for collecting a little rain.
Sandra J. says
My husband started his rain barrels last year. It’s amazing how quickly the barrels can fill up!
Karen says
We just had a landscape plan drawn and the designer had just been to a seminar on harvesting rain. We had him draw 2 rain barrels into our plan. I have been meaning to do an Internet search about them to decide if it is something I want to do here in Cincinnati where the winters do freeze. Thanks for sharing!
KK says
I have to reiterate what stellaboo said: if you don’t elevate your rain barrel (before it’s filled) when you attach a soaker hose to water your plants, there is not enough pressure for the water to make its way throughout the entire hose.
We have two rain barrels, one on each side of our house with soaker hoses hidden inside of our flower beds. Unfortunately, we did not “hike” them up high enough, so they don’t work as well as they should. However, our neighbors put cement blocks under theirs and they work fine.
Maddie says
I’d definitely hook up an overflow tube. A 55 gallon tank can fill up faster than you think. Would the overflow go into the existing black drainage tube and away from the house? Here in Baltimore the Herring Run Watershed Association (east side of town) and the Jones Falls Watershed Association (west side of town) sell rainbarrels for $50-$70.
For the person in Cincinnati, make sure you drain the barrel before it freezes. Leave the spigot open, reconnect the downspout and you’re good to go.
ellessu says
I love this idea, but I live in Arizona — no rain gutters at my house, lol.
Shayna says
This is perfect timing. We just added this to our weekend to-do list. Thanks!
Ciara says
On behalf of your Irish readers I have to say that the idea of a rain barrel is really quite amausing! I live in the south west of Ireland where we get 1250mm of rain on average! If only we could invent a sun barrel… :)
Ciara says
eh em ‘amausing’ being an old Irish word for amusing and not a typo…
Melissa says
I was just admiring some rain barrels yesterday in a garden mag I got in the mail. Speaking of them having curb appeal, they actually have some really saucy rain barrels. They are kind of expensive though compared to your homemade one.
Gina says
King County, WA has a rain barrel program (http://tinyurl.com/d35snz). I believe the restriction on collection of rain water is limited to water intended to be used inside the home.
Blair says
I am loving this post! My husband and I are interested in going to the next workshop on 3/28, but we don’t live in Chesterfield. Any idea if this is open only to county residents, or could us city-dwellers (who, ironically, both work in Chesterfield!) go to it? We haven’t been able to get in touch with anyone yet to get an answer.
YoungHouseLove says
Hey Blair,
You’re totally welcomed with open arms even if you’re not a Chesterfield county resident. We don’t recall them asking for our address when we signed up and they mentioned that some people drive in from 45 miles away to be in the class so it’s a-ok to come from other counties! Happy rain barreling…
xo,
Sherry
Lynn says
Thank You ~ Thank You ~ Thank You for posting this! I have been wanting to get a rain barrel for some time! Water is so expensive here and it rains a lot, so what better way to harness that power.
I signed up to do the seminar in Chesterfield County next Saturday!
I figure the money we save on water this summer will more than pay for the barrel. I love green grass.
I got quite a chuckle out of the pictures of John inside the barrel. LOL! I thought the same thing about the California Raisin. “Heard it through the grape vine”.
Have I mentioned that I love your blog. Its going to kill me if we have to move out of state.