Whether you’re interested in painting a chair, a table, or any other wooden piece of furniture, the steps are pretty much the same.
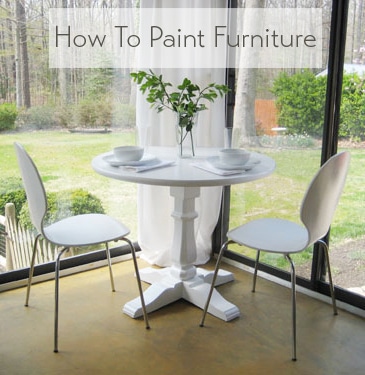
Take this table that we built and subsequently painted along with the accompanying white chairs (which used to be a golden blond wood tone).

Sprucing things up with a fresh coat of white paint took them from thrift store (where we got the table base) to Pottery Barn (which sells a similar version of it for 500 beans) in just a few hours.

But enough jibber-jabber. On with the how-to deets:
Step 1- Evaluate the surface of the piece that you’d like to paint. If it’s a sleek glossy surface (like varnished or sealed wood) you’ll want to gently sand the entire piece with 100 grit sandpaper). If it’s more of a dry chalky texture (like unfinished wood or flat paint) you can forgo the sandpaper and skip right to step two.
Step 2- Break out the oil-based primer to ensure that the paint sticks and no stains come through and ruin your finish (we’ve also used Zinsser Smart Prime with great success, which is a low-VOC stain-blocking primer that’s not oil-based – so it’s less stinky). Give the entire piece a good once over with a small foam roller or a paint brush. This coat of primer doesn’t have to be perfectly even in tone (it’ll probably look thinner in some areas since that’s how primer rolls) but as long as the entire piece is well covered – and it’s not too gloppy and thick – it’s ready for step three once it dries.
Step 3- Use a fresh small foam roller or paint brush to apply two thin and even coats of latex paint (a semi-gloss finish is usually best since it’s nice a wipe-able and durable choice). Many people mistakenly think that latex paint isn’t supposed to be applied over oil-based primer, but the real painting no-no is applying latex paint over oil-based paint, which is a guaranteed bubble-fest and should be avoided at all costs. And a word about small foam rollers vs. brushes: according to experts, all rollers – especially if used too quickly- may rile up the paint and lead to bubbles while paint brushes are the most bubble free application method known to man (although you might have brush stroke issues if the paint isn’t applied thinly enough or given ample drying time between coats).
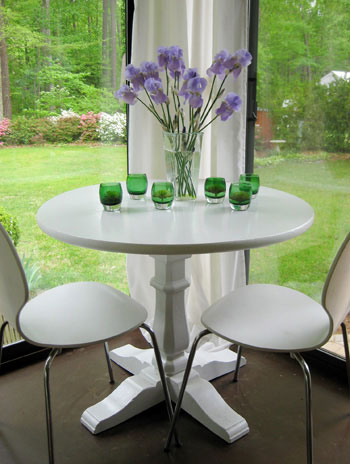
We painted the table above with a paint brush, not a roller. But we have also used small foam rollers with great success, so those are actually our recommended choice for beginners since they cut down on brush strokes or drippy finishes and seem to be the most error proof. No matter what you use, be sure to wait until the first coat of paint is thoroughly dry before applying a second coat (each coat should be applied super lightly and evenly – aim for the thickness of an eggshell or a piece of paper). This thin application is the key to avoiding brush strokes or roller marks for a smooth, gorgeous finish. Repeat after me: three or even four super thin coats are far better than one or two thick and drippy ones!
Step 4- This step is optional, so think of it as extra credit. Brushing on two thin and even coats of water-based poly for wipe-able protection that really goes the extra mile (and provides a glossy oh-so-luxe sheen) can’t hurt if you pick the right stuff. The only two brands that we’ve ever used with unmatched success are these two, so they’re our strong recommendation (other types can yellow or crack over time):
- Minwax Water-Based Polycrylic Protective Finish in “Clear Gloss” (found at any home improvement center)
- Safecoat Acrylacq (which is a low-VOC, non-toxic alternative sold at eco boutiques or online at places like greendepot.com)
We went the extra mile and applied poly to our white table above for a bit of added protection, and we even thinly polyed the chairs since they need to be just as easy to wipe down due to their proximity to food whenever we dine in the sunroom. Thin is definitely the operative word, and again you’ll want to be sure to let the first coat thoroughly dry before going in for the second. Any time you go over semi-wet paint or poly to smooth things out you’ll get terrible drag marks, so work from one side to the other and never go back over things until they’re completely dry.
Step 5- Wait at least a full 72 hours to place objects on your newly painted piece to avoid dents or divots in your finish. If you really want to be on the safe side, we’d recommend waiting five full days. Sometimes factors like humidity and primer/paint/poly thickness can keep things from fully curing up, and you don’t want to get indents from using your newly painted piece too quickly. Waiting this long might take some willpower because you’re dying to sit on/eat on/enjoy your brand new piece, but it’s worth the wait. Promise.
Easy, right? Ok, those were a lot of words, so it might sound complicated. But just take things one step at a time. And remember to breathe. You can totally do it. There’s really no reason to live with wood furniture that’s not exactly the tone or the shade that you’d like. So from painting an old side table a handsome glossy black to giving a scratched up wooden chair a cheerful red tone, it’s definitely a project that you can confidently tackle in an afternoon. Go forth and paint something!
*Oh and it bears noting that if your furniture item is anything other than solid wood or veneered wood (like laminate, melamine, etc) you should visit your local hardware store and ask the paint pro there what they recommend for that surface. There are some great oil-based primers and enamel paints out there (which are changing all the time) so it might be possible to get a great result. The key is really roughing up the surface so it’s less glossy and then priming and painting with the best stuff they have (usually oil or enamel based).Good luck!
Psst- In the market for a quick cabinet painting tutorial? Look no further.
Psssst- Wondering how to paint a brick fireplace? Wonder no more.
Pssssssst- Itching to paint wood paneling? Try this.

LJK says
Great play-by-play! Thanks!
Jordan says
Hi – I didn’t mean to leave a ‘reply’ but it was the only way I figured out how to ask a question.
I walked into Home Depot today with my YHL checklist in hand to paint my kitchen table. The guy was helpful, but now he confused me and I don’t know what to do.
He suggested I try Behr’s paint and primer in one. He also told me NOT to do a poly over paint. I’m completely loyal to YHL and love you very much. However, this is my first DIY furniture paint project and now I’m worried/confused!
Anyone have any experience with primer/paint in one?
YoungHouseLove says
I’ve seen some folks use it with success and others with failure. The issue is that the primer in that is water based, so it won’t block bleed through and sometimes things remain tacky/don’t cure nearly as fast as when an oil-based primer is used. But it can work! You can also leave off the poly as it’s optional (although we use that specific brand of poly by name on lots of furniture in our house with success and it adds protection that paint alone can’t provide). Hope it helps!
xo,
s
Sean B. says
I just painted furniture for the second time. Furniture I painted for my son’s nursery I just repainted for my daughter’s room. I did a lot of paint details on the top and bought polycrilic to finish the tops and protect the paint job. Is it really necessary to sand in between coats? I will probably try to skip this part because I don’t have any sandpaper and don’t feel like running back to the hardware store. I’d love to hear what you think. Thanks!
YoungHouseLove says
Nah, I only sand when I have obvious drips or marks to be smoothed out – but it sounds like yours looks good so I’d keep going with super thin and even coats.
xo,
s
Colton says
Hello,
Great post. We just painted our table and chairs and did so when it was a little too warm. Although we did 3 light coats, it seems to have dried “rough”. We wanted a smooth finish and are not sure what to do in order to fix the obvious paint strokes. Sanding it didn’t seem to help much. What can we do?!
Thanks,
YoungHouseLove says
Anyone have tips for Colton? I would sand it smooth and then try one top coat after it has a smooth base. That should help! And using a small foam roller tends to cut down on brush strokes.
xo
s
D-ra says
any tips for selecting a poly? I used supposedly clear poly over a white bench on our porch and it left it with a slightly amber tinge. I’d like to find a truely clear poly to use over white paint, which looks like worked for you on your table and chairs.
YoungHouseLove says
Hey D-ra,
We have heard about the yellowing effect of certain polyurethanes, but the key is to go with a water-based one. Oil-based poly has a lot more of that yellow tinge (in fact, it’s nearly impossible to find a clear oil-based one due to the nature of what it does), but a water-based poly should be a lot less yellow in tone. Our table and chairs look 100% white (not an ounce of yellow to be seen) and we used Minwax Water-Based Polycrylic Protective Finish in “Clear Gloss.” Hope it helps!
xo,
Sherry
Marjorie says
Try Rustoleum Crystal Clear spray.
Kristen says
is there a poly that isn’t shiny? I like a matte finish…
Carmil says
Im confused about the oil based primer….. Why didn’t you use a water based primer? I thought mixing oil based and water based would result in a “bubbling” of the paint. Obviously, I thought wrong, because your table looks fantastic!
YoungHouseLove says
Kristen- We don’t know of a poly that isn’t shiny, but for a matte look you can just skip this optional step and go with flat latex paint for a much less glossy finish. It will still be durable, it just won’t be as easy to wipe down with water and might absorb a bit more stains and spills than anything coated in poly would. It’s really a great option for any furniture not being used for eating like a bedroom night table or a desk chair, etc. Hope it helps!
Carmil- In our experience, there’s a definite order to be considered when applying paint, primer and poly. As long as you go for the oil-based primer before the water-based latex paint and water-based poly, everything is hunky-dorey. Latex paint and water-based poly will absolutely adhere to oil-based primer with ease and look fantastic. And it gives you added protection against stains since water-based primer is not nearly as good at blocking seepage. You may have issues with bubbling if you follow a coat of water-based latex paint with oil-based polyurethane. It seems that oil-based primer can easily be followed with latex paint, but latex paint shouldn’t be followed by oil-based poly. Does that make sense? In many cases water-based primer will totally do the trick (and make for a much easier clean-up… that oil stuff is sticky) but we actually have used water-based primer for certain projects and the stains and wood sap still bleed through and ruin our finish (super annoying!) so we follow the whole it’s-better-to-be-safe-than-sorry philosophy. Hopefully that explains our method!
xo,
Sherry
Cari says
There’s satin polyacrylic, it has much less shine. It isn’t matte but it isn’t nearly as shiny.
megan says
Perfect timing! On my way home yesterday someone had put a perfectly good end table out on the curb. I am not one to pass up a good piece of furniture, so I picked it up! I hope to paint it soon.
Amanda says
Love it! I just picked up supplies last night to paint the desk that’s on my blog. We discussed back and forth the need to prime and I didn’t end up buying any. The thought was that the desk is already painted white, I’m going to be doing minimal sanding in a few areas, so the priming could be skipped over direct to painting a satin black. What is your advice for priming when you’re painting over existing paint?
YoungHouseLove says
Hey Amanda,
Whether a piece is painted or not, I would definitely still do a coat of primer. In fact, I think you’ll have more problems with paint adhesion and possible peeling than you would painting raw wood (which absorbs paint a lot better than an already painted surface). People look at it as an extra step, but it’s seriously a short cut when you think about how paint over an already painted surface can crack, chip, or peel a lot more easily. Primer is like a layer of sticky stuff to ensure proper adhesion for a paint job that lasts decades and not just a few months. And the step you could probably skip instead of the primer is the sanding since a white painted desk probably isn’t varnished or glossy so the primer should do the job better than sandpaper. Hope it helps! Happy painting!
Oh and Kristin, a piece of glass or even plexiglass atop your desk will definitely nip those rubber feet marks in the bud. Great idea! A good way to avoid those marks in the future is to paint in very thin layers and be sure that each one dries thoroughly before moving on to the next coat. Hope it helps!
xo,
Sherry
bungalow_bliss says
Useful info, thanks!
Kristen says
hmmm…mine is my desk, which I painted black. The little rubber feet on my laptop leave marks on the painted surface. I may just try to find a glass top for it…
Meg says
I beleive that poly’s come in different finishes, gloss, matte, etc. At least the spray one’s I use when crafting do.
sceniclady says
Kristen- I usually use Modern Masters Dead Flat Varnish if a client wants no sheen, it is waterbased and does not yellow. It is kind of thick, so sometimes I thin it with a little bit of water (just a little though) and do maybe 3 coats instead of 2, I don’t like seeing those brush strokes. Although I prefer the Minwax Satin Polyacrylic, it really does have a pretty low sheen.
Bridgett says
Sherry, I just wanted to let you know how much I enjoy your blog. My husband and I rehab houses for a living and the design process is my favorite part. And you guys do such great things!
Love the table and chairs to death! And wish I had that little nook overlooking the yard. I’d never get out of the chair.
YoungHouseLove says
Aw shucks, Bridgett. You’re making us blush. Thanks so much for the kind words! You may be envious of our little sunroom eating area, but we’re jealous that you rehab houses for a living. What fun! Feel free to send us any and all before and after pics. We eat that stuff for breakfast.
xo,
Sherry
Amanda says
Thanks so much for the tip! I’m going to sandpaper a bit, with a 100 grain, just becuase there are a few rough spots, but then I’ll definately be oil-based priming before painting. I appreciate your advice.
Does anyone have any suggestions for this…
The last person that painted the roll top let the paint glob into the crevices of the roll down door. So, there’s a bunch of “extra” paint sitting in those crevices and I’d like to get rid of that dry, old paint, before painting again. But, I don’t want to damage the wood by scraping or picking at it too much. Is there any suggestion? I don’t think I can fit sandpaper in the small crevices either…
Everyone is so helpful! I’m learning lots from your questions and Sherry’s answers!
beth says
try using a little stripper and then removing residue with an old toothbrush. If you have a access to a saw dust you can sprinkle this in the crevices and use the toothbrush to clean it up. I use saw dust to clean up after using stripper. Rubbing the saw dust over the left over residue helps get rid of the sticky gunky stuff sometimes left behind.
Hope this helps.
YoungHouseLove says
Great tip!
xo
s
elizabeth says
Do y’all think it is necessary to sand and apply primer before painting trim and moulding (if it has already been painted)?
Thanks!!
YoungHouseLove says
Good question Elizabeth! We actually paint right over any painted molding, baseboards and window trim with white semi-gloss latex paint unless it’s super globby or peely in which case we sand it for a while and then prime and paint it (since sanding down to the original wood and just painting it would probably result in sap or stain bleeding through the paint). Most trim looks a lot fresher with a new coat of white semi-gloss, and since it’s not usually a place that gets high traffic (like the tops of a desk or the seat of a chair) it seems to do just fine without the the sanding and the primer in most instances. Hope it helps!
xo,
Sherry
Rachel says
Great tips, your table turned out wonderfully! I’ll belinking.
Diane says
Learn something new every day… I had always thought that water-based latex paints could not be used over an oil-based primer.
Clearly NOT the case, because look how sharp your table turned out!
Christina says
This is SO helpful- thanks so much! I have definately found a lot in thrift stores that I want to repaint but haven’t found such nice clear directions anywhere on the web- until now! Do you think I could follow these same steps for a wicker chair that needs repainting? (it has flaky white paint on it now) Thanks again!
YoungHouseLove says
Hey Christina,
I think due to the nooks and crannies found in a wicker chair, your best bet is to lightly sand all the cracked paint away with 100 grit sandpaper and then use spray primer and spray paint to refinish it (which will go on lighter than with with a roller or paintbrush). You can then follow with a coat or two of spray poly if you’d like even more durability. Just remember to spray using long even strokes and don’t get too close to the chair when you’re applying the primer, paint and poly since you don’t want drips and pools of paint between the woven wicker material. Hope it helps!
xo,
Sherry
elizabeth says
Thanks Sherry! I think we may need to do a bit of sanding on our bathroom trim before repainting, but we definitely won’t be going down to the wood.
Amanda says
Makes me wonder if it would be best to spray prime and spray paint the roll top portion of my desk- to avoid gooping up in the crevices? Wonder if I can get that roll top out of the track to do that though….
YoungHouseLove says
Hey Amanda,
You could also just use plastic bags (or a big plastic tarp from Lowe’s for like $2) to shield any parts of the desk that you don’t want to spray and keep the roll top of the desk exposed. The only issue I see with spraying part of the desk and painting another part is that you’d want your spray paint and your paint to match perfectly so it doesn’t look mismatched. This usually means you have to get someone like Benjamin Moore to pour some paint into a spray can for ya so you can use the same paint for both areas of the desk. I also think that a paint brush would work just fine on the roll top so if the whole custom spray paint thing sounds too complicated just stick with a paintbrush (since the bristles can easily get into those crevices, as long as you keep from applying too much paint you’ll be just fine). Wicker and anything meshy us usually hard to do with a brush, but regular grooves and crannies in wooden pieces are still easy enough to navigate with a brush most of the time. Hope it helps!
xo,
Sherry
Amanda says
Oh yes, didn’t think about the color difference between the rest of the desk and the top- I should have considering how long I pondered the “many facets of black” last night in the paint aisle at Home Depot- sheesh! I just wanted normal black and there’s about 10 variations, I swear!
I’ll give it a go at getting the old stuff out of the crevices and using a brush… sounds like a good method to attempt first.
Thanks!
Tiffany says
Great tutorial! And I must say, PERFECT timing! I just bought a dresser on craigslist that is painted an ungodly black/red/gold glitter color (for only $15!!) that I can’t wait to paint a crisp white. It’s going to look great thanks to your advice! LOVE LOVE LOVE your website!
Lindsay says
Interesting, I’ve painted quite a few things, but always used the water-based primers (thinking, apparently incorrectly(!), that was the only option unless you wanted to paint with oil-based paint as well). I wonder if the oil-based stuff would “stick” better? I’ve painted a couple pieces of that cheapo veneered MDF type furniture, and after a while the paint starts to chip off when I prime with water-based stuff. I’ll definitely keep this in mind to try out next time. Thanks for the tip!! :)
jane says
I was inspired this morning by this post so I went out and bought supplies and I just finished painting our computer cabinet black. I followed your instructions and used an oil based primer and two coats of semi-gloss latex paint. Here’s the problem…. While painting with a foam roller, the paint rolled on with thousand of little bubbles. Now it feels quite rough and you can see all the brush stokes. Any suggestions on what to do now? I’m really frustrated!
Also, the color I went with (BM Black) has strange gray/blue undertone. I’m hoping it will look better in the morning. Any tips for picking out a pure black color?
YoungHouseLove says
Hey Jane,
Eeeks! It was the foam roller. I’ve actually never used those things but I called my Benjamin Moore buddy and got her take on it and she definitely thinks foam rollers create those bubbles while brushes and regular rollers ensure a more even coat (she again reiterated that it had nothing to do with latex paint over oli-based primer). I’ll have to add the no foam roller disclaimer to my painting tutorial! So sorry for your frustrating bubble fight. We actually used a brush for all the furniture that we’ve painted thus far (the table above, the other white pedestal table in the den, the light green bookcase) so if you’re looking for the most foolproof method I’d definitely go with a brush. And the only caution would be that you should use a brand new brush to apply the latex paint (using an old brush for the primer is ok, but you want the paint to go on smooth and clean). You also want to allow each coat of primer and paint to thoroughly dry before going on to the next coat- which will really do wonders when it comes to making any brush strokes less visible.
As for the bubble situation you’re currently dealing with, my BM buddy suggested waiting for the last coat of latex that you applied to dry completely and lightly sanding the surface to smooth the bubbled texture. Then try using a brush to add one more coat of black paint which should go on as smooth as a baby’s butt (you might need a second coat depending on how deep you sand, but it should look great when you’re done). But please know that I’m frustrated for you, and I’m crossing my fingers that you end up with a fabulous piece that works perfectly in your space. Even we have paint snafus (like the aforementioned time we primed, painted and polyurethaned just to have stains come through since we didn’t use an oil-based primer so we actually had to start over from square one. I totally feel your pain! And at least you’re just redoing the last step and no going back to that nasty sticky primer! Good luck…
xo,
Sherry
erin says
My $0.02 – I never seem to have problems using a roller when painting furniture, but I only do it if I’m using flat paint, not any kind of enamel or gloss.
We painted a ping-pong table with flat paint as well as washed a dresser with it. Of course, otherwise I don’t know why anyone would use flat on furniture. :)
Todd says
I’ve actually used foam rollers with a lot of success and no bubbles! I refinished or repainted the kitchen cabinets in my former house, a 1940’s bungalow. The cabinets were built specifically for the home, but were in rough shape. We had originally thought about ripping them out and installing new cabinets, but our friends would always comment how much they loved them. I sanded them to make a nice, smooth surface, primed any needed areas, and painted them a crisp and glossy white. I did not want any brush strokes or roller marks on them. I wanted a smooth and glossy finish. I bought high quality brushes and also high quality foam rollers. I used the brush when needed, but used the roller for all of the large surfaces. To ensure I didn’t get any bubbles or brush strokes, I thinned down the latex paint. Since I did not know how much to thin it down, I thinned it down, little by little, until I got the desired consistency. Thinning down the paint increased the drying time but allowed the paint to even itself out. As Sherry mentioned, I applied numerous THIN coats of paint. I took down the cabinet doors, laid them down flat and painted them, which helped with making sure the paint dried evenly. It took longer, but cabinets looked smooth as a sheet of glass when it was all done, with no bubbles. In retrospect, I am very glad we redid the cabinets, instead of replacing them with new ones. It gave the kitchen an updated with a clean look, but retained the original charm. Everybody marveled how wonderful the kitchen looked.
Sadie says
this is timely…. thanks! I just picked up a free solid wood stand alone jelly cupboard for my kitchen and am looking to paint it white to match – I do love the deals I find on freecycle.org, and this will help me do the trick!
Eve says
Thank you so much for this! I’m getting a coffee table back from a friend (long story) and there’s some chips in the smooth melamine paint on the top (I think it’s melamine – it’s very thick). I was wondering how exactly to go about it due to my furniture painting debacles in the past – I will certainly have this handy when I go to do it!
Kelly says
This is such perfect timing. My sister-in-law gave us her old (like 25 years old) dresser and nightstand. It is in perfect condition, but the finish – orange 1980’s knotty pine – leaves little to be desired. I have the nightstand hardware off, and downstairs just waiting for me to go to Home Depot for supplies. I will be starting on Monday – will definitely send you some before and after shots.
One question though…I had planned on getting a piece of glass cut for the top of both pieces (which someone else also mentioned above) – any reason to polly? Also, what is best – flat, semi, etc…
Thanks so much!
Kelly
YoungHouseLove says
Hey Kelly,
The paint finish is up to you although we prefer semi-gloss for more wipe-able protection and a crisp, sleek shine. As for whether you should also poly if you’re using a piece of glass on the top of the table, it’s totally your call. It’s an optional step to give your piece a bit more of that spill-proof shine and added durability so if you think the top is the only part of the piece that will get wear and tear, you might not need it. But if it’s in a place where you’ll lean shoes, bags, and other items against it, you might want the added poly protection. Happy painting!
xo,
Sherry
Becky says
This is a great step-by-step tutorial. I’ve painted a lot of furniture recently but I’ve used a paint sprayer (like the kind you’d use to paint your house, but littler). As long as I don’t get too close, it seems to create a super-smooth, factory-like sheen on all of my pieces and it’s a lot quicker!
One question though, can I use an oil-based primer with a paint sprayer and then clean it out and use the same sprayer for the latex paint?
I’ve been mostly painting white stuff white but I am hoping to paint a coffee and end table set that are currently a rusty orangey brown color. I plan to lightly sand first but am not sure whether to use my sprayer this time or not. What do you think? Any experience using sprayers with oil and then latex paint?
YoungHouseLove says
Hey Becky,
I think the safest way to go is to use a brush to apply a thin coat of the oil-based primer and then use the sprayer to apply the latex paint in thin even layers. That way you won’t have to worry about the oil-based paint in the sprayer reacting with the latex paint afterwords, and you’ll still get that factory-like, super-smooth sheen. Happy painting! And feel free to send us before and after pics!
xo,
Sherry
Rebecca says
I recently acquired an old hutch and followed ALL of your instructions to the T. I painted it white. Now, after applying my water-based poly, there is a significant yellow tinge and my bright white summer hutch now looks dirty. I am concerned. Is there anything I can do to fix it? And if not, how can I avoid this is the future?
Thanks….
YoungHouseLove says
Hey Rebecca,
I have three thoughts about the yellow tinge:
1. You’re sure it was water-based poly and not oil-based, right? Oil-based has quite a yellow tinge while most water-based versions are clear and untinted- like thick water.
2. Perhaps the brand or quality of the oil-based poly makes a difference and since I always use the same kind I haven’t experienced the tinting you describe? I swear by Minwax Water-Based Polycrylic Protective Finish in “Clear Gloss” so perhaps you picked up one that wasn’t “clear” and had more of an “antique glaze” finish?
3. Thickness is key for polyurethane application. Two very thin coats help to add shine without changing the color of the paint at all, so anything that was applied too thickly would muddy up the finish and diminish that super sleek white tone.
Is there any possibility that the three things I outlined above could be the culprit? As for fixing the painted piece, one thin coat of primer and another two coats of paint will get you back to glossy white. I know it’s a lot of work to essentially start over, but we had to do it once when we skipped the oil-based primer step (since we experienced some annoying stain-bleeding without it) so although it’s a pain, the perfect glossy white finish is worth the trouble.
If you’d like to skip the poly step (it is optional), you can always just use white semi-gloss or gloss latex paint and just let that dry a few days and you’re good to go. If you’d still like the protection of poly, grabbing the one I recommend (Minwax Water-Based Polycrylic Protective Finish in “Clear Gloss”) and applying two thin even coats (I use a brush for super thin application as opposed to a goopier roller) should certainly do the trick. Hope it helps!
xo,
Sherry
Heidi williams says
Thank you for your info, I just made a cool retro boomerang table out of MDF. I did use a water primer then a Latex paint (2 coats). I want to top it off with minwax polycrylic clear gloss. I was worried of this last step because I put so much work into this….Thanks again!
YoungHouseLove says
Hey Heidi,
As long as you use two thin coats of Polycrylic applied with a paint bursh (avoid a bubble-inducing foam roller at all costs!) you should be left with a smooth and unfirm finish that lasts and lasts!
xo,
Sherry
szilvia says
can someone help me? i painted my sons bed with a disney primer (i think it’s water based but might be oil based cuz i couldn’t wash it off of anything including my hands) and glidden brand water based high gloss paint, i was told it is very low VOC. i applied a thin first layer on the primer and had to do two more coats to look nice. the pieces were drying for about 40 hours when i took them in the room, now it passed even 50 hours but the paint feels kinda sticky…you won’t get paint on your hands or anything, it just feels weird…i was told this paint dries very fast….now i never worked with high gloss but semi gloss and it always dried like in an hour…any suggestions what’s happening.
is it ok for my kid to sleep in the room now, i mean this doesn’t produce toxins when it smells like oil based paint..especially after two days?
please help
YoungHouseLove says
Hey Szilvia,
I have no idea what the paint is still tacky 50 hours later! Do you have good ventilation in there (it’s not hot and humid in there is it? sometimes that can dramatically effect drying time). Does anyone else have any ideas or helpful info? I do know that regular Glidden paint is low VOC but it’s not no VOC by any means, so perhaps keeping your child out of the room a few more days and opening some windows/getting some fans going is the way to go. Hope it helps!
xo,
Sherry
Meredith says
Any tips for painting cheap plastic fake wood veneer? I have an entertainment center I got for free on the side of the road and reinforced (my dad did that part, actually) so it’s very nice and sturdy, but I want to paint it white to match my envisioned new living room. Can I just go oil-based primer followed by water-based paint, or is there something else necessary to help stick to the fake veneer?
YoungHouseLove says
Yup, I’d go oil-based primer followed by two coats of latex semi-gloss paint so it’s easy to wipe down. Veneer can definitely be tricky, but that’s your best bet for something that looks great in the short term (but might scratch a bit in the long haul). Good luck!
xo,
Sherry
Barbara says
Love all the info, guess the pros think all this stuff is elementary but I don’t have any experience at all. What I need to know is, what do I do with an old dining table that I bought already refinished and when I got it home you could see brush marks in the sealer on the top. Can I just sand it back a little and add more sealer to smooth it out or is there a danger of using the wrong type (oil-based or water) and having it turn out worse than it is. It’s gorgeous except for that. Thanks for listening!
YoungHouseLove says
Hey Barbara,
You definitely have the right idea. Sanding down the sealer will eliminate those brush marks and then you can re-poly the piece more carefully for an even finish. You might want to do a little test in a small area to see if water-based poly will do the trick, but we’re pretty sure that’s what was used since oil-based usually has a very yellow tinge (which makes it less popular). A little test swatch should help you determine whether water-based poly is right for you (if it doesn’t crack or peel or bubble as it dries, you’re good to go). Then you can apply two very thin coats with a brush for a smooth, glossy finished product. Hope it helps! Good luck…
xoxo,
Sherry
Cecily T says
I figured I’d post a comment about my yucky (but uber-useful) bookshelves from when we were very poor and needed storage. When I read the comments though, I see that Meredith had the same question!
They are the plastic wood veneer as well. I’m a bit worried about painting them because they will likely be used to store books, and I’ve had trouble before with paperbacks kind of sticking to the paint on other shelves I’ve painted. Also, these are probably going to be in the kids’ playroom, so they may also have toys and/or bins, and will probably be not so gently handled. Is the scratching a big deal? Will it look horrible in a year?
Last…I’ve thought about other things beside paint, at least in part. Could I wallpaper/decoupage the backs of it?
YoungHouseLove says
Hey Cecily,
Good idea with the wallpaper! Maybe you could paint the sides and the front and wallpaper the base of each shelf along with the back so anywhere that the books will rest won’t stick in super humid weather (which does tend to happen). Hope it helps!
xo,
Sherry
kat says
I loved reading this post, and find it so very helpful. I just bought an antique dresser from Salvation Army, and I’m in the process of sanding it down. There are some decorative elements and grooves–would you have any suggestions for getting in those tiny spaces to sand, or does it matter? I’m so excited about this project. Thanks for the advice!–great website, too!
YoungHouseLove says
Hey Kat,
I would do my best to get in those grooves with the sandpaper (maybe wrap a thin sheet of metal flashing or even cardboard with sandpaper and use it to get into those cracks and crevices?). You’ll probably have no problem even if you don’t get in there and sand things down, but it’s always nice to be thorough. Hope it helps! Happy painting…
xo,
Sherry
kat says
Wonderful!–thanks!!
Pipsi says
I acquired an early Canadian chest of draws that has been painted many times with thick paint. I would like to strip all the paint off and start over. I have tried several different strippers and all I have accomplished was long strips of paint off. I am wondering if sanding may be the rest route to go AND how long that would take?
YoungHouseLove says
Hey Pipsi,
You’re definitely on the right track with the sanding idea- it’s exactly what we would recommend. The idea is that you would sand everything down until you have one solid, unwavering plane to work with (a common mistake is thinking that if things are a bit uneven or jagged that a coat of paint will cover it- in fact, it will magnify any issues so prep is the most important step of the repainting process). I would recommend a hand sander (not very expensive or hard to use- you just plug it in and let it do the work for you). Hopefully it’ll speed up the process tremendously (and you can even rent tools at Home Depot or Lowe’s if you don’t want to purchase them for one project- or borrow from a friend). Hope it helps! Good luck…
xoxo,
Sherry
Brandi says
Hi Sherry. I’ve sanded down our pedestal kitchen table and primed it with an oil based primer. I’m not sure how long I have to wait though before I can paint. It says 1 hour recoat (for primer), but I got primer on the label and am not sure how long to wait to paint.
Thanks!
Brandi
YoungHouseLove says
Hey Brandi,
Good question! Both primer and paint should be applied in thin even coats, so assuming you didn’t glop on the primer you should be good to paint in about 2 hours. It’s important to note that primer can feel tacky forever, so waiting until it’s bone dry might be hopeless. Hope it helps!
xo,
Sherry
Elisha says
I want to redo a dresser and nightstand we already have to go in my daughter’s nursery. Both pieces are in excellent condition but are a dark blondish finish that doesn’t go with my vision for the nursery. Is my best bet to paint them white using your technique above or is it possible to redo them in an espresso color that is so popular now? If so, do you happen to know if it would be a similar technique to what you’ve described? Any help and advice would be greatly appreciated as I’ve only begun researching how to take on this project.
YoungHouseLove says
Hey Elisha,
Staining the dresser and nightstand would involve a bit more prep (you would have to sand each piece down the the bare wood so it can absorb the stain, while painting just involves a coat of primer and then adding the color right over the piece so you don’t have to worry about the color being absorbed into the wood) but it’s really your call!
I would suggest dropping by Home Depot or Lowe’s and asking the paint specialist there to show you some stains and explain how to apply them to see if it’s something you’d like to take on. Either way, good luck with everything!
xo,
Sherry
Kay says
We want to paint my kitchen table and chairs black. We’ve sanded the chairs and table,what kind of primer and paint should we use do you? What do you think about using a paint sprayer to apply the paint?
YoungHouseLove says
Hey Kay,
Any oil-based primer followed by a latex paint should do the trick. For black, we like Glidden’s Dark Secret. Try stopping in at Home Depot or Lowe’s and talking to someone in the paint department for more info! As for a sprayer, it always makes for a great finished product, just do some test sprays on newspaper or cardboard to be sure you don’t have globbing or dripping and try not to stand too close to the piece and apply too much of a heavy spray (which will cause drips and pooling in the paint). The real foolproof way for beginners is definitely a good ‘ol high quality angled brush. Hope it helps! Good luck…
xoxo,
Sherry
Connie says
Hello Sherry,
I have been so inspired by your blog, that I have been writing down all of my household long and short term goals, collecting photos, and desperately looking for ways to finish rooms with low cost, that is until I can afford what I really want. Well I have been in my house for two years, it still looks like we just moved in, particially hung pictures, unfinished paint jobs, and the list goes on. Well I am so excited to tell you that I found three counter stools for my kitchen at a garage sale for $10. I was so excited because I could envision how I want them to look. My questions to you are as follows; 1. The base is metal, How can I refinish them. 2. There was a little rust under the seat where the seat swivels, what can I do to restore a smooth swivel and refinish the wood seat and wooden back rest black?
Inspired by Young House Love,
Connie
YoungHouseLove says
Hey Connie,
Thanks for the kinds words! We’re psyched to hear about your fabulous stool score. The metal base can easily be spray painted any color that you’d like (just tape off the seat or better yet, remove it by unscrewing it from below). And as for the rusted seat swivel, sanding the rust down and using a bit of oil to “grease” the swivel mechanism should help. Good luck!
xoxo,
Sherry
allison says
Hello! I am a huge fan of your blog and had a question I thought I would run by you…
I bought a house with the original kitchen cabinets (circa 1992) and they are the cheapo plastic-type wood cabinets with the fake wood grain (and the horrible gold knobs!) I would like to paint them white. Which route should I take?
YoungHouseLove says
Hey Allison,
You should be good if you follow the oil-based primer followed by two coats of latex paint approach. Remember of course to remove your hardware first (you can follow these simple steps on our How To Paint Your Kitchen Cabinets post). Hope it helps! Happy painting…
xoxo,
Sherry
Linda says
Help! My project is an old secretary desk with a drop down table. I applied two layers of water based primer expecting to paint the following weekend. Then I learned from a Home Depot salesperson that I need to paint over primer within 12 hours. So the next weekend I added another coat of primer and waited 1 hr. before applying 2 coats of water based latex satin paint, waiting 4 hours between the coats of paint as instructed on the paint can. I painted all of the exterior of the secretary and did not touch it for a week, enabling the paint to dry thoroughly before opening the drop down table to paint the inside desk area. However, when I opened the drop down table for it to rest on a ledge above the top drawer, the paint from both parts stuck, and now I will have to sand, re-prime, and repaint. But of course I have to wait until the inside desk area dries first. I am afraid once pull up the drop down table, it will stick to the sides of the desk area even though I have waited another week for the inside to dry. I thought I’d try putting wax paper or parchment paper between the painted parts to keep the painted parts from being damaged.How long does it take for the dried paint to keep from sticking? Will I have to coat with the poly to keep from sticking? What did I do wrong?
YoungHouseLove says
Hey Linda,
We always recommend one coat of oil-based primer followed by two to three coats of latex paint applied with a brush or high quality wool roller (we prefer a brush for furniture). I think the reason your piece is stayed tacky/sticky is due to the two layers of water based primer (if one layer didn’t thoroughly dry before the second coat was applied, that would explain the stickage). Our best advice to you would be to sand it down and apply only one coat of oil-based primer and let that thoroughly dry and follow it with two thin thin thin thin thin coats of paint (allowing each coat to dry is key). As for the parchment paper, it sounds like it might stick to the paint, but it may be worth a shot. You might also want to call or visit your paint professional at Lowe’s, Home Depot or even Benjamin Moore for their advice. Hope it helps!
xoxo,
Sherry
Linda says
Quick response! As for the first two coats of water based primer I applied two weeks ago, the can instructed me to wait an hour between coats. I waited maybe two hours between coats to be sure the first coat was dry. I worked indoors on a So. Calif. day of 75, low humidity! Same warm weather the following weekend when I added 1 layer of primer and 2 coats of paint. I used water based primer because the piece was too heavy for me to move it to the garage or outdoors and I didn’t want the lingering fumes for my dog to breathe. I have never painted a piece of furniture other than a wooden picture frame. I think I will buy a finished piece next time! LOL!
Kay says
Hi Sherry,
I notice on Linda’s comment she was advised to paint within 12 hrs of using the water based primer, is the the same for oil based?
Thanks
Kay
YoungHouseLove says
Hey Kay,
Good question! We actually don’t know because we always follow our primer with our first thin coat of latex paint as soon as it’s dry (usually within 2-4 hours), but checking the label on the specific oil-based primer that you purchase (they’re all a bit different) should clear it right up and give you some additional direction. Hope it helps! Happy painting…
xoxo,
Sherry
Lauren Bigot-Hubbard says
I would like to paint a piece of furniture made of MDF. I purchased the item from the net and I am not “wild” about the treatment. Reportedly, it was sold as “hand painted”, It does have some type of protective coating. Should I follow the same procedure as wood painting i.e. sand, apply oil based primer, latex paint, etc?
Thanks for your help.
Lauren
YoungHouseLove says
Hey Lauren,
Yup. Sanding it, applying oil-based primer and then two coats of latex paint (maybe three if you need it) should be just the ticket. Hope it helps. Happy painting!
xoxo,
Sherry
Dane Tamburino says
Can the two coats of latex paint applied after the oil base primer be high gloss latex? Instead of semi-gloss
YoungHouseLove says
Hey Dane,
Yup, you can definitely pick your finish although we always recommend either semi-gloss or high gloss for the practicality that it offers (it’s a lot easier to wipe than flat or satin paint). One warning is that high gloss paint shows more imperfections since it’s extra reflective, so be sure to apply thin even coats to keep drips, bubbles, and brush strokes to a minimum. Happy painting!
xo,
Sherry
Gina Davis says
I purchased an unfinished wooden rocking chair for my grandson. I’d like to paint it a high gloss black and add touches of color with designs typical of Polish folk art (think, Polish Easter Egg Decorating).
I don’t know how to tackle this project. Should I paint all the base black first and paint the design on top? Thanks!
YoungHouseLove says
Hey Gina,
Yup, you definitely want to lay down a good foundation of black paint (using oil-based primer and a bunch of coats of black latex paint until you get good, deep coverage). You may want to use flat black latex paint as opposed to semi gloss so the colorful designs that you plan to paint on top of it will stick well. Then we’d recommend sealing everything with two very thin coats of clean water-based polyurethane (we only recommend the one we mention above by name as others can yellow your finish) for a long-lasting result. Hope it helps!
xo,
Sherry
Gina Davis says
Thanks for the quick response. I appreciate your suggestion about the flat black first….the sheen will come with the polyurethane at the end. I’ll follow your suggestions.
Gina
Tammy says
Hi Sherry –
First of all – love your blog! My husband and I just purchased our first home, and we are super excited about getting in there and making it our own (we will definitely be referring back to your “How To” page). I’m especially excited about getting started on my first ever craigslist furniture updating projects. I’m also a little intimidated! I have a question about a couple of pieces I picked up today. The first piece is a wood faux bamboo side/end table with a glass top. Right now it has a glossy sort of oak thing going on — I know I should sand until the glossiness is gone, then use some primer, and then paint. My question is: should I spray paint or paint with a paint brush? How do you guys decide what to use?
My second project will be a set of 8 Chippendale chairs (not the Chinese Inspired style, but the more traditional curvy style). Right now they are a glossy cream color, and I really want to paint them a bright white or some kind of light blue. I am super scared to start this project! Any advice? There are some definite groove details down the legs, and since I’ve never painted anything, I’m worried they will not look polished.
Thanks!
Tammy
YoungHouseLove says
Hey Tammy,
Good questions one and all! I would definitely say that you know more than you think (you realize that you have to sand things that are super glossy to get the shine down before priming- fabulous!). With that said I would actually recommend that you use a high quality angled brush to tackle both of your projects and apply thin even coats of oil-based primer (only one) and latex paint (probably 2-3) on each piece. I would definitely go with semi-gloss paint for both projects and probably forgo the top coat of poly since for chairs the semi-gloss is usually adequately wipe-able (it’s not like a tabletop that you want to be super glossy). The thing with spray paint is that you usually have a lot less control so you get thick and thin spots of paint and it’s very common to end up with unsightly drips. With a brush you have a lot more control and you can move slowly and surely and use it to get into all the little cracks and crevices. Thin, even coats are key! In other words, three thin coats are infinitely better than one heavy drippy coat. You definitely want to give each coat time to dry as well, which will keep things looking smooth (dragging a wet paint brush through half-dry paint to apply another coat makes for a sticky-icky mess). Hope it helps! You can do it! And the light blue idea for the chairs sounds lovely!
xo,
Sherry