Ok, so here’s a bathroom update that’s way overdue. And it’ll literally change the way you look at your bathroom (or any other place that has bad caulk in your house). Let’s do this.

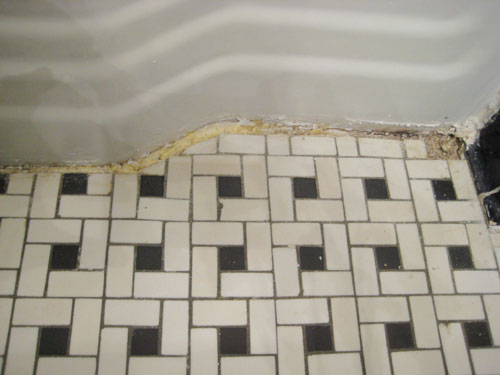
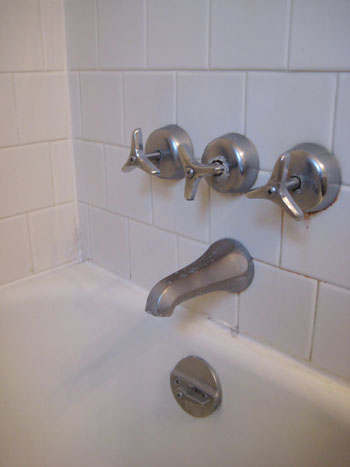
This is what our bathroom looked like when we started this whole mini-overhaul in an attempt to salvage our vintage basketweave tile instead of demoing every last cracked and peeling corner of our bathroom (warning: this ain’t pretty):

Now for a few more slightly less than pleasant “during” shots in the spirit of sharing the semi-painful process. First, we cut out all the old caulk with a box-cutter (as captured in this tasty photo):
Then we did some serious tile cleaning with the 40% peroxide (purchased at a beauty supply store) that one of our readers recommended (thanks Gimbler!). After we let the peroxide soak in overnight, we scrubbed the heck outta the tiles the next morning and they definitely looked lighter and brighter. So it was on to the next step, which involved taping off all the places that we needed to re-caulk.
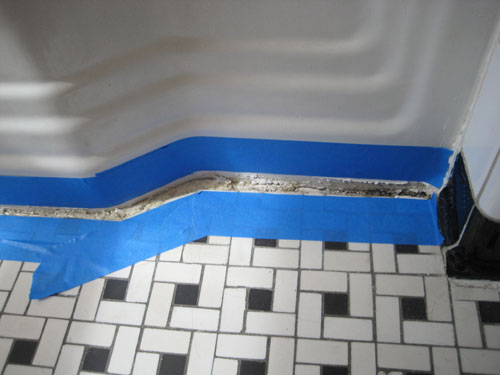
The painters tape was another fab tip from a perfectly helpful perfect stranger (thanks Mary!) which resulted in perfectly straight caulk lines that look much improved. The details: caulk, smooth caulk with finger, and quickly remove tape before caulk starts to set. Easy peasy.
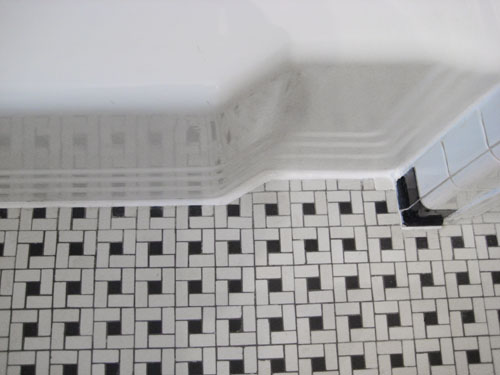
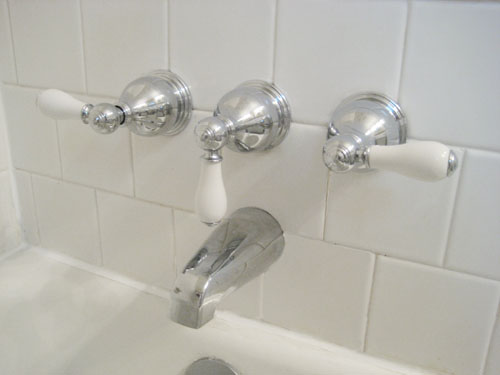
Doesn’t less dingy tile and a clean caulk line make all the difference? It also should be noted that we purchased one replacement tile for the top right hand corner where the tub meets the tile (if you scroll up to the picture where we cut out the caulk, you’ll see that there’s a huge hole where a tile should be). We actually couldn’t find an exact match, but it’s pretty close. Plus the fabric shower curtain hangs down completely obscuring the new caulk line and that tile anyway. But it sure is nice to know that when a guest pulls back the curtain there won’t be a hairy surprise waiting for them anymore.
(I’ll pause while you shudder. Go ahead, it’s ok.)
We also used a little more caulk to totally overhaul our gross-ish drain. Since our tub was reglazed about 8 years ago by the previous owner, the glaze was perfect everywhere except for around the drain. Observe:
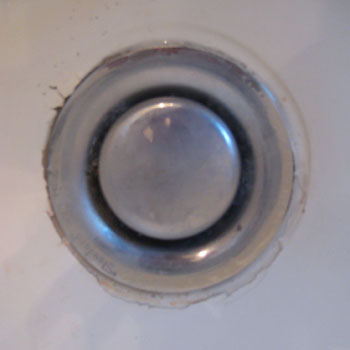
But caulk is like magic in a tube. Look at the difference a little ring of the stuff can make!

And while we were at it, the old bath and shower fixtures had seen better days. They were original to the house (51 years old) and the corroded knobs and leaky faucet just weren’t up to par anymore.
So we switched them. Well, by “we” I mean Mr Rooter. We tried doing it ourselves but the crazy old configuration of the pipes behind the wall made it necessary to call in the experts (who actually needed to use a diamond blade to cut through a 2-inch cement wall to access the old rusty pipes). We’re so glad we knew when to say uncle, because it took two experts over four solid hours to make the change. Luckily they quoted us a price before they discovered the cement wall.
When it came to new fixtures to install, the pickins were slim because we had to match the old three-across configuration of our prior faucets. But thankfully this cute retro-ish set ($136 from Home Depot) looks right at home in our black and white bathroom.
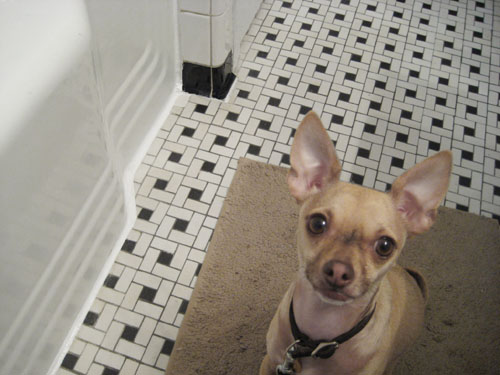
Burger loves the mini-bathroom-overhaul (see that happy gleam in his eyes?) and so do we. Mission Save-The-Basketweave accomplished. Thanks so much for all of your help!
Update: Alas, a few years of use later made it clear that our cracked and stained wall and floor tiles just couldn’t be saved (although the cleaning and caulking tips above definitely tided us over for a while). So we embarked on a full bathroom overhaul in late 2009. Here are those details.

brynalexandra says
oh my gosh!!!!! It really does look brand new! I am SO glad you could restore the original tile. It’s absolutely beautiful, and it really does look brand new with the peroxide. And the new caulking makes it look new too! It gives me hope for our bathroom, which is such a mess. (unfortunately, our original tile is circa 1983, not from a stylish decade like yours). You guys did a great job – and I love your new fixtures. I bet it makes getting out of bed a lot easier in the morning when you can go take a shower in your awesome “new” bathroom!
Aimee says
it looks great! i love your new fixtures too, and of course, burger. :)
Gene says
Very nice! It does make it look new.
DawnMarie says
Congrats on working with what you have. It is always so rewarding when you can put a small amount of time and money into a project and be happy with it. With old houses that never seems to happen. Always an unexpected pops up. It looks wonderful, as does everything in your home.
MrsLimestone says
It looks fab!
Mary says
Woohoo…it looks awesome! I’m so glad your tiles whitened up with the peroxide and the tape “trick” worked for you! We went on a caulking spree once we saw the difference taping makes. And your new faucets fit perfectly…nice choice!
Sarah says
Oh yeah! That’s a good fix! All of it looks fabulous!!! I’m glad you saved the tile…at least for now! I love the basketweave! Good job on all!
YoungHouseLove says
Thanks so much for the enthusiasm! We were so excited to share the good news, especailly because we couldn’t have done it without everyone’s help. Where would we be without our trusty commenters?
xo,
Sherry
Deserae says
It all looks incredible…love the new tub/shower faucet! I’m so glad you were able to save the tile too! Great job you two :o) Have a Happy Easter!
~Desi
Kristy Hall says
Gorgeous results. I can’t believe the tile transformation. I’ve lived in several apartments in NYC with this same type of tile – if only I knew then what I know now!
kellie says
looks great!
Carolyn says
I just found you blog. I knew you lived in Richmond as soon as I saw your house. I look forward to checking out your flickr and archives. :)
-Carolyn
meg duerksen says
oh i feel so encouraged! we live in a 100 year old home and have a very old bathroom. i love it but it looks dingy and needs re-chalking and the tiles are similar to yours. it’s hard to find people who know what to do to fix it. this is so helpful and makes me want to go fix it up right now!
this is my first time to your blog…through a series of links.
you both look like you have alot of fun together.
hope you have a great day.
i look forward to seeing what else you can accomplish in your young house.
-meg
YoungHouseLove says
It’s just amazing that a bunch of strangers took the time to offer us advice that we could then pass along in the form of this post. So glad you’re encouraged, excited, and super complimentary. We can’t take all the credit, but we’ll happily share it with everyone who wrote us with ideas about cleaning and re-caulking. Nice teamwork, people.
xo,
Sherry
judy says
Just ripping off vinyl floor sheeting because I remembered the original 1928 flooring to be excellent. Found the ‘basketweave’ design….all excited…until I realized that the vinyl flooring most likely had asbestos. Checked on-line and found the exact design of the vinyl to be used in a ‘how to remove asbetos’ site. Screeched to a stop and am hoping that I have not inhaled asbetos AND am hoping that I can restore the original floor(with professional help) to look just like yours!!! Love it!
Emily says
How has the caulk around the drain held up?
I recently learned the trick of using painters tape to caulk as well. What a huge difference that makes!
YoungHouseLove says
Hey Emily,
We actually thought of the caulked drain as a quick fix that we’d have to redo from time to time but it has actually held up perfectly- looks as good as the day we did it. Of course we think the fact that we used waterproof white caulk has something to do with the durability that we’ve been experiencing. Hope it helps!
xoxo,
Sherry
Ray says
I am also trying to save my basketweave floor. Can you please post the “how to” directions and what product other than the 40% peroxide should be used to clean the floor. Great web site!
Thanks
Ray
Ray says
Sorry, that would be Gimbler’s tip on cleaning the floor that I am looking for.
Thanks
R.
j.d.w... says
You did the right thing by calling a plumber. I tried to do it myself and after lots of gutwrenching, ended up calling one in the end:
http://jdwhittenburg.blogspot.com/search/label/plumbing
Anjana says
Brilliantly done my dear Watsons!
I struggle with this all the time.
can you apply this method for silicon chaulk, the clear kind. I want to rechaulk my glass shower enclosure which has the cultured marble sorround on 2 sides. How to get off the old stuff? and hint? is 40% peroxide stronger than Clorox bleach?
Thanks for all your tips, am currently struggeling wiith lots of issues in renovation.
YoungHouseLove says
Hey Anjana,
The tape method would definitely work with silicone caulk, just be sure to remove the tape before the caulk has time to set. That’s the key! As for whether 40% peroxide is stronger than Clorox, I’m not really sure. I do know that something too strong can etch (create tiny scratches on) your tiles so perhaps 40% peroxide is milder than straight bleach… but maybe that’s a good thing? All we know is the peroxide secret was recommended for vintage tiles like ours and we went for it. It’s still super affordable and easy, so definitely feel free to give it a whirl!
xo,
Sherry
becca says
i tried using this caulking method last weekend on our kitchen. we painted the walls a dark peacock blue color which unfortunately bled onto the white grout (no matter how hard we tried to make it seal) which left the kitchen looking sloppy. i caulked around the tile and anywhere the paint bled using the painters tape and it looks perfect! thanks for the tip!
Michelle says
The bathroom looks marvelous!
I just moved into a recently renovated place, but the caulking in the bathroom already needs repairs. I was dreading the removal of the old caulking, but your pictures have really inspired me…especially because my job looks like cake by comparison. :)
One question: what kind of caulking did you use? I have a tube of acrylic painters caulk, but I can’t figure out if it is up to the task.
YoungHouseLove says
Hey Michelle,
We like Dap when it comes to caulk, and although I don’t remember the actual name off the top of my heads, I believe it’s something like: Dap Waterproof Bathroom Tub & Tile Caulk in “brilliant white.” Hope it helps! Happy caulking…
xo,
Sherry
Kim says
I’m just looking through some of your old “How-To” articles (one of my favorite new internet activities since I found your blog a few weeks ago!), and this one has particularly good timing. My husband and I are planning to start tackling a bathroom renovation this weekend and these tips I’m sure will come in handy!
One question…I noticed that you mentioned the previous owners of the house reglazed your tub 8 years ago and it’s held up pretty well. Do you have any other experience with this? We’ve gotten quotes for reglazing our *bright blue* tub as well as having acrylic liners installed over the existing tub and shower walls. Of course the reglazers tell you the acrylic doesn’t last and the acrylic guys tell you the reglazing will be cracked within a year…we don’t know who to believe anymore! Some firsthand experience (especially from you guys, who obviously know your way around a renovation!) would be excellent.
YoungHouseLove says
Hey Kim,
Our tub has indeed held up pretty well, although the paperwork that we got with the house indicated that reglazing should be done every 7-10 years. It’s not a permanent solution but it really looks authentic and it’s pretty easy to clean (no harsh chemicals allowed, but we like organic stuff anyway). The acrylic liners are more of a long-term thing/quick-fix, but I’ve actually heard a few horror stories about mold festering between the old tub and the new plastic liner so that method has given me the creeps ever since!
We also appreciate the look and feel of a real ceramic tub instead of something plastic, but we can totally understand if you go for that method since it drops right in on top of your tub with little maintenance. In short: the reglazing isn’t much work at all and it holds up well for a long time unless you go crazy with harsh chemicals or chip away at it with a screwdriver or something. Hope it helps!
xoxo,
Sherry
Sara says
Sherry,
What did you scrub the floor with the next day after the peroxide soaked in? Just hot water or soap and water? I think I am going to tackle my bathroom this weekend.
Thanks!
S
YoungHouseLove says
Hey Sara,
We actually just used a lot of water to dilute the peroxide over and over again (maybe 10x) and did one last scrub with mild soap and water at the very end once our last application of water only had fully dried to ensure that we got all the peroxide up (didn’t want any bleached feet!). Hope it helps!
xoxo,
Sherry
Sara says
Thanks Sherry for your response to my questions about cleaning old tile and painting cabinets. My house is just outside DC and a lot like yours. It needs some major work (a new boiler- yikes!), but mostly minor and I want to thank you and your blog for giving me back some of the motivation I’ve lost recently!
YoungHouseLove says
Aw thanks Sara! We’re thrilled to help. Happy home improving!
xoxo,
Sherry (& John)
lylah ledner says
Great post with great tips with great pics. I’m inspired to recaulk two bathtubs and a shower. Thanks for posting the product you used. We’ve tried different ones that turned out gross looking.
By any chance do you have tips on regrouting the kitchen tile? I’ve got some great colbalt blue 3″ squares in my kitchen and I’m still crazy about the blue. I’ve dug out most of the “stuff” and will now use one of those little dremels. I’m not sure how deep to go AND I’ve no clue as to what kind of new grout to use, let along the steps.
Any resources you have would be great.
Blessings…Lylah
YoungHouseLove says
Hey Lylah,
Here are two articles that will hopefully help you out:
http://www.doityourself.com/stry/regrouttile
http://www.ehow.com/how_2050194_regrout-bathroom-tile.html
Good luck!
xo,
Sherry
lylah ledner says
Wowzers! You’re quick. Thanks!!!!
Renee says
Wow Wow Wow!
My husband and bought a little 1955 home last summer, and immediately after we moved in, suffered some severe buyer’s remorse (It is getting better after much elbow grease, money, and creative ideas)! We didn’t realize until the house was vacant and un-air-conditioned for a couple days that the previous owners had smoked in it for the 40+ years they lived in it. Most of the house just needed a serious (multi-pass) scrubbing and layer of oil based primer to lock away the yuck.
The tile and grout in our master shower and hall tub surrounds are the last bit of smoke stain remaining. The grout is white (hidden by mocha brown smoke tar). What was the procedure for the peroxide wash (is it maybe listed in an old post)? I imagine it will be a little different for a vertical surface, but I’m willing to try just about anything! I want to do the cleaning before I re-caulk the tub, so I won’t have to caulk twice!
I’m new to your blog, but love everything I’ve seen! It is reassuring to know we aren’t the only young couple with an old house and major to-do list! Thank you so much for sharing your discoveries and passing on the discoveries of others!
holly says
This looks great you guys!! My husband and I are working on our first house and the bathrooms are major on the list. Sicne the huose was built in 1937 we’re working with the very retro lavendar and black tile design in one and the glorious green and black in the other. Oh, and you guessed it–sinks and toilets to match! YUCK!
We’ll need to recaulk, possibly glaze the tub (yes it IS purple) if cost permits, change the fixtures and components and try your peroxide bath. Thanks for the tips!!
rebekah hunt says
I just found your blog, and WOW, you are something else!!! I am so inspired and can’t wait to try some of your “How to’s”
Since you are such an expert, do you have any experience painting/reglazing tiles? we have the ugliest BLUE bathroom, the floor tiles are dark blue, the vanity tiles are mixed blues and the wall tiles are a light aqua. I would like to paint the floor and vanity tiles the same shade of white, so we would only be dealing with 1 shade of blue. any suggestions for us?? thanks.
YoungHouseLove says
Hey Rebekah,
So glad you found us! We’ve heard great things about tile reglazing and think it could definitely be a solution for your blue on blue on blue bathroom. I don’t know if you can reglaze a floor though (I know you can do a tub and wall tiles but I don’t know how it stands up to foot traffic with shoes on, etc). I’d suggest googling or using the yellow pages to find someone in your area who can come out for a free estimate and go from there. Hope it helps!
xo,
s
Emily Wallace says
I love your site! I just found it via a friends blog. Our bathroom reminds me SO much of the way yours was. We’ve painted and done a lot of improvements, but you’ve inspired more ideas! I have a question though. Your basket weave floor is awesome since it’s black and white. Our floor looks the same, except alas… it’s pink! Dreadful, I know. I painted the walls pale blue with all white everything else (curtains, shower curtain…) I put burgundy rugs on the floor with burgundy towels. It seems to make the pink less noticeable. But, would you rip the tile out and redo it, or do you have a better suggestion?
YoungHouseLove says
Hey Emily,
Unfortunately replacing the tile is the easiest and most cost effective way to deal with it (other than leaving it of course) since there’s no known short-cut method that works when it comes to “painting” floor tile (nothing will stand up to foot traffic well enough to make it worth your while). Hope it helps! So glad you found our blog!
xo,
s
Carrie says
Working my way through all your old posts… and I am so trying this when I get home!
We have a 1956 bungalow with a peach and black bathroom (otherwise just like yours). You are so lucky to have gotten white and black! It will be gutted one day, but I would just love to make it look “not gross” for right now. This will help do the trick!
Thanks for so many great ideas!
Chuck says
Hey, Would happen to remember the Make and Model of the shower faucets? We need to replace the diverter stem and we have the same unit. I can;t remember the make/model. Thanks so much!
YoungHouseLove says
Hey Chuck,
So sorry don’t have a clue other than that we got them at Home Depot. Good luck!
xo,
s
Kevin Schifino says
Great to see two young people that have vision! To actually keep the original ceramic tile bathroom in your 1950’s house! That’s great! Most people would just simply demolish it and start over. Unfortunately, that’s exactly what happened with the main bathroom in my vintage 1941 house, well sort of! The previous owners didn’t realize what they were getting into when they decided to remodel that old bathroom back in 1991! They thought that they could just simply scrape off the ceramic tile wainscot, not realizing that it wasn’t the cheaper thin set type, more common to the 1950s, but the heavy-duty thick ceramic tile set in mortar on wire mesh! Well, once they started they had to finish by taking the walls down to the studs! But, they left the original floor, a black and white basketweave similar to your bathoom after they realized that too was set in a bed of mortar and not just simply installed over a wood subfloor, common after 1950 or so. They put up drywall and wallpaper and a three-piece tub and shower surround! They put peal and stick vinyl tile squares over the ceramic tile floor. When I bought the house in 2006, the first thing I did was to remove the dated wallpaper and that horrible vinyl floor. I have yet to restore the bathroom, but it looks better to me now in a state of transition than what it looked like on moving in day. You serve as inspiration as I intend to attempt to replicate what my bathroom used to look like when brand new back in 1941! With the retro materials available today, I should have no problem accomplishing the task! Thank you very much!
Caitlyn Whichard says
That’s so funny — that is the same tile my mom has in her Victorian home! …It used to be my bathroom! I loveeee the transformation and will definitely have to pass this on to her!
Hailey says
I have no clue why I didn’t try to find this post prior to my “caulking” adventure yesterday, but I made the mistake of NOT using blue tape. It was a freaking mess.
First off, we noticed that the original caulking around the tub was cracking, so I took the box cutter to it. Well, it wasn’t even caulking, it was grout. Dry and crumbly. I removed all of it and then went at it with some white silicon caulk. Thinking I knew what to do after watching it being done on HGTV, I just put some in the crack and spread it out with my finger. To my horrible surprise, it got everywhere. I spent hours wiping it away and trying to smooth it with my finger. After about 3 hours of working on the tub, it finally was done. It isn’t the prettiest, but we know now that we won’t have any leaks.
Can’t wait to see the overhaul of the bathroom. :)
Carolyn West says
Does anyone have any of the original 1955-56 brown kitchen tiles. I have actually bought a few newly made ones. Not exactly the same color + they don’t make all the pieces I need .
Taylor @ thehouseonpennylane says
It’s interesting how this caulk mess is right above where you found the rotting subfloor. It looks like previous owners had a lot of problems in that area, but never realized how big of a problem it truly was…
YoungHouseLove says
It’s true! There was even a missing tile there but we never thought the subfloor would be so rotten!
xo,
s
Mary-Kate says
I found your blog a little over a month ago, and I have been hooked every since–you guys do a wonderful job!
With all of your know-how on tiling bathrooms, I was wondering if you had any tips on simply replacing old tile (since it looks like you replaced a tile in this post)? There are about 6-8 tiles in my shower area that are cracked and damaged. Is it possible to remove the old tiles, scrape out the dry mortar, apply thinset mortar, and install and grout the new tile while keeping the rest of the area in tact? Or is it more difficult than that?
Thank you, and best wishes to you in the new year!
YoungHouseLove says
Yup it’s really that easy! Just google around for “replacing a tile” and find a simple online tutorial or two for reference. It’s basically exactly as you described it, so you should have no problem taking it on. Hope it helps!
xo,
s
cassie says
You two, and your site, are about the cutest I’ve ever seen! I can’t tell you how many hours of my work day I’ve spent on this blog since discovering it a week ago!! :/
I know you paid to have your tub facuet replaced. Did they have to cut into the tile, then retile after replacing? I’m dying to replace the faucet in my garden tub, but it’s mounted through the tub with tile wall on the outside…so there is no entrance for us.
Also, is switching out bathroom sink faucets fairly cut-and-dry if you match your new faucet to the existing holes?
Thanks so much for your help, inspiration and cheerful attitudes!
YoungHouseLove says
No way! There’s a “back entrance” to the fixtures in most homes, so they don’t have to cut the tile at all but can just remove this back panel (ours is in the nearby linen closet) to get to them from behind and switch them out. It should be relatively straightforward, just remember to hunt down a fixture with the same configuration (you can’t go from a three faucet set-up to a one lever fixture since there will be gaping holes left in the tile). Hope it helps!
xo,
s
Jillian says
I have that EXACT bathroom, except my tile is the ugly pink and dark magenta! PLEASE HELP! What color can I paint the top portion of the bathroom where the tile ends…what goes with a 50’s style PINK bathroom!?
YoungHouseLove says
We like soft buttery yellows with pink for sort of a retro feeling. You can also temper the color with a nice sandy tan neutral tone (try Glidden’s Water Chestnut) to cut all that pink and make things feel a bit less girly and bright. Good luck!
xo,
s
M Black says
Thank you for sharing the shower fixtures – I need to replace mine (along with the mirror/ lights). Have been told this “old style” is not to code. Need to find a plumber who knows how to replace these items w/o causing more damage. Any tips on finding a wise a plumber? Have you had to replace any vintage tiles?
YoungHouseLove says
We love sites like Angie’s List or Service Magic to find a well reputed, highly rated pro. And of course we love to get three or more estimates to meet with people and see how comfortable they make us feel. Hope it helps!
xo,
s
Alison says
Hi,
In our bathroom the caulking just won’t stay. for some reason no matter what we do it won’t stay it hardly even dries and for the life of us we don’t understand why. Do you think it might be the type of caulking we are using or is it that our bathroom doesn’t have good air circulation?? I just don’t get it. We have been trying to fix it with no luck. Now just so you understand where i am talking about it is along the inside of the shower where the wall and the tub meet the wall is almost seperated from the tub so water is slowly seeping its way intot he wall and that can’t be good. if you have any advice please do tell…
YoungHouseLove says
It could be both factors (the type of caulk and the humidity in your bathroom). We would suggest going to a home improvement store and asking them what type of caulk they recommend for a moist room (something that will definitely “cure”) and then try to keep a table fan going in there with the window open so it’s nice and breezy and not too humid. Good luck!
xo,
s
Dianne says
Hi, Love your site. I have this floor in my small bath. My shower surround is all white. Due to damage, it has to be replaced. Im going back with white, but would like a simple black design near the top. Can you give me an idea. My home was built in 1952 and want to keep it true to the period. Thank You, Dianne
YoungHouseLove says
How about using black suway tiles or black and white hex tiles as a detail near the top? Otherwise just check out the tile store near you for ideas. Good luck!
xo,
s
Sue says
What kind of caulking did you use?
YoungHouseLove says
Waterproof white silicone caulk by Dap. Hope it helps!
xo,
s
April says
Hello from Texas! I just accomplished my first caulking project today, and I used the “tape trick”. It turned out so well! Thanks for your help!
laura says
We have the SAME bathroom…it is simultaneously fabulous and horrific! I read up on adding a third color to the black and white palette, and we chose a violet color and it looks great. I find the black and white color and the squareness of the design (in our bathroom walls are also done in subway black and white) to be too “hard” and so to soften it I found the ideas of uses artwork and textiles with a swirled pattern and in our bathroom that softened up the look a lot. I will post a pic for you….
Natalie says
Hey There!!
I stumbled across this desperately looking for ideas for my bathroom in my 1950-1960 house. I have the same black and “white” wall tiles, black at the top and bottom, white througout and a diamond design along the top as well. I’m having a very dificult time trying to find new tiles for the floor because it was ahideous vinyl. My two biggest issues are 1)matching a black and “white” palette that isn’t a pure white more of an eggshell and 2)keeping true to the time period look of the old tiles.
I have found that new white tiles look too white next to my old ones and I think a black floor would be too dark for this smaller bathroom. I’m sort of out of ideas with a ripped up floor, any suggestions appreciated.
YoungHouseLove says
Hmm, I would try to find an old secondhand place like a Habitat For Humanity ReStore (they have one of them in almost every city if you google for one near you) since they tend to have old tiles and you might find a perfect match! You also could try searching for an “architectural salvage” place in your area since they might have old ones too. Good luck!
xo
s
Sophia says
You guys have the best blog. I’ve been following for years. When I figured I had to caulk my shower, you were my go-to resource and this page popped up. Thank goodness!
One thing I’d add though…I found that I needed to smooth down the caulk with my finger a second time after the painter’s tape was removed…otherwise, for some reason, the act of ripping off the painter’s tape raised the edge of the caulk up off the tile so it didn’t lay flat. I think it might be because I spaced my painter’s tape much closer than it looks like you did in the picture so that when I smoothed the caulk over the first time, I had caulk spillover onto the tape all the way across.
YoungHouseLove says
Great tip! So glad you figured out how to make it smooth with a second swipe!
xo,
s
GC says
OMG, thank you so much for the tip. It was simple and the results look great. You guys are my inspiration to try more DIY projects :)
Ashley B. says
I knew you guys would have an excellent tip on this.
We’ve just started weather proofing our windows and I struggled with the silicone caulk for an hour (and you can tell by the looks of it).
I should have come to you first! However, I’ll be using this tip for the remaining windows. :)
Anyway, LOVE this site!! You two have been a HUGE help in many of our home improvements.
Thank you, thank you, thank you!