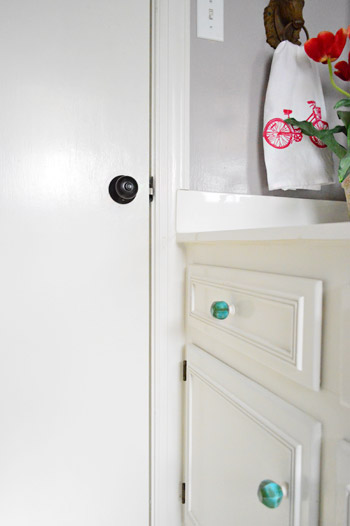
You down with ORB? Yeah you know me.
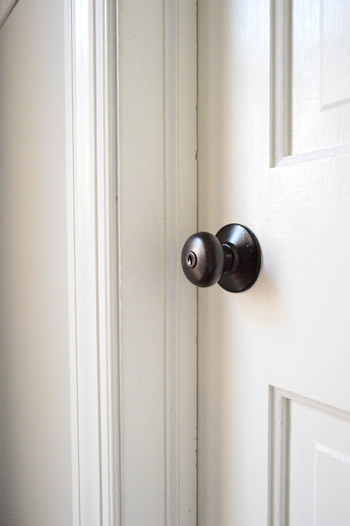
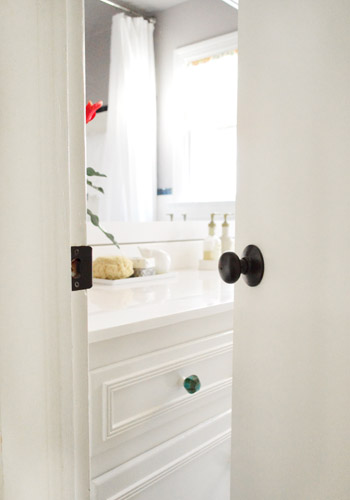
The deed has been done. After years (yes nearly two years!) of planning to upgrade every last old brass door knob in our entire house, we finally got ‘er done. Strike up the band! I can’t hear you. Can I at least get some cow bell?
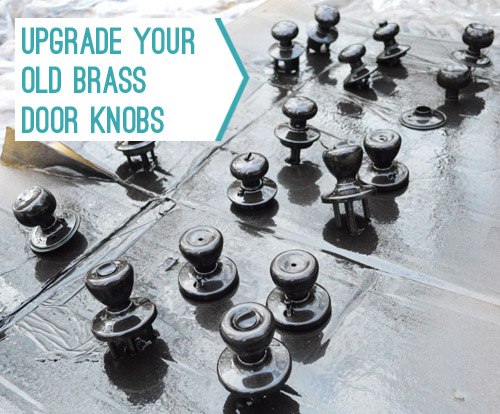
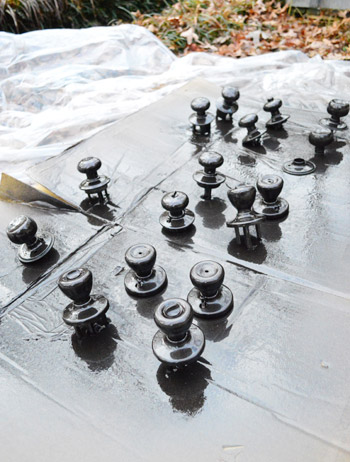
Yup, we removed 19 knobs with the intent of oil-rubbed bronzing (aka: ORBing) those babies. First we tried this method with a few exterior knobs, handles, and even a doorknocker a while back, just to see how they would hold up before doing the whole shebang (and I’m not gonna lie, I didn’t really have energy for the whole shebang up front). Baby steps.
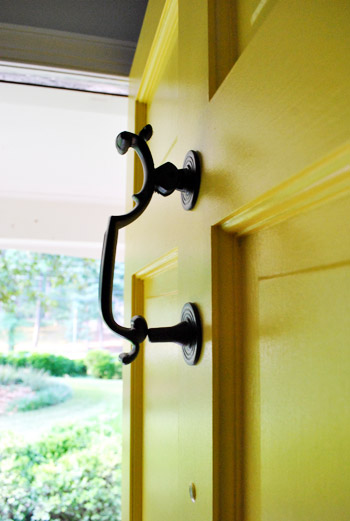
We figured that since those exterior knobs/handles/knockers still look great after a year and a half of being exposed to the elements (remember we did an update on them here?), that bodes well for all 18 (yes 18!) of the interior knobs that we finally got around to removing and ORBing. But we’re so happy with the results! Totally worth the trouble.
Here are the steps we followed:
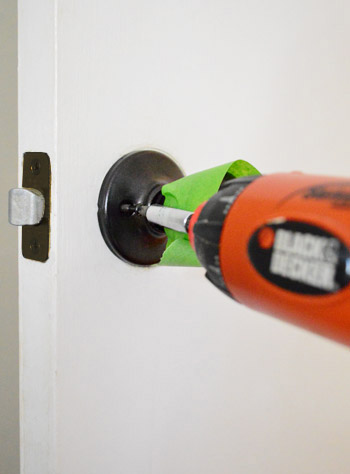
- we removed all 18 knobs with a screwdriver, being careful to keep them paired up (we didn’t want to forget what went with what when we had to reinstall them)
- using super high grit paper (400) we sanded every last knob to rough them up so the paint would stick (if you see small scratches don’t worry, they’ll be covered with paint- but you definitely want to use high grit paper because low grit can leave deep/big scratches that show through)
- then I wiped down each knob with liquid deglosser like this and laid them all out on a piece of cardboard (with them facing up, not lying on their sides – which sometimes meant piercing through the cardboard with their back parts to make them stand up).

- I used Universal All-Surface Spray Paint by Rostoleum in the oil-rubbed bronze finish. This has a built-in primer and sticks extremely well to things – especially metal – so if you’re contemplating using another brand, you might need to spring for a separate primer to apply first if it’s not already included.
- When it came to how I sprayed, I just misted everything from all angles. To avoid nasty drips and runny paint, doing several light coats with about 10 minutes of drying time between them was the charm. Mine were so thin it took five coats and I kept the can moving around the whole time – like you’d mist your mane with Aqua-Net. I also squatted on the ground from all sides to be sure I got all of the exposed parts of the knob completely covered.
- We let everything dry for a full 48 hours before reinstalling them (didn’t want to mark up the finish while wrestling them back into place). After 12 hours outside on a nice day (you don’t want to spray when it’s too cold – check the can for temperature guidelines) we brought them inside to the sunroom so they could continue curing for the rest of the time since it gets too cold outside at night for the paint to dry properly outside.
When it comes to a time breakdown, it took about thirty minutes to remove all the knobs, about two hours to sand and degloss them all, and about an hour to spray paint them. Then after 48 hours of drying time we reinstalled them in all in about half an hour. So the total time spent for what look like new ORB doors = 3 hours and 30 minutes (plus a few passive days of drying time).
And it only took one can of spray paint (actually less than that, since we were using an already-open leftover can). So that’s a lot cheaper than the $185 (!!!) we would have spent at Home Depot buying the exact same knobs in their oil-rubbed bronze finish. Our verdict: so happy with them. Wish we did this about two years sooner. Seriously it wasn’t even that big of a project (in our heads we kept putting it off because messing with every door in the house feels intimidating, but honestly you just remove a few screws, note which ones go together, and they’re all back in a few days later).
Oh and here’s an installation tip for ya: we found that using some painter’s tape while re-installng them kept us from scratching the newly applied finish (then just remove the tape when you’re done and it’s all good).
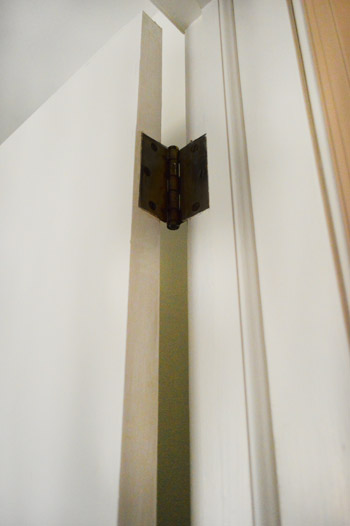
As for our door hinges, many of them already look ORBed (they’re old and darkened and not bright and shiny brass like the knobs were) or are painted over in white like the door from the previous owners, so we don’t have bright brass hinges clashing with the dark knobs or anything. But if you do you could probably switch them out for a few bucks per door. ORBed doorknobs are muuuch more expensive to buy than hinges or door plates, which is the good news (so I probably wouldn’t attempt to spray paint hinges like the doorknobs, since I’d worry all that grinding over time would make the paint peel and scrape off).
And as for the latch strike plates, a few of those already look ORBed like the hinges (just from darkening over time, which for some reason didn’t seem to happen to the shiiiiny brass knobs themselves) but a few were still brassy and bright, like this one:
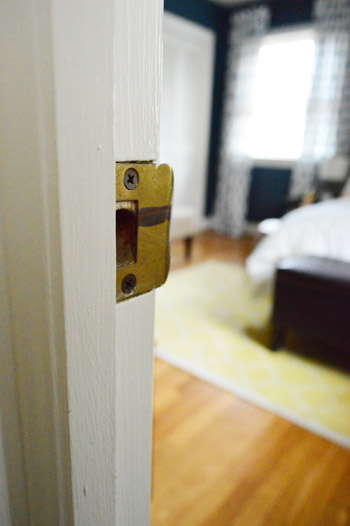
…so we picked four of them up from Home Depot for $5 total (they’re a whole lot cheaper than knobs!). Our reasoning for buying new ones to replace any super brassy ones that stood out instead of spray painting them ORB as well, was because the latch bangs against them a lot, so we thought they might scratch over time (whereas the knobs themselves don’t grind against anything else that’s metal, which must by why they hold up so well – even when they’re outside).
So there it is. A “dude get on that already” project that has been in the making for a long arse time. Feels pretty good to check that off! And just as I suspected, every single room/closet that we put them back on looked a little posher and less “ew, eighties brass”-ish than it did before. Hooray for small upgrades that make your whole house feel a little more crisp, new, and loved. What have you guys been checking off your to-do list? Does it involve paint? Sandpaper? A whole lotta procrastination beforehand?
Update – Wanna know where we got something in our house or what paint colors we used? Just click on this button:

*This post contains affiliate links to items we have purchased and love*

Anele @ Success Along the Weigh says
Those look awesome guys! I’m forwarding this on to my aunt b/c her fixtures are ORB in the kitchen and the rest of her fixtures are 80’s brass so this is right up her alley. (Though I know she won’t do it. She’ll say “hey, you in the mood for a project?”)
Lauren says
Okay this might be VERY weird and OCD, but I am going to ask. I’ve thought about doing this in my own home but worry that it might be bad to touch the spray painted surfaces over time (exposing your hands to the paint). Did you worry about this or am I just insane? I’m sure we touch lots of other painted surfaces all the time and don’t even think about it. It’s okay to tell me I am weird…
YoungHouseLove says
I totally think like that too, but I’ve learned that once spray paint is cured it’s just like touching anything else that has been factory sprayed, which is everything from parts of your car to other handles, knobs, metal stools, stepladders, etc – anything else that is sprayed metal or wood. So for example, if you bought the ORBed knobs that I linked to at Home Depot in this post, they have been sprayed in the same way – possibly with even more oil-based/strong paint). But when you touch fully cured paint it shouldn’t transfer into your system (obviously you don’t want to eat or inhale it or coat your body with it when it’s wet – but touching cured spray paint should be all good). Hope it helps!
xo
s
Jill says
I thought the same thing, Lauren! Thanks for calming the OCD, $herdog :-)
Brittany says
I orbed all of my hardware last year, and it is definitely worth the extra money to buy the latch strike plates! Paint definitely comes off! The only other place that paint starts to come off is the key hole. I guess when it is dark people miss the hole and it scratches the plates sometimes… but overall the best improvement you can make in a day or 2!!!! Thanks Sherry for introducing me to the ORB!
YoungHouseLove says
Wahoo! So glad you’re loving the ORB. And as for the strike plates, so good to hear that confirmed! I was tempted just to spray them but it was only a few bucks to get new ones so I went for it. Haha!
xo
s
Steph H says
When we first moved into our house we replaced a couple knobs as a start. Thinking about painting the rest…but as for the latch strike plate that came with our knob, I have the opposite opinion. The ORB has totally rubbed off and bright brass is showing through. Made me think I’d be better off to paint them myself. Of course it was a part of a knob kit. Maybe there’s a better option is you’re buying JUST the strike plate?
YoungHouseLove says
No way! That stinks! Anyone else have this issue! We’ll do an update in a while to see if the store bought ones scratch off for sure!
xo
s
Abby says
We painted one of ours too (as a test). And the latch strike place is the only place we’ve had any chipping. Good to know there are some at Home Depot. I was going to order them offline!
p.s. we’ve been doing ours one at a time. 2 down-7 left!
YoungHouseLove says
Wahoo, you can do it Abby!
xo
s
Lauren says
We have the same problem as Steph! I just checked them after your post, and sure enough, the paint has scraped off of the ORB plates we purchased.
Jen M. says
I ORBed all my hardware from that nasty brass a couple years ago too — first I actually considered doing the hinges myself, but didn’t want all my doors off their hinges while it dried, so I bought those (SO cheap and easy to install – worth the money!). I did spray the latch strikes though, and the first time someone closed a door with out turning the handle first, it scraped right off. I ran out and bought the ORB latch strikes after that, and most of them have been replaced in my house now. I can’t get the screws out of a couple (could the first time either, and just painted them right on the frame), they are stuck good. Any tips on getting those out without ruining the door frame? I literally shredded two screw drivers trying to twist them out, and the screws are just totally destroyed too (instead of the phillips head shape in the screws, now they are just hollowed out inverse cones… if that makes sense?). I got so annoyed, I just left them. But I LURVE my ORB hardware, seriously, I smile everytime I walk down my hallway, wish I would have done it sooner!
YoungHouseLove says
Ooh that’s really hard. Honestly I would try to pry them out with a crowbar or prybar or even use a flat-head screwdriver as a chisel in the hopes that with some wood putty and a new plate you’ll be as good as new once you get them off. Anyone else have better/more gentle ideas?
xo
s
CohoesMom5 says
For the stripped screws, we bought a small tool that you hammer into the screw (to make new lines) and then unscrew very slowly. It has worked for us.
I also ready a tip online to use a rubber band between the screw and the screwdriver and that the rubber band might fill in the hole just enough to grip the screw. I haven’t tried this but it might work.
YoungHouseLove says
Great tips!
xo
s
Jess @ Little House. Big Heart. says
Muuuch better! Such a great, inexpensive upgrade. Thankfully, the Little House has all glass door knobs, so painting/upgrading wasn’t necessary!
PS. Thanks to you guys we’ve discovered the wonders of liquid deglosser. That. Stuff. Rocks. So glad you turned us on to it!!
YoungHouseLove says
Glass door knobs = amazing! Oh yes, and so glad you’re loving deglosser!
xo
s
paintergal says
We have glass knobs on every door too. Love them!
sheila says
Yes!! Love it! I have same old brass knobs, and this will be sooo much better and cheaper than replacing them all. Maybe I’ll get on this now too! I’ve only been hating mine for almost six years now…
Laura says
I’m SO with you Sheila. We’ve lived here for 3 years and I ALWAYS look at them and wish they were different!
Katie says
ORBing is the best :) My husband keeps trying to remind me that the answer to everything I see in the store isn’t “we should buy that and spray paint it!”
Captain Micah says
My family has planned a few interventions with me and my spray painting…
YoungHouseLove says
Hahah!
xo
s
A.J. says
I had planned to either swap out or spraypaint all the brass doorknobs in our 50s ranch, too. And then an odd thing happened: I started to like them. (They’re old, so they’re not suuuper shiny, but still kinda shiny nonetheless. I blame (credit?) Emily Henderson. So I’m kinda glad I lived with them for a little while before spraypainting.
YoungHouseLove says
Oh yes, the older brass ones shaped like a circle I think are chic-er. The flat-domed 80s brass ones we have are way worse I think!
xo
s
Sally says
Me too! I’ve got a 50’s ranch and the knobs have grown on me.
I did switch out the 80’s cabinet pulls for ones that looked more retro.
Janelle says
Looks so good!
Callie says
It looks great you guys!! I really appreciate how you two have the patience to do all the steps carefully enough for an optimal result (like not rushing the number of coats or drying time)! I’ve just been learning the last couple years how important that is.
Also, I’ve had surprisingly good results spray painting some old hinges that I couldn’t stand but didn’t have money to upgrade! I’m so lazy I didn’t even take the hinges off the door. Haha. I documented it here: http://house-capades.blogspot.com/2012/03/what-normal-people-probably-dont-do-at.html
YoungHouseLove says
No way! That’s good to know!
xo
s
Andrea Ferree says
We have a pretty small house (1,200 sq/ft) so we just sprung for the 5 door knobs in that brushed nickle finish and we still haven’t put them up.. that was a few months ago. D’oh. Maybe we should “dude get on that” already.
YoungHouseLove says
That’s awesome! I bet they’ll look so new and crisp. I love that.
xo
s
Amy says
I’ve been ORB-ing all of my ugly brass – including the hinges. The hinges have held up great – you just have to be careful when re-installing the hinge pins that you don’t knock the paint off!
YoungHouseLove says
That’s awesome to hear!
xo
s
Melissa Shipman says
We painted our hinges, too! Here’s my post about our entire door adventures!
http://lovinghere.com/the-door-project/
April says
Great kick in the butt, ya’ll! I have been working on stenciling my bathroom walls, thanks to motivation from your book! My stencil is being a biznitch now that I’m close to the end, but MUST PERSEVERE. Can’t wait to use the link up to show off the results too!
Niki says
OMG. I was completely just thinking of this LAST NIGHT and I almost posted a random comment asking if you had ORBd the hinges, etc… Great timing. (they also look great)
YoungHouseLove says
Haha, so funny!
xo
s
Kristi says
I tried that with our brass hardware and we haven’t even lived here for a year and its all wearing off. Hope it works out for you!
YoungHouseLove says
Hmm, did you sand and degloss? That seemed to help our exterior stuff hold up (and we figure if that’s still going strong after being outside/in the elements than hopefully this stuff inside will too). We’ll definitely keep you guys posted and do an update!
xo
s
Ayisha says
I second Kristi. The Rustoleum Universal spray paint does well when it isn’t handled. I sprayed the trim on my cook-top satin nickel a little over a year ago and now it’s starting to fade. I did sand and degloss. I thought of doing it for all of my interior door knobs, hinges and strike plates but wanted to see how it held up. Given that the knobs would be handled so much, I’m a little reluctant.
YoungHouseLove says
Eeks, so sorry that happened!
xo,
s
Karly says
We sprayed the hinges on our kitchen cabinets when we redid them, and they have held up wonderfully! No scratching or scuffing. Love the power of spray paint, the new knobs look great!
YoungHouseLove says
That’s awesome!
xo
s
Jennifer A says
Same here on the latch plates! I only did one and it has scratched already. Now that I know they are so cheap I will go buy an ORB one!
Jen says
You guys should do a blog post (if you haven’t already) of what sandpaper to use when. I never know if I’m supposed to go fine or rough if I’m (for example) sanding for prep of painting, in between coats, to remove gloss, to remove actual finish, etc.
YoungHouseLove says
Generally if you are refinishing wood go with low grit and then high grit, but for metals you want a very high grit one so you don’t scratch things up! Same with walls (sanding with low grit and then high grit to smooth it seems to work best). Hope it helps! Basically high grit removes finish + gloss and low grit smooths things out so you don’t have scratches.
xo
s
Shanna says
I’ve been meaning to do this after your post about your front door’s hardware, but I’ve been procrastinating too. Now you’ve motivated me again. :) And your “like you’d mist your mane with Aqua-Net” comment cracked me up!
J+H @ Beyond The Stoop says
looks amazing! i didn’t even know they made a spray paint to look like oil-rubbed bronze!? learn something new everyday!
we recently tackled adding shelves to our pantry-that-used-to-be-a-bedroom-closet. our brownstone is ANCIENT, and our kitchen used to be a bedroom (that’s why our water heater sits out in the middle of everything in the kitchen, yuck), so there was a bar across for clothes and hooks in the back (because before everyone uses a bar in the closet, they used hooks! those hooks must be 100 years old!!) so we took out the bar and installed shelves on either side for food storage (since we also have no cabinets, only open shelving that we installed ourselves)
did i mention we have a RENTAL!? that’s what you do, i suppose, when you pay half the market rent, you live in a crappy place and fix it yourself!
YoungHouseLove says
I love that! Showing the rental some love = awesome.
xo
s
Meredith says
My old apartment had a crumbling tile border, and my mom helped me pick out replacement tiles and replace the broken ones. It made me so happy! I think it was a $25 fix, but totally worth it for the 2 years I lived there.
Kathie G says
Wow, looks great!
I replaced all my hinges to with real brass that accept screwed in finials on the top and bottom of the hinge. The finials I picked are little brass pineapples. Soooo expensive but those pineapples make my heart skip.
My doorknobs are all glass and when I replaced them I had to redo all the locksets because the new version was a bigger than the original inset door locks.
Procrastinating on the last detail; the little plate thingy that goes between the knob and the door. My ol’ house is sucking my checking account dry.
YoungHouseLove says
That sounds so sweet!
xo
s
Amy @ drivethirtythree says
NICE!! I actually did this over the summer too.
http://drivethirtythree.blogspot.com/2012/08/ive-officially-been-orbd.html
Made the mistake of spray painting the strike plates and they are all scratched up..so good to hear those are nice and cheap..and still need to get hinges, but just having the knobs done makes SUCH a great difference. Hooray for ORB!!!
YoungHouseLove says
Haha! Three cheers for ORB!
xo
s
Emily says
Looks great!! Are your interior doors all solid wood, or are they hollow-core??
YoungHouseLove says
They’re all hollow core except for our bedroom door (that was added when they put on an addition in the 70s so we think that’s why it’s different). I’d love solid doors someday!
xo
s
Stacey T says
This is great! We are in the middle of updating our circa 1983 condo, which came complete with all original brass hardware. Now I know exactly what to ORB and what to not waste my time on. Especially since we have only 5 interior doors to update hardware on. Thanks for a great tutorial. Can’t wait to finish bringing our place into the 21st century before we list it to sell in 2014!
Anne @ Planting Sequoias says
This looks awesome! A perfect example of how an easy update can make a big difference. I’m going to mention this one to my parents as an easy update! By the way, for our Christmas gift for my parents this year, we’re making over their bedroom which has been long overdue! So excited to begin! And yes, we’ll definitely reference several YHL tutorials. :)
YoungHouseLove says
Aw, good luck Anne!
xo
s
Kristina says
**Cowbell** I’m dancing around like Will Farell right now. We’re ramping up to repaint the kitchen and finish the painting in our hallway (it’s been half done for 4 years!)
YoungHouseLove says
Hahaha, thanks Kristina! And good luck with the kitchen and the hallway!
xo
s
Emily says
I’m glad you brought up NOT painting the hinges. Our interior doors came with brass hinges when we built our house and I got to pick out the knobs (which I purchased in a satin nickel finish). The clashing is so annoying, although I’m pretty sure no one in my house notices it but me! I’d debated spray painting the hinges, but thought the same thing you did about the possibility of the paint grinding off with multiple open-and-closes over time. I know you can buy lots of hinges at the contractor’s price at most home improvements stores – but I have to admit the thought of removing three hinges from each door is a little intimidating and sounds terribly time consuming. Now that I see how great yours look now that they all match, I just might have to ‘get on that’!! :)
Pam says
Emily,
Try to replace the hinges one at a time. It’s much easier than removing and having to re-hang the door. And it’s quicker than you think!
Vanessa says
This post sparked a few bulbs in my head.
I wonder if this would work with cabinet pulls too. :) Those things are so high and the existing ones we have are pretty except they are worn out brass.
YoungHouseLove says
Oh yes, I’ve seen people do that! I would just be sure to sand and degloss them since the oils they might have on them from being in a kitchen could make the spray paint come off if they’re not stripped of it first!
xo
s
Emma (Broke Ass Home) says
What a difference! A a budget saver. I personally give you ten points for this one. My Dude Get on That was I finally finished converting a vintage TV into a dog bed for Teagan. http://www.brokeasshome.com/2012/12/a-fancy-bed-for-little-lady.html
I feel like it took me way longer than it should have since once I just did it it hardly took any time at all.
YoungHouseLove says
Isn’t that always how it is? Something you put off for so long ends up being so simple you wish you tackled it sooner?! But at least that’s better than thinking something will be fast and easy and hitting ten snags (that happens too! haha!).
xo
s
Ginny@ Goofy Monkeys says
Looks great! I have finally decided to replace all ours knobs with satin nickel and the ones that are done look so much better than the old beat up brass or the new bright & shiny brass.
It’s definitely expensive though – so we do 2 at a time.
YoungHouseLove says
Smart to do two at a time so it’s not one big expense at once!
xo
s
Rebecca W. says
I’ve been wanting to do this since you did your first few. Haven’t convinved the husband on it yet. We were looking to sell our townhouse but looks like we’ll be sticking around so I might push more for it now since we want to finish the basement and will be buying brand new part for that project. Glad to hear that the hinges and plates are much cheaper.
Kate says
Awesome! Makes a huge difference, doesn’t it?! When we moved into our house we replaced all of our interior doors and knobs, and the impact it had was huge.
We just finished adding crown molding and wainscoting to our entry and long hallway! It was pretty much the opposite of your project – we didn’t think it would be that bad but it took two months. It was awful and tedious work. But it’s done and we love it!
YoungHouseLove says
Ooh but it sounds so awesome! Congrats Kate!
xo
s
Jessica says
We need a “down the hallway” shot to see a few knobs in a row! : )
Been thinking about spray painting our knobs, but I might just spring for the ORBed ones in the store. Already too cold in NY for spray painting and my brass knobs need to go!
YoungHouseLove says
How did we miss that down the hall shot. Soon!
xo
s
Beth Jackson says
Have done many of our doorknobs and fixtures. What do you think about glass knobs? Like, not the prism itself, but the plates behind the knob? And the skeleton keyhole? All the knobs on the second floor of our house are glass. Love the charm, but some have been painted over to match the doors, and some are just old and nasty. We’ve looked at replacing with similar but they are so expensive. Didn’t see any glass knobs in your pics. Any thoughts?
YoungHouseLove says
Hmm, if they’re nasty and painted over I don’t think it could hurt! I would google around to see if you can find a way to strip the old paint off them first (some folks mentioned something about a crock pot soak, which sounded kind of genius!) and then see if you would like to tape off the glass part and carefully coat the back plate with some fresh ORB if it’s still looked marked up!
xo
s
Rebecca says
Crock pot method found: http://www.thisoldhouse.com/toh/how-to/intro/0,,20055784,00.html
Kim says
Read Daniel at Manhattan Nest! He did it here and the result is ahMAZEing. :) http://manhattan-nest.com/2011/11/03/black-doors/
YoungHouseLove says
LOVE THAT!
xo
s
Monika says
We did this as well on (most) doors in our house! Our hinges and strike plates were also shiny gold, so I spray painted them as well. It’s been a year since I’ve done it. The verdict? The hinges hold up real well (they are well oiled and do not rub), like you predicted the strike plates scratched immediately, and the doorknobs are hit or miss. Some have chipping/peeling ORB paint and I’ve re-coated them already once. My feeling is that for doors where the handles are used A LOT (like our pantry door and garage door is opened at least 100 times a day), replacing them should be a way to go. But for bedroom doors that get locked once a day tops, the paint hasn’t chipped off at all. I might just put a third coating on the puppies to save $$$. Even with chipping ORB on some of the doorknobs, it’s well worth is for $8 total!
YoungHouseLove says
So good to know! We plan to do an update with photos on ours in a while (just like we did with the exterior ones). Here’s hoping they hold! I do think sanding and deglossing seem to help a lot too, so to anyone about to try it, don’t skip those steps and try to apply paint as thinly and evenly as possible!
xo
s
meganleiann says
I’ve been procrastinating on this waiting for your tutorial! I figured you would come up with something I’d miss. :)
Did you spray the little latch part itself? Are you worried about that part rubbing off?
YoungHouseLove says
We actually just did the knobs, so that latch part was already that dark color. It’s so odd how some of the strike plates and latch parts darkened over time while the knobs stayed so brightly brass!
xo
s
Lindsay says
So glad your knockers are still looking good! Sorry, I couldn’t resist.
We recently switched out all of our interior handles. I was going to try the spraypaint method, but they were so badly dented from the previous owner.
YoungHouseLove says
Oh yes, I take pride in my knockers.
xo
s
Sydney says
Love it! Funny story- when choosing paint for our house four years ago, I chose the main color of our interior from your blog- it was Water Chestnut. We have an open living area and vaulted ceilings and I’m sorry to say I hated the color! It was nearly impossible to see against our trim- 2 years later we painted all our trim and doors white (it took years before I realized they weren’t white and the problem wasn’t the wall color. woops!) and BAM – we got to see the beauty of Water Chestnut! But what really made a difference was replacing every door knob and hinge from the hideous 80’s gold to ORB. It’s by far one of the biggest transformations we have made in the house. Our only mistake was reversing the lock portion of the door to one of our guest rooms so it locks from the outside. Now it’s our daughter’s room and our friends always joke we did it on purpose. Maybe we will keep it like that, then she can’t lock herself in :)
YoungHouseLove says
Hahaha, that’s pretty funny!
xo
s
Annika says
I did this a couple of years ago too, but got lucky and could by all the ORB handles for about $2 ( will never be that lucky again!!:) But I ended up spraypainting the hinges and they have held up great. I bought one set (3) new and then just switched out one by one, so that I never had to remove the door. So I basically did one door at a time, witch took a couple of days but it wa soo totally worth it! What a difference it makes!
YoungHouseLove says
Good to know about the hinges guys! Who knew?!
xo
s
Paula says
Fascinating – I would love to paint our hinges – I loooove the idea of buying one set and switching them out one by one – taking all the doors off their hinges to paint/switch them stresses me out!!
Stefanie says
We ended up buying new ORB knobs with handles because we thought it made our home look more improved since it’s a starter home with many other “starter home finishes.” Then we craigslisted our nickel-finished hardware for the same price we paid for the new hardware at Home Depot. Just like we had even exchanged it!
YoungHouseLove says
That’s amazing!!! So smart.
xo
s
Andrea says
This is timely – I bought ORB last month and haven’t summoned the energy to go for it (definitely a “dude get on that already” for me!), so this is inspiration! And yes, I also refer to it as ORBing… you have created a new word!
YoungHouseLove says
Hah! Someone call Websters! Urban Dictionary? Maybe not…
xo
s
Chris says
I am totally doing this in the spring (live in Michigan). I have some knobs that are brass on one side and silver on the other side of the door. Didn’t know that was part of builder grade! :)
YoungHouseLove says
Me too! Must have been done in the 60’s too! Haha!
xo
s
Anne says
And now I have that song in my head. It’s always on XM 90’s on 9.
I think we’re going to try painting this weekend! It’ll be our first fun project since closing on our house a month ago.
Heather W says
Sherry, I couldn’t tell in the post but did you also spray paint the screws for the door knobs or buy new? Also where did you buy your deglosser? Thanks! They look great!
YoungHouseLove says
If you look in the spraying pics, we put the screws into the holes they would be used in and then sprayed the knobs with the screws in place! Worked like a charm! Oh and deglosser is from Home Depot. Hope it helps!
xo
s
Heather W says
Thanks! Oops didn’t notice those little buggers….
YoungHouseLove says
Sure, no worries!
xo
s
Shelley @ Calypso in the Country says
They look great! How long did it take for the smell to go away? I always feel like I smell paint forever when I spray paint something! Thanks!
YoungHouseLove says
If spray paint is fully cured it shouldn’t smell anymore, so the secret is super thin misty coats (they dry so much faster than thick goey ones) and giving it about 48 hours to totally cure up so it’s hard like a car finish.
xo
s
Kim says
Looks great! Such a small change with big impact :) Do you ever wonder if 20 years from now we’ll all be thinking “Ugh, that ORB stuff is SO outdated!”
YoungHouseLove says
Haha, it totally could happen! Although I tend to think the less neutral things will be dated before anything that’s almost black (it’s such a timeless color in design). For example, I think chrome or gold might be “of a certain era” someday (aka: dated to some people) while anything white or black might fit right in. Who really knows though!
xo,
s
LisaOK says
Love this! Have been thinking about doing the same thing at our house–now I have the courage to try. I noticed you have simple, flat doors (at least in the bathroom). Have you thought about upgrading them with some trim or anything? We have the same doors and I’m dying to gussy them up a bit.
YoungHouseLove says
I think if we upgraded we’d actually find secondhand doors with paneled fronts (our bedroom one is like that and we love that!). Maybe someday!
xo
s
Caroline says
We had a big dude-get-on-that-already moment this weekend. After living in our house for almost three years, we finally replaced an atrocious old storm door on the back patio and the cheapo, hollow, totally uninsulated door leading from the house into the garage. Both of their replacements are b-e-a-yootiful and better at their respective jobs! And we thought: why did it take us three years to do this?? Hooray for progress!
YoungHouseLove says
Yay progress!
xo
s
Tracie@MiddleClassMod says
It really is the little things that helps make a house come together! That’s such a great upgrade. Now I just have to work up my courage to attack my own, which I can’t remove from the doors.
Lucy says
This is motivating me to figure out how to get the paint off all our door hardware. We have the old glass doorknobs (1920s house), and, while the knobs themselves are fine, the plates and hinges have been painted over regularly for 90 years… Seems you can use a pan of hot/boiling water – better head to Goodwill to pick up a disposable one, since 90 years and multiple layers of paint also means lead…
YoungHouseLove says
Great tip!
xo
s
Eileen says
Looks great guys! We’re moving into a new house this weekend with brass knobs and I’m thinking of doing the same thing once we get settled.
My one big question though is whether the spray affect the side of the knob with the lock on it. Do the locks still turn after they’ve been sprayed?
Absolutely loving your book! I already have so many pages bookmarked with projects I want to try in our new place. Still riding the high of getting to meet you guys at the signing in NJ! Good luck on your upcoming book tour trips!
YoungHouseLove says
Oh yes, the spray is a very thin coat if you’re misting it! It won’t gum up a lock or effect how the door functions/turns at all! Just be sure not to gum it on! Thin and even, baby!
And so glad you’re loving our book. Yay! And it was awesome to meet you in NJ!
xo
s
Anika says
Such a dramatic change – I need to get on this too. It’s such a worth-while difference and much cheaper than buying all new ones.
Sherry, I’m so glad you answered this question; I was also wondering about protecting the key hole so you put my mind at easy. Thanks!