It’s Wednesday the 14th… so it’s time to share this season’s (completely unofficial) Pinterest Challenge (not sponsored by Pinterest or anyone else, just dreamed up by Katie to make us stop pinning and start doing).

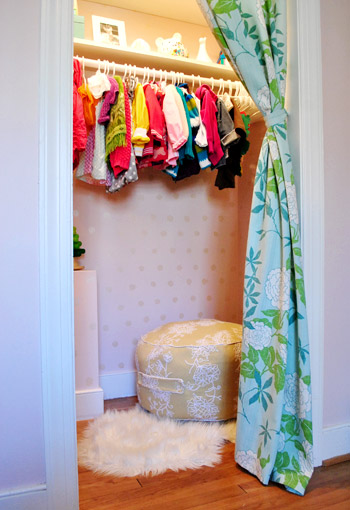
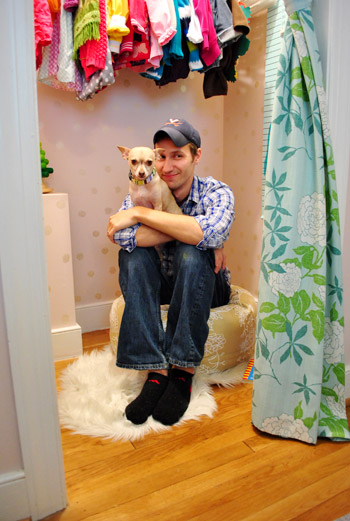
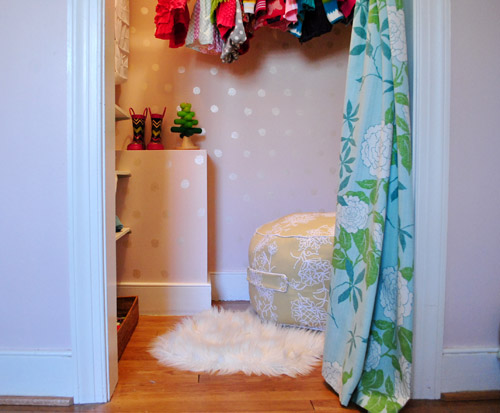
I actually tackled a homemade beanbag for Clara’s closet, which I mentioned last Wednesday when Katie, Erin, and Cassie and I issued our little get-off-our-bums-and-make-something challenge.
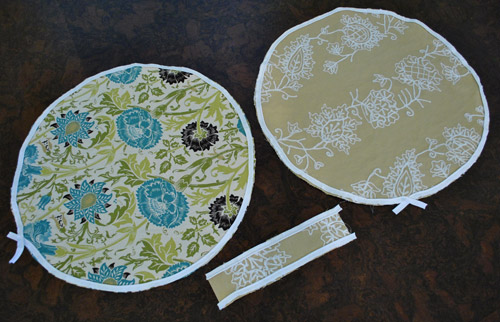
As are the rules, I took inspiration (or Pintspiration, har-har) from the projects below and then I did my own spin. Which added up to this comfy little bean-bag…
… for the bean to plop down on…
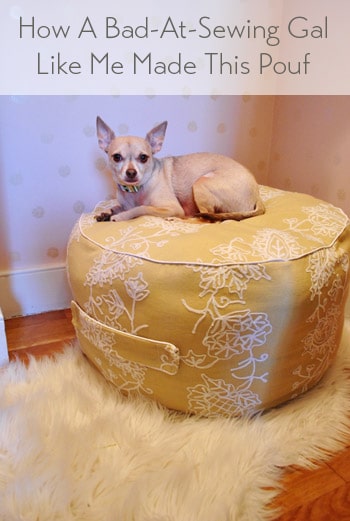
… or the pooch to hang out on…
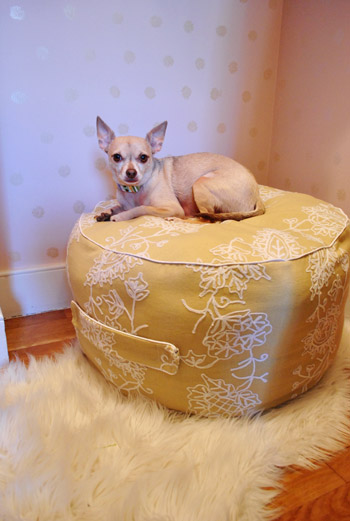
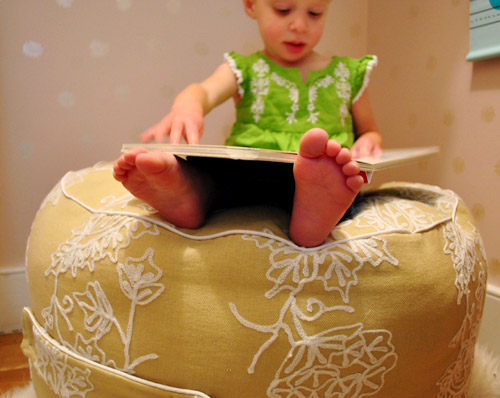
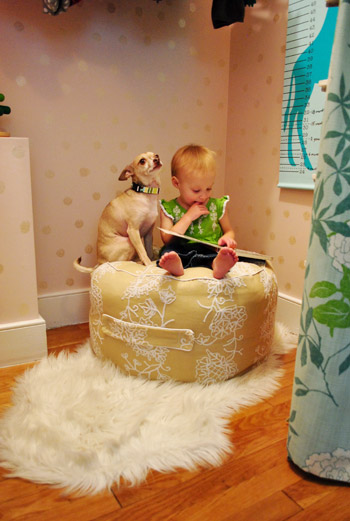
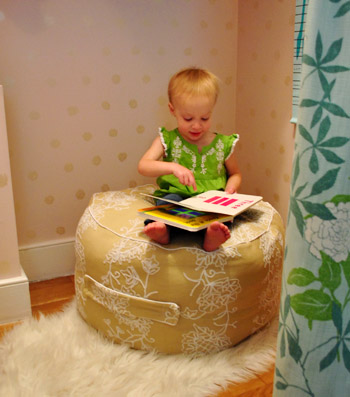
… or for a toddler reading to a chihuahua…
… or a tired momma or daddy (it works for that too).
And after declaring my goal, two kind commenters shared a link to this blog, which had an awesome tutorial that I decided to go with.
It was clear, concise, and pretty darn easy to follow, even for a novice like me, so I can’t say enough about how much it came in handy! Oh my gosh, and I actually mastered piping. This is big guys. So big I actually had to call my mom and tell her. Big sewing strides going on in our house. Haha.
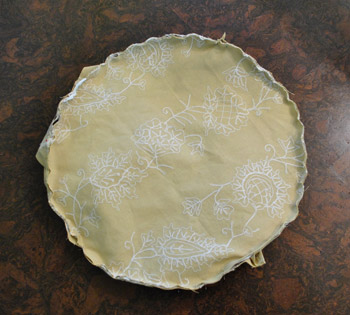
My method? I just crossed my fingers, tried to follow the instructions, and did my own riff when it came to size (I wanted something a bit bigger than 17″ wide, so I made my pattern 22″ wide (by just sizing up the instructions that were over here). But seriously, a seamstress I am not. So all you fancy sewing folk try to hold your giggles as you read about the most-likely-not-proper ways that I cobbled this thing together. The result is comfy, looks good, and gets two toddler thumbs up, so I’m thrilled! And it made all of that sewing machine wrestling (more on my tumultuous relationship with my sewing machine here) worth it. And now, more pics:

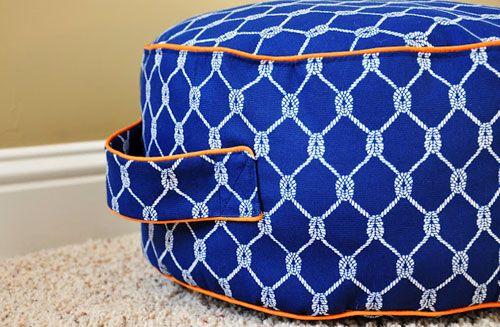
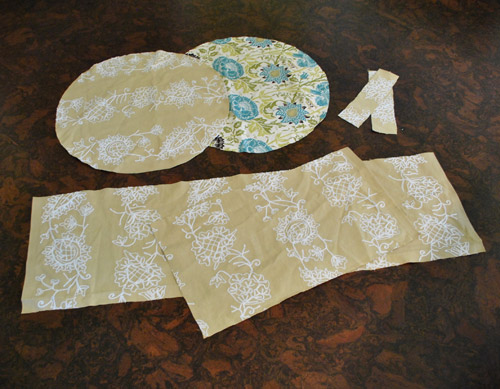
And here’s how I made it (there are much clearer explanations and pics over on this blog, where she clearly knows gobs more about sewing than I do!). First I cut out two 22″ circles, two tabs to make the handle, and fabric to make the rectangular-wrap-around part (all measurements/pattern details are on this blog). I used leftover fabric that I had from a book project actually (wahoo, secret sneak peek!) but only had a yard so I was just shy of having enough to make the last circle so for the base I just used other fabric I had on hand (both are from a local fabric store called U-Fab but I don’t know the fabric name/model since it’s an outlet – so sorry!).
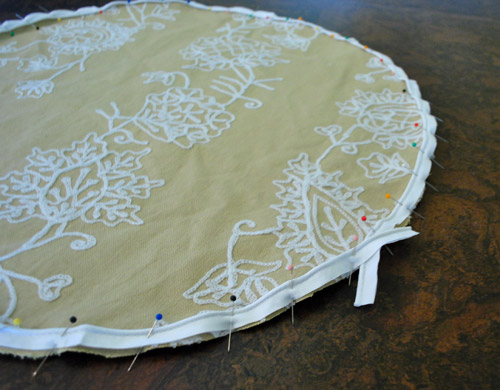
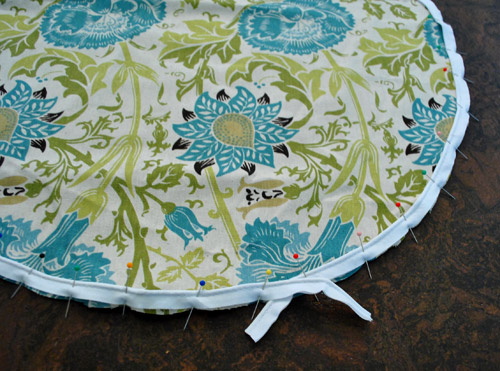
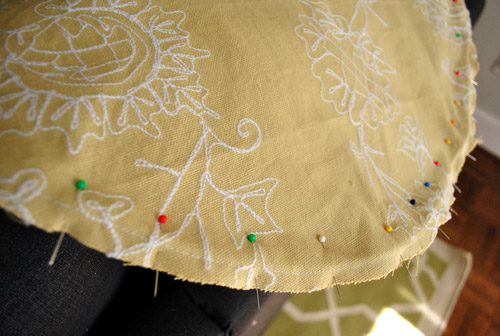
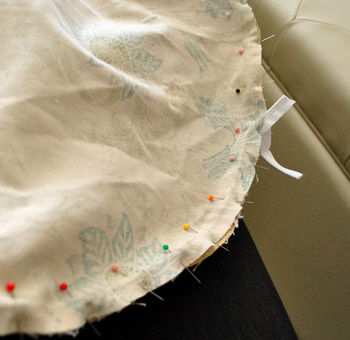
Then I pinned my piping around the perimeter of the fabric (piping side in, with the end lining up exactly with the perimeter of the fabric, print side up).
And I left the ends like this as directed in the tutorial. I also did the same thing for the other circle of fabric…
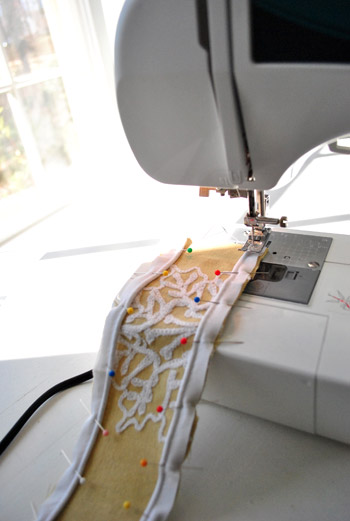
… and used piping on either side of one of my fabric tabs to make the handle.
Then I stitched them all on the sewing machine, being sure to follow the stitching in the piping with my needle. I thought it would be hard to stay right on top of that line of thread, but it was actually really simple and I got into this zen-like rhythm with it. So there’s hope for non-sewers out there (I would have laughed if you told me last week that I’d describe any sewing step as zen-like).
Then I did the exact same thing with the other circle…
… and also ran a little stitching along the piping on each side of the handle.
Then I had these:
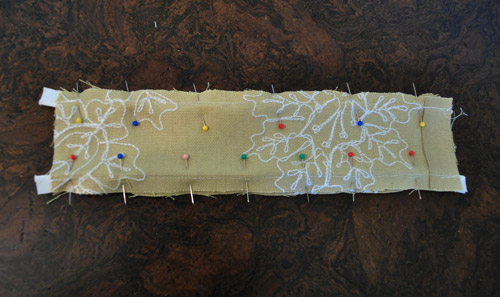
Next I pinned the other side of the handle to the first side (print side in) and stitched along the thread on the other side that I had stitched when I followed along the piping.
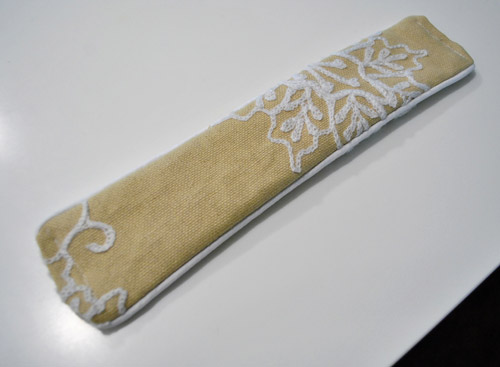
Then I turned it inside out, which is where I got to see my purrrty purrrty piping. I know it’s just a handle, but at this point I ran outside to show John. Seriously, I was proud with a capital P. Then the sewing gods brought me back down to earth.
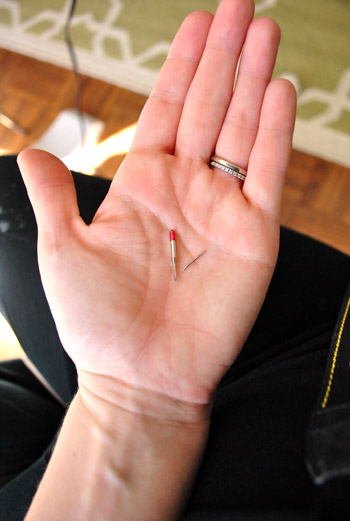
While sewing the ends closed (just tucking them under and running them through the machine to get a line of thread to hold the handle closed) I broke a needle. Bam! And it was scary and frustrating and all that jazz. But I got back on the veritable horse. Thank goodness my sewing machine came with some extra needles so I just popped one back in there and was off to the races again.
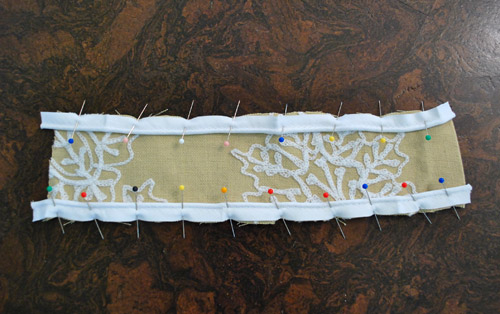
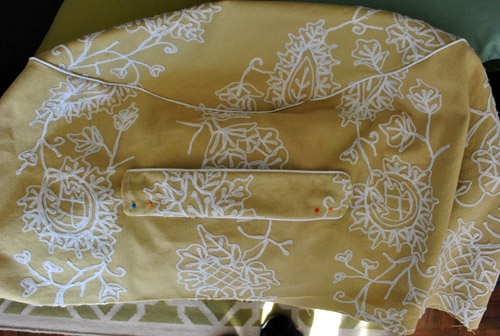
Next was pinning the circle to the long rectangular piece of fabric that wrapped around the entire perimeter (print side down).
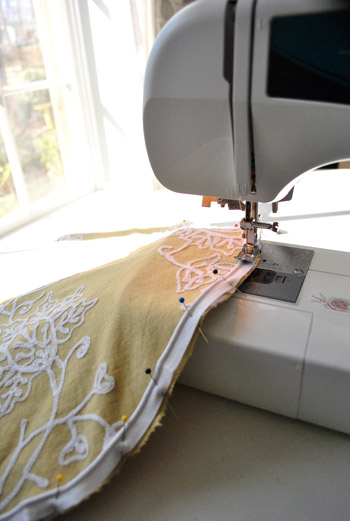
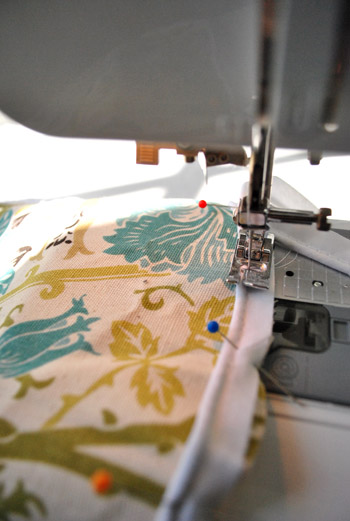
Then I ran that through the sewing machine, again following the line of thread that I made when I sewed the piping on. See that subtle line of white thread around the perimeter below? I just stitched right over that.
And then turned things rightside out, to see this beautiful sight. Wahoo! A partially piped beanbag! Then I pinned my handle in place and stitched that into place by making a box with an X in the middle of it (there are great pics of this on the site with the tutorial that I linked to ten million times above).
Then I turned it back inside out and pinned the other circle to the bottom of the rectangular piece of fabric that creates the middle part of the beanbag and stitched along the piping thread line again.
Except I didn’t seal the whole circle because I needed to turn the whole thing rightside out again…
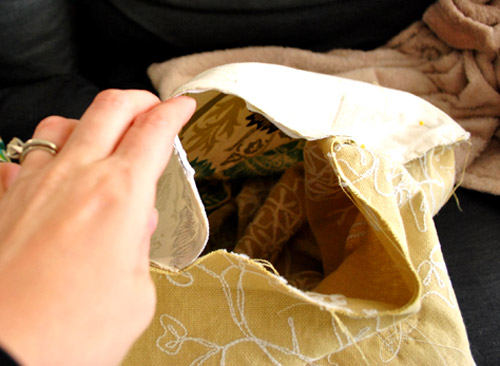
… and stuff it with batting (I used four old pillows we had stashed in the linen closet that were well past their prime for the guest room but perfect for being recycled as beanbag innards).
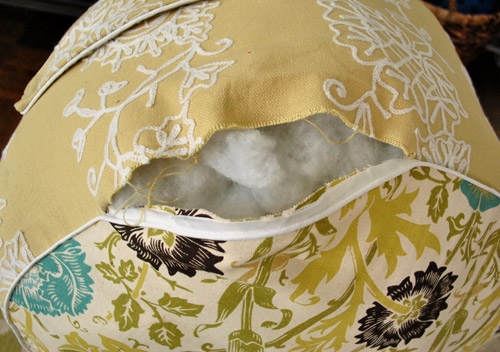
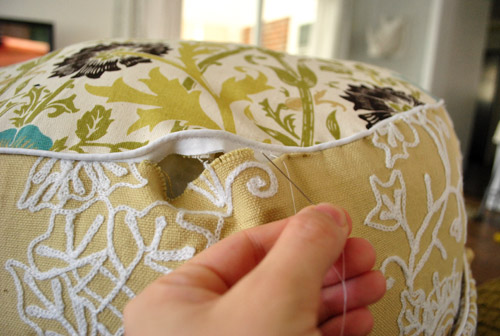
Then I hand stitched it shut. I gotta admit that I purchased a zipper in the hopes of adding that (so I can unzip it and remove the batting to wash the cover) so I hope to “upgrade” my little beanbag someday. But in the meantime, I can always use a seam-ripper to open the hand-stitched part and just resew that up after I run it through the wash (sewing this five inch part shut took about four minutes total).
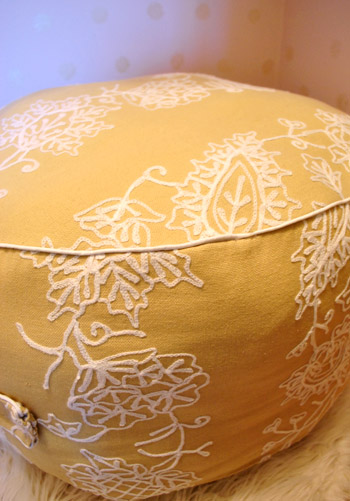
And now for the craziest thing of all. See how the pattern on the top of the beanbag sort of curls over the top and drips down the side since it all lines up?
Um, yeah, that was an accident. The fabric was inside out at that point, so I randomly pinned it and stitched it and turned it rightside out later and said “holy cow, that was the best accident ever.” John even noticed it and sweetly complimented me on my “attention to detail” later, to which I sheepishly responded “total accident, dude – the fabric was inside out and I didn’t even notice- I just randomly pinned it and sewed it up.” How crazy is that? Must be beginners sewing luck.
So that’s how it all went down. Of course for the tenth time, this tutorial is waaaay better than mine, so be sure to check it out if you have any questions! Now for the money stuff – here’s the budget breakdown (thanks to a bunch of 50% off coupons at JoAnn):
- $0 for one yard of leftover fabric (originally from U-Fab here in Richmond)
- $2.38 for two 25 yard packs of white piping (from JoAnn thanks to coupons)
- $1.19 for a zipper that I vow to someday add (from JoAnn, again thanks to coupons)
- $1.50 for white thread (from JoAnn)
- Total: $5.07
Oh and don’t forget to check in on Katie, Erin, and Cassie to see what amaaaaazing projects they whipped up (they’ll be sharing theirs sometime today as well)!

And now here’s the part where we invite you to share all of the fun Pinterest Challenge projects that you guys have tackled in the last week (right along with us, well at least virtually with us). If you’ve already blogged about it, just:
- click on the blue “Add Your Link” button with the odd cartoon head at the bottom of this post (you might have to do some scrolling, depending how many projects are added)
- add a link to your specific blog post about your project in the url field (not your home page)
- where it says “name” write a descriptive name for your project (ex: “Homemade Beanbag”) as opposed to your actual name
- we’d also love if you could quickly link back over to our project posts within your own (here’s Katie’s, Cassie’s, Erin’s, and ours) – it’s also nice to link to your inspiration project on Pinterest as well as to directly link to the original project/site, just so they get some love too.
And if you’d rather just link over to your project in the comment section, feel free to do that – or even add a link to a free photo sharing site like Flickr with your pics if you don’t have a blog (remember to set the gallery to public so we can all see it). We can’t wait to see what you’ve been up to! Freaky-deek-excited doesn’t even begin to describe it.

Tessa says
SO IMPRESSED. And envious of your “beginners sewing luck.” I was just pondering with a co-worker about what could I do with my too-many, old pillows, since I probably couldn’t donate them anywhere…
Nicole says
Nicely done!! Is that photo of Clara reading to Burger an actual photo with the two of them sitting so nicely together? Or was it photoshopped?! Too cute :)
YoungHouseLove says
That was a real shot! They love each other.
xo,
s
Lauren Tal says
It looks so cute! I want one ME sized. And, stupid question, where are the beans? Did you buy the foam ones or is it all pillow? Is it a bean bag sans beans?
YoungHouseLove says
I just stuffed it with four old pillows I had – so my beanbag is bean-less! Haha.
xo,
s
Meg says
That’s what I was thinking! I noticed a lot of people referring to it as a poof, but, personally, I’d call it a tuffit. Little Miss Clara sat on a tuffit….oops! Doesn’t rhyme.
Brandi says
It looks amazing!!! I think I’m going to have to try this for my boy… his room could use a sweet little reading nook :)
Ruth says
Oh no to the broken needle! That makes your adrenaline surge so high when you are sewing along and then BAM! Since you will probably be sewing a lot of upholstery weight stuff, next time you are at Joann’s or wherever you should pick up heavier needles… look for a universal needle in size 14 or 16. That will be harder to break when you try to sew through a few layers of the thick stuff. No worries about getting the “right” needle for your machine – actually all needles fit any machine (that was my fret in the beginning – getting the wrong one).
I love how your bean bag turned out! That fabric is super pretty and makes me even more excited for your book to come out. :)
YoungHouseLove says
Thanks for the tip Ruth!
xo,
s
Becky @ DIY Newbies says
That is amazing! I’m excited to look through all of these!
Gena says
I love it!!! Also, I can’t get enough of your doggie pics as I have a Chihuahua too. This tutorial has me thinking lower, wider doggie size pouf.
Suzanne says
Not sure if you knew that someone entered you in a competition. Come on everyone, vote for Sherry, she’s currently in 74th place and deserves to be much higher. Voting ends at 4:00 PST today.
http://www.circleofmoms.com/top25/Top-25-Creative-Moms-2012-2012?trk=t25_Top-25-Creative-Moms-2012-2012#_
YoungHouseLove says
Aw thanks Suzanne! Didn’t even know!
xo,
s
Caitlin @ Desert Domicile says
WOW! The Bean’s beanbag turned out so great! It looks so much nicer that the ones you’d find in the stores and I love how well your happy accident turned out :)
Sheila @SZInteriors says
Wow, you made that project look easy! And I was having a moment with my own machine just sewing wax paper circles, go figure!!! Love how Clara is right at home on it already :-)
Lisa Ornelas says
Adorable!!!! Love the piping! I just made the Amy Butler “Gumdrop” pouf for my sons nursery. It makes a great addition to his room as well. :)
Where do you guys get your sheepskin rugs? I want to put one in front of my sons crib. The RENS from Ikea seems so small.
Thanks!
YoungHouseLove says
We get the faux sheepskin ones from Ikea (they seem to be bigger- and are machine washable!).
xo,
s
Isabel says
wow, that´s amazing! kudos to you!
Melora says
Wow :)! Really love it! Thanks for posting such fun stuff. Your blog is addicting :)…
Lou says
Hey! I just did my first ever piping too! I just re-upholstered my sofa, and I even made the piping so that it would match my cushion fabric. Although I will admit my sewing machine, Kenny(he’s a Kenmore and older than I am), and I haven’t had as tumultuous a relationship as you and Oh Brother. One thing though- Someone else may have mentioned this but before you someday pop that into the wash, maybe hem or temporarily tape the loose edges that will be revealed by the seam ripper… Otherwise they might come partially unraveled in the machine and it just wouldn’t look as fabulous as it does now. Great job!
Stephanie H. says
Bravo, Sherry! You’ve come a long way from safety pinning pillow covers together ;) I hope this encourages you to try more things. A good place to start is this book: http://www.amazon.com/Amy-Butlers-In-Stitches-Projects/dp/0811851591/ref=sr_1_4?ie=UTF8&qid=1331745664&sr=8-4. Work your way through it to learn new skills AND make awesome stuff for your home.
YoungHouseLove says
Thanks for the link Stephanie!
xo,
s
JessE @ LoveLifeFromScratch says
Love the idea of using old pillow stuffing for this! I haven’t bought new pillows because I can’t stand the thought of throwing the current ones away… guess it is time to make a pillow chair!
Lesley says
Well color me impressed! I didn’t even know piping was bought that way. Good job!
Michelle says
Wow! It looks fabulous! I love the fabrics you chose! Kudos to you for attempting this project. I have a similar relationship with my sewing machine, and as soon as it was mentioned that I’d have to sew circles and piping, forget about it. You’ve inspired me to be a little more daring and give it a try! Now i just have to un-bury my machine and dust it off!
Amy says
I love this! My son has a closet that is similar to Clara’s, and this has totally inspired me to get my bum in gear & make him a pillow/revamp his closet as well! Love it!!
Amy @ The Button Casa says
I don’t sew all that much…if find it slightly frustrating (breaking needles, thread jamming up, etc.) but this might get me back on the sewing machine. I love it!
Morgan says
I love the ottoman idea! My guy and I are looking for one and this is definitely an affordable alternative! Now if we can only figure out a way to make it storage-compatible…hmmmm
Bree says
LOVE this! What an awesome project! I’m going to have to track down some fabric and stuffing and give it a whirl.
Quick note, I hate broken needles too! My mom (expert in all things sewing/quilting) gave me a couple tips when I started out: make sure you’re not pulling/pushing your fabric, make sure you remove the fabric pins rather than sewing over the top of them (I try not to, but I’m guilty of this one), and make sure to put in a new needle every project (they get dull over time and eventually “bounce” off of fabric and are more prone to breaking).
Just figured I’d share because that’s the worst IMHO when you’re really going all out on a sewing project. You’ve done some really awesome sewing projects, thanks for sharing!
YoungHouseLove says
Thanks for the tips Bree! I always take pins out as I sew (no sewing over them) but don’t always replace my needle and must have been pulling way too hard on the fabric, which I think is what made it snap and scare the heck outta me! Haha.
xo,
s
Jackie says
So awesome! I love that you can flip it over for some contrasting fabric. I don’t think you can call yourself a beginner anymore…piping and covers are tough and you made it look easy! Thanks for sharing!
Emily says
Nice work on the bean bag! It’s looks so “finished” with the piping. I’ve never done piping, was it pretty straight forward?
YoungHouseLove says
Oh yes, I just followed the tutorial to the letter and it wasn’t too bad!
xo,
s
Lauren says
Beautiful! Your beanbag is a wonderful craft, as the premade beanbags that are sold in catalogs, etc., are so expensive!
Brandy says
I was browsing the Missoni Home sale over at Joss & Main and noticed a pouf that looked really similiar to the one you made Clara!
https://www.jossandmain.com/Missoni-Home-Lakoan-Pouf~MSH2713~E703.html
Except I think yours is much cuter! And with over a $300 savings! Awesome!
YoungHouseLove says
Fun! I love that one too!
xo,
s
Jyl says
Oh Shery, ::wipes eyes:: you’re turning into quite the seamstress, aren’t you? I’m so proud.
I can’t wait ’til Halloween rolls around one year and you decide to tackle something special for the Bean! You will get the bug, I promise!
Way to go taking on a project that scared you a little and coming out victorious! Super cute Bean bag!
Paula K says
Looks great!! Quick pinning tip in you’re interested — if you put the pins in with the top facing the edge (instead of the sharp point facing the raw edge) then you can pull them out easily with your right hand as you sew along and you tend not to jab yourself as much.
YoungHouseLove says
Thanks for the tip Paula!
xo,
s
laxsupermom says
Wow! Great job on the pouf! You officially need to stop calling yourself an amateur. It looks incredible! I’ve sent myself into tears before trying to line up a pattern like that. Accident or not, you rock! Thanks for sharing.
Missy G. says
I’m on inspiration overload from all these links!!!!
There goes my workday…. darn you, Sherry and Katie!
Nick says
Thanks for doing this guys!
So great of you to support the little guys in the blogosphere…..
There’s definitely a reason why everybody loves YHL
Katherine Victoria says
Clara’s such a lucky girl! She and Burger look so cute on their new perch – great work Sherry (and I love the fabric choice).
Diana says
The first thing I noticed about your beanbag was how the pattern lined up so professionally from the top to the sides! I was very impressed…but what was even better was your sweet admission that it was beginner’s luck! Beautiful job! I could see this beanbag for sale in an upscale store!
Georgia says
Holy cow that’s alot of links. i will have to go through them all at some point. But for now I had to say that I love you bean bag (ie bag for the bean, as there aint no beans inside that thing), and woo hoo, wel done to you. I made two things seen on pinterest without following any recipes, but didn’t bother to post about them…eggs with peppers as a ring, and nutty health balls. I’m having second thoughts about pinterest, and the whole intellectual property thing. I want to love it and embrace it, but I keep thinking how I would feel if some one ripped off my ideas. Not that I’m implying you did, oh no siree, you always have impecable internet manners.
YoungHouseLove says
A great way to approach Pinterest is to only pin things from blogs that have a Pin It button (like the blog that posted the awesome beanbag tutorial that I linked to). That way you know they added the button because they LOVE being pinned (as do we! pin away!).
xo,
s
Meg @ Revamp Homegoods says
This project is amazing. I can’t wait to use your tutorial and make one of my own (or a few!) Great job using the old pillow stuffing too!
Christine says
I don’t know what’s cuter— the beanbag or the bean’s little toes!! Great that she seems to be turning into such a reader! I’m sure that you’ve helped that happen by setting up such a cozy little reading/dreaming spot for her.
LARY@Inspiration Nook says
Love it Sherry! The fabric is gorgeous.Glad you are friends with your sewing machine now! I sometimes wish I had one, but are afraid to go crazy with it. LOL I made some cute bracelets this time around…
http://www.larysubero.com/wp/?p=5062
Rebecca in NC says
Sherry, that’s awesome! I might have to try that out for my three little beans…
Alanna says
I’ve been wanting to make one of these, too!!! I was worried about the stuffing being too soft but you have motivated me to try it!
Katie says
Sherry. Shut the front door!!!! I am soooo impressed with you tackling just a grand sewing project!!! Seriously, I have the same love/hate relationship with my sewing machine and after my last debacle, it has been sitting in the closet collecting dust. You have inspired me to give it a whirl again though. Don’t think I will start over with a round pouf, but…I maybe, just maybe, have enough courage to tackle a linen ruffle table runner I have been dreaming about. Thanks for sharing the good, and the ugly for the world to see!
Elizabeth says
I may be paranoid, but I wanted to share something that I learned in a sewing lesson with you. (I know you two are very cautious, so maybe you’ll appreciate this.) I was told never to sew over pins. If the needle happens to hit the metal shaft of the pin, it can break off and is more likely to bounce toward you than perhaps it is when hitting fabric. From one of your pictures, it looks like you might have sewn over the pins, and I wouldn’t want your next broken needle incident to result in a broken Petersik as well.
YoungHouseLove says
Oh no I don’t sew over them, I slide them out as I go!
xo,
s
Liz says
this is awesome! i have been toying with the idea of trying to make ottoman “poufs” for our family room and i think this tutorial might actually work. i would probably just stuff the fabric as full as i could so it was less bean-baggy :)
Amanda A says
LOVE the beanbag, I have a sewing machine that has been sitting since 1 failed attempt at using it some time ago…I think I could actually do this though.
I’m wondering about the piping measurements…2 packages of 25 yards seems like a lot…wouldn’t 1 more than cover it or am I misunderstanding?
YoungHouseLove says
Yes something is wrong with my description but I don’t have the packaging anymore! Maybe it was three yards each?
xo,
s
Laurel F says
Yay you did it! Looks like it’s Burger’s favorite new place to hang out and Clara is too adorable reading on it :)
Random–but have you ever read http://hyperboleandahalf.blogspot.com blog? It just seems to be right up your alley. It’s hilarious beyond words and it’ll make you laugh til you snort.
YoungHouseLove says
Oh yes, I love that blog.
xo,
s
Karen @ bellacarina.com says
I’ve actually been wanting to make one of these for my newborn shoots! I like that you used old pillows to fill it because I was worried that was going to be the expensive part.
I am very impressed with how well your sewing skills have progressed! Nice job!
Roeshel says
Amazing job! I love the choice of fabrics! This Pinterest Challenge really does motivate! My painted puzzle floor mat turned out way better than expected too. :)
Karin T says
Love the beanbag! You have inspired me to attempt this for my 1 year old.
Is that a homemade height chart off to the side of Clara & Burger in the picture of her reading to him on the bean bag? Would love to know how you made it or where you got it as looking for something to track the growth of my little monkey too!
YoungHouseLove says
That’s actually from a site called nameyourdesign.com. Love their stuff!
xo,
s
Crystal says
Wow crazy good job! You deserve a pat on the back!
kristin says
Woohoo, you rock! Piping is not easy to sew, and neither are curves (especially for a beginner). Great job on the pouf!!
Netties Expressions says
Wow! Love how the bean bag turned out! Makes me wanna add this to my “To Do List”. :)
I tried my hand at Pallet Art for the Pinterest Challenge. This is such a neat idea! Thanks for giving me the extra push to get on with it! :)
http://www.nettiesexpressions.com/2012/03/12/the-pinterest-challenge-winter-edition-pallet-art/