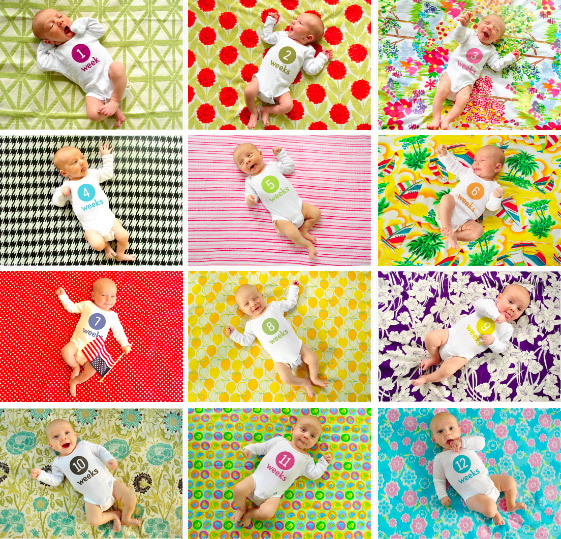
Many of you have asked questions here, on Flickr, and on Facebook about how the weekly photos that we’re taking to document Clara’s first year are really done. After answering a bunch of you individually, we figured the topic deserved a quickie “how to” post to collectively take care of anyone else out there who’s been pondering how we end up with images like this. You know we love a step by step tutorial. And documenting photos of your family can definitely fall under DIY art and decor – especially if they’re framed or even collected in a big coffee table book (which we eventually plan to do).
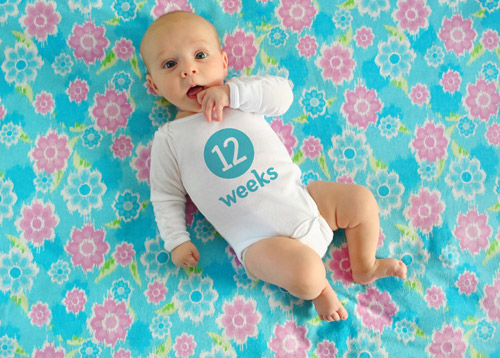
We’re not professional photographers, expert photoshoppers, or even seasoned baby wranglers… but after twelve weeks of taking shots of Clara on a fabric background and adding her age to her onesie “in post” we’ve developed a system that seems to work pretty well.
- Clara wears a plain white onesie (so far the same one, although she’s about to outgrow it) and we use Photoshop to add the text later
- We’ve only need one yard of fabric for each shot at this point, which helps keep the cost of the project down
- We usually snag our fabric at discount stores like Hancock or JoAnn Fabrics and use 40% off coupons to further save money
- We’ve also used already-owned fabric (and on-hand blankets & pillow cases) as backgrounds that are 100% free
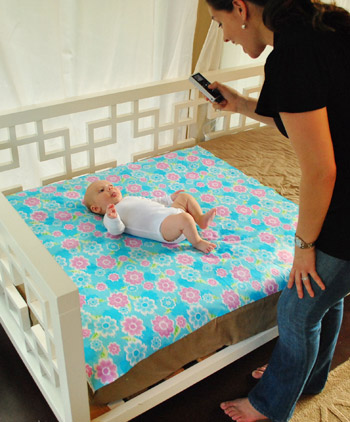
- We shoot them in the evening (around 5:30-6:30ish) because the light is indirect, which means no harsh shadows and no squinty baby
- We take the photos in our sunroom because it gets the most natural light (you might get a similar look by setting your baby on a blanket outside in the early evening).
- We use a Nikon D3000 (which we’re learning to use thanks to a lot of your advice).
- To keep photos looking consistent from week-to-week we always white balance the camera against Clara’s onesie before we begin (most DLSR cameras have a setting for this)
- We usually take between 75-100 shots to get one final frame we both love (yeah, we’re a little obsessed with the beanette)
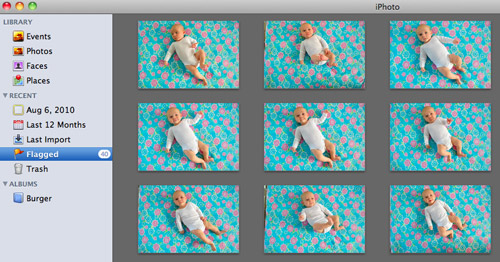
Now that we’re all caught up, I thought I’d breeze through what happens after we’ve snapped away at our tiny model and it’s time to finalizing our weekly image. First up is the sometimes long, often difficult process of selecting on our single favorite image. We use Apple’s iPhoto to sort through all of them, deleting the bad ones and flagging the good ones until we’ve narrowed it down to the one that not only represents Clara best at that age, but also isn’t too similar to past weeks’ photos (since we like them to feel as diverse as possible when it comes to composition).
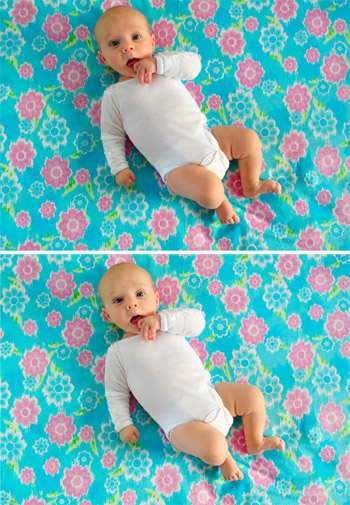
Once selected, we pull the winning image into Photoshop. Again, we’re not experts, but we’ve honed a pretty good process for achieving the fairly convincing look of text printed on a onesie. First we do some basic touch-ups like cropping the photo or lightening it up a smidge if necessary, and occasionally we do a bit of virtually smoothing out if the fabric has any crazy wrinkles that the iron didn’t seem to take care of (with the Healing Brush and the Clone Stamper). As a comparison of sorts, here’s the original picture on top as it looked straight from the camera, and the slightly lightened and de-wrinkled version below it:
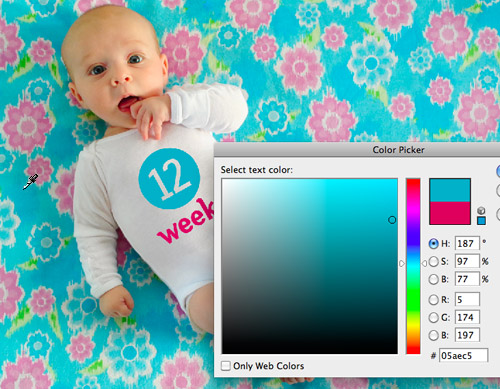
Then we add the text. At this point we usually just copy the text layer from the previous week’s file, but in case you’re starting from scratch we use a font call Fyra for the circled number and Otari for the word “weeks.” Both are free from the site FontSquirrel. Once dragged in we make sure the week is correct (in this case, we changed the week number to “12”) and we rotate the whole thing to line up with the angle of Clara’s body.
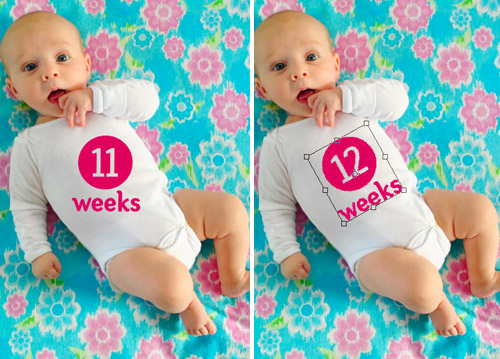
Then we select the color for the text. Usually we snag some color from the fabric itself (using the Color Picker tool) so the whole image coordinates, but sometimes we pick something complimentary to the fabric, like week one’s plum-magenta text that we liked against the green background.
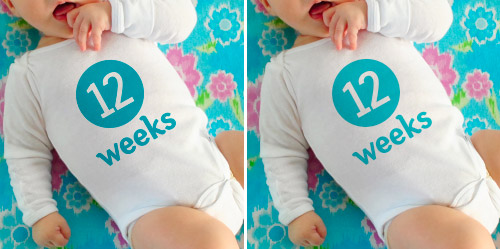
The trick we came up with for making the text appear to be printed on the onesie is a combination of layer style and opacity. We set the text layer to “Multiply” and bring down the layer opacity to somewhere between 60% – 80% depending on how saturated the color is. Note: sometimes we have to adjust the color slightly after these steps to make sure it hasn’t gotten too light or washed out.
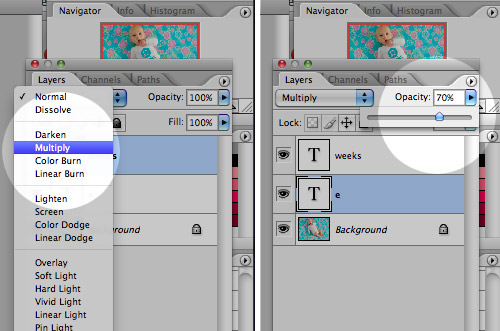
Here’s what the image looks likes before and after the “Multiply” and “Opacity” steps. You can see how it has subtly picked up the shading of the onesie behind it which tricks our eyes enough into thinking that it’s been there all along. Oh, and sometimes Miss Clara’s outfit is a bit wrinkled so I have to do some text chopping and skewing, but I haven’t gotten that process down enough that I’d feel comfortable advising others. Just trust me that it’s easier when her onesie is smooth (which is definitely the case lately since she’s outgrowing it)!
With that, we’re done!
Now that we’re nearly 1/4 of the way done with this year-long project we’re getting even more excited to amass all 52 images so we can get them printed in a nicely bound book for our coffee table (and the coffee tables of a few adoring grandparents). Plus we definitely think Clara herself will get a kick out of looking back at her weekly growth (and range of adorable expressions) when she gets a little older. Note: You can see bigger versions of the current dozen here on Flickr (we add the latest one every week there too).
Oh, and as for all of this fabric that we’re slowly collecting, the jury is still out on what we’ll do with it (make a quilt, sew some baby clothes, etc). Though our latest idea is that we’ll whip up an eclectic-looking banner or bunting that we can break out for birthday parties and even yearly growth pictures of Clara (sort of as an homage to her first year on Earth). At least until she gets too old and embarrassed to indulge us.
We hope this little picture play-by-play was helpful to anyone looking to adopt a similar method of documenting their child (or pooch, we could totally get behind that!). We’d also love to hear about any fun ways you guys have captured changes in your kids, family, or even your home – or if you’ve spotted someone else doing it in an interesting way (like the adorable Mila’s Daydreams project that we love). Spill those sentimental beans.
PS: If you’re looking to achieve a similar look but don’t want to bother with Photoshop, we learned of a company called Sticky Bellies that sells removable monthly milestone stickers that can be applied to any clothing.

David Durrett says
The fonts are no longer free. Any idea where they can be downloaded for free? Thanks!
YoungHouseLove says
Anyone know?
xo
s
Ashleigh says
I got the fonts for free about 4 weeks ago. There were upgrades of those fonts that you could pay for, but I was still able to get them for free. Hope that helps.
Marija says
Hello! I am new to your blog/website and I love it : )! I have a 10wk old baby and absolutely love your idea of the weekly photos. So I captured a 10wk photo determined to start, even though I missed the first 9wks of her life, and see it through to the end : ) Any cute thoughts, ideas or suggestions on what to fill in the first 9wk gap with after the project is complete and I make a book (or whatever I decide to do with them)??? Thanks for any thoughts you might have for me! Keep up the good work you guys are awesome : )!
YoungHouseLove says
Maybe just using photos you took for those nine weeks without the colorful background and number? Or you could add a number to some of them somehow or even try to photoshop a bright background? Good luck!
xo,
s
Sally says
I’m going crazy trying to figure out how to get the text on the onesies in PhotoShop. I’ve been taking weekly photos since my son was born last October and I’m determined to get this project done for his 1st birthday. Would it be possible to give some more detailed instruction on that part of the process? I love your blog! You guys are so creative. You’ve inspired me to try many new projects!!! :)
YoungHouseLove says
Could you give any more detail about what part in particular is giving you trouble? That might help me elaborate better on the process described in the post.
-John
Sally says
First, I can’t figure out how to download Otari font. Next, I can’t get my text to rotate to put it in the right position. I think I need Photo Shop for Dummies :)
Sally says
Okay, I found the Fyra font and downloaded it to my Mac but how do I get it into Photo Shop??? I know I’m an idiot!
Sally says
Disregard the last post . . . I finally got it the Fyra font in Photo Shop. Now I need to figure out how to rotate the entire text???
YoungHouseLove says
If you look under the “Edit” menu you’ll see “Transform” which gives you options – one of which is rotation. That’ll create a box around the text which you can spin to rotate. Good luck!
-John
Ashleigh says
Been trying to re-create your photo project except with our little one. When you last wrote this, you mentioned if the onesie was wrinkled, you would have to do some text chopping and skewing, but you didn’t feel comfortable with a tutorial yet….maybe you are now? Would love to get your feedback. Your other tips have been very helpful so far.
YoungHouseLove says
Basically you rasterize the layer and then you can cut parts of it and paste them onto their own layer and move them up and down or skew them to create that wrinkle/overlapped look. Hope it helps!
xo,
s
Kate says
I love this! I’m determined to do a monthly picture with my daughter. I featured you on my blog today!
http://crafty-kate.blogspot.com/2012/08/monthly-milestones.html
Thanks for the inspiration!
Kate
crafty-kate.blogspot.com
YoungHouseLove says
Aw I love it! Thanks for the shout out.
xo,
s
Adrienne says
Hey there!! Y’all are awesome and you probably get a million questions on this. My baby just turned 20 weeks and I am at my first photo where her hand is in the middle of my photoshopped number. What do you do about that to move the number to the background. BTW- please come to Phoenix on book signing tour. I would love to meet y’all. Thanks Sherry, now that I know your daily routine and you will be responding to this comment. I love your blog and definitely read it daily.
Adrienne says
I saw the answer you left a million others. Please ignore question, but don’t ignore all the praise. Y’all are awesome.
YoungHouseLove says
Aw you’re so sweet! Good luck with everything.
xo,
s
ange says
I hate to bother you guys, but I’ve been trying forever to figure out how to “rotate” my 1 month on my babies shirt. How do you get it to be 1 image so to speak? Mine is currently 2 pieces, the 1 in the circle font and “week” in another font. I’m not sure how to connect it and rotate it??
I’m using Photoshop CS4.
YoungHouseLove says
Oh you can “merge layers” so those two laters become one and then you can use the rotate tool. Hope it helps!
xo
s
ange says
nevermind…I just found out that you use CTRL+T and it rotates the text.
Danielle says
Hi John and Sherry, not sure which one of you would have the answer for this question but I tried downloading the circled number font and want to use it for the number “10” but when I type it out in photoshop, it doesn`t make a singular circled “10”, but instead a circled “1” and a circled “0”. I can see that this font worked for you for double digit numbers though based on Clara`s onesies. . . Any ideas how to fix this?
YoungHouseLove says
Oh yes, you just keep clicking different letters (ex: you don’t hit two numbers to make two digit numbers, you just hit another letter to get a ten and another letter to get an 11, etc). Hope it helps!
xo
s
Danielle says
Eeee forget it, I figured out that the numbers just continue into the letters! Sneaky sneaky font…
Amanda says
I’m pretty sure y’all addressed this in one of the weekly pictures but I’m not sure which one. How did you deal with Clara once she became mobile? I’m doing this with my son and he’s 8.5 months old and refuses to sit still. Was it just a matter of finding her at a mellow time?
YoungHouseLove says
Yes, a lot of it was timing (if she was wiggly we just tried again later) and trying to hold things over her or talk to her or sing to her or do something to try to hold her interest. It definitely was more challenging once she started moving around a lot!
xo
s
alphys says
Hi
Love ur work and u have a lovely baby.
I’m doing the monthly project with my baby, I sew a costume for her. and random pics almost every other day. I am obsessed with white background. It was working fine as she used to lie on the blanket but now as she is 6 months now and sitting im having problem about how to set blanket.
I just noticed in latest pics, clara is standing. How to u set the background blanket?
Once again, keep coming with weekly pics.
YoungHouseLove says
We actually just tape it to the wall in an L shape (about a yard of the fabric on the wall for her to stand in front of it and a yard on the floor in an L shape so it’s her entire background. Hope it helps!
xo
s
Paige says
So fun. :) I did something similar with my daughter, born in 2009. My husband bought her a giant Winnie the Pooh before she was born, and I had no idea what to do with the thing. So “Wednesdays with Winnie” was created. :) You can see it here. http://youtu.be/LlphcVgUlmQ
YoungHouseLove says
So cute!
xo
s
Jason says
I don’t know if you’ve gotten this tip already, but my wife is having me do this to a bunch of pics of our daughter now and I had some major onesie-wrinkle issues. I found this handy photoshop tutorial on dealing with such things and she suggested I give you the heads up… http://www.creativepro.com/article/add-realistic-artwork-wrinkled-surface-photoshops-displacement-map
YoungHouseLove says
So cool!
xo
s
menoo says
Just wanted to let you know that I love the idea and found the whole post really helpful, only one complaint… I wish i would have found this earlier, I found it when my baby was 7 weeks old so I don’t have from the earlier weeks ;( But I love it! Can’t wait till I have one for the whole year!
Mernin says
Hi,
This is just awesome! I have a question for you…when i go and use the multiply and opacity and adjust the color down to “see through” it makes the color pretty dull. How can boost the color back to closer to the original while still maintaining the look like its part of the shirt? I’m just doing ,y second photo and am very excited to have a full year!
Thanks…
YoungHouseLove says
Whenever my color is looking too dull I either make the opacity a bit higher or I adjust the original color to be brighter or more vibrant – so rather than a muted gray-blue, I’ll do a more intense blue. Hope that works for you!
-John
Lauren B says
We are having our first in just a few weeks and I have been inspired by your projects (crib skirt, fabric banner) and hope to do weekly photos too, love it! Do you have any suggestions for free photo editing software similar to photoshop that works on a mac?
YoungHouseLove says
I think there’s a program called Gimp that might work! It’s free. Hope it helps!
xo
s
Lauren B says
thanks! I will try Gimp out
Nathan says
Hey Guys,
This is an amazing idea! I’m trying to recreate this, but I’m fairly novice with Photoshop. I was just trying to create a similar text layer, but I can’t figure out how to achieve the transparent numbers. Can you help ?
YoungHouseLove says
You can play with the later opacity (bring it down) once you rasterizer the text later. Hope it helps!
xo,
s
Nathan says
Thanks for the response! When you threw out the term “rasterize”, I knew I was in over my head. I know in your original post you mentioned that you didn’t feel comfortable explaining the process of skewing and clipping your text layer, but now that you’re an expert I was hoping you might be able to share how you create and manipulate the text layer from the beginning.
I’m just so amazed by what you’ve done, I can only hope to create a similar result once my little guy arrives!
YoungHouseLove says
Aw thanks Nathan! It’s actually not too hard to rasterize text (it’s in a menu box and you just click it and it’s done) so maybe checking out a Photoshop book from the library (for free!) is all it takes to get ‘er done. Good luck with everything :)
xo
s
Cathy C says
You mentioned in this that you didn’t feel comfortable yet with when there were wrinkles in her clothes, etc. Do you feel up to adding a small update to how you do this, since you have a few more years under your belt? Would love to see the final, fine-tuned process steps.
Thanks!
YoungHouseLove says
Essentially we just mess around with it and end up doing a different thing every time. We definitely rasterize the text layer, which makes it a flat layer that we can distort, cut, etc. Then if there’s a big wrinkle we might literally cut the circle along that wrinkle using the line tool and then paste the half that we cut and then scooch it over the other one so it looks folded or wrinkled. Hope that helps! It really is a different beast every time :)
xo
s
Laura says
A friend sent me your blog and I was totally inspired by this fun project…only slight complication was that we had twin girls – way harder to get two to stay still and “pose” than dealing with just one (did something similar but not nearly as cute with my son a few years ago)…anyway, we just made it through the first year and even though some turned out better than other, I absolutely adore the finished project! I took pieces of the fabrics and turned them into two quilts for each girl (made rag quilts which are much faster and easier than real ones!). I’m just wondering what you all did to display the finished project? I was thinking of having them printed as a collage somehow and framing maybe??? Any suggestions? Thank you all for sharing your creativity and obvious love for your sweet baby!
YoungHouseLove says
We made a photo book of them all and loved that. We also print them all out for her birthday parties and hang them (just taped up on the wall in a grid).
xo
s
Stephanie says
I am just working out some photoshop files to replicate your photo project.
I am due in 10 more days!!!!
Question for you…
How do you make the photoshopped weeks appear under Clara’s arms… for example, week 7, week 9 etc… how do you make it look like her arm is just covering part of the text?
I am having troubles with understanding that part of the process.
Thanks in advance!!
I can’t wait to see how these turn out!
YoungHouseLove says
We rasterized that text layer (it’s in a drop down menu) and then we could reduce the opactity of it and just use the eraser tool to erase the part that goes behind a body part, and then bring the opacity back up so you can see it all clearly again. Hope that makes sense!
xo
s
nan says
this project it really cute just allow me to copy your idea to do it with my son that will come to say hello to the world end of this month
p.s i love this website it so nive and helpful
thankyou
idonette says
How do u get the text or circle behind a hand or arm for example. I see u have a couple of images where clara’s hand is on her chest then the photoshoped circle is behind her hand. Dont know how to do that step in photoshp
YoungHouseLove says
We rasterize the text image (that essentially makes it flat and editable) and then we can erase it so it looks like it goes under something.
xo
s
ERICA says
Hi! We just had our first child 4 weeks ago and decided to steal your idea and do this with our son. Just curious how you did your numbers in Fyra once you got past single digit weeks? Love the simplicity of an already circled font, but noticing that it only does single digits! Thanks for any tips – we are always inspired by your site!
ERICA says
Figured it out – ignore my last comment… i’m sure you have plenty more to respond to! :)
Melissa says
I’ve been following your tutorial for my little guy, but I just hit a snag! He turned 10 weeks today and I cant figure out how to get the 1 and 0 inside one circle :) The Fyra font is giving me two separate circles.
YoungHouseLove says
You have to keep going along the keyboard (it’s like Q or something) since two keys will give you two circles.
xo
s
Melissa says
Found it- you hit the letter Q
Laura says
Just dying to know whether Teddy is going to have a photo shoot project as well!? Can’t wait to see what you do.
YoungHouseLove says
Yes we’re planning to share that this week! We already got two weekly pics and have a new spin on the project that’s making it feel fresh for us. Clara’s a sweet little helper too!
xo
s
Nicole says
Thank you for your inspirational project. After reading your blog while I was pregnant I decided to try to duplicate the weekly photos with my daughter. The results were a little different and the photos probably not as professional looking, but I am so happy to have the memories. I know some people have asked what you did with the photos. In addition to making a photo book with mine, I was able to display a slide show of them during her first birthday party, it was a hit! Here is my blog post showing how the project turned out for me. http://webecamethree.com/projects/first-year-photo-project/ good luck on the new photo project with your son and congratulations on your growing family.
YoungHouseLove says
That’s so sweet Nicole!
xo
s
Sarah says
Love this idea!! Expecting my first little one in two weeks. How do you adjust the text for when she is at a different angle like sitting up in week 50?
YoungHouseLove says
We rasterize the text and then use the distort (under transform) tool to make it look like that.
xo
s