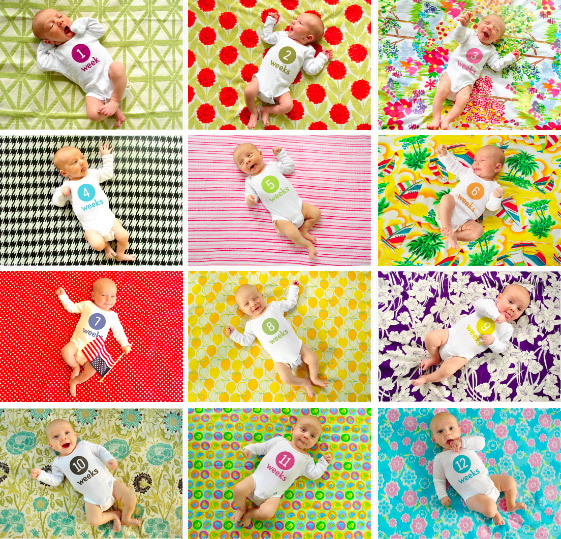
Many of you have asked questions here, on Flickr, and on Facebook about how the weekly photos that we’re taking to document Clara’s first year are really done. After answering a bunch of you individually, we figured the topic deserved a quickie “how to” post to collectively take care of anyone else out there who’s been pondering how we end up with images like this. You know we love a step by step tutorial. And documenting photos of your family can definitely fall under DIY art and decor – especially if they’re framed or even collected in a big coffee table book (which we eventually plan to do).
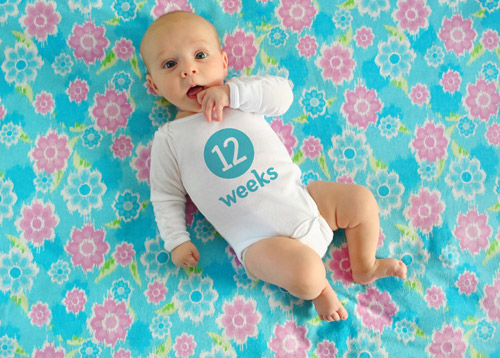
We’re not professional photographers, expert photoshoppers, or even seasoned baby wranglers… but after twelve weeks of taking shots of Clara on a fabric background and adding her age to her onesie “in post” we’ve developed a system that seems to work pretty well.
- Clara wears a plain white onesie (so far the same one, although she’s about to outgrow it) and we use Photoshop to add the text later
- We’ve only need one yard of fabric for each shot at this point, which helps keep the cost of the project down
- We usually snag our fabric at discount stores like Hancock or JoAnn Fabrics and use 40% off coupons to further save money
- We’ve also used already-owned fabric (and on-hand blankets & pillow cases) as backgrounds that are 100% free
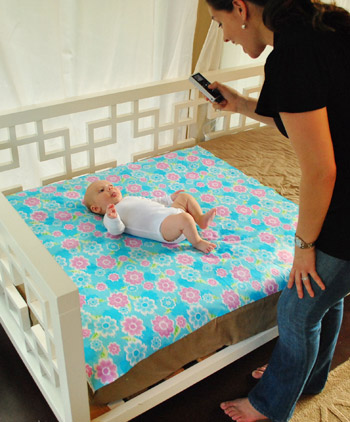
- We shoot them in the evening (around 5:30-6:30ish) because the light is indirect, which means no harsh shadows and no squinty baby
- We take the photos in our sunroom because it gets the most natural light (you might get a similar look by setting your baby on a blanket outside in the early evening).
- We use a Nikon D3000 (which we’re learning to use thanks to a lot of your advice).
- To keep photos looking consistent from week-to-week we always white balance the camera against Clara’s onesie before we begin (most DLSR cameras have a setting for this)
- We usually take between 75-100 shots to get one final frame we both love (yeah, we’re a little obsessed with the beanette)
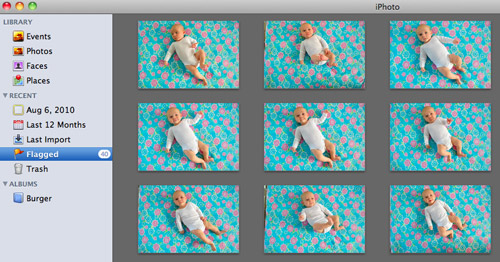
Now that we’re all caught up, I thought I’d breeze through what happens after we’ve snapped away at our tiny model and it’s time to finalizing our weekly image. First up is the sometimes long, often difficult process of selecting on our single favorite image. We use Apple’s iPhoto to sort through all of them, deleting the bad ones and flagging the good ones until we’ve narrowed it down to the one that not only represents Clara best at that age, but also isn’t too similar to past weeks’ photos (since we like them to feel as diverse as possible when it comes to composition).
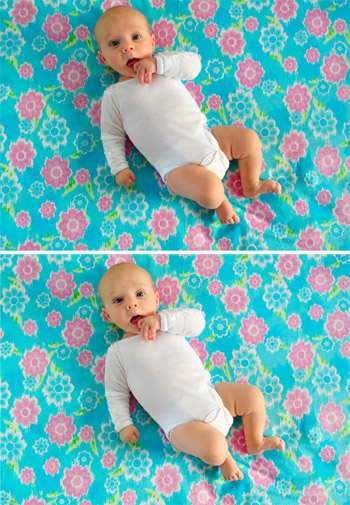
Once selected, we pull the winning image into Photoshop. Again, we’re not experts, but we’ve honed a pretty good process for achieving the fairly convincing look of text printed on a onesie. First we do some basic touch-ups like cropping the photo or lightening it up a smidge if necessary, and occasionally we do a bit of virtually smoothing out if the fabric has any crazy wrinkles that the iron didn’t seem to take care of (with the Healing Brush and the Clone Stamper). As a comparison of sorts, here’s the original picture on top as it looked straight from the camera, and the slightly lightened and de-wrinkled version below it:
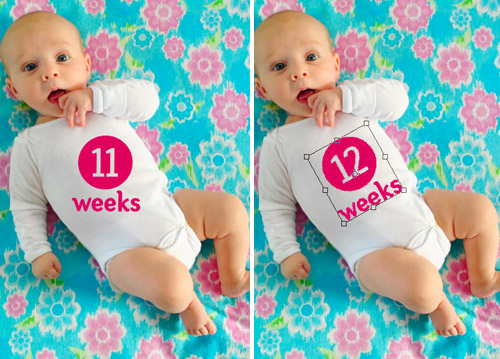
Then we add the text. At this point we usually just copy the text layer from the previous week’s file, but in case you’re starting from scratch we use a font call Fyra for the circled number and Otari for the word “weeks.” Both are free from the site FontSquirrel. Once dragged in we make sure the week is correct (in this case, we changed the week number to “12”) and we rotate the whole thing to line up with the angle of Clara’s body.
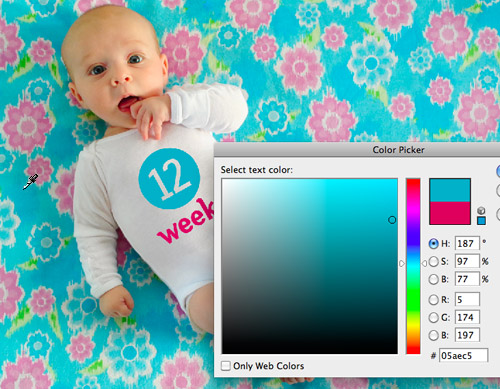
Then we select the color for the text. Usually we snag some color from the fabric itself (using the Color Picker tool) so the whole image coordinates, but sometimes we pick something complimentary to the fabric, like week one’s plum-magenta text that we liked against the green background.
The trick we came up with for making the text appear to be printed on the onesie is a combination of layer style and opacity. We set the text layer to “Multiply” and bring down the layer opacity to somewhere between 60% – 80% depending on how saturated the color is. Note: sometimes we have to adjust the color slightly after these steps to make sure it hasn’t gotten too light or washed out.
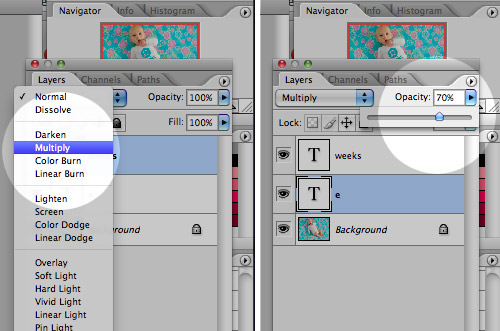
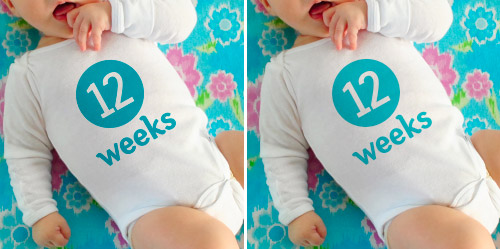
Here’s what the image looks likes before and after the “Multiply” and “Opacity” steps. You can see how it has subtly picked up the shading of the onesie behind it which tricks our eyes enough into thinking that it’s been there all along. Oh, and sometimes Miss Clara’s outfit is a bit wrinkled so I have to do some text chopping and skewing, but I haven’t gotten that process down enough that I’d feel comfortable advising others. Just trust me that it’s easier when her onesie is smooth (which is definitely the case lately since she’s outgrowing it)!
With that, we’re done!
Now that we’re nearly 1/4 of the way done with this year-long project we’re getting even more excited to amass all 52 images so we can get them printed in a nicely bound book for our coffee table (and the coffee tables of a few adoring grandparents). Plus we definitely think Clara herself will get a kick out of looking back at her weekly growth (and range of adorable expressions) when she gets a little older. Note: You can see bigger versions of the current dozen here on Flickr (we add the latest one every week there too).
Oh, and as for all of this fabric that we’re slowly collecting, the jury is still out on what we’ll do with it (make a quilt, sew some baby clothes, etc). Though our latest idea is that we’ll whip up an eclectic-looking banner or bunting that we can break out for birthday parties and even yearly growth pictures of Clara (sort of as an homage to her first year on Earth). At least until she gets too old and embarrassed to indulge us.
We hope this little picture play-by-play was helpful to anyone looking to adopt a similar method of documenting their child (or pooch, we could totally get behind that!). We’d also love to hear about any fun ways you guys have captured changes in your kids, family, or even your home – or if you’ve spotted someone else doing it in an interesting way (like the adorable Mila’s Daydreams project that we love). Spill those sentimental beans.
PS: If you’re looking to achieve a similar look but don’t want to bother with Photoshop, we learned of a company called Sticky Bellies that sells removable monthly milestone stickers that can be applied to any clothing.

Kate McG says
Such an adorable idea … I love the background fabrics and the simplicity of the onesie. Unfortunately, I missed the window with my 18-month old, however, we are expecting Baby Girl McG #2 in June, so I am going to “gear up” and start practicing my Photoshop skills as you’ve outlined for the new one! There will be some things that we do for the “first time” with baby #2!
Mindy says
I did weekly pictures too, with her “holding” a sign I made from scraps of paper. I made it through all 52 weeks! even though there were many weeks when I just wanted to quit already! It is exhausting to get that one shot! Just wait until she can move guys! Good luck!
Love the fabric backdrops and photoshop’ing the weeks!
Lindsay says
Thanks for the tutorial!! Totally using the photoshop onesie idea!!! – http://www.flickr.com/photos/funkylindsay/5503723353/
YoungHouseLove says
So cuuuute! Love it.
xo,
s
Rene' says
Your baby, Clara, is precious and this video brought tears of joy to my eyes. Thank you for sharing this.
May says
Hi you guys!
I am sure you’ve been asked a gazillion times already, but how do you do the layer mask and erase technique so that the font appears to be behind Clara’s limbs on those onesies? Can you please outline the steps for that part again? Pretty please?!? Thanks so much.
May
YoungHouseLove says
First you have to “rasterize” the layer, so go up into one of the menus at the top and find “rasterize text” or “rasterize layer” and do that. Then the text becomes uneditable (but it can be erased, duplicated, and manipulated like any other shape in photoshop). Hope it helps!
xo,
s
May says
Thank you X 100! I got it and it worked. You guys rock.
May
Brittany says
I so wish I would have done weekly photos. I did monthly and love it but weekly shows so much more change. As far as the fabric I would do a mix. Quilt with it. You’d only have to use small square of it so there is plenty or room for bunting, a pillow case and some cute kid clothes.
Ship it my way, I’ll help out! :)
-Brittany
Martina says
This is brilliant – so colorful and creative yet your little girl is always the focus. And I love that use a different background but the same outfit and angle and crop everytime. Brilliant to photoshop on the text. I’m a graphic designer and at first glance I was convinced it was really printed on her onesie. I was thinking, wow, that’s a lot of printed onesies. Expensive!
Erin Simmons says
I love this idea and will probably steal it for when I have children. But I was wondering, how do you edit the number graphic to not show on top of Clara’s hands or feet or whatever is over the onesie (eg Week 12 in this post).
YoungHouseLove says
We “rasterize” that type layer (go up to the “Layer” drop down menu and click rasterize type) which then makes it uneditable but it’s erasable (so you can shave off bits with the eraser or select the part you want to keep and delete the inverse). Hope it helps!
xo,
s
Luther says
Thanks for the post and getting this great idea out there. We are now on week 10. How do I get both digits in one circle??? When I type 10 each digit has it’s own circle :(
YoungHouseLove says
There’s an actual command/letter assigned to make two digit numbers (like 10 and 11). So you don’t combine them or anything (since they’d be in separate circles). For example, when we do 52, it’s like “shift and then P” or something. Hope it helps!
xo,
s
Heather says
I started doing this on Saturday at Week 1. I’m not a Photoshopper, so I just made signs in Word to put next to the baby in the same bright colored circle concept. Sorry there’s no way to upload them so you can see!
Courtney @ the Mommy Matters says
I came across your blog via Pinterest. And I have to say that I absolutely LOVE this idea! I wish I’d done it with my first born, but have intentions of doing it with our second (when we have one!). Thanks for sharing this!
Sarah says
Hi guys, if you happen to see this, I just have a quick question – what version of photoshop are you using? I’ve been looking into purchasing it for quite a while, and will be using it for multiple purposes, but it’s difficult to find recommendations on which version is a best fit. There’s a lot I want to do, but holy cow some of those versions can get expensive. Just curious which one you’re using, because I do want most of these functions. Thank you!!
YoungHouseLove says
We have Adobe Creative Suite, but it’s expensive since it has a lot of ad-ons (we used to use it in advertising, which is why we own it). They sell just Adobe Photoshop (not the suite version) for less though. Which is definitely all you need for anything we do on the blog. So maybe try ebay or even cragislist or amazon.com for a deal? Good luck!
xo,
s
Sarah says
Cool, thanks so much for the reply! That was my guess. I’ve been zeroing in on Photoshop CS5, but $700 is mucho $$. I do a lot with photos and already use Nikon photo software – just looking for an Adobe product to round out the features, and the layering is something I definitely need. At least Adobe lets you upgrade down the line for less. Haha, and I will definitely be looking for a discount code or sale either way! Thanks again!
jess @ fushmush says
Thanks for the tutorial. I’ve started doing this with my own daughter who was born two weeks away. A great inspiration.
http://fushmush.net/t/growing_evie
YoungHouseLove says
What a cutie!
xo,
s
Chelsea says
Thanks for the tutorial. I have been using this for our son each month for the past 10. Months 1-9 have been really easy since there is just one number. I am now on month 10 and can’t figure out how you did the 2 numbers “1 and 0” together. I’m sure there is an easy solution so I thought I’d ask.
Thanks for your help!
Chelsea
YoungHouseLove says
There are actually other letters that do double digits (just work your way across from lower case q, which I think is ten). Good luck!
xo,
s
Rebecca says
Sorry for asking again if this has already been addressed in the video or a previous post, but what kind of lens are you using for these pics?
YoungHouseLove says
It’s the regular stock lens that came with our D3000 (Nikon). Hope it helps!
xo,
s
Susie B. says
Which version of Photoshop do you guys use?
YoungHouseLove says
We use Photoshop Version 8 (as part of Adobe Creative Suite). Hope it helps!
xo,
s
Fabi Charest says
I LOVE IT!!! It’s so good designed the fabrics and contrast with the white onesie! You can check out my baby Camille’s pictures: http://babycamille.tumblr.com/ . I take a picture of her every month at 730 am. I’ll try at 530 or 600 pm :) Thanks for the tip! I love you style and taste of design!
Fabi
YoungHouseLove says
Cute!!
xo,
s
Donna says
Perfect timing, our baby is due in 2 weeks and we’re ABSOLUTELY doing this. On that note….you guys ever cheat and just superimpose an online photo of fabric into the background? I’m wondering if I can just green screen the shots and do that, since our blankets are less awesome then yours…
YoungHouseLove says
Nah, we’re not that good at photoshop! Haha. We like the shadow and the wrinkles and all the realness of doing it with fabric under her- but if you’re good at Photoshop and can make it look realistic I say go for it!
xo,
s
Melinda says
Hello, heroes! (Yes, I affectionately refer to you all as my DIY heroes. My husband thinks I am a crazy stalker since I am constantly referring to your blog in our conversations.) Anyway – I am doing this weekly photo project with my daughter (12 weeks old now!), and I am wondering how you make the graphic look like it’s underneath Clara’s arms, hands or fingers when they are in front of the onesie. I am using Photoshop, but I am certainly NOT a pro. Any advice would be sooo helpful. =)
YoungHouseLove says
Aw shucks, you’re sweet. We go to “layers” (I think) and scroll down to “rasterize.” Then we can reduce the opacity and use the eraser to remove anything that should be hidden by something like Clara’s arms. In short: we rasterize the type and then delete parts of the graphic that shouldn’t be there. Hope it helps!
xo,
s
Ellis says
Just curious what setting is the camera on when you are taking these shots? Manual?
YoungHouseLove says
We keep it on A mode, which is partially manual (so we can turn off the flash, adjust the exposure, and play with the depth of field.
xo,
s
Ashley Bird says
Hey guys! I seriously love this idea I cant wait to do it when I have a little tot! With your camera do you use the auto setting? or something different?
YoungHouseLove says
We do the A setting which means we can manually adjust the exposure and the aperture. And we always turn off the flash.
xo,
s
Maryam says
I am having trouble making the number and letters (of weeks) look as smooth as you guys have on Clara’s shirts, mine looks rigid and not evenly smooth – can you please share how you got it to look so smooth?? PLEASE!!! I have multiplied and changed opacity but no help. Thank you! BTW i love you guys- you are awesome!!!!!!
YoungHouseLove says
Hmm, is it the onesie under it that doesn’t look smooth and is just showing through? If that’s the case maybe try ironing it beforehand (sometimes we iron Clara’s shirt since we’re usually already ironing the fabric and it’s no big deal). Otherwise I’m not sure what else to tell you since playing around with opacity and multiply would be our recommendation and it seems like you’re already doing that.
xo,
s
Maryam says
Thank you SO MUCH for your response!!!! No the onesie is brand new and has no baby in it yet – i am due in 5 weeks. I came across your page when i was looking for DIY baby books and have become seriously ADDICTED to anything you guys do. SO i love this picture idea and am so glad to have found such a wonderful thing, i have purchased photoshop, cook fabrics and got the fonts, i am just trying to set it up so once the baby comes it will all be smooth sailing. SO i have the onesie on the fabric and took an aerial shot, added the 1 week, but for some reason it does not look like Clara’s amazing shots! Thanks again for replying, i guess i will try playing around with it!
YoungHouseLove says
Good luck! I bet once there’s a baby in it it’ll make a lot more sense! Haha. Have fun!
xo,
s
stephanie says
I have a question about the weekly photos as i would love to do it someday when we expand our family. i read your tutorial on the photoshop and the numbers BUT how do you do the photoshop for weeks when her hand is covering her onesie or when its really sideways and hidden – for example: week 33, week 35, week 36…. is it just something in layers? and when its angled is it just rotating the image?
YoungHouseLove says
We rasterize that text layer (it’s in a drop down menu somewhere- just click rasterize text) and then we can use the eraser tool to erase it so it looks like a hand is over it. Hope it helps!
xo,
s
stephanie says
thanks!
i will have to play around with that
Lindsay says
Hi there!
I’ve been doing this project with my son and I love it! The problem I am getting right now is that when I get to double-digit weeks (10 and on), the Fyra font does the 1 in a circle and the 0 in a separate circle. How did you get them both in the same circle?
Thanks!
Lindsay
Lindsay says
Agh, found it in your other comments. Thanks for all your hard work and all the awesome ideas! Love your site!
YoungHouseLove says
Good luck!
xo,
s
YoungHouseLove says
Once you get to ten you start using letters to get them both in the same circle. I believe ten is a lowercase or uppercase Q. Then just work your way across the keyboard for higher numbers in the same circle. Hope it helps!
xo,
s
Tara says
I’m a newbie to photoshop. I downloaded the fyra font, but am unable to get it to produce double digit numbers. When I go to my font book on my mac it shows that I have those numbers available. I just can’t figure out how to type “22” as opposed to two “2’s” in a row. Hope this makes sense. I’m hoping this isn’t a stupid question!!
Tara says
It was a stupid question b/c I just barely saw my answer right above my comment! Disregard!! :)
YoungHouseLove says
No worries!
xo,
s
Adriana says
I’m so happy I saw this before my baby is born next month! It’s an awesome idea! Making a coffee table book out of it is even better. I do have a huge question though, how do you photoshop the numbers on the onesie to be BEHIND her hands and feet when they are in front of the numbers??? That seems awfully difficult.
YoungHouseLove says
We rasterize that layer (so it’s no longer a type layer) and then reduce the opacity so we can see whatever appendage is over it and use the eraser tool to erase that part of the number and then bring the opacity back up (so it looks like it’s behind it). Hope it helps!
xo,
s
Adriana says
AH, I just read all your comments and found the answer to how you put the hands and feet in front of the text. But what about where she is sitting up like in Week 50? Is that also through rasterize layer? Thank you so much!
YoungHouseLove says
Yep, it was through rasterizing the layer and doing some transform (skew, perspective and distort to be exact) to try to get it to match as well as possible.
-John
Shannon says
I have been doing the week by week pictures with my little girl & I am so happy to have found the idea from you guys! I am doing week 29 & I cannot for the life of me find #29 on the Frya font!! Can you help me, please? (Yes, I’m begging…)
YoungHouseLove says
Hmm, they’re all letters and we think lowercase or uppercase Q is ten. So just move across your keyboard hitting letters and hopefully they’ll go up by 1 until you hit 29. Try hitting shift to go through the uppercase letters if you can’t find it while going through the lowercase ones. Good luck!
xo,
s
Shannon says
I found it! Thanks! :)
YoungHouseLove says
Yay, so glad! Have fun!
xo,
s
Claire says
I love this entire series! I was able to do a similar thing with my daughters first year pics. Random question? How do you squash all the pics together into a grid of all 52? Thanks!!!
YoungHouseLove says
We just did that in photoshop (brought them all in and shrunk them down). Hope it helps!
xo,
s
Carly says
I have read through the comments and still have a question… How do you take the existing “30 weeks” and move it to the new picture?
YoungHouseLove says
Just drag the type layer and drop it onto the new picture. Hope it helps!
xo,
s
Camille says
Hi! I’ve read through all the comments and don’t think this question has been answered… I’m about 6 weeks away from giving birth to my first baby and want to start the photo project from the get-go. What day did you use to do your “weekly” picture? Meaning, was it the same day of the week each week or did you go every 7 days? Thanks!
YoungHouseLove says
We did it every Friday since that was a day that we could carve out some time in the afternoon!
xo,
s
Lindsay says
How did you get the shamrock on her 44 week photo instead of the usual circle?
Lindsay says
And the same question for the heart in week 39?
YoungHouseLove says
Those are prexisting shapes you can find in Photoshop using the shape tool. We didn’t use the circle that comes with the number, and instead rasterized that and deleted the circle around it and just placed the number within the premade shape that we got from the dropdown menu using the shape tool. Hope it helps!
xo,
s
Lindsay says
It does! Thanks so much!
Cathie Dawson says
I love Clara’s weekly photos and books from Publish and have started doing the same for my first grandchild. But my question is how and what do you do with all the other dailey photos? Do you ever print hard copies and put them in an album? Or are all “the other photos” kept in a digital file? I’m not sure how to handle all this digital photography…..what do you think?
YoungHouseLove says
We make a “annual yearbook” through mypublisher with all of our other pics at the end of each year. We just upload all of our favorite pics for the year and make one hardcover book that they print for us (we wait for coupon codes to get a deal)! They’re fun to design and easy to store (much thinner than a photo album). Hope it helps!
xo,
s
Sally says
I am new to Photo Shop and I am trying to do this project for my baby boy. How do you get the text in the circle? I can’t figure it out and it’s driving me crazy! I’m really behind . . . he’s 24 weeks old (I have the 24 photos saved) so I have lots of catching up to do!
YoungHouseLove says
It’s a specific font (called Otari). If you download it for free it comes with the circle around it! Then just press every key until you find the one that represents 24 (you wouldn’t type 2-4, each key would be assigned to a circle with a number in it). Hope it helps!
xo,
s
Sally says
Sorry, I didn’t phrase my question very well. I meant that I can’t figure out how to add a circle with text in it to my photos. I just got Photo Shop last week and I am trying to learn how to use it! :)
YoungHouseLove says
Oh, you use the “type tool” (the one that looks like a cursor in the toolbar) and you have to download Otari (it’s a specific font). Then with the type tool you just click on the middle of the onesie (and make sure you’re in Otari typeface) and hit any key (ex: p, q, r) and random numbers-in-circles should come up, then just delete it if it’s wrong and keep hitting keys until you hit the right one. There are also free photoshop books available from the library if you need more help! Good luck!
xo,
s
Jill says
I love what you’ve done for your little girl! Can you please tell me know you got double digits when using Fyra? I can only get 1-9. When I try to do 10 through 12 it separates each number. Thank you!
Jill says
I figured it out based on your post right above! Thank you!
YoungHouseLove says
So glad!
xo,
s
YoungHouseLove says
You just keep using different single keys to get above 10. So instead of typing two keys to get a ten, just try hitting different keys (just keep working your way across the computer- I think a 10 is a Q and an 11 is a W, etc).
xo,
s
Jill says
For the pictures when the onesie is not smooth, how do you make the letters curve to her body so that it looks like it’s apart of the onesie? I can’t seem to figure that part out. Any tips is appreciated!
Love your blog!!!
YoungHouseLove says
We just rasterize the type layer so we can manipulate it (using the distort command in the dropdown menu, etc). Also lightening the opacity a bit makes it look more like it’s on the shirt!
xo,
s
Jaclynn Stevens says
Now this has got to be the cutest darn thing I’ve ever seen.
Sarah S. says
I’m pretty sure you posted along the way about how you get the weekly number circle to look right when it’s at an odd angle or hidden behind her hands/feet… but I can’t find it for the life of me! Can you hook me up with a linky? :)
YoungHouseLove says
We “rasterize” the type layer and then use the “distort” function to bend it or angle it if we need to. We can also erase parts of it after we rasterize it (to make it look like her hand is in front of it). Hope it helps!
xo
s
Kara Hilburger says
Love this idea. Thank you so much for inspiring me to do this with our newborn. Just curious – What photoshop program do you use? Thanks so muck. Kara
YoungHouseLove says
We use the full version of Adobe Photosop, but there is a less expensive version called Photoshop Elements. I can’t speak to it personally though, so I’m not certain it has the capabilities we used for this project. Sorry!
-John
Nancy says
I have my own little Clara who will be 3 years old in September. I love this idea, and wish I had done this as well!
I’d love to find the “Clara” fabric you used behind your daughter’s 12 month/1 year photo. Did you buy that one at Joann’s?
YoungHouseLove says
We actually made that one on Spoonflower! Here are those details for you (there’s a link within this post for more info): https://www.younghouselove.com/2012/04/clara-petersik-fabric-designer/
xo,
s
Sonya says
Love this. You guys have given her such a gift by documenting these pictures. Now, you have given me the power to give this gift to my children. Thanks!
Katie says
You guys have inspired us to document our little one this way. Thank you so much!!! You can check out what we’ve done here: http://hoerz.weebly.com/weekly-photo-project.html We are working on improving our photo takin’ and our photoshoppin’ skills, so some of the first ones aren’t the greatest, but thank you for the tips!!! I love reading the posts everyday- you guys seem like such down-to-earth, fun people!!
YoungHouseLove says
Awesome! Love the photo project- thanks for sharing! And thanks too for the kind words!
xo,
s
Christy says
LOVE LOVE LOVE this!!! I am going to try it with some friends that are expecting… wish I had had this idea 18 yrs ago when we started our family of 3 boys!!!! awesome idea!!! Thanks for the Inspiration!!!!
Laura says
Hey guys, I just wanted to thank you for the inspiration of these photo shoots! My husband and I followed suit with our daughter Olivia, who just turned one. We’re sad to see the photo shoots end, but a bit relieved too (it’s a lot of work!). Here’s a link to Olivia’s pics: http://chez-blochwitz.blogspot.ch/2012/07/olivia-celebrates-her-first-birthday.html Looking back on these pictures (which we do often) is priceless. Thanks again!
YoungHouseLove says
Adorable!!!! Thanks for sharing the link. So much fun.
xo,
s
how2home says
You guys are honestly so inspiring. We’d love to do this in the future. And all the fabrics you choose are so beautiful.