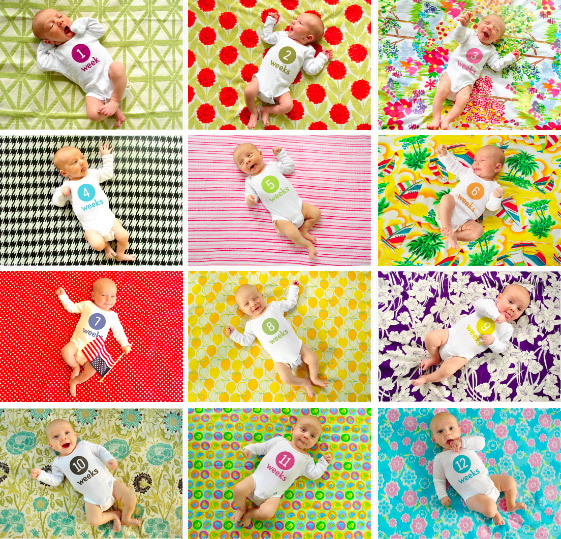
Many of you have asked questions here, on Flickr, and on Facebook about how the weekly photos that we’re taking to document Clara’s first year are really done. After answering a bunch of you individually, we figured the topic deserved a quickie “how to” post to collectively take care of anyone else out there who’s been pondering how we end up with images like this. You know we love a step by step tutorial. And documenting photos of your family can definitely fall under DIY art and decor – especially if they’re framed or even collected in a big coffee table book (which we eventually plan to do).
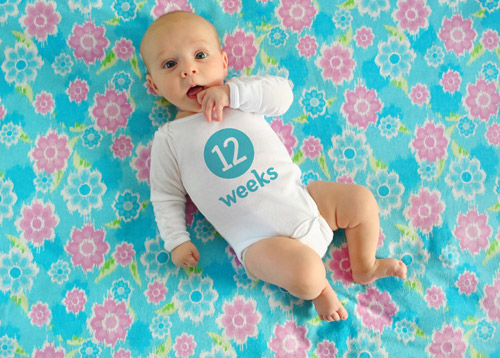
We’re not professional photographers, expert photoshoppers, or even seasoned baby wranglers… but after twelve weeks of taking shots of Clara on a fabric background and adding her age to her onesie “in post” we’ve developed a system that seems to work pretty well.
- Clara wears a plain white onesie (so far the same one, although she’s about to outgrow it) and we use Photoshop to add the text later
- We’ve only need one yard of fabric for each shot at this point, which helps keep the cost of the project down
- We usually snag our fabric at discount stores like Hancock or JoAnn Fabrics and use 40% off coupons to further save money
- We’ve also used already-owned fabric (and on-hand blankets & pillow cases) as backgrounds that are 100% free
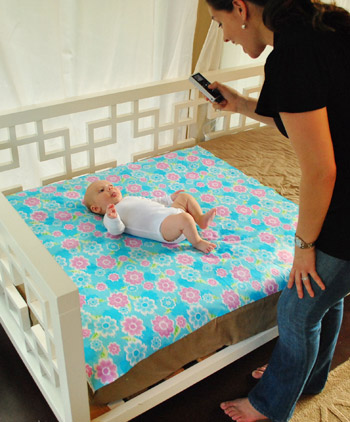
- We shoot them in the evening (around 5:30-6:30ish) because the light is indirect, which means no harsh shadows and no squinty baby
- We take the photos in our sunroom because it gets the most natural light (you might get a similar look by setting your baby on a blanket outside in the early evening).
- We use a Nikon D3000 (which we’re learning to use thanks to a lot of your advice).
- To keep photos looking consistent from week-to-week we always white balance the camera against Clara’s onesie before we begin (most DLSR cameras have a setting for this)
- We usually take between 75-100 shots to get one final frame we both love (yeah, we’re a little obsessed with the beanette)
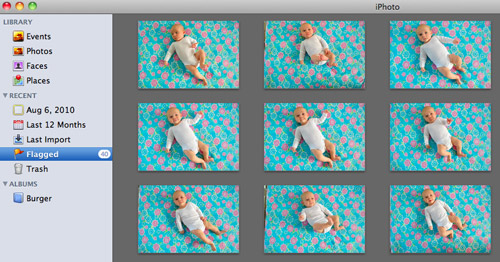
Now that we’re all caught up, I thought I’d breeze through what happens after we’ve snapped away at our tiny model and it’s time to finalizing our weekly image. First up is the sometimes long, often difficult process of selecting on our single favorite image. We use Apple’s iPhoto to sort through all of them, deleting the bad ones and flagging the good ones until we’ve narrowed it down to the one that not only represents Clara best at that age, but also isn’t too similar to past weeks’ photos (since we like them to feel as diverse as possible when it comes to composition).
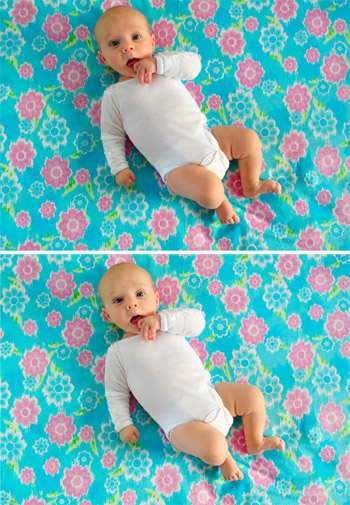
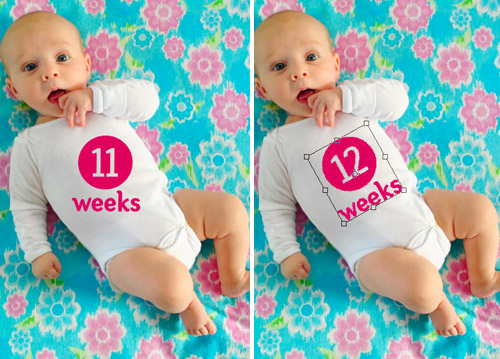
Once selected, we pull the winning image into Photoshop. Again, we’re not experts, but we’ve honed a pretty good process for achieving the fairly convincing look of text printed on a onesie. First we do some basic touch-ups like cropping the photo or lightening it up a smidge if necessary, and occasionally we do a bit of virtually smoothing out if the fabric has any crazy wrinkles that the iron didn’t seem to take care of (with the Healing Brush and the Clone Stamper). As a comparison of sorts, here’s the original picture on top as it looked straight from the camera, and the slightly lightened and de-wrinkled version below it:
Then we add the text. At this point we usually just copy the text layer from the previous week’s file, but in case you’re starting from scratch we use a font call Fyra for the circled number and Otari for the word “weeks.” Both are free from the site FontSquirrel. Once dragged in we make sure the week is correct (in this case, we changed the week number to “12”) and we rotate the whole thing to line up with the angle of Clara’s body.
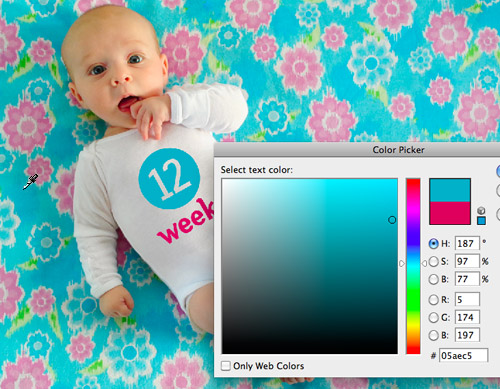
Then we select the color for the text. Usually we snag some color from the fabric itself (using the Color Picker tool) so the whole image coordinates, but sometimes we pick something complimentary to the fabric, like week one’s plum-magenta text that we liked against the green background.
The trick we came up with for making the text appear to be printed on the onesie is a combination of layer style and opacity. We set the text layer to “Multiply” and bring down the layer opacity to somewhere between 60% – 80% depending on how saturated the color is. Note: sometimes we have to adjust the color slightly after these steps to make sure it hasn’t gotten too light or washed out.
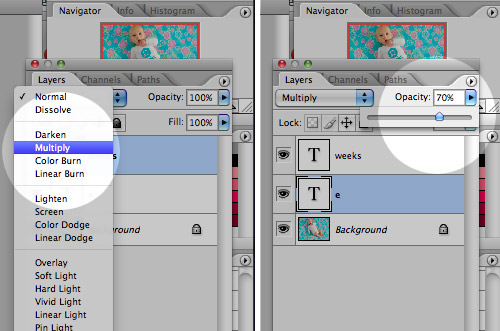
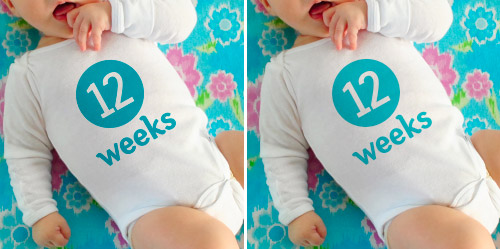
Here’s what the image looks likes before and after the “Multiply” and “Opacity” steps. You can see how it has subtly picked up the shading of the onesie behind it which tricks our eyes enough into thinking that it’s been there all along. Oh, and sometimes Miss Clara’s outfit is a bit wrinkled so I have to do some text chopping and skewing, but I haven’t gotten that process down enough that I’d feel comfortable advising others. Just trust me that it’s easier when her onesie is smooth (which is definitely the case lately since she’s outgrowing it)!
With that, we’re done!
Now that we’re nearly 1/4 of the way done with this year-long project we’re getting even more excited to amass all 52 images so we can get them printed in a nicely bound book for our coffee table (and the coffee tables of a few adoring grandparents). Plus we definitely think Clara herself will get a kick out of looking back at her weekly growth (and range of adorable expressions) when she gets a little older. Note: You can see bigger versions of the current dozen here on Flickr (we add the latest one every week there too).
Oh, and as for all of this fabric that we’re slowly collecting, the jury is still out on what we’ll do with it (make a quilt, sew some baby clothes, etc). Though our latest idea is that we’ll whip up an eclectic-looking banner or bunting that we can break out for birthday parties and even yearly growth pictures of Clara (sort of as an homage to her first year on Earth). At least until she gets too old and embarrassed to indulge us.
We hope this little picture play-by-play was helpful to anyone looking to adopt a similar method of documenting their child (or pooch, we could totally get behind that!). We’d also love to hear about any fun ways you guys have captured changes in your kids, family, or even your home – or if you’ve spotted someone else doing it in an interesting way (like the adorable Mila’s Daydreams project that we love). Spill those sentimental beans.
PS: If you’re looking to achieve a similar look but don’t want to bother with Photoshop, we learned of a company called Sticky Bellies that sells removable monthly milestone stickers that can be applied to any clothing.

hyzen says
I love this! I did weekly pictures with my daughter until she was 1 (and then monthly pictures after that), but they aren’t all consistent like this so that the baby’s growth/changes are really the focus. Also, she just turned 2, and I still haven’t put them together in any form of print media–they live on flickr and my computer. I need to get on that! For our new baby on the way, I think I might try something like you’re doing–thanks for the tutorial!!
Jennifer says
Sheer awesomeness!
Melissa says
This is such a wonderful idea and it’ll be a great thing to show her first boyfriend!!
I like the idea of making a quilt out of the fabric once you’ve got enough but I’d personally make bunting to use in her bedroom, or indeed for future birthday parties.
Tina-The Wellness War says
She is SO cute! And that’s such a cute idea! I’m doing something kind of similar-every year I take pictures of my kids on their first day of school. Well, my oldest son is going to be a junior this year, so next year, I will be compiling them all into a Shutterfly book along with his graduation picture at the end. I’m currently looking for all the past years-you know, before digital!I’ve already found a few & its so cute. And sad, too!
YoungHouseLove says
Tina,
I was just telling Sherry how my mom did the same thing with the first day of school pictures. Probably somewhere in our house can still find an overflowing clip of construction paper, each with four first day of school photos (one for me and each of my three sister). Though since there are 13 years between my oldest and youngest sisters they kinda blurred into “first day of work” photos at some point for a few of us.
-John
Juliann says
Too cute! Clara is beautiful. Where was this idea when my two kids were babies? I’m known for taking 18 million pictures of our kids on any given day, so I get the 75-100 pics:) Keep up the good work. Clara is a cutie pie!
Martha says
A. This is fantastic!
B. What on earth are you going to do when she starts to crawl?
YoungHouseLove says
Hey Martha,
We’ll figure something out! We’re thinking we’ll have to secure the fabric a bit more so she can’t crumple or wrinkle it (and we might not get to take 100 pictures when she’s on the move) but we’ll definitely get ‘er done!
xo,
s
Beth - BTW says
I absolutely adore this weekly photo/coffee table book idea that you have going. I plan to try it out with number 3 who is cooking as I type.
For the previous two Wee Webbs, I started a tradition of taking monthly photos of our first (and continued with the second) in the *exact* same outfit each time. That’s right, from 1 month until 12 months, they were each s-q-e-e-z-e-d into the same outfit to show how they had grown. This method was not as pretty (as your method) as far as the backdrop went, as I did the pics in the same, not so pretty, chair each time, but it worked! I could do a flip book and watch them grow before my very eyes, and I might just do that!
Kim at Yellow Brick Home says
I just love this idea SO much. Kudos to you for putting together a book down the road. I love making books and use the program Blurb – super easy and customizable (is that a word? Looks funny as I type it).
Not that we’re ready for children yet, but this is on my future to do list! Love it.
Heather @ Side of Sneakers says
You guys are geniuses. And awesome. That’s all I have to say. :)
Mrs Soup says
I love the idea of the onesie! Brilliant!
We did something similar with our daughter, taking a picture of her with a huge stuffed lamb.
Here is the up to 6 month slideshow: http://s223.photobucket.com/albums/dd98/katarianna/blog/?action=view¤t=ae060c70.pbw
Still need to put together the rest into the first year…..I should probably do that, considering she is 18 months now…
Kimberly M says
LOVE this idea ( as always you are BRILLIANT). Thanks for sharing! I have my wheels spinning right now for ways I can recreate some fun things for my own kids :) LOVE your blog! Have you ever considered doing a TV show? PLEASE do one, Id tune in forsure!!!!
YoungHouseLove says
Hey Kimberly,
So far we’ve actually declined a few proposals for a TV show because we’re just two (well four counting the “kids”) homebodies and while we love sharing our projects via the blog, we’re not exactly driven to see our faces on TV- eeeks! Plus it would take weeks away from the blog, so we definitely couldn’t keep up with our projects or our posting schedule- so for now any TV gigs are on the backburner. Hope that explains our rationale though!
xo,
s
Kara @ KARA PASLAY DESIGNS says
It’s so fun to see you guys interact with Clara! It warms the heart!! :) She’s absolutely ADORABLE! Thanks for the comment on my blog yesterday- it’s such an honor to know you make time in your busy schedule to drop by!
Ashley says
<3 your videos! theyre so entertaining! :)
Mary says
Love the TV show idea, and also – love a BOOK idea!!! I’d be the first in line at the signing, Barnes & Noble here we come to see the Youngsters and their new book!!!
YoungHouseLove says
Hey Mary,
The book idea definitely sounds more our speed. If only we could clone ourselves so we’d have time to take on enough projects to fill a book (and write that book as well) all while keeping up with our two-post-a-day blog habit, coordinating giveaways, and raising Baby P. Cloning is just around the corner right???
xo,
s
KK says
I love Clara! She could not be more adorable. I can’t wait to get my hands on her. XOXO to all of you
Elaine says
I took monthly pictures of both of my girls and for the second one, made a little sign out of carstock and scrapbooking paper with the month number on it and took her picture on the same rocking chair in her nursery. It’s neat to see how much she grew each month because she’s sitting in the same chair. This Saturday is her first birthday and I used the monthly pictures to make a birthday photo banner like the ones you see on etsy, using more scrapbooking paper and some ribbon. I love your idea, especially since it will be come a beautiful book documenting her first year. Do you make digital photobooks at all? I’ve ordered from Shutterfly, My Publisher as well as directly from Apple. I think that My Publisher’s photo quality is the best of the albums I’ve done. Do you guys have experience with any others or have a recommendation for photobook sources?
YoungHouseLove says
Hey Elaine,
Yup, we’re planning to make a digital photbook through Shutterfly or one of those other companies. Not sure which one we’ll go with yet though!
xo,
s
Beylah says
Love this, thanks for sharing! I really like the idea of making bunting from the fabric, or you could use little bits of it to make fabric covered clothespins (like you just did, but with fabric and mod podge) or fabric covered thumb tacks to clip/pin them up on the wall, clothesline or bulletin board. Or you could even make little bows or hair clips out of them when she sprouts a few more on her head! OR, since the fabric tends to be a larger print you could always use it to make fabric covered baby albums! :)
Liz says
What an amazing way to document Clara’s growth in a super visible, objective, and quantifiable way (although your love and excitement of and for her can never be quantified…priceless!). You guys have a great knack for making things fun yet memorable. You will have these photos for forever! I can’t wait to do this for our future babies someday…and to learn how to use photoshop! I was almost thinking flip-book….. :) But I suppose she would have to be in the same exact position to have that happen.
Nell says
Such a great idea and tutorial video!
I love the idea of using the leftover fabric to make a quilt or party bunting, but I thought I would offer some more ideas:
tablecloths – can be used at parties or double as beach/pincic blankets
placemats – can also be used at parties, and the simple construction will make it easy to recycle them into something else down the road
hair accessories – bows, headbands, wrapped barrettes, etc… she is a little girl after all!
monogramming/letters – i cut out letters from fabric and sew them onto towels for a monogrammed look. you two could take this one step further. i am sure you could come up with a saying or quote that is made up of 52 letters, cut the letters from the fabric, and glue them onto a white matted board to create a really special wall hanging.
April says
It doesn’t look like the fonts are free – when you go to the link to download it takes you to page to pay?
YoungHouseLove says
That’s odd! They were free for us! Is anyone else seeing a pay page? Weird!
xo,
s
Maryam says
I just added the Fyra for free but the one that was used for the week, it is not free anymore (booo)!
YoungHouseLove says
Oh no! That stinks.
xo,
s
Fernanda says
Thank you so much for this post!!! I am one of the followers that asks questions about the weeks photos all the time!!! I loved this idea, and I am planning on doing this when I have a baby too! Thanks so much for the post!!
Catherine says
Uhhhg, I’m already having baby lust issues, and you all are just making it worse! When we finally do decide it’s time to start a family, I’ll be shamelessly copying this. It’s such an awesome idea.
Kevin M says
This is one of the coolest ideas I’ve ever seen. I wish I could go back in time and do this for our 6-week old.
Cheryl Joy says
Really awesome post guys. I am a photographer and I honestly didn’t even realize the onesie had been photo-shopped! It looks great. Also, I see a lot of babies.. and Clara is definitely in the 99th percentile of cuteness. ;)
Lauren says
Hi guys. So what do you plan on doing with all 52 yards of various fabric? It might be a nice reminder, as well as keepsake to make a quilt out of all the fabrics for Clara.
YoungHouseLove says
Check out the last few paragraphs of this post for that info! Hope it helps!
xo,
s
Alana says
This is the cutest thing ever. Such a great idea! And your little girl is totally precious.
I don’t have kids yet, but when I do, you can bet I’ll be stealing this, step-by-step, from you!
Laurie says
I love this project and look forward to doing it with my first baby (due in 6 weeks). I don’t have photo shop so I’ve mapped out 12 weeks already in powerpoint and am printing them on sticker paper picked up at Staples-sort of a homemade Sticky Bellies. :)
hi-d says
Oh my goodness!!! This is one of the cutest ideas I’ve EVER seen! I’m so planning on doing this when the time comes. Thanks for the awesome tutorial. :)
Meghan says
I love how you do a week by week picture – that’s some serious dedication! And even better that you add the numbers on the computer! Brilliant!
I did a monthly picture with our little pepito and it’s been so fun seeing how he changes each month! And I can manage to keep up with just doing one a month – I seriously have no idea how you do it every week – I’m impressed. Can I say that one more time?! ha! Good job! Love love love!!
If you want to check out my monthly posts – http://onelittlerumer.blogspot.com/2010/08/william-by-numbers-last-edition.html
And I love the idea of using all the fabric at the first birthday party OR the quilt idea would be awesome too!!
Kara Ayers says
Thanks for this tutorial! I snagged your idea about a month ago and we just had our 2 month shoot yesterday. I must say I’m so relieved to hear how many you take…it’s MUCH harder to capture a good one at this age than I thought!
I was trying to figure out the editing process last night-if only I’d known your publishing schedule;)
I found this tutorial on Photojojo a bit helpful though:
http://content.photojojo.com/tutorials/fake-tshirt-photoshop-tutorial/
If you have a really pesky wrinkle sometime in her onesie, the warp method might work. I used it to make Hannah’s onesie look a little more real.
Julie says
Thank you, thank you, and thank you! I wish I’d done something like this for my first. Luckily I’ll be having another shot at it!
Danielle says
love these – clara is adorable!
for my first I made onesies for her to wear, and for my 2nd i’ve been taking onesie pics (just w/ a plain tan blanket background using stickers with the months on them…your idea is def way more original and looks great.
I can’t wait to see as she gets older – I know you will figure it out, but I do hope you post some of the outtakes…some of my outtakes from when they start crawling right off the blanket are too funny!
also love the quilt idea! I know you guys are busy but it seems like such fun busy (aka the kind of busy i wish i was :)
Jen says
You guys are awesome and Clara is such a cutie!! Thank you so much for the tutorial. I was going to order customized onesies for when our little tater tot arrives, but now I’m going to just use Photoshop like you guys do! Thank you sooo much! :)
Patti says
Thanks for the tutorial! I wish I had done this with my twins when they were born…now in college. I was very surprised to see your response about how many hours you guys put in…I never realized. But if it makes it any easier, your quick response to comment questions is awesome! It’s like we’re having a conversation with you, so keep up the great work!
Aimee says
I LOVE your idea for chronicling your daughter’s growth! So adorable!!
When my son was born, we went the route of photographing him with the same stuffed animal each month, because he spent his first 4 months in the NICU. The stuffed animal gave us a visual size comparison as he started at the same size as the monkey and ultimately eclipsed it.
When my sister had her last baby, I created some belly stickers for her to use using label sheets and my inkjet printer. Just last week, I offered them as a free printable on my blog: http://sprik.blogspot.com/2010/08/monthly-baby-photos.html for those moms & dads who aren’t Photoshop-savvy.
christine says
i agree with john, i got a pack of sticky bellies as a baby shower gift and LOVE THEM. i’ve been using sticky bellies for 5 months now and my daughter’s pics are just too cute. everyone always compliments me on my monthly photos and scrapbook. i also love the fact that the sticky bellies stickers are opaque, so i can put them on colored or patterned onesies to spice things up. for someone who doesn’t have the time/ability to bother with photoshop, sticky bellies is PERFECT.
Briana says
Clara’s looking adorable as always! If anyone wants another method to deal with extreme wrinkles in photoshop, displacement maps work great, although they are more complicated. See this tutorial http://www.scribd.com/doc/4301/Photoshop-Tutorial-Displacement-Maps or this one http://layersmagazine.com/displacement-maps-for-graphics-in-photoshop-cs4.html for more info.
Becky says
Hi Sherry and John!
I was wondering- when you add music to the videos that you post, to you have to obtain copy rights? Or do you use music that is “royalty free”?
Thanks :)
Becky
YoungHouseLove says
Hey Becky,
Yup, we’re sure to use 100% royalty free music (which we credit at the end of each video) and we add it using iMovie. Hope it helps!
xo,
s
Amelia says
I just wanted to say that was the cutest video ever (even though I’m not really supposed to be looking at it at work!). Thanks so much for it – it was just really sweet!
Chelsea says
Do you guys know of any blogs that are deep into photoshop/graphic design or recommend any books? Pioneerwoman is a great blog that has a lot of free actions. LOVE this post!!!!
I really hope you guys keep growing your blog and focus on all aspects of your lives, us readers love that! Not just the home part.
YoungHouseLove says
Hey Chelsea,
We were going to recommend Pioneer Woman and Dooce.com. Also any basic Photoshop books at the library should help!
xo,
s
Amanda says
Question – I have never used Photoshop (embarrassing, frankly). Looking at what Adobe has…there’s Photoshop, Elements, Elements Plus, Elements Plus This That and The Other Thing, PhotoshopSuperDuperAwesomeness…ugh!!!
Which version did you guys go with, and has it met your needs??
I love the weekly Clara pics!!!
Becky says
So you can just download the songs straight from the website? Do you have other websites that you normally use?
Thanks again :)
YoungHouseLove says
Becky- We go to creativecommons.org to find almost all of our available-for-use music (you can search a variety of artists there). Hope it helps!
Amanda- We have Adobe Creative Suite which comes with Illustrator, Photoshop, InDesign, etc. Of course we use Photoshop all the time (and rarely use the other programs) so maybe try buying only Photoshop to start? We couldn’t live without it!
xo,
s
Candace says
Absolutely adorable!!
Shar says
Take a photo of yourselves on your anniversary every year. It will be fun in golden years to look at a photo book of how you “grow old together”. If you have already had an anny or 2, then use a photo taken close to that time to catchup. LOVE the photos of Clara. That is just the neatest idea!
Pamela says
Sherry and John,
Can we be friends? Seriously. I need some creative people in my life. :-) Also, we’re preparing our house in NoVa to send you some before and after pics for a house-crashing. You guys are super inspiring!
Thanks,
Pamela
YoungHouseLove says
Hey Pamela,
Sure! Consider us friends! And we’d love to see your Nova pics. Send away!
xo,
s
Shannon says
This tutorial is really great! It was fun seeing how these come together – and wow – all the work! Nice job!
Shannon
Carmen says
Thanks so much. I tried it myself, but didn’t turn out so great. Now I have no excuses. I think you should put your posts and diy tutorials in a book, then I and many others don’t have to visit your site so much to get a project done (besides printing the post). Count me in for the book, if you decide for it.
Jessica F. says
FONT QUESTIONS ANSWERED:
April – I think you asked the question about whether or not you had to pay for the fonts John and Sherry used. You don’t…see below. :)
Both the Fyra and the Otari fonts have about 8-11 “kids” in their font “family”. Out of all of the kids that they offer, they only offer ONE of them in each family for free: “Fyra-Numeric Circle Closed” and “Otari Bold Limited” are FREE and happen to be the fonts the Petersiks used for the number and the weeks on Clara’s outfit. You do have to register and create an account, and then add the free fonts to your virtual cart and then check out. It will then link you to a page where you can then download the compressed font file. After you unzip or “decompress” your font, depending on whether you have a PC or a Mac, you will likely have to install your font manually.
I just did this about a minute ago and I didn’t have to pay a thing! Hope this helps!
Caitlin says
So precious! I love a quilt idea as well, but there’s also a great book called One-Yard Wonders (http://www.amazon.com/One-Yard-Wonders-Sewing-Fabric-Projects/dp/1603424490) that’s filled with sewing projects that require only a yard of fabric (there’s lots of baby and pet related projects in there and fun stuff for the home). It might be good for a few of the fabrics that might not go with the others for a quilt.
Carmen says
quick one: how did you combine all your pictures, from all your cameras? and did you? i saw in one of the pictures that you use iphoto, but owning two cameras and an iphone, I find it frustrating to have the pics in three diff places. thanks
YoungHouseLove says
Hey Carmen,
Here’s a post to explain how we organize and sort our photos (check out the comments for even more info): https://www.younghouselove.com/2010/05/easy-upgrades-count-on-it/
xo,
s