The last few weeks have been deliciously random and so productive for us! I think we should bounce around from room to room all the time like this… at least until we dive into a big renovation that demands all of our attention. So far this week we’ve painted raindrops & a pink door in Clara’s room, had some fun with Shannon’s design dilemma, finally finished our big sunroom floor project, and we’re actually starting to work on something in the kitchen for Monday (ahhh! that room needs more help than I did in Calculus class).
And this week’s little crafty project didn’t bomb, which is a huge relief because there were definitely a few moments of doubt. I decided to tackle something I’ve been meaning to do for, oh, about two years: displaying our vacation keepsakes in a charming and easy-to-see way. So here’s where I ended up…
It’s sort of like a vacation-memory-jar-meets-snowglobe-or-cloche, and it was actually really easy and only ran me $2.79 to make each one.
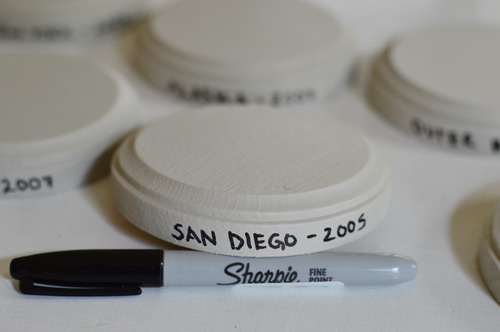
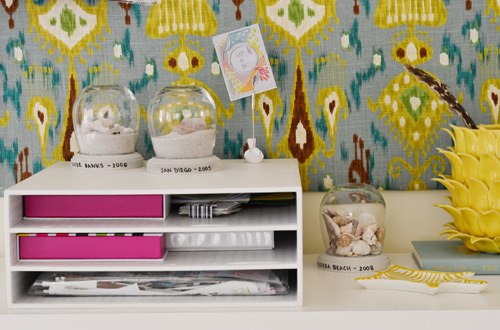
But let’s grab a ride in the Delorean and go back in time for a second. Once upon a time (back in 2008) I made six vacation time capsules here… but I haven’t been displaying them for the last few years because I just don’t love them anymore. Which is sad because I love the keepsakes – I just didn’t like the containers as much anymore.
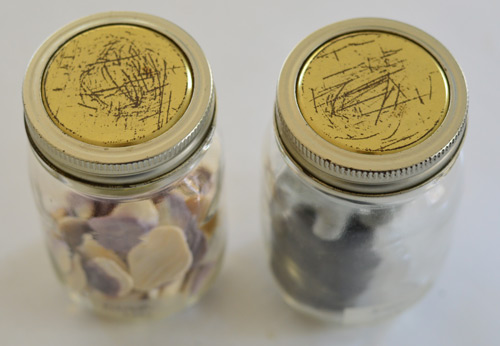
I certainly think canning jars are crazy charming (and they’re probably more “in” now than ever) but I didn’t like that when you looked down at them on surfaces like console tables or desks or dressers, almost all that you saw was the lid instead of whatever was inside (see above).
And I also didn’t love that when you lowered your gaze to stare at them head-on (or placed them in high places like up on a bookcase) the glass was wavy, so it blurred the items inside. Here’s a comparison of how the canning jars obscured the contents compared to a regular stemless wine glass. See how much clearer the objects in the glass on the right are?

I also thought the scotch tape labels that I had added so many years ago were hard to read, especially depending on what’s behind it (you can see one in the picture above). So I wanted to come up with a way to accomplish three things:
- more clearly label the contents of each jar
- display our keepsakes behind non-wavy glass
- make them visible from above and the side instead of just from the side if at all possible
At first it felt like a tall order, but I was inspired after coming across this project, which made me realize that there might be a way to use inexpensive stemless wine glasses or vases from the craft store along with little slices of wood and some type of adhesive or caulk to connect them. It definitely could have bombed (uh… sand everywhere) but I had a few lucky breaks along the way.
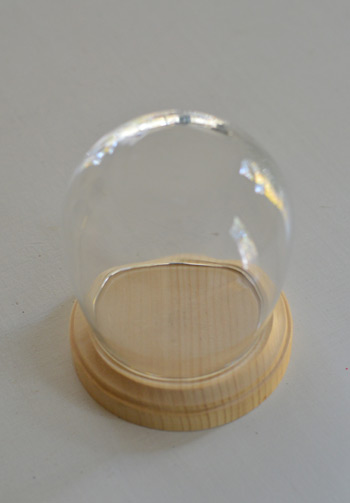
For one, I couldn’t find any tree branches of the right thickness to slice in our yard or at a local firewood spot (they were all triangular or too narrow, and free of bark) and I couldn’t even locate any pre-made wood slices in the craft store (other than some too-large birch ones for $15 a pop online). But when I walked around JoAnn I did notice these little 4 x 4″ round wood plaques for 79 cents each (in their wooden box/birdhouse/plaque area). They also sold stemless wine glasses (in their party/glassware area) for $1.99.

It was nice to find both potential items at the same store because I could flip the glass over on top of the wood plaque to see how they’d work together. It kind of felt like a miracle when they lined up so well.
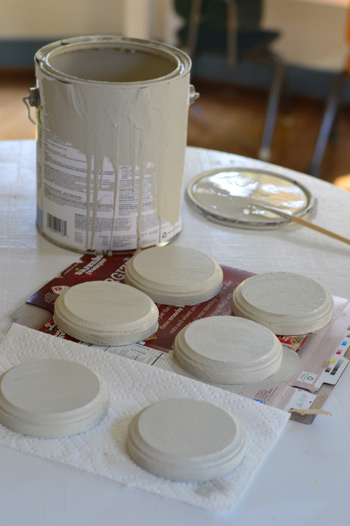
So as soon as I got home, I jumped right into painting the wood plaques. I debated everything from a bold color to white or charcoal or even a whitewash or a stain, but in the end I liked the idea of a timeless neutral taupe-y color the best so the items in each jar could be the focus – and I already had leftover Revere Pewter from the bathroom project upstairs. Two coats did the trick without any bleed-through from the wood (which is nice because I didn’t use primer, so it was sort of a gamble).
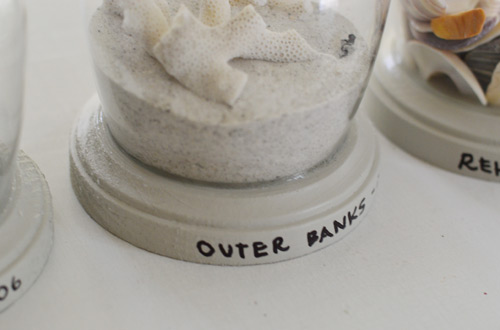
After they dried I used a sharpie to write each of the places we’d been on the side of each one, along with the year that we traveled there. It’s so much clearer and easier to read than tape on a wavy glass jar!
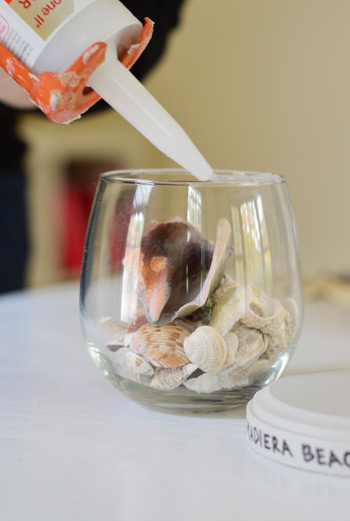
Next I decided that clear silicone caulk would be a good way to seal the glass to the wood. Here’s why: some types of adhesives/glues are thinner/runnier and I worried the seal wouldn’t be as tight as it would with a more thick/dense line of something to stick them together. The other reason that I went with clear caulk is that it can easily be sliced with an exacto knife and peeled back to free up the contents of these jars. So I don’t have to Hulk-smash them like an old school piggy bank to access things (which definitely could have been the case with crazy glue). Instead, I can just score and peel the silicone caulk to open these up again whenever I’d like. But in the meantime they’ll be nice and secure – even with things like sand floating around inside.
I just ran a thin line of it around the top of the glass like this (I used GE Premium Waterproof Silicone II Caulk in the clear color). Tip: try not to make the opening in your caulk tube too wide or caulk will pour out a lot faster/thicker and you’ll end up with a drippy ol’ mess (this is universally true for practically every caulking project, so it’s a good skill to master).
Update: I’m a paranoid prego, so I wore a ventilator and worked the caulk gun like Darth Vader (since caulk can get fumey sometimes), but I later learned that this type of caulk is on the green list. Hurrah!
After getting a thin ring of caulk around the top of the glass, I pressed the wood round onto the cup while it was still in the upright position (didn’t want things to spill all over the floor, which I was certain would happen if I flipped it over before joining it to the wooden plaque).
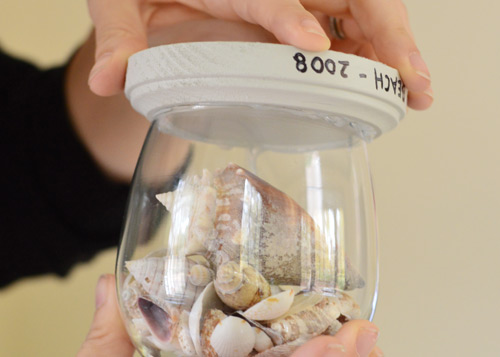
Once they were joined, I could easily turn it over without anything spilling. So I placed it on the table and made sure the glass dome was centered. Then I pressed the glass down with one hand (to keep it centered, since it can slide around a little before things start to set) and used the other hand to wipe the edge down with a paper towel to remove any extra caulk that was oozing out.
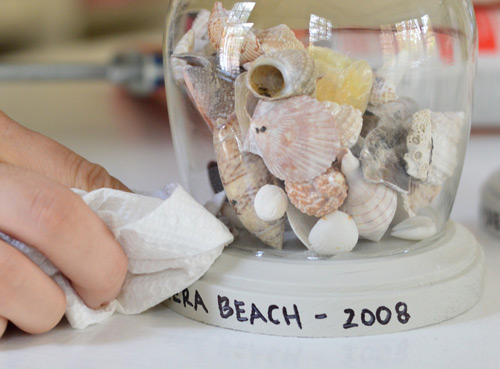
It only took them three hours to dry, and they were sealed up and pretty dang seamless looking. Here’s the sand, all nice and contained (you can sort of make out the clear shiny line around the base, which is the caulk doing its job). I shook that thing like a snow globe and there wasn’t a sand explosion or anything. So glad.
Right now they’re chilling on various surfaces in the office and living room, but my dream is for them to eventually end up all together in our bedroom (we’d love to add a wall of built-in cabinetry in there to make our bed feel like it’s tucked into a nook – and I can just picture them all lined up on one of the shelves). Sigh. Can’t you see it?
I’d love to keep making more over time as we travel to new places, so the paranoid collector in me is tempted to buy at least ten more wood plaques and glasses just to keep around for future vacations so they all match. Is that crazy? What do you think?
Is anyone else out there displaying vacation keepsakes? How do you do it? In shadow boxes? Scrapbooks? With framed photos? I read somewhere once that “experiential purchases” bring you the most happiness. So instead of buying a new car, if you spend money on an amazing vacation, the effects can last longer and you won’t take the purchase for granted like you might if you upgraded something that you’d use everyday and would soon become accustomed to (I found an article here about it, although I’m not sure this is the same one). Certainly makes me want to make the most of our little vacations and memorialize them when we’re back home – even though they’re usually just road trips as opposed to exotic foreign locales. Maybe someday I’ll have a vacation jar for Morocco or Australia. A girl can dream…
Psst- Wanna know where we got something in our house or what paint color we used? Just click on this button:


Shareea says
I really LOVE this guys! My family is traveling home to CA for Thanksgiving. This will be a great DIY project for my granddaughter and I when we collect sand and shells from the beaches of Carmel, Santa Cruz and SF. Living in the midwest for almost 25 years, the one thing I miss almost daily, is 20 minute access to the ocean.
Karah @ thespacebetweenblog says
Such a cute idea! And yes, I can totally picture them all lined up on those nice built-ins in your bedroom :)
Kristin @ Little Corbin Hill says
This is such an awesome idea! Love it and definitely doing this for our next vacation =)
Leisa says
Sherry, I LOVE this!
I am obsessive about finding pretty ways to treasure the things we have collected during our travels (over 30 countries and counting).
We keep all of our ticket stubs and tourist maps. And I collect a postcard from every place we go, plus I like to buy little works of art from the street sellers.
When we eventually move back home I want to have a gallery wall with all my little art works.
Plus a wall of frames with all of the tickets and postcards for each city, and maybe some DIY map art.
Your project is making me wish I had collected sand and shells too! Oh the possibilities.
I currently have 2 vintage style maps on pinboards in our lounge – with all of the places we have travelled pinned.
My dream travel memory project is to create a feature wall with a HUGE map, and put little lights in each of the places we have visited. Then when we entertain we will have mood lighting and a conversation piece in one! And when my fiance and I are old and grey we can stare at it from the sofa and remember all the amazing adventures we had when we were young.
You definitely need to stock up on supplies for your future travels – book signing in the UK, beach holiday in Fiji, then pop down to New Zealand to visit your favourite fans (cos in my head we are besties) :)
x
YoungHouseLove says
Oh man, that would be amazing.
xo
s
Kyra says
Those are super cute! BTW, did that one say Madeira Beach in FL?! That’s where I live! Not that anyone else would notice but the E should be before the I…
YoungHouseLove says
Oh my gosh you’re right! We loved our trip there!
xo
s
Meredith Dagen says
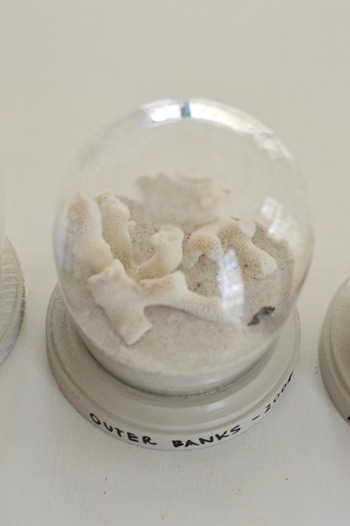
Hi! First I have to say I love, love, love your Blog and have been following it for a while. I was super excited to see that you had visited my hometown – The Outer Banks! Hope you had some great memories here and hope you will come back to visit! :)
YoungHouseLove says
We loved it there!
xo
s
Andrea says
You come up with the most original crafts! I love that they are usually easy, too. This is a great one and I’ll have to pin for a later project. Thanks!
Erika says
What a cute idea! You might want to try looking in Dollar Tree sometime. Those wine glass’s would have been a dollar a piece. It’s a really good place to go for those crafty things :)
YoungHouseLove says
Thanks Erika!
xo,
s
bronwyne says
I would buy as many as you think you will need for the coming years.There is always room at our home to stay if you ever get to Victoria in Australia.
YoungHouseLove says
Aw thanks Bronwyne! That would be amazing. I’m going to daydream about that for the next thirty minutes now…
xo
s
Amy says
What a great idea! When my husband and I get home from a trip, we go through all of our pictures and pick one to blow up and frame. We use Shutterfly to blow the pictures up and get frames from IKEA. We have a whole wall in our house that we dedicate to trip photos so it’s ever expanding. It’s also fun for others to look at when they come over to our house. I love it!
YoungHouseLove says
Sounds really sweet Amy!
xo
s
Hunter Hammersen says
We do something similar, but on a slightly smaller scale. I’ve taken to bringing just a tiny bit of shells/sand/glass/rocks/TREASURE home from our various excursions and putting them together in jars like this: http://violentlydomestic.com/2012/11/18/ornamental/ They hide around my house (I label the underside of the cork with the place and date) and please me to no end when I see them!
YoungHouseLove says
Love that!
xo
s
Claire @ Claire K Creations says
Crazy? I was actually surprised you didn’t buy a heap of extras! Definitely a good idea. They look fantastic.
I used to collect things from our holidays but was so slack at doing anything with them I stopped. I love the little sand one though – would be nice even if it didn’t relate to a holiday.
Brooke Fedigan says
I’m a saver, so I say buy a dozen at least and save away for excursions to come! Rock on!
Bethany says
Clever clever!!! And yes! I vote for buying extras now!
Shane says
This is genius. I love it. I wish we would have been doing this for years. I guess we will have to go back to all those beaches to make ours. Thanks for you post!
Kristen @ LoveK Blog says
LOVE this idea! What a great way to showcase special momentos!
Nardia Cooper says
Wow can you get me some & send them to NZ. I love that you could pop anything into them.
Have you thought about taping off the bottom of the glass and painting the join where you see the silicone? I wonder if that would ruin the look.
Sadly nowhere here has anything this fab for such a low price, but it has inspired me to have a hunt around for an alternative as I would love to do this to my Orphan Annie miniature doll.
YoungHouseLove says
Aw, I hope you can find something! As for taping the joint and painting it, I think that could work with paintable caulk (some clear silicone caulk doesn’t take paint very well though, so finding the right kind would be key). Good luck!
xo
s
Vanessa says
Such a cute idea! I love it. You’re so creative!
farzana says
I ALSO HAD THIS FRAME MADE WITH OUR HONEYMOON SHELLS WE PICKED FROM THE BEACH. I WAS THINKING OF SHARING THAT BUT YOU GUYS BEAT ME (STILL LOVE YOU). AND SHERRY YOU ARE RIGHT, WE ALWAYS GO TO VACATIONS RATHER THAN BUYING EXPENSIVE STUFFS…WE ARE PRETTY HAPPY WITH OUR LIFE.
Kristin says
I think these are just lovely, and that it is prob best to stock up on some more as you’re bound to pick up more little mementos on future travels. Being sentimental as well, I find it hard to get rid of these little memories, but hate putting it all in ‘the drawer’. (We all have one, ha). Great tip!
Callhomedear.com
Kim says
I’d go so far as to not only get more glasses and plaques, but to paint the plaques so next time you only have to assemble! You could keep a tube of caulk, the plaques, a Sharpie, and the glasses all together in a box and then next time you have keepsakes you can quickly make a globe. I know I have a tendency to keep “keepsakes” but never have a plan for them, then I get tired of moving them around and they end up getting tossed.
sarah @makingitmyhome.blogspot.com says
i LOVE this project!!!!
Jen says
Go and get 20 more!! One day you will be SO SO thankful you did! Box them up with a sample pot of the paint and pop it in the attic.
ps- Australia would love to have you ;)
Amber says
I was so inspired by your post. I already had one of these wooden plaques at home and went in search at Michaels for a glass. Didn’t see any that really looked like they would work. Went to World Market and….BOOM….clearance glass for $1.48. Took it home to make sure it would work and it did. So….I went back and bought the other two clearance ones and one that was clearance to .98 cents! (Of course I had to go buy the other ones and save for later LOL). Can’t wait to try.
YoungHouseLove says
So glad!!
xo
s
Beth says
Oh, two things.
One, definitely go buy more of those items so you’ve got ’em when you need ’em!
Two, your comment about adding cabinetry around your bed caught my eye. I live in a 901 sq ft home and storage is lacking, to say the least. I’ve thought about doing that very thing around my bed because – unlike most of the house – there’s room for it there. I even went back and looked at pictures of your first house where you put the Ikea closets in. My fear is that it’s going to make my serene bedroom look industrial. Your thoughts?
YoungHouseLove says
We want to do more of an open look this time, so hopefully if we tackle it, it’ll help you envision it. I bet it could add a lot of function to a small space! Will keep you posted.
xo
s
Chantel B. says
Wow! What a great idea! I never would have thought of this. Thanks for sharing.
http://therizaslocaslife.blogspot.com
Divya says
I have been trying to figure out what to do with our honeymoon rocks from the Himalayas and have just put up some cute display shelves on our walls that needed “trinketizing” (is that a word? it should be!)
This is a brilliant idea and i just happen to have clear caulking from a bathroom update!!
Seriously, your weekly craftys rock my world!
YoungHouseLove says
Thanks Divya! So glad!
xo
s
vel says
Ooooh, love this project, will certainly try this, so easy and cute! thanks Sherry!
Janine says
I would definately buy more… I am a sand collector (every beach I visit) and I have already bought 30 jars in advance! :-)
Janelle says
I just saw this project on your “Favs from 2013” and I love it! I’m all about buying more supplies for future vacations, but here’s my take: you will surely have either more supplies than vacations or (hopefully!) more vacations than supplies. That said, if you have more vacations than supplies, you can start displaying your new mementos in a new way and be happy that they don’t all match because it means you were blessed with the oppotunity to travel more than you thought! :)
(Kind of like when we got rid of a lot of our baby stuff because we were “done having kids”…we are going to spend money on things we should have just kept, but instead I am just going to be happy that we were blessed with another!!) :)
YoungHouseLove says
Aw, thanks Janelle! Love that!
xo
s
Cathy says
I love this! I’d love to see some of your other ones. What else do they include? Only beaches and sand?
YoungHouseLove says
We have them from all over, so one from Alaska has a glacier rock and a small ceramic bear and one from NYC has our metrocards and punch cards to favorite restaurants, etc.
xo
s
Alyssa says
I’m nervous but I think I’m gonna attempt hopefully soon! I was wondering if E-6000 glue would work instead of caulk (just because I have it on hand) or if it’s worth picking up some caulk while I gather everything else! Thanks :) ps I have seen the stemless wine glasses in the dollar section at target, although they might not be exactly the same size as yours from Jo Ann :)
YoungHouseLove says
Hmm, I would go for the caulk if you can (I worry that glue won’t be thick enough to make a nice seal).
xo
s
Alyssa says
Thanks so much! I’ll have to send pics when I get them done :)
YoungHouseLove says
Sounds good!
xo
s
Kellie says
Thank you for posting this! We are bringing our 3 month old on his first beach vacation next month and I will be doing this for him! Thank you!