Remember this old post about all the fun projects we were daydreaming about taking on with some bonus cash from BHG’s 48-Hour Challenge? Well 20,000+ votes later (!) we didn’t win the 5K (congrats Nicole!), but the good news is that plenty of those projects are still on the agenda. In fact, two of them are already completed! Remember we spruced up our patio a few weeks ago with a DIY firepit and some cheap-o lounge chairs? One down, four to go.
Well, better make that three because we’re back to share the second project that we tackled on the sly. We hinted at wanting to “introduce some layered, textural interest in the half bath” but then decided not to delve into details and surprise you guys instead. Well… surprise!
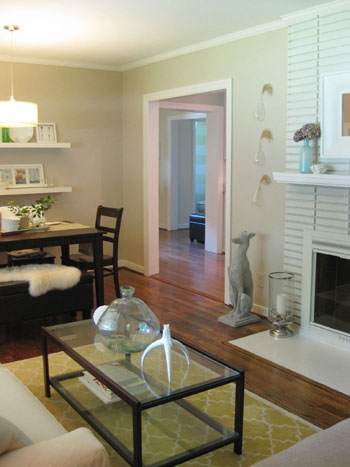
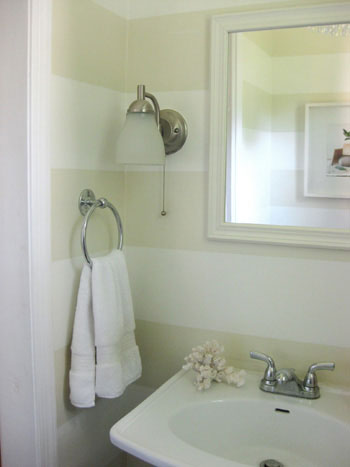
See that cream on cream texture that’s visible all the way from the front door? Let’s get closer shall we?
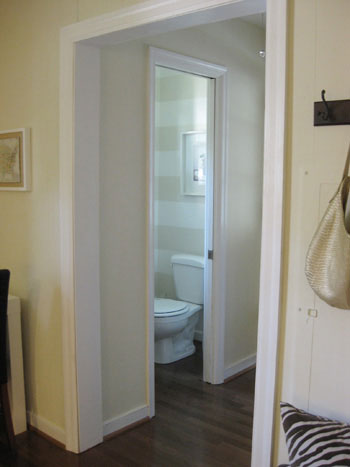
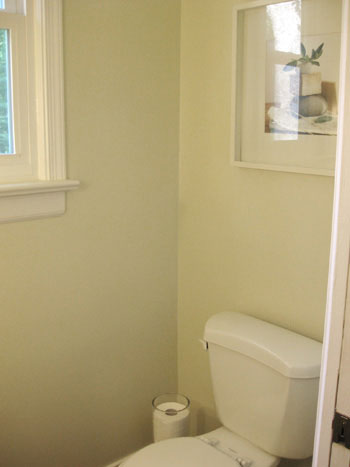
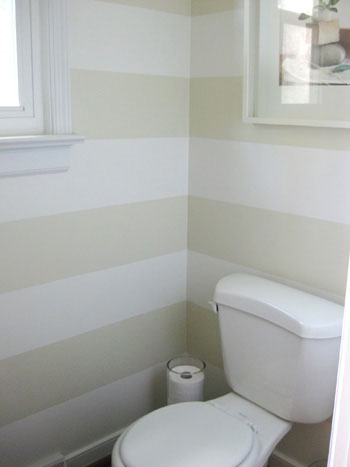
Yup, we painted cream on cream horizontal stripes in the half bathroom! It used to be the same tone as the hallways and the adjoining den (Wishes by Glidden) but we decided to amp it up in that jewel box of a bathroom with some lighter stripes to make the room feel a little more expansive (horizontal stripes have a way of creating that effect) and a heckova lot more interesting. Jenn’s Design Star makeover from last summer was actually our inspiration- it just took us twelve months to make it happen. Here’s the bathroom before our little paint intervention:
The entire project took just 4 hours one evening, and the steps were really simple:
Step 1: Divide & Conquer- Measure the full length of your wall and divide that number by twice the number of stripes that you want to have minus one (ex: our ceiling is 98″ tall and we wanted six horizontal stripes so we divided 98 by 11 (6 x 2 = 12 – 1 = 11) to get the thickness of each stripe. Ours came out to about 8.9 inches.
Step 2: Make Your Mark- Use a ruler to mark off every 8.9 inches starting from the floor and working up to the ceiling (we made two small pencil marks on each wall, one on each side).
Step 3: Tape It Off- Grab some blue painter’s tape and connect your pencil markings to create taped off stripes (once the tape is in place rub it a few times so you know that it’s flush with the wall for cleaner lines). The main thing to remember is that the tape should go outside the marks for the stripes you’ll be painting but inside the marks in the negative space that you won’t be painting. This might sound confusing, but just ask yourself if you’re taping off the stripe or the negative space as you go, and make sure the taped stripes are the right distance apart (ours were 8.9 inches) while the tape for the negative spaces is closer (once you remove the tape both areas will be the same width).
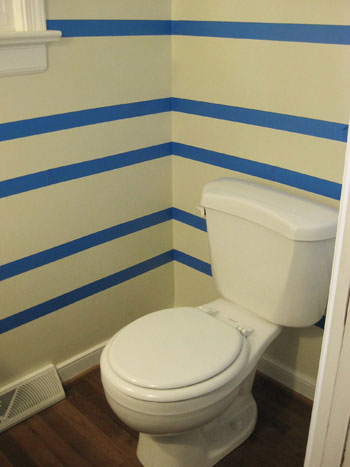
Step 4: Roll With It- Grab a good roller and some slightly lighter or darker paint (subtle is key for this look, so just going a shade or two away from the wall color makes for a soft layered look). Then apply two even and thin coats of latex paint between the tape that’s further apart to create your stripes. You’ll also need to use an angled brush to cut in near the base molding and the ceiling.
Step 5: Take It Off, Baby- This is a very very very important step. It’s crucial that you remove every strip of tape as soon as you’re done with your second coat of paint while the paint is still wet (assuming the coverage is good enough that you don’t need a third coat). Waiting to remove the tape until after the paint has fully dried will cause peeling and uneven lines that are less than crisp (which will make you want to cry after all that taping). In short: as soon as your roller is down, start pulling that tape off the wall for a clean stripe that looks seamless and sleek.
There you have it. Horizontal wall stripes. Easy eh? Oh and we used a quart of Valspar’s Honeymilk for the stripes because we actually had a $10-off coupon to Lowe’s. And thanks to that $10 off coupon, this entire project came in at just… (drumroll please)… $2.48. Gotta love that bang-for-your-buck upgrade!
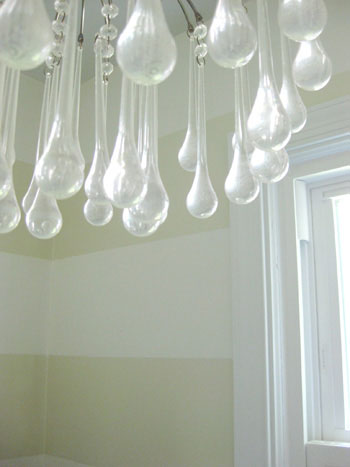
We really like how our crystal tear-drop chandelier (a cheap-o Urban Outfitter’s score from a while back) looks even more dreamy with the soft stripes around it.
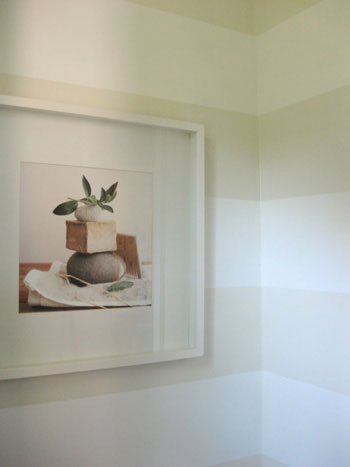
And our $9.99 art somehow feels even more spa-like with the tone on tone stripes:
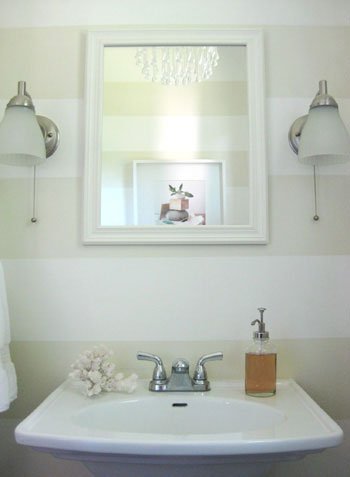
We also feel particularly lucky that our stripes ended up framing our wall sconces perfectly (of course this is something you can ensure by starting your stripes in that area and working up or down to tape off the rest of them so nothing cuts through your lighting at a funny spot).
So there it is. Our under $3 bathroom makeover. We’ve always had a soft spot for stripes (take our blog’s background for example, or our recently striped porch) and I guess we just had to bring ’em into our tiny half bath to fully embrace the linear love.
What do you guys think? Did any of you take on any cheap-o projects this weekend? Any striping stories of your own? Do tell.

Heather says
It came out great…I had a hard time picturing it when you mentioned that you were going to do it but the pictures are amazing.
Shannon says
Oh! I love it! The stripes really look fantastic! This past weekend, we assembled some Ikea furniture, painted our picket fence to match the trim on the house, and added some colorful flower pots to the porch.
Sher says
I love it! I’m also a fan of stripes. My fiance and I had 2 tones of gray-blue in our room. The bathroom looks amazing and I love the price of the makeover! :)
Juliet says
WOW! That’s a true testament to the power of paint. What an elegant transformation. I’m inspired to stripe something!
Nakiya says
Love the stripes!
Also, really like the artwork- I think that may work well in my bathroom as well. Where did you get the frame?
YoungHouseLove says
Hey Nakiya,
The frame is from Ikea (I think they’re around $19 and they accommodate 12 x 12 prints and actually come with that great white mat that you see). Hope it helps!
xo,
s
erin fudge says
That is gorgeous! I absolutely love it! I’m thinking I might have to do that on one wall in our studio/future nursery! Beautiful! Great job :)
Lisa Liberati says
Sherry,
Do you have any tips on how to paint behind the toilet without having to take it out? I always find that difficult and it never comes out well.
Lisa
Lisa Liberati says
Sorry I forgot to look on the first page of comments, I see what you did. Thanks!
Amanda says
That looks fantastic! I’m intrigued with the 3 glass vases hanging on the living room wall… I don’t think I’ve ever noticed them before. Are they the CB2 hanging vases? I picked up one (what was I thinking, I need THREE!) over the holidays and just got around to hanging it up. Of course, fresh flowers look great in it, but something dried seems more appropriate since I truthfully don’t have the time or the $ to constantly put in fresh flowers… What dried arrangement do you have in yours?
YoungHouseLove says
Hey Amanda,
They are in fact the CB2 hanging teardrop vases and we just have dried grasses in ours since they last forever and look wispy and light. We actually “borrowed” our grass clippings from a giant clump of grass at a movie theater near us (hopefully there’s a park or parking lot that you can raid for a few snips near you- or even something growing in your backyard). Happy hunting…
xo,
s
Laura in LA says
Love it!
erin says
omg the stripes make a world of a difference! i am so stealing your idea for our tiny half bath in our new house! we got a pale gray-blue paint for that room, and i think an even paler blue stripe would look wonderful!
we decided to start working on our stairs and stair rail in the new house, there was a hideous 80’s style metal stair rail that was unsafe, so we have to replace it to move into our new home, so i have my dad working on that and we pulled up the icky carpet from the stairs and uncovered some good looking wood stairs- which already matches the laminate flooring upstairs perfectly! so thats saving us some $$$! im very happy with what we have found! we also primed all the bedrooms and painted the ceilings… during the week we hope to finish the walls!
Averill says
Great job, guys! This looks great.
erin says
thanks for the heads up on the danze faucet (in your what were digging column) its perfect and just what i’ve been wanting, the matching accessories are great too!
Johanna says
LOVE IT!
My husband and I painted horizontal stripes in our daughters room (yellow and white since her gender was a surprise). They are much bolder, but we think its still fun for a kids room. You can see it pretty well in this blog post (http://andbabymakesthreepluspooch.blogspot.com/2009/05/what-no-one-told-me.html) and a little in some of the other pictures that I have posted in other posts.
The taping we the hardest part for us- the building had settled a little so the walls weren’t completely even, but luckily my husband is handy and was able to figure it out. The laser level helped out HUGE for the taping.
maria says
Looks amazing! What a transformation!!
Kara says
LOVE striping the walls. Your bathroom looks even more amazing, if that’s possible. We did vertical stripes in our dining room, but instead of using two colors, we painted the entire room with a flat and then did the stripes (after hours… and hours of leveling and taping) over the flat paint in an eggshell. Gives the very subtle sheen and effect that we were going for.
Btw, completely 200% over-the-top addicted to your blog. Keep it comin’.
Brighton says
No cheap-0 projects, but a new and improved laundry room that my husband built is ready for a nice coat of paint : )
Kayce says
Another fabulous job, guys! (and the price is more than perfect!)
yansy says
Hi Youngsters,
What a transformation. Of course, I am not surprised because after all it is you guys. I fall in love with your home more and more everyday. You are truly an inspiration.
Ace says
Wow! That is really, really neat.
Abby Larson says
My addiction to your site is getting completely out of hand. Love, love, love the new bathroom!!
Celeste Zuckerman says
love it! great job!
Jackie says
Nothing super exciting here. Finished the dining room table i’ve been refinishing for 3 weeks. LOL.
Painted some siding that needed touched up, and finished repainting the master bedroom grey. YAY!
JM says
Where did you find the artwork?! I love it, its very zen-like and calming for the bathroom. I tried to search on allposters.com but had no idea what to put in the search field – rocks? Stone art?
YoungHouseLove says
Hey JM,
Here’s the direct link to the art work for ya: http://www.allposters.com/gallery.asp?startat=/getposter.asp&APNum=2036226&CID=81270310742B4D9694A99B3955423170&PPID=1&search=spa%20bathroom%20olive%20branch&f=t&FindID=0&P=1&PP=9&sortby=PD&cname=&SearchID=
xo,
s
jesse says
I love the colors you chose. Looks fab! Our entry way was a pale blue matte with gloss stripes of the same color! Love the subtle texture of it!
Ashley says
This looks FANTASTIC! You both did such an amazing job! So swanky and love, LOVE the chandelier. You two rock my socks!!
Ms. molly says
We just painted stripes in my BFF’s new house this weekend. We used just one color in two finishes (eggshell for the wall and semi gloss for the stripes) it turned out great!
Nancy says
I am just MAD for stripes right now and I absolutely love your idea. I just painted stripes in our mini guest room and I’m already thinking of doing another room like that; maybe the bathroom!
One tip I found somewhere on the internet was to use a clear coat of modge podge over the tape before painting in order to prevent the paint from bleeding under the tape. This works especially well with textured walls that don’t allow the tape to stick evenly.
Again, I think your bathroom looks fabulous!
Megan says
Love it, youngsters! We are getting ready to move and I’ve been trying to decide which room in the new house to stripe… the half bath may be the winner! In our current house, we have vertical tone-on-tone stripes in the living room (2 shades of a tan/cream color) and we LOVE it. We also did thin vertical stripes behind our built-in shelves and a big square outline above the fireplace. So fun! We have used the blue painter’s tape in the past, which worked okay as long as we took it off at just the right time. This time, we splurged a little and used the green Frog tape and it is amazing! The lines are absolutely perfect- so worth the extra cost!! Anyway, keep up the awesome inspiration! I love your bits about Richmond for those of us who are locals, too.
Jillian says
Definitely doing that in my half bath. I had horizontal stripes in my studio in college and I loved them. The trick for me was to use a laser level and do a coat of the other color before you do your accent color. That way if any paint seeps through the tape, it’ll be the wall color. I hope that makes sense! Love your blog!
Janis says
I absolutely ADORE the color combination of the stripes. For me the hardest part would be picking the right colors to compliment each other. The bathroom looks amazing!
Jennifer says
Two thumbs up!
heather s. says
Funny timing – I am hoping to paint stripes in my bathroom as well. I’m not a huge fan of large stripes over the entire wall since it makes the room seem smaller to me(sorry!) so I’m planning on doing a couple of smaller stripes near the ceiling to give the room some height. We’ll see how it works out.
Lynn says
Fabulous!
Natalie says
Thank you SO MUCH for your very helpful answer – and for always answering the many questions us readers throw at you! I’m glad that even though you guys are famous, you still have time for the little people ;)
Beth says
Love it! It looks great. :)
JM says
Thanks Sherry! love it! I was never a fan of stripes (I think the headache of planning and taping it all out – ick) until seeing you bathroom makeover. It looks oh so luxe, great job!
Keri says
I’m new to your blog, but absolutely love it! Ok, wait, let me rephrase that … I’m obsessed! Your taste for design is awesome & definitely gives me some creative ideas as well! :-)
Jackie says
This turned out so great! I have been itching to paint either my entry or bathroom in stripes, but am a bit nervous about the whole taping process. I was originally thinking black or chocolate brown and white, but I really like the idea of two creams like you have done. And if I mess up a bit it won’t be as noticeable! Thanks for the inspiration and tutorial!
pamela says
Love the stripes! I finished an inexpensive art project at my daughters house this weekend. Created an art gallery using a book of poems. Here’s the link http://pammielou.blogspot.com/
She’s attending Flagler College St. Augustine, Florida and it’s a hit with the college scene! Cheap, easy, trendy!
Jennifer says
LOVE IT! So refreshing and chic looking. What a dramatic change for such little money! You guys are good ;)
ps I gave you a little shoutout on my blog; you are my organizational inspirations! http://peckavenue.blogspot.com/2009/06/plan-on-this-cloudy-day-is-to-seriously.html
~~Rhonda says
The stripes are great and the price of the makeover is amazing! Wonderful job! ~~Rhonda :)
Kate says
I love the color combination of these stripes! I ended up striping our hallway with vertical stripes a few years ago and love it. It was the result of an “oops”! I wanted to paint our hallway the same color as our den since they are adjacent and grabbed the wrong can of paint! I didn’t realize it until it dried so instead I striped with the correct color. I get lots of compliments and LOVE the effect. I hadn’t considered a horizontal stripe in my house but I think I have a wall in mind already…
Erica says
Love this so, so much! My master bathroom is very purposefully all white, but reading this post makes me think that some subtle stripes might add just the right amount of visual interest to give the space more dimension. Because two of the four walls are taken up entirely by windows and the shower, I’m wondering if you think stripes on two opposite walls would look any less sophisticated than your full-room makeover? And, also, about how much time did you wait in between letting your first coat of stripe paint dry before applying the next and removing the tape?
Thanks for your input and inspiration!
YoungHouseLove says
Hey Erica,
Good question! We definitely think this look is subtle enough to be applied just to a feature wall or even to two out of four walls in a space if it makes sense in the room. We say go for it! As for how long it took between the first and the second coat, by the time we were done with the first coat we could pretty much start on our second coat since there were six stripes so by the time we finished painting them the first one was already pretty dry. We also didn’t want the paint to set up too much since we wanted to peel off the tape while it was still wet for the freshest and crispest line. Hope it helps. Happy painting!
xo,
s
xo,
Sherry
Katrina says
Ahhh, love that! The bathroom looks so fresh and clean. Love the lights too! By the way, I am sure you are aware, but if you are ever looking for a deal on curtains, rugs, lights…come see me at the Shades of Light outlet on Midlothian. I can hook you up, we have great deals all the time. Have you ever been?
YoungHouseLove says
Hey Katrina,
Not only have we been but we’ve actually done a giveaway with your sister store Shades of Light (Devon and Amanda were our contacts- here’s the link). Of course we’ll definitely drop in again one of these days. We haven’t been by in a while and it’s high time we swung through!
xo,
s
Natalie says
Just one more question: does this wordpress template work on blogspot?? I’ve been trying to figure it out but haven’t had any luck yet :/
YoungHouseLove says
Hey Natalie,
Can’t speak for Blogspot unfortunately, but our guess is that it probably won’t transfer cleanly. Perhaps someone else with more blogspot experience could make a recommendation? Sorry we can’t be of more help.
-John
jeana says
i have had it in my furture plans to do this in our entry, you inspire me to just get it done already!!
Cathy says
I love love love the stripes! And would totally do more stripes in our house… but I am certain that either my hubby or I would have to do them on our own… not together. See the story goes that when we first bought our home (a 100+ year old shotgun) we decided to paint stripes in the then diningroom… they are flat/gloss stripes vs. 2 shades… we have 2 sheens. Well I’ll just get to the point… we started working on them, and about an hour later I was sent on my way… to be anywhere but in the house while he finished the stripes… it was frustrating, but overall better for us… lol! We have 2 very different methods of problem solving… makes for some interesting days… lol!
robin says
WOW GUYS!!! this looks absolutely amazing! i’m really impressed that you did this all for under $3! (and i’m super excited that you didn’t make us wait too long for one of the makeovers you mentioned in your post about all the things you would do around the house. i’ve been on the edge of my seat!)
just a tip for anyone else that is doing any taping for painting and wants really clean, perfect paint lines…especially for stripes/or designs: after applying the tape, press down very hard on the edges and then apply a very thin coat of spackle over the seam of the wall and tape. wipe it off with a rag, then paint. peel the tape off while still wet, and voila!! you have a PERFECT paint line every time! it takes a little longer, but if you really want it perfect, that’s the way to go!
Katie says
I’ve never done stripes before, but have done some blocks of color behind artwork. I’ve found that laying the tape down doesn’t always create a smooth line, even if you rub it down with your nail. I now brush a smooth sealer over the edges of the tape first, let dry, then move forward as described here. Works perfect!!