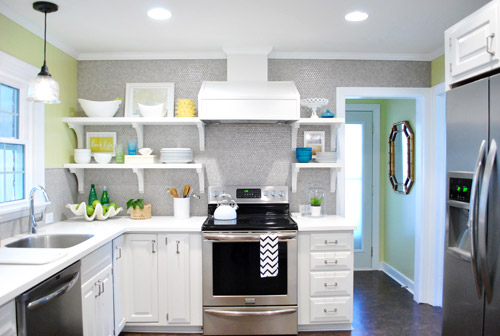
Tweakity-tweak-tweak. That’s the sound of a little course correction that went on in our house last night. See, our kitchen underwent a little bracket redux. Yup, after taping things off, photoshopping them, and then (ahh!) drilling right through our wall of tile to install our brackets, we were completely sold on their spacing, which we landed on because:
- Functionally, that’s where the wall studs were
- We thought keeping the same distance between the brackets on each side of the hood would create balance on an unbalanced wall
But then we lived with them for a while and more things kept going into the kitchen (new lighting, a new dishwasher, new art, new floors) and with every change we noticed – first just in photos, and then in real life – that the eight brackets on the left side of the hood were – gasp – looking a little crowded.
So sad. Especially since a few of you mentioned that you thought six would have looked great on that side after we installed them (but we were too drunk with excitement or adrenaline or whatever it is that gets into your blood when you take a room that looked crazy dark and dated and start updating it). I think it just took some time for our eyes to adjust, so we had to live with things and let the room evolve until it became unbelievably obvious to us. And then we were suddenly right there shaking our heads and saying “oh why did we go with eight brackets on this side when six would have looked soooooo much better?” It’s like when your mom tells you she doesn’t like your tenth grade boyfriend or your best friend confesses those jeans look terrible on you but you’re in denial or just somehow completely blind to it and then later it hits you and you have a what-was-I-thinking moment and ditch the dude/burn the pants.
Thank goodness nearly everything that we’ve done to both our first house and this one can evolve and change as we go (like the living room, for example) or our first house’s paint colors (we painted nearly every room at least twice there, along with painting the trim twice too). Live and learn, right? So the good news is that the whole: “if at first you don’t succeed, try, try again” thing really does have a ton of truth to it when it comes to making your house a home. Just keep your rooms moving and growing and someday they’ll be right where you want them to be! Even if you don’t get it right on the first (or even the fifth) try.
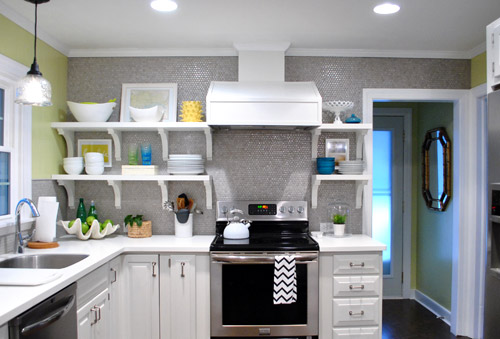
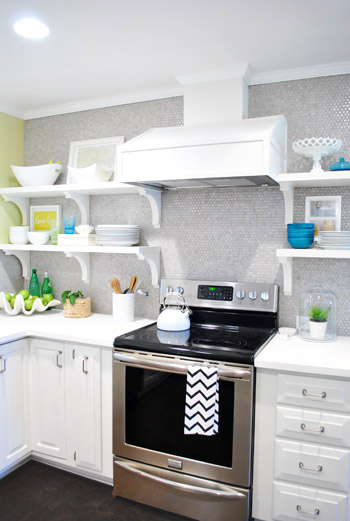
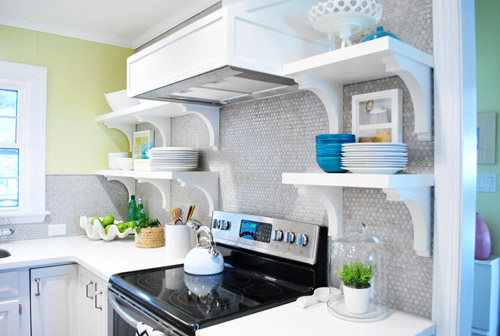
So here’s our kitchen after our little bracket redux. It’s simpler, right? And we actually love how the middle bracket lines up with the line of the counter, so it still has balance since things are aligned so they look intentional. Whew. Note: the middle bracket is in the direct middle of the other two, so if it looks further to the left or right, it’s just the angle of the pic.
But we drilled through the tile to hang those eight brackets on the left side, so how did we undo that snafu?
Well, first we cleared the shelves (the black stuff is just small pieces of 3M removeable velcro that holds up my Love Life frame).

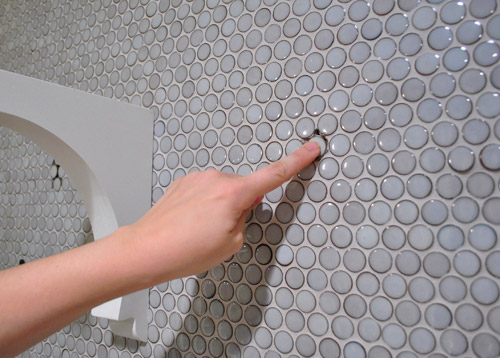
Then we removed the shelves (by unscrewing a few screws that connected them into the brackets) and slipped all the brackets off of the wall screws that they were resting on. You can vaguely see them in this picture below (they look like colons since there are two screws for each bracket).
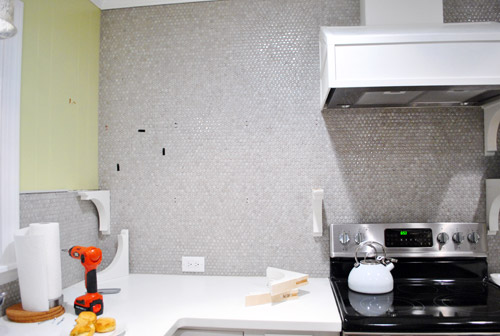
Then we measured and drilled new holes for our middle bracket using a drill bit meant for tile to drive the screw into the wall (these new holes would replace the two middle brackets of yore). Since these screws weren’t going into a stud this time, we used heavy duty anchors in each of the two holes to hold up each of the two brackets (the top bracket and bottom one). Since the outside brackets on each of the shelves go into studs and the heavy duty anchors are really darn strong, each shelf could probably support a few John pull ups. Yup, they’re in there good.
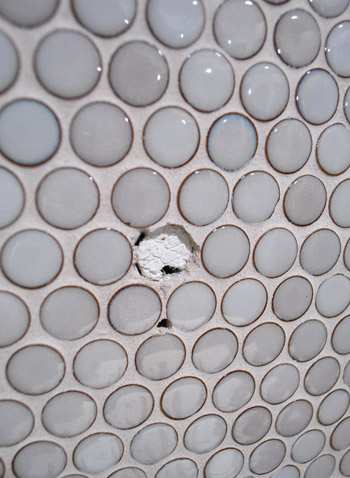
Next we chiseled out the old tiles that had holes drilled into them. I completed this task completely on my own in about five minutes (seriously it was really easy) by using a flat-head screwdriver and a hammer to bang the screwdriver into the grout around each tile that I wanted to remove (sort of creating a chisel).
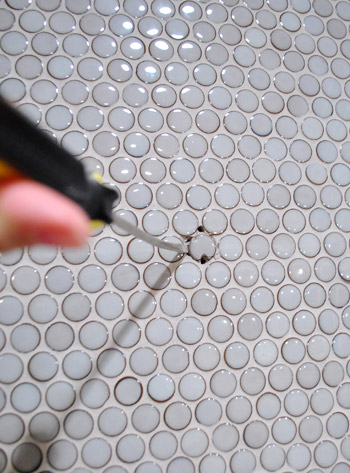
After about four chiselings around each tile, they just popped right out. Oh and see how one of the holes was in the tile (which we removed) but one of them was just in the grout? That happened with each bracket, which was nice because it meant we only had to pop one tile out and just would need fresh grout to fill those second holes.
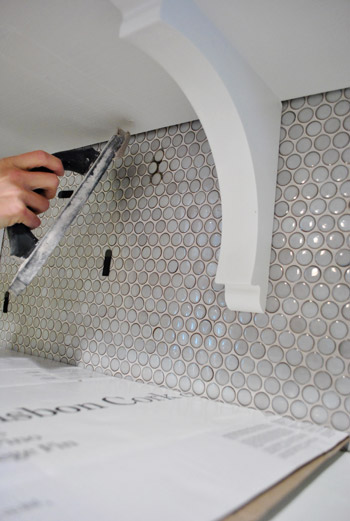
Next I used tile adhesive to stick new tiles right back into those holes:
And then all that was left was to mix up a tiny batch of grout to fill those telltale holes around the new tiles.
Ta-daaaa! It’s like those extra two brackets were never there!
Well, if you squint you can see that the grout is still drying in these pics, haha. But once it dried it was completely impossible to tell that we replaced a few tiles and moved those brackets. Whew. And as for how much this upgrade cost: zero point zero dollars. Hurrah.
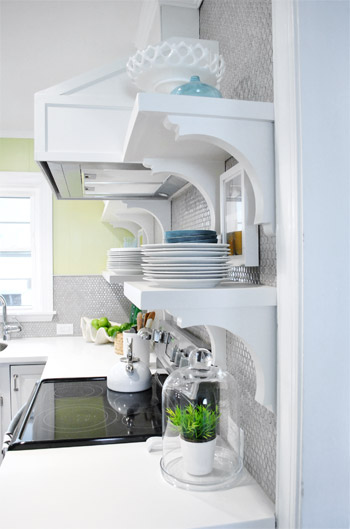
Here are those babies with a little side-angle action going on:
And here they are completely from the side (I love this view, so I always find myself glancing to the right when I walk in the door from the laundry room to gaze).
So the lesson is that even if you’re thinking things through, mapping them out on the wall with tape, and relying on photoshop before pulling the trigger – you still might end up tweaking things after you dive in, do something, and live with it for a while. But thankfully there are so many re-DIYable things, that home improvement is hardly ever a one-shot-only endeavor. It’s probably safe to say that every project has at least nine lives, like a cat. And getting started is the only way to get any closer to that elusive finish line, anyway!
What have you guys done and then redone lately? Anything you’ve lived with that has slowly started nagging at you and jumped back onto your to-do list? Have you ever chiseled tiles out? It’s totally my new favorite thing to do. Sometimes it’s just satisfying to bang on something with a hammer and watch the dust fly.

Heidi says
so much better. that wall can breathe again!
Heather says
I’m not sure how removing just 2 brackets makes that corner seem less crowded but it really does! I wasn’t a fan of the 8 brackets from beginning so I’m so happy you removed the 2 “extras.” You guys are so inspiring and make me feel like I could tackle some of these projects!
AJJT says
Can I just say – John is a good sport. My Honey is incredibly sweet and humors me whenever I want to change things around but I’m pretty sure that after the ordeal of tiling (and if roles were reversed), he would have told me me to wait until everything else in the kitchen/house was complete because ALTHOUGH 6 looks better than 8 — it wouldn’t have made it onto the “help me do this now” priority list. Way to go, Guys! You’re a good team. It does look nicer and cleaner wit 6 instead of 8.
YoungHouseLove says
Haha, I did have to bat my eyes a bit. But John is a fantastic sport!
xo,
s
betty in munich says
Wow! Much better, who’d a thought?
Karen says
I like the change and give you a lot of credit for bothering to go back and do it over. My husband would want to choke me over things like that! I am less distracted when I look at all your plates and decorative items on the shelf because there are less brackets-don’t get me wrong, I like the brackets, but now that I see the shelves with two less I think they look just right.
Laura says
Love it! Looks much better! Sometimes you need to live with things for a while to see if it works or not.
Rebecca says
This looks so much nicer! Great work!
sue says
small change, huge impact… nothing wrong with taking a step back a re-evaluating! well done you & i love that you don’t just wrap everything up with a big shiny bow of make believe! showing things that don’t quite work is as appreciated as showing those things that do! thank you
Steph says
Am I the only one that can’t read any of the text due to a Habitat for Humanity badge that has blown up the page? I’m on my iPad and I believe I’m browsing in Firefox.
YoungHouseLove says
Hi Steph,
Sorry that’s happening to you. It’s some glitch in the iPhone and iPad operating system that does that on occasion (happens to me too once in a blue moon). It picks up one of our sidebar graphics and decides it should be our background. It usually clears itself up in a day. Again, sorry for the bug but so far we haven’t figured out a way to prevent it.
-John
Katie N. says
Kudos to you guys! You are putting me to shame, considering we drilled some now un-used holes in our plaster wall (ugh!) to hang a curtain rod 6 months ago and they are still un-painted (though I did caulk and sand them, so I get points for that, right? ;)
Katie says
Yay, this is so much better. I liked it a whole lot before but it looks even better now!
Ana Silva says
I didn’t think about it before but now that I see it, WOW it does look a lot better.
Claire says
OMG, I’m so glad you made the change! I wasn’t sold on your first rendition because of how crowded it looked, but now… breath of fresh air :D I’m glad you took a second look!
Claire says
I made a giant 40+ frame collage on our dining area wall shortly after you guys did your hallway collage. Now I’m thinking about taking it down and starting over. Sigh. I’m sure my neighbor will LOVE me for it. I’ll just have to make sure he isn’t home when I’m banging on our shared wall.
Claire says
Oh and I agree that the 6 braket arrangement looks much, much better. I honestly wasn’t loving that wall with the 8 but 6 is a world of difference. It lets those chunky brackets sing instead of being crowded.
Gord says
So much better! Good job. And thanks for once again, being real! I appreciate that you admit when things don’t go perfectly … it keeps your DIY’ing realistic! Thanks!
Lauren says
I love the change! And is that shoe molding I see in the laundry room??
YoungHouseLove says
Maybe… more on that next week!
-John
Theresa says
Oh it looks great! When you first wrote that you would do 8 brackets (and then posted pictures) I was a little liek “Ohhh.. weird?” but I actually have no design experience so just went with it. Now I veey vindicated and I really love what you guys did. I was thinking 4 would be right but no, 6 is perfect for that side!
RobinDenning says
I am amazed at how much better that looks!
I wish I could re-do our granite countertops that were installed last summer. I know, agony.
I just wish I had gone for a solid color countertop.
oh well!
Gabrielle says
Much much sexier. Love how you took the time to do it right by digging out the broken tile and replacing it. You two are fab.
Seriously Sassy Mama says
I never thought about it, but it actually does look better.
Jyl says
We’re friends right? And because we’re friends I can totally understand why you told me my jeans are awful. Now that I’ve spent the evening in my room listening to loud music and destroying those jeans, I’m ready to be your friend again.
I love the new bracket spacing. It’s so much cleaner looking. I still wish the brackets were smaller or shorter in some way, though. Which pains me, because I know you worked your butts off on this kitchen.
Can we still be friends?
YoungHouseLove says
Haha- it ain’t no thang! I bet 20 people would pick 20 different brackets, but when it comes to the shape/size we’re so into them. Haha. It’s like my taste in men – I love them tall and statuesque. Haha.
xo,
s
Maddie says
I have loved everything you guys have done to the kitchen! But honestly, I cringed the first time I saw the four brackets on the left side…. I’m so glad that you guys changed your minds because it really does look SO much better with only three! Much cleaner and less cluttered!
shelly p. says
So glad to see this change!! I kinda had thought three would be better from the start, but of course didn’t want to say anything! In fact, one of my co-workers also reads your blog and we have our daily YHL discussions:)
So we thought maybe the hood could use a little extra trim to lengthen it down closer to the range. maybe 6-8″? It would also conceal the blower more. Just a suggestion, but I do looove the way the kitchen looks. you guys are amazing, rock start diy’ers. I am pulling inspiration from you to start my kitchen/bath reno when I move into my very first home next week!!!
YoungHouseLove says
Since we reach up to push buttons within the trim, we made it as low as we could comfortably reach up and press the hood buttons – hope it makes sense!
xo,
s
Beth C says
I’m really glad you made that change. I agree–it was looking a bit crowded with eight brackets. Looks great now!
Ideas Woman says
I am so glad you fixed that. I love it now. I just love how you admit to errors and blog about it. Just shows what good people you are! xx
Natalie says
Sometimes the smallest changes make a big difference – much more open and spacious, the shelves look great!
Kristin says
Bravo! I like the change. What do you think you’ll do with the leftover brackets? Another shelf somewhere else, perhaps?
YoungHouseLove says
We were thinking about putting them under the peninsula but have to make sure they don’t interfere with knees!
xo,
s
Jess says
Wow, your kitchen looks fabulous! Where do you buy all of your white frames? They look so fresh and pretty.
YoungHouseLove says
Aw, thanks! Most are from Ikea or Target on clearance or yard sales/thrift stores!
xo,
s
misa says
just today i bought five new yards of fabric for a chair reupholstery project, and now i have to sell the other five yards of fabric i bought last year.
Jeanna Walton says
Way, WAY better!! Much easier on the eyes :) It’s so great that you guys are willing to change something, and you just jump right in and do it! It makes me feel like I could do it too, so thanks :)
katie says
Looks great! And I’ve been thinking to myself for quite some time that your peninsula counter overhang would look great with 2 matching/coordinating brackets on either end to look as if they are holding up the counter. Now you have the extra 2 in case that would be a possibility. You have probably already thot of that but I just wanted to add my 2¢ :) love how everything is coming together!
YoungHouseLove says
We can’t wait to see how they look there! As long as they don’t get in the way of knees we’ll definitely go for it!
xo,
s
Ashley says
I have to admit, I’m so glad you guys made these change. It looks great!!
toni from says
I love it so much more with less brackets, (although it was beautiful the other way as well.) It looks so much more open, and it makes the right side seem so much more balanced. I am glad you were able to switch it up semi-easily. I can’t wait to see what you do with the two extra brackets. Island? Floating shelf in another room? Book ends? Dude get on that already! LOL.
YoungHouseLove says
Haha, we’re thinking peninsula. Will keep you posted!
xo,
s
Jessica says
You know what might look great above the stove instead of art? Some ORB metal shelving from IKEA to hang utensils from or the ones that have the galvanized steel bottoms to put oils on or a ceramic animal. That way you don’t lose too much of the view of penny tile behind a picture.
Jessica says
PS Look at the Fintorp line on the IKEA website or in the store. You can even get cute galvanized buckets to hang from them.
rosa says
whew! i’m so glad you guys reduced the number of brackets! i was one of those who felt the 8 brackets were too much, but i didn’t want to hurt any feelings by commenting something negative about something you obviously loved to bits. now, it looks “cleaner” (maybe cause there’s less visual clutter?) and i can say I LOVE YOUR NEW KITCHEN!
cheers!
Jen Fernandez says
Much better! The simpler look of 2 less brackets makes you appreciate what are on the shelves and on the counters now. The colors also seem to pop more. Love the teal. Your entire kitchen looks amazing. Such a transformation! Another YHL project well done!
Jo says
First let me start by telling you that i”m a fan of your blog and that you guys are so resourceful and ingenious whenever you tackle a project. Your kitchen is a unrecognizable from before and shows that you guys have come so far from having an outdated paneled kitchen. But I must admit that I’m not a fan of the range/hood/shelves section. Maybe it looks different in photos than real life, but for some reason, I just don’t think that side is as put together as it should be. I think the brackets are a little too busy and competes with your shelves decor and dinner ware as well as your tiles and it doesn’t balance well with your hood. I know everyone has different tastes, but whether it’s fashion in clothes or decor, we should be able to step back and note that we not over design in order to amplify the complement our style, and as Coco Chanel says “Simplicity is the keynote of all true elegance.”
http://www.decorpad.com/photo.htm?photoId=80077&relatedPhotoId=12449&index=1
http://kitchensforliving.net/wp-content/uploads/2011/03/Diodisalvi-After-010-e1300216029176.jpg
http://www.nestgoodies.co.uk/open-shelving-for-kitchen-spaces-inspiration/
http://1402division.files.wordpress.com/2008/08/sa0407140k_1_x.jpg
YoungHouseLove says
I think it’s just a “to bracket or not bracket” preference! That’s a debate for the ages! John and I found some of the links you shared to be a bit sleek/cold for our tastes, probably just because we love brackets to add some interest and architecture (we were originally going to do floating shelves but all our favorite kitchens that we pinned had a hood and bracketed shelf system like ours). But it’s definitely a personal thing! I’m sure twenty people would have redone our kitchen in twenty different ways!
xo,
s
Meredith says
Awww, I always saw the “dead” space between the brackets and not the brackets themselves… Now it looks off balance to me because the “dead” space between the brackets is not equal on the left and right side of the range hood! The studs are equally spaced, that arrangement made much more sense! You could have gone with a sleek metal (ORB or painted white) bracket that would have made the previous alignment less crowded.
YoungHouseLove says
I think for us it just came down to eight brackets in that small corner being too much for us (no matter the type) but its definitely a personal preference thing!
xo,
s
Joy says
Fantasic tweak! As other have mentioned, I really admire that you guys have the patience for proper follow-through. Like most, I usually just live (begrudgingly) with my mistakes.
Carla says
I had a feeling you’d eventually start to notice how crowded that wall looked. I find your kitchen to be very refreshing and cheery, but I’m wondering if, over time, you’ll start to see how locked in it feels because of the heavy look of having boxed in the fridge and its partner on the opposite wall. Those two giant blocks add some awkwardness to flow of the room, as does the half wall of tile that abruptly ends at the base of the window.
But what I really love is how you share everything throughout your design process and how open you are about updates and adjustments. I find that to be really inspirational.
Carla says
I just browsed the comments and wanted to add that I wouldn’t have boxed in the hood. There’s just too much boxy stuff going on.
YoungHouseLove says
Oh yes not everyone would go that route for sure! In our first house we had the same hood (but stainless) and we love it white in this kitchen – but it’s def. personal preference!
xo,
s
Benji says
Yeah, I agree. In your previous kitchen, the hood had much lighter proportions. Now the box to stack ratio seems a little skewed toward the box.
Denise says
Ahhhhhh, lots of breathing room with 2 less brackets…much better! I would never get any cooking done in your beautiful kitchen. I would be too busy admiring that yummy penny tile!
Jacqueline says
Wow, it’s amazing the difference that makes – so much better now! And thankfully you were able to cover the old holes!
April says
I love the simplicity of the three brackets. It’s also inspirational to hear about your “mistakes” and the changes you make to afterwards to improve.
Jami @ An Oregon Cottage says
Oh my goodness, I totally thought that there were too many brackets when you first posted the shelves, but I would’ve never had the nerve to say anything! :) They really do look so much better- kudos!
Silke says
I love it how you guys are so HONEST with yourselves (and us) and just admit that maybe you should have done it in a slightly different way. And then just DO it too, instead of just thinking it !!
Really, really great how it changes up the space, much lighter. I am sold :-))
(unless you change it again, of course… hahah)
Matthew McGarity says
Im soooo glad you made this change. Largely because *I* couldn’t envision it — I had been looking at your pictures & knowing something seemed “off”, but now that I see the openness you achieved by removing the bracket…it was like you were reading my mind! Great work!
Bea says
Hello,
Just a quick question : you may have discussed it earlier (sorry if I missed that point), but what about a dish rack next to the sink ? Yay or nay ? Do you do without one i.e. wash your dishes immediately and dry them at once? Or put everything in your dishwasher?
I think I have my opinion (due to admitting how we really live in our kitchen) but would love to get yours!
Burning question I know :)
Have a lovely weekend!
YoungHouseLove says
We actually have a dish rack but rarely use it since most things just get rinsed and we towel dry them and put them away (if it’s not dishwasher safe).
xo,
s
Nancy says
Wow! That really does look better! And I’m glad it was so easy to redo! You know, I kept thinking, “There is something about those shelves that bothers me” but I never could put my finger on it, so since it’s not my house and I don’t have to live with it, I just forgot about it. :) But as I read this post I thought, “AH! That’s it!” I love posts like this because I stress out about things being perfect the first time and I have recently begun to embrace the idea to jump in and if it doesn’t work, change it up again. It’s ok. It really is freeing. So this post was really encouraging that people with such great motivation and taste change things all the time – even something as seemingly permanent as these shelves. Thanks!
Hannah says
wow! i love it! that DID make a big difference….and it totally does look less crowded! awesome!!! happy st. paddy’s day weekend! ;)