Tweakity-tweak-tweak. That’s the sound of a little course correction that went on in our house last night. See, our kitchen underwent a little bracket redux. Yup, after taping things off, photoshopping them, and then (ahh!) drilling right through our wall of tile to install our brackets, we were completely sold on their spacing, which we landed on because:
- Functionally, that’s where the wall studs were
- We thought keeping the same distance between the brackets on each side of the hood would create balance on an unbalanced wall
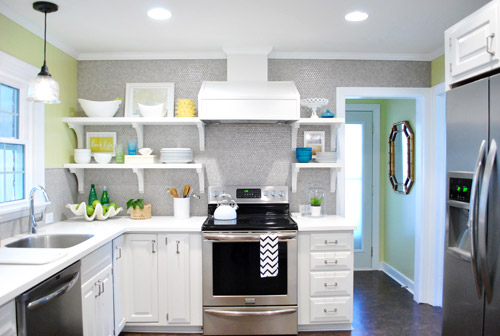
But then we lived with them for a while and more things kept going into the kitchen (new lighting, a new dishwasher, new art, new floors) and with every change we noticed – first just in photos, and then in real life – that the eight brackets on the left side of the hood were – gasp – looking a little crowded.
So sad. Especially since a few of you mentioned that you thought six would have looked great on that side after we installed them (but we were too drunk with excitement or adrenaline or whatever it is that gets into your blood when you take a room that looked crazy dark and dated and start updating it). I think it just took some time for our eyes to adjust, so we had to live with things and let the room evolve until it became unbelievably obvious to us. And then we were suddenly right there shaking our heads and saying “oh why did we go with eight brackets on this side when six would have looked soooooo much better?” It’s like when your mom tells you she doesn’t like your tenth grade boyfriend or your best friend confesses those jeans look terrible on you but you’re in denial or just somehow completely blind to it and then later it hits you and you have a what-was-I-thinking moment and ditch the dude/burn the pants.
Thank goodness nearly everything that we’ve done to both our first house and this one can evolve and change as we go (like the living room, for example) or our first house’s paint colors (we painted nearly every room at least twice there, along with painting the trim twice too). Live and learn, right? So the good news is that the whole: “if at first you don’t succeed, try, try again” thing really does have a ton of truth to it when it comes to making your house a home. Just keep your rooms moving and growing and someday they’ll be right where you want them to be! Even if you don’t get it right on the first (or even the fifth) try.
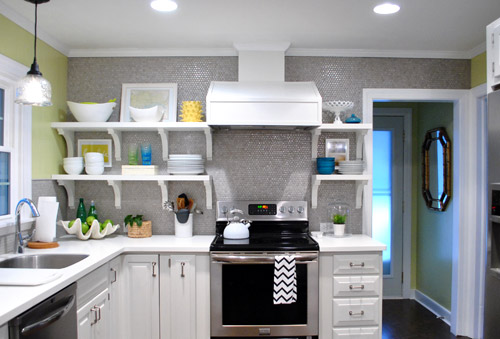
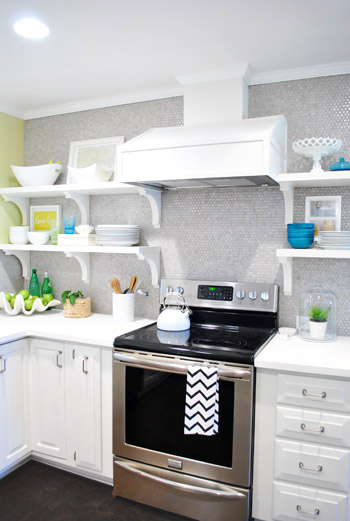
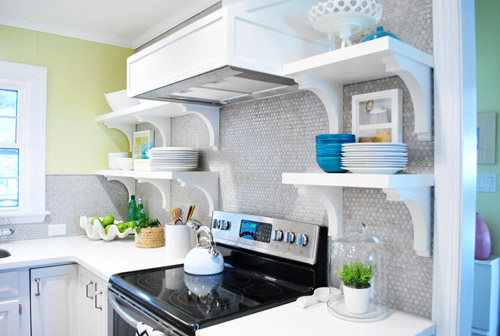
So here’s our kitchen after our little bracket redux. It’s simpler, right? And we actually love how the middle bracket lines up with the line of the counter, so it still has balance since things are aligned so they look intentional. Whew. Note: the middle bracket is in the direct middle of the other two, so if it looks further to the left or right, it’s just the angle of the pic.
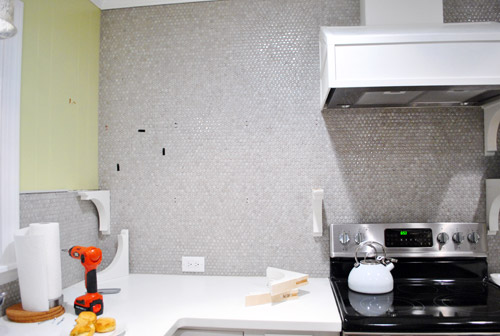
But we drilled through the tile to hang those eight brackets on the left side, so how did we undo that snafu?
Well, first we cleared the shelves (the black stuff is just small pieces of 3M removeable velcro that holds up my Love Life frame).

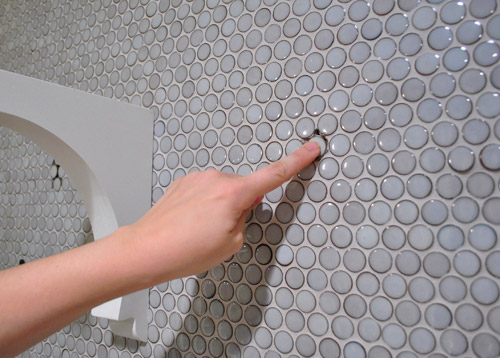
Then we removed the shelves (by unscrewing a few screws that connected them into the brackets) and slipped all the brackets off of the wall screws that they were resting on. You can vaguely see them in this picture below (they look like colons since there are two screws for each bracket).
Then we measured and drilled new holes for our middle bracket using a drill bit meant for tile to drive the screw into the wall (these new holes would replace the two middle brackets of yore). Since these screws weren’t going into a stud this time, we used heavy duty anchors in each of the two holes to hold up each of the two brackets (the top bracket and bottom one). Since the outside brackets on each of the shelves go into studs and the heavy duty anchors are really darn strong, each shelf could probably support a few John pull ups. Yup, they’re in there good.
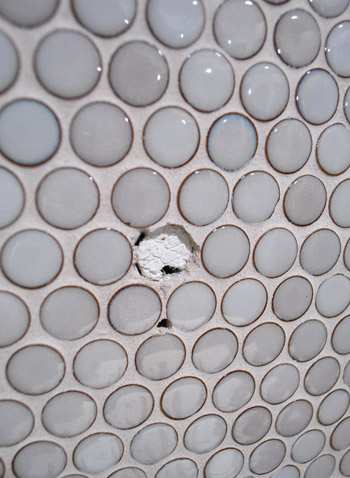
Next we chiseled out the old tiles that had holes drilled into them. I completed this task completely on my own in about five minutes (seriously it was really easy) by using a flat-head screwdriver and a hammer to bang the screwdriver into the grout around each tile that I wanted to remove (sort of creating a chisel).
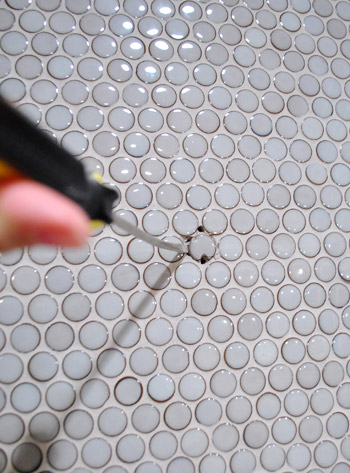
After about four chiselings around each tile, they just popped right out. Oh and see how one of the holes was in the tile (which we removed) but one of them was just in the grout? That happened with each bracket, which was nice because it meant we only had to pop one tile out and just would need fresh grout to fill those second holes.
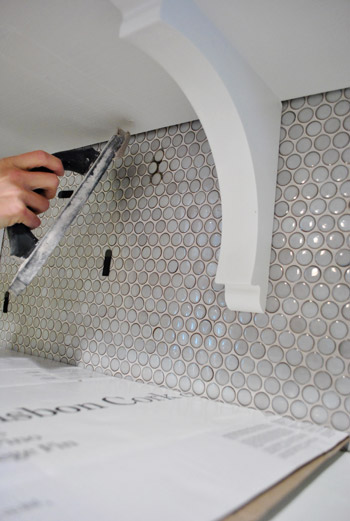
Next I used tile adhesive to stick new tiles right back into those holes:
And then all that was left was to mix up a tiny batch of grout to fill those telltale holes around the new tiles.
Ta-daaaa! It’s like those extra two brackets were never there!
Well, if you squint you can see that the grout is still drying in these pics, haha. But once it dried it was completely impossible to tell that we replaced a few tiles and moved those brackets. Whew. And as for how much this upgrade cost: zero point zero dollars. Hurrah.
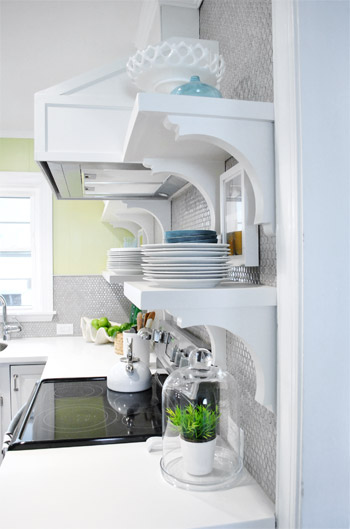
Here are those babies with a little side-angle action going on:
And here they are completely from the side (I love this view, so I always find myself glancing to the right when I walk in the door from the laundry room to gaze).
So the lesson is that even if you’re thinking things through, mapping them out on the wall with tape, and relying on photoshop before pulling the trigger – you still might end up tweaking things after you dive in, do something, and live with it for a while. But thankfully there are so many re-DIYable things, that home improvement is hardly ever a one-shot-only endeavor. It’s probably safe to say that every project has at least nine lives, like a cat. And getting started is the only way to get any closer to that elusive finish line, anyway!
What have you guys done and then redone lately? Anything you’ve lived with that has slowly started nagging at you and jumped back onto your to-do list? Have you ever chiseled tiles out? It’s totally my new favorite thing to do. Sometimes it’s just satisfying to bang on something with a hammer and watch the dust fly.

Amanda S. says
It looks SO much better! Which is great, because you’ve done so much great work on the kitchen and it would have been a shame for the eyes to be drawn to an over-crowded open shelf instead of the beauty of the kitchen as a whole.
Lindsey says
WOW! The kitchen looks fab! I HEART the penny tile!
Where did you get your wavy fruit bowl? I love it!
YoungHouseLove says
That’s a faux clam shell from ZGallerie. Hope it helps!
xo,
s
Monica says
I think my comments must somehow go into the spam black hole! :) Some how they rarely show up. So I’ll try again…
I didn’t see any issues until you removed the extra brackets. Now I can see how crowded it looked! So pretty now!
I have a quick bloggy question for ya…what widget do you use for the social share bar (facebook, google +, pinterest, etc)?
Thanks for all your inspiration!
YoungHouseLove says
The things at the bottom of our posts are all individual code inserted from each of those respective sites. So just google for Google+ or Facebook share. The only one that’s a widget is the Pinterest one. Hope it helps!
xo,
s
Monica says
Thanks!
Jessica says
Looks a lot better, good job. Just have one small suggestion and maybe you already have something cooking. I think that since you’re hood is so high you need a little something between it and the stove. A photo or decorative piece (dude, get on that challenge?) would fill in that space and balance it out a bit don’t ya think?
YoungHouseLove says
Oh yes, that’s always a possibility! We’re definitely still accessorizing in there since things like the floor just went down! All a work in progress!
xo,
s
jeannette says
whew.
Nik says
So much better. I was wondering why you put so many brackets up in the first place. It looked way too crowded.
Emiles says
So glad you went ahead and did this!I was one ofthose lurking, thinking it might look less over-crowded! YAY! Also, you’ve reassured me that replacing the floor tile in the bathroom that my husband dropped the SINK on when installing it, is a better idea than paint and sealer…now to finally convince him. :)
Amanda J. says
Yay! You read my mind. When I first saw the brackets up I had a major Negative Nancy moment, but you’ve restored my faith in…well, you…for changing it. I, too, thought that 8 made it look really crowded and took so much away from all the pretty things on your shelves.
It’s always tough to criticize, because of course you’ve put so much hard work into it – I commented on the AT post where it was shared, saying that I wasn’t a fan of the shelves initially, but your penchant for editing and changing things up didn’t have me too worried. :) I secretly wondered if you’d change it. And I was right! Vast improvement from a visual standpoint – way to keep it real, Petersiks.
Ellen says
They look much better! I thought the shelved looked cramped but didn’t know why. You guys are so brave to tackle that with a new tile wall. I surely would have just lived with it. I fear grout!!
Jenn Ski says
That was bugging me too, but at first I didn’t know why. Glad you went back in and fixed it, i would have been to lazy to do it! lol
Mike Grant says
Either way I think your kitchen came out great. All of your design choices make for a bright, attractive, and functional space. Can’t wait to see your next big project…. What are you guys waiting for… Get going.
Just kidding. You all deserved that Hawaii vacation.
Kelly Gross says
Much better and less crowded looking! Its not easy to have to re-do something like that- but totally worth it!
Katie says
Okay, so first off you guys are amazing. And I am no professional interior designer, but I SO agree with the choice you made to lose the two brackets. I have loved every design choice you have made as I have followed your BLOG for over two years now. But the four brackets was the first design choice I did not love. It was too much going on or something. It looks perfect with three, balanced, simple, just great. Way to go. Love your style, love your blog, love your God-given creativity. Thanks for always inspiring your readers! God bless.
YoungHouseLove says
Aw thanks Katie! You guys are so sweet!
xo,
s
Danielle says
Looks awesome! I thought it looked a little busy with the extra brackets before, but would have never said anything – afterall, it’s not my house!
Thanks for the tip on popping out the old/drilled tile, too. That definitely would have scared me off making any changes – glad to know it’s not as hard as it seemed!
Lauren Nicole says
Just put a second coat of paint on our playroom last night. I’m pretty sure I already hate the color, but we’ll live with it for awhile before I decide for sure.
YoungHouseLove says
Aw man, I know that feeling! I hope it grows on you when all the furniture goes back in!
xo,
s
Katie says
Something always bothered me about the shelves, and I thought it was that they were mounted at the same height as the range hood, but it was too many brackets! It looks so much better – and now I can stop obsessing about why it just didn’t look right to me! I am trying the same thing in my little kitchen (I bought the same brackets at HD and a stair tread) – we’ll see how it looks when all is said and done. Great job!
Mary says
It does look better, once you see the change, but for the average person (not professional home improvement people) it really isn’t worth the trouble. It looked “good” the way it was. Beware of perfectionism.
YoungHouseLove says
It wasn’t much trouble at all! We just skipped vegging on the couch watching a TV show and did it all within about thirty minutes! And it’s nice to know that patching a penny tile isn’t a big deal in case we have to do that in the future due to something cracking or something.
xo,
s
Marlayna says
Great tweak! So great to know you can redo/undo such a seemingly sensitive/permanent project! Thanks!
Micha says
It’s amazing how much better it looks now! Not like there was anything reallyw rong with it before, but now it looks lighter and more open!
Tweaking seems to be in the air :o) I used the same word in my blog post today – what a coincidence! (And how giddy that makes me – to be dancing to the same YHL beat *L*). We’re constantly tweaking. This is our first house and the first time ever we’re allowed to do whatever we want!
YoungHouseLove says
Haha, yay for tweaks!
xo,
s
Dawn says
That really looks better! I painted and re-painted my hallway until I got it right. A pain in the… but so worth it!
Hey, talk to your editor about making a stop in Seattle on your world-wide book tour. We have a great independent book store that I’m sure you would love. You would be in good company – they hosted Hillary Clinton, Paul McCartney and most recently, the Vlog Brothers.
YoungHouseLove says
Sounds like fun! We’d love to!
xo,
s
Reenie says
Ahhh much better. I never would have thought to pop one of the penny tiles out and replace it….then grout again. Good thinking =)
Tara says
It looks great! I have chiseled tile out…but not to replace a single tile. When my parents redid their counters and backsplash we discovered that my secret calling in life is removing tile from the wall – I was going at it!
YoungHouseLove says
Haha, isn’t it fun? I want to do it for sport.
xo,
s
tara says
That made a big difference!! (Only because you brought it up in this post) I will say I wasn’t on board with the brackets 100% – it felt so crowded – but removing those two brackets makes such an improvement and I now welcome the brackets with open arms:)
And I truly don’t mean to talk down your decision on the brackets – your house, your life, your choices:) It’s always beautiful when you finish and I love that I get to follow along on all the fun things you two do!
Andrea says
I love, love, LOVE the change. I think it really opens it up and gives you way more flexibility in styling it. Way to think outside of the box, I never would have thought to change it – I would have thought, ‘well, we drilled through the tile so that’s the way it’s going to be!!’. Awesome!!
Laura says
Looks great!! Much better! Your kitchen is beyond gorgeous. It has definitely come a very long way from when you guys started. It’s a show-stopper for sure!!
Rachel says
I kid you not, at happy hour on Tuesday night my girlfriends and I were talking about how we thought it was a tad crowded. How weird is it that three girls in DC are talking about your kitchen? The change is terrific, and what a relief that it wasn’t a difficult fix!
YoungHouseLove says
Haha- no way. That’s scary and hilarious all at the same time!
xo,
s
Katie A. says
That is sooooo much better!!!
DONNA says
Now I love the shelves even more and thankfully an easy fix! BTW…FORTY pounds of plates. I really do read each and every word!
Have a wonderful day!
YoungHouseLove says
Haha, thanks for the typo tip!
xo,
s
taetae says
It looks great! I’m in the camp of “didn’t notice anything was wrong before,” but seeing the before and after pics, it’s definitely an improvement!
And the floor looks sooo good in these pics. Could we see a view from the penninsula into the dining room? Any chance you’d consider installing cork floring over the parquet in the living room & hallway, so that you only have 2 different kinds of flooring going on in the house instead of 3?
YoungHouseLove says
Alas, it’s way too expensive to do cork in the living room (that room is like a gymnasium, it’s 25 feet long!) and our cork is sadly discontinued. But once we refinish it all to be the same mocha color we think it’ll have a much better flow! As for pics from the peninsula into the dining room, as soon as we clear the secret book projects off the dining table we can shoot some pics for the reveal!
xo,
s
Clover says
Much much better!!! I’m a big fan of the change!
Candi Rodgers says
This would be a good candidate for the “Hidden Pictures” section of a highlights magazine! I do agree that it looks great now… or great-er because it was also great before!
hollyloo says
wow! it’s lovely and feels so airy now!
AAAAND now you have two brackets on which to build a little matching shelf somewhere! win/win!!
Jenny Stoudt says
Although I’ve been reading your blog for years (nearly since its inception and I went back to read all the old entries) I’ve never left a comment other than for giveaways. I’ve generally loved everything you’ve done but when the brackets went up I thought, “WHOA” and not in a good way. I kept it to myself because I figured it was just a preference thing, so I’m happy to see you’ve changed them. I wonder how many people would share similar thoughts if you did a poll? My husband, baby, and I are nearly the same ages as yourselves and are working on renovating our first home. It seems like we are in similar places in life and I’ve found your blog totally relavent and enjoyable, so keep up the inspiring work, young house lovers!
heather says
Wow! I didn’t think it looked bad before but now after seeing the before and afters the before’s definitely feel a lot more crowded. I like the three bracket deal you have going on (and how you fixed the tile oops!)
Not many changes in our casa yet (oh warm weather, get here fast to thaw and dry the ground out so we can start the reno’s/gardening!). I did however last night take some inspiration from one of the Pinterest Challenge link-ups and add some free art above our laundry area. I love love love it and it only cost me $14.00 ($7.00 per matted large white frames from the Christmas Tree Shop). Woot!
YoungHouseLove says
Wahoo! Congrats Heather!
xo,
s
heather says
Why a thank you. I didn’t expect a response, let alone a response that included two exclamation points. You just made me feel immensely accomplished. Hah!
Now off to go make some soap this afternoon. You know you’re doing the right thing in your life when it makes you want to jump up and down with joy at the idea of doing mild chemistry.
Marcy says
Thank you so much for writing this post!
I am getting really excited when we go house shoppping imagining all the things we could do to a house, but I konw it will be a long process and sometimes you have to just try stuff and see how it feels.
It doesn’t have to be perfect on your first try! You two are totallly inspiring and encouraging and I really appreciate you showing all the steps – your thought processes, brainstorming, trying things out, changing them up.
It’s just awesome.
Ann says
I am so glad you made that change. It looks great!
Amy @ Lovely Nest says
It looks so much more open and airy! Not that it looked bad before, but this is definitely better! As for me, I’m know to re-do things pretty often. If I don’t like a paint color, I change it and decorations move around pretty often. Our bedroom has been ever-evolving but I recently repainted it in a lovely shade of gray and love it so much more!
Mary says
MUCH better! I often think editing our ‘work’ is the hardest part, at least it is for me.
I might even try four brackets on the left, or even paint them a soft gray that blends with the tile. I know the brackets were expensive but they do sell some gorgeous metal corbels, too. I think something less chunky could be cool.
Jessica says
I agree with Mary.
YoungHouseLove says
Oh yes, I’m sure twenty different people would pick twenty different brackets! It’s all persona preference, so we just love the ones we picked, but to each his own!
xo,
s
Laura says
This looks awesome! I thought it looked a little heavy with the 8, but now seeing it with 6 made me realize how heavy it looked! I love it :)
Renee says
So much better…I was in the “don’t quite like it crowd, but not going to say anything…” LOL With that said, I love your wave/shell bowl, but I think it makes that corner look busy. Every time I see your wall I want to move it. Have you thought of placing it on the peninsula under the swimmer picture? Waves+Water…just a thought…from someone who is always moving stuff around!!
YoungHouseLove says
Oh yes, everything on the counter will definitely move around! That stuff is definitely just plunked down and tends to shift!
xo,
s
Amanda says
I love the change – so much more airy!
Jessica says
Ooohh, I am so happy that you did that. I never posted that I didn’t like the eight, but I didn’t. I feel like I can breathe when I look at it now. I even think you could go down to four, but I’m sure you like the added support of the six. Awesome change! Love it!
Rachel@hammeringourwayhome says
Funny what a difference taking out those brackets makes. Def looks less crowded. Question- what’s the deal with the plant in the beauty and the beast type glass? Is it real? I love the look and tried doing this to a plant, but then someone told me I was going to suffocate the lil guy (EKK), so I didn’t.
YoungHouseLove says
Haha, nope it’s faux from Ikea! Haha. But I’ve had some luck with wet plants (like ferns) in there. I kind of have a black thumb though, so faux is safest!
xo,
s
ruthy says
such a small change that makes a big difference! It really looks so much better!
Barbara says
You know what drives me crazy? Not the brackets. Hang something over the stove!! That bare spot makes me nuts!
(and of course, that’s just my opinion…)
YoungHouseLove says
Haha, we’re definitely not done accessorizing in here! We’ll have to see where we end up! I’m sure it’ll take a while to find the perfect things for every wall (and tile) spot though!
xo,
s
Samantha R. says
I love it! It does look less crowded and really opens up that wall – makes it feel light and airy. And now each of the items on the shelf really pop.
And I had a similar “I should have listened to my mother, but please don’t tell her I said that” moment. My husband and I had just gotten married and settled into our first home, and I was making chili for my in-laws and some of their distant family (it was their first visit to our home)and I found a healthy chili recipe to try out (and it was my first time making chili). I called my mother to brag about my healthy recipe, and she told me that she didn’t think it wouldn’t turn out like what I was expecting – she said that I needed to thicken it with more sauce. I laughed because I figured she just didn’t understand the new cool way to do chili! After it sat there heating for a while, it was very apparent that this was not anything that resembled chili. I had to call my mother to make an emergency trip to my house (and bring over some sauce, etc) to save my chili. Thankfully she was able to save the chili and get out of there before my in-laws came to see that I had some outside help!!
YoungHouseLove says
Oh man, now I’m craving chili!
xo,
s
Wendy says
Your shelf wall looks SO good with only 3 brackets per shelf. Kudos to you guys for actually being able to SEE what the problem was.
I’ve made my fair share of DIY mess ups. Probably the funniest was before we lived in our house. We were in an apartment that let us paint the walls. I wanted to make it more like a home, so we went out and bought some paint for the living/dining area. I envisioned this relaxing blue on the wall as an accent color. We did a test area and thought things were ok. Once we had painted about half the wall, we realized it was too blue – like it was the exact same color as the blue painters tape! The worst part was, we lived with half the wall painted that color until we moved out! haha!
YoungHouseLove says
Oh man, at least it’s a funny story to look back on!
xo,
s
Lauren Johnson says
Wow! I can’t believe how much of a difference that made!!! Looks great!
Yvonne says
Ah so much better! I was wondering will you be adding crown molding to the top of the cabinets? It seems a bit unfinished without but that’s just me.
YoungHouseLove says
We actually planned to do that but then held crown up there and it looked all wrong! We tried different kinds, etc, but it just didn’t go with the clean lines of the rest of the kitchen. Perhaps because we only have two tall cabinets? It just looked so odd!
xo,
s
Pennell says
I’m sorry you had to make the changes but it does look great. I honestly never looked over the spacing that much but I did think when you were talking brackets, “oooh, they are brave drilling through the tile. What if they get tired of the shelves, want a different look.”…..then you went and inadvertently gave me an example of how easy it would be to change/move things around! Great job!