Tweakity-tweak-tweak. That’s the sound of a little course correction that went on in our house last night. See, our kitchen underwent a little bracket redux. Yup, after taping things off, photoshopping them, and then (ahh!) drilling right through our wall of tile to install our brackets, we were completely sold on their spacing, which we landed on because:
- Functionally, that’s where the wall studs were
- We thought keeping the same distance between the brackets on each side of the hood would create balance on an unbalanced wall
But then we lived with them for a while and more things kept going into the kitchen (new lighting, a new dishwasher, new art, new floors) and with every change we noticed – first just in photos, and then in real life – that the eight brackets on the left side of the hood were – gasp – looking a little crowded.
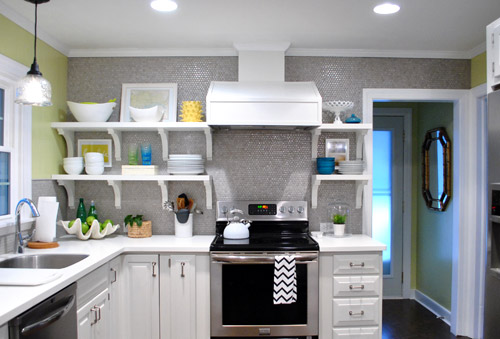
So sad. Especially since a few of you mentioned that you thought six would have looked great on that side after we installed them (but we were too drunk with excitement or adrenaline or whatever it is that gets into your blood when you take a room that looked crazy dark and dated and start updating it). I think it just took some time for our eyes to adjust, so we had to live with things and let the room evolve until it became unbelievably obvious to us. And then we were suddenly right there shaking our heads and saying “oh why did we go with eight brackets on this side when six would have looked soooooo much better?” It’s like when your mom tells you she doesn’t like your tenth grade boyfriend or your best friend confesses those jeans look terrible on you but you’re in denial or just somehow completely blind to it and then later it hits you and you have a what-was-I-thinking moment and ditch the dude/burn the pants.
Thank goodness nearly everything that we’ve done to both our first house and this one can evolve and change as we go (like the living room, for example) or our first house’s paint colors (we painted nearly every room at least twice there, along with painting the trim twice too). Live and learn, right? So the good news is that the whole: “if at first you don’t succeed, try, try again” thing really does have a ton of truth to it when it comes to making your house a home. Just keep your rooms moving and growing and someday they’ll be right where you want them to be! Even if you don’t get it right on the first (or even the fifth) try.
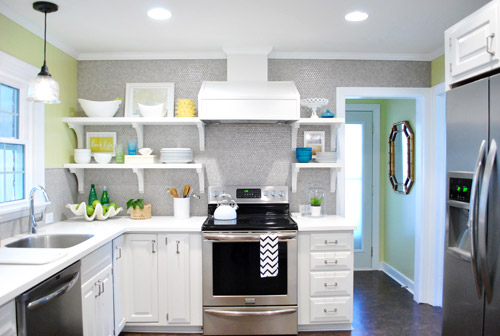
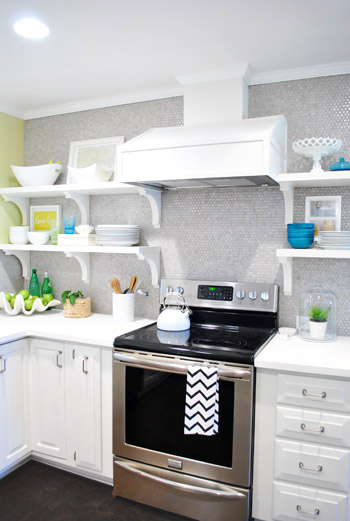
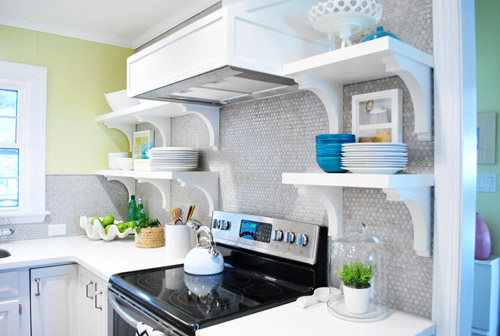
So here’s our kitchen after our little bracket redux. It’s simpler, right? And we actually love how the middle bracket lines up with the line of the counter, so it still has balance since things are aligned so they look intentional. Whew. Note: the middle bracket is in the direct middle of the other two, so if it looks further to the left or right, it’s just the angle of the pic.
But we drilled through the tile to hang those eight brackets on the left side, so how did we undo that snafu?
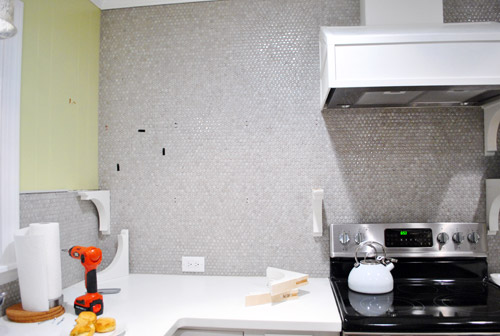
Well, first we cleared the shelves (the black stuff is just small pieces of 3M removeable velcro that holds up my Love Life frame).

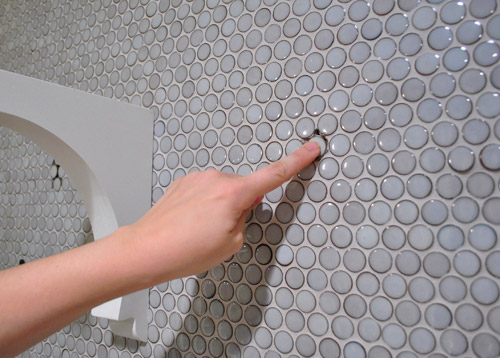
Then we removed the shelves (by unscrewing a few screws that connected them into the brackets) and slipped all the brackets off of the wall screws that they were resting on. You can vaguely see them in this picture below (they look like colons since there are two screws for each bracket).
Then we measured and drilled new holes for our middle bracket using a drill bit meant for tile to drive the screw into the wall (these new holes would replace the two middle brackets of yore). Since these screws weren’t going into a stud this time, we used heavy duty anchors in each of the two holes to hold up each of the two brackets (the top bracket and bottom one). Since the outside brackets on each of the shelves go into studs and the heavy duty anchors are really darn strong, each shelf could probably support a few John pull ups. Yup, they’re in there good.
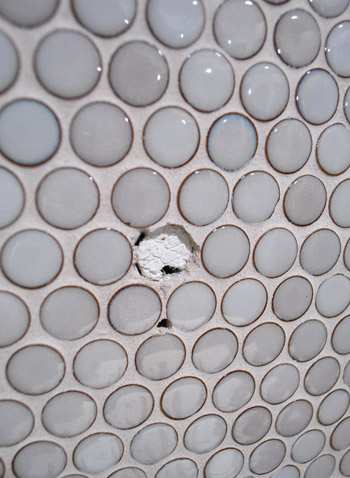
Next we chiseled out the old tiles that had holes drilled into them. I completed this task completely on my own in about five minutes (seriously it was really easy) by using a flat-head screwdriver and a hammer to bang the screwdriver into the grout around each tile that I wanted to remove (sort of creating a chisel).
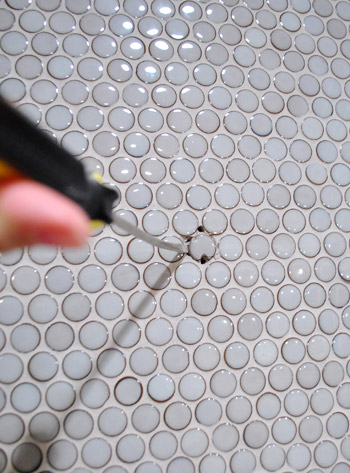
After about four chiselings around each tile, they just popped right out. Oh and see how one of the holes was in the tile (which we removed) but one of them was just in the grout? That happened with each bracket, which was nice because it meant we only had to pop one tile out and just would need fresh grout to fill those second holes.
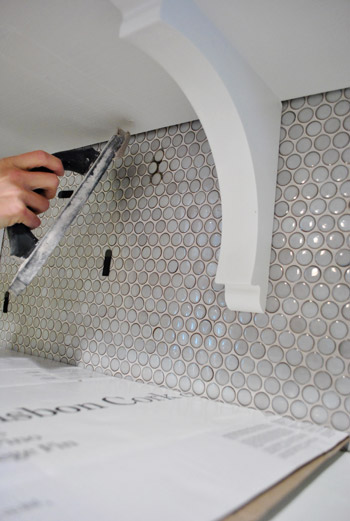
Next I used tile adhesive to stick new tiles right back into those holes:
And then all that was left was to mix up a tiny batch of grout to fill those telltale holes around the new tiles.
Ta-daaaa! It’s like those extra two brackets were never there!
Well, if you squint you can see that the grout is still drying in these pics, haha. But once it dried it was completely impossible to tell that we replaced a few tiles and moved those brackets. Whew. And as for how much this upgrade cost: zero point zero dollars. Hurrah.
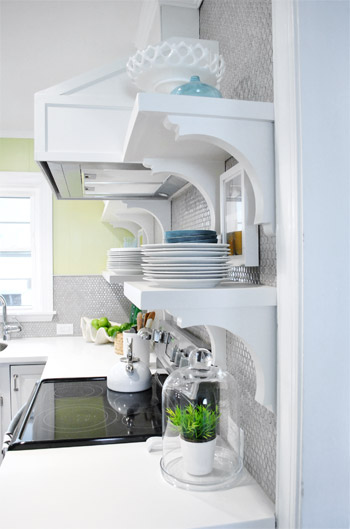
Here are those babies with a little side-angle action going on:
And here they are completely from the side (I love this view, so I always find myself glancing to the right when I walk in the door from the laundry room to gaze).
So the lesson is that even if you’re thinking things through, mapping them out on the wall with tape, and relying on photoshop before pulling the trigger – you still might end up tweaking things after you dive in, do something, and live with it for a while. But thankfully there are so many re-DIYable things, that home improvement is hardly ever a one-shot-only endeavor. It’s probably safe to say that every project has at least nine lives, like a cat. And getting started is the only way to get any closer to that elusive finish line, anyway!
What have you guys done and then redone lately? Anything you’ve lived with that has slowly started nagging at you and jumped back onto your to-do list? Have you ever chiseled tiles out? It’s totally my new favorite thing to do. Sometimes it’s just satisfying to bang on something with a hammer and watch the dust fly.

Melanie @ Mailbox Journey says
Wow, it really does look a lot better now! Less chunky & heavy looking. I had a recipe box on my to do list FOREVER and I finally got’er done: http://mailboxjourney.com/2012/03/15/travis-bright-orange-recipe-box/
YoungHouseLove says
Ooh, sounds delicious!
xo,
s
John@ Our Home From Scratch says
That was some precise tile surgery! You’re right though, it does look less crowded now.
Jess @ Little House. Big Heart. says
That looks much more simple and less cluttered!
By the way, I love the splashes of teal!
Paige says
Good fix! I think getting rid of that extra bracket lightened up that whole side of your kitchen!
Samma says
YES! Better! Have you thought about repurposing the 2 extra brackets on the island, or would that crowd out the stools? Either way, I’m sure they’ll end up in some clever repurposing down the road. Is repurposing a noun? It is now!
YoungHouseLove says
I was actually telling John we should look at that last night! Definitely have to explore it!
xo,
s
Samma says
eeep! I feel all special, like I should shout out FIRST!
BTW, were you 2 Ze Frank ‘The Show’ fans? Cause if you are, he’s coming back. So excited!
YoungHouseLove says
Now I have to google that! Haha. Sounds exciting.
xo,
s
Vidya @ Whats Ur Home Story says
Man….you guys are so thorough!Hats off to you for your patience. Loving the less cluttered look.
We are so lazy, we still have to fix our corner mess ups on our bench reupholstering project.
http://whatsurhomestory.com/bench-blues/
Marianne says
My thoughts exactly- when we make ‘mistakes’ like this I usually just live with them because they are so much work to fix and also my husband would be sooooo annoyed with me! :) Love the new look- totally worth the hassle.
Kelly says
We redid our basement last summer. Two days after everything was finished and cleaned up, I decided I didn’t like the towel bar in the bathroom that we had just painted around. 10 months later we still have two sanded-down patches on our bathroom wall where we have been too lazy to get out the 5-gallon paint bucket to repaint!
Amanda @ Our Humble A{Bowe}d says
The spaced out brackets look so much better. Less cluttered and I’m sure you can move things around more. Glad it all worked out!
Sally @ Exploits of a Military Mama says
Not that you care about others’ opinions (nor should you), but I LOVE it now. I really, really love it. I agree that the eight were a bit crowded, but this looks so light and balanced. I’m a fan!
YoungHouseLove says
Aw thanks guys!
xo,
s
Sarah says
So glad to finally hear the word “bracket” in a context I enjoy. Getting so sick of hearing “brackets” at work for March Madness or whatever, I never understood all the hype there!
Looks amazing, I love the lightness that your new change brings to that already cheery corner!! :)
YoungHouseLove says
Hahaha, not being in a work environment I forgot how overused that word can be in the March Madness context! Hahahaahah.
xo,
s
Brooke says
Sarah, if you need a team, I suggest the University of Kansas Jayhawks! ROCK CHALK! :) [I’m as addicted to March Madness as Sherry is to ceramic animals.]
Infact, Shery may *need* a ceramic Jayhawk to add to her collection! ;)
http://www.framewoodslawrence.com/p-46-painted-ceramic-or-concrete.aspx
YoungHouseLove says
Haha, nice!
xo,
s
Melanie says
Oh wow. I was one of those people that thought it looked crowded (but didn’t say anything. You loved it, that’s what matters). It looks SO much better!! I’m amazed at the difference and how much more open it looks. Great job guys!
MamaJ {TheSecretLife of a Scientist'sWife} says
Ditto!
Now I’m wondering how it would look with only two brackets under each shelf … if that would provide enough support, that is.
Carolyn says
yep, like it much better! Although it never caught my eye that they were crowded. I still think beefing up the hood cover would make a difference too!
Looks great!
YoungHouseLove says
That’s always another possibility!
xo,
s
gk says
i agree! i haven’t been a fan of the brackets, but they look much better now – less crowded and cluttered. i do have to agree w/ carolyn on the hood cover. i (personally) think it would look better if it was less angular – all the angles right now make it seem like it’s competing w/ the brackets right now. at least in the pictures.
Chaucea says
Would love to have seen what it could look like with having at least the front half of the hood cover exposed to show that curved and really pretty stainless steel (and with stainless steel floating shelves instead of the white shelves with brackets). :-)
YoungHouseLove says
It was actually scratched up in the front and along that curve (which is why we got such a good deal on it via craigslist) so leaving any of the stainless exposed just wasn’t an option for us!
xo,
s
Devon @ Green House, Good Life says
Yes! Love the change!
emily says
Ahhhhhhh (that’s a big sigh)… so much better.
Now that the kitchen is 97% done, which room do you think you’ll tackle next? I know y’all like to space out the big projects, but have you decided which is the next on your checklist?
YoungHouseLove says
I’m not sure- maybe one of the bathrooms that only needs something lighter (paint, accessories, art, etc) and we want to make a big walk-out deck this spring! Still have lots of porch stuff on the list too. I’m sure we’ll be all over the place!
xo,
s
Laura B. says
ahhh looks SO much better!
Melissa // thefauxmartha says
Ahh! Much cleaner! Although I wouldn’t have noticed it had you not shown the before and after.
Quiana says
It’s amazing how that small change made such a big difference! Living in a rental I love doing little tweaks like that around our apartment. They are little moments of joy! (Yes, I’m corny and it doesn’t take much to make me happy!)
Amanda R. says
I really like the new spacing, definitely looks less crowded. I thought it would have been much worse to patch the holes, but you guys make it look easy! Good job!
linda says
Yes! Looks fab, as does you current styling which looks cleaner and more functional.
alyssa says
I was wondering what was slightly “off” when I looked at your beautiful kitchen originally… i knew I loved it but something didn’t seem quite “right”. this totally did the trick! sometimes less really is more!
Sarah says
And I love how having penny tile made this process so much easier…. imagine having to work with subway tile or something, you’d have to replace so much more! oy!
YoungHouseLove says
It was very handy just to have a few small circles to replace!
xo,
s
Kristen @ Popcorn on the Stove says
Great tweak – and you’re right, the shelves look less crowded now with the 6 brackets. I’m glad it was so easy to update!
Have you noticed any structural difference or do the shelves feel just as sturdy??
YoungHouseLove says
They feel just as sturdy! That stack of large dinner plates is hard for me to lift all at once (maybe it weighs forty pounds?) and I just thumped them all down after we loaded the shelves up again and it was just as sturdy!
xo,
s
Janelle D says
What a great patch job you did. It looks so seamless. I’m impressed! I must say I was one of those people hoping for 6 brackets before you revealed the 8. It’s baffling how removing just 2 little brackets really opens up the wall space. Looks great guys!
Krystle @ ColorTansformedFamily says
I like six brackets much better. I can’t believe how easy it was for you to replace the tile. I would have been too scared to do it.
Nicole Puckett says
Glad to see you have to redo things too.. Just spen the last two nights putting up a closet system that I carefully and meticulously measured out then had to remeasure and take two more trips to Home Depot…But at least it’s done. For now. Thanks for the update!
YoungHouseLove says
We can totally relate! So glad it’s done- I bet it’s awesome!
xo,
s
Angela Kintner says
Loving the tweak!
Kim says
Looks great! You’re right, it looks much less crowded, and the shelves actually look bigger!
Cynthia says
WOW I never would have thought it made that much of a difference, but you are right it opens things up alot!! well done. And the kitchen looks AMAZING by the way :)
Brandi @ His Shabby Her Chic says
If you hadn’t point it out, I wouldn’t have noticed the crowding. It does look a lot better now for sure!
Seriously love your kitchen!
Melissa M says
LOVE it! I loved the shelving but wasn’t sold on the brackets – this made a world of difference and Im a bracket loving convert now!
Jessie says
Vast improvement! I went from “meh” to “LOVE”. What a clever extraction!
Emma says
Looks great! And cheers to you for doing the tile fixes RIGHT away. I probably would have left the drilled tiles up for a few months (years?) out of sheer laziness. Well done!
Maureen @ This (Kinda) Old House says
It does look way better, even though I thought it looked fine before! lol
Dre says
Looks great! I would’ve been too overwhelmed to make that change even though you made it look so easy! I have made some smaller changes around my hiz-ouse recently though: http://futuredukes.blogspot.com/2012/03/little-house-updates_15.html
YoungHouseLove says
Oh my gosh, I love those drawer liners!
xo,
s
Dre says
Thanks! I love them too- I saw them and thought… what would Sherdog do? SNATCH THEM UP IMMEDIATELY.
Ginny @ Goofy Monkeys says
It looks so much lighter now! The brackets have a lot of style, but are also beefy and with 4 brackets for each shelf it was left feeling a little heavy. It’s definitely an improvement!
Thais Bessa says
OMG I am so happy you did that. I really didn’t like the shelves because I always felt they were super crowded/cluttered, but after this change I like them now!
PS: I didn’t like but never commented because.. you know, you live there and I didn’t want to be that guy, lol.
gk says
me too! if you can’t say anything nice, don’t say anything at all, right? but i’m still glad to see the change :)
Amy says
Much better! Looking good.
sara says
I am so glad you changed it. I was totally hating on the brackets. I still think the floating shelves would have looked better but I’m coming around to the brackets now that the long side is a little lighter looking! Great tile work, too.
Julia @ Chris loves Julia says
Did you guys put eight brackets up just so you could show us how to fix holes in tile? You guyyysssssss. ;) Just jokes. Just jokes. It never bothered me, but now I see the light. Six feels much less stuffy.
As for what we have been doubling back on? We aren’t afraid to re-do just about anything if it is bugging us. I think it is a great lesson in home-decor humility.
Allyn says
Good call! It looks much more light and airy now.
I was have been so freakin nervous about do that though. Those tiles are surprisingly easy to work with!
Carrie @DreamGreenDIY says
So much better =) Although, I loved the four brackets too! Who woulda thunk it…
I am finally succumbing to the fact that my teal studio is “too teal”…Bracing for a big paint overhaul but dread the idea of covering such a dark color. Ughhhh…
http://dreamgreendiy.com/2012/03/12/pinspiration-monday-brass-bed/
Chrissa says
I didn’t want to sound judgey so I never said anything, but I LOVE that you removed the extra brackets. It is so much better now.
xo
Ashleigh says
It does look much better with 6, well done for deciding to change. We are always changing our minds about what we have done (especially me!!) we recently painted these shelved teal http://madeinmorningside.blogspot.com/2012/01/hallway-shelves.html but they came out bright blue and really clashed with our hallway once we painted it. So last weekend we started again and painted them grey. So so much happier now.
xox
YoungHouseLove says
Hooray for grey! Sounds gorgeous.
xo,
s
SB says
I did think that it originally looked a bit “bracket heavy” and now it does look a lot better. But almost everything you two do – it so awesome. I get so motivated and inspired reading your blog. It forces me to do more and better around my house. That’s a good thing!
Robin @ Our Semi Organic Life says
Looks so much open and free!
Nat says
I’m really impressed. I didn’t notice that it was too crowded but I definitely think it looks less crowded now. So many people would have just always said that they wished they’d done it another way without taking the time to fix it. Hats off to you guys for taking the time to make the change! I’m impressed!
YoungHouseLove says
Aw thanks Nat!
xo,
s
Meredith says
I like everything you guys do, and this is an improvement (even though I liked it before)! Also, it makes me feel better that even the DIY machine that is YHL periodically needs to redo things. :) (I realize you guys aren’t perfect, but you do such an amazing job on things that I forget sometimes).
Heidi P. says
Ditto!!
le sigh. :) It looks greater (better + great).
Amanda K says
Love the six bracket look! It does look a lot cleaner on that side now. I recently decided to change up our bedroom. We’ve been in the house for about 5 years, and I have repainted each room at least once or twice. Our new duvet cover from West Elm should arrive in the mail today: http://www.westelm.com/products/organic-oasis-duvet-shams-b819/?pkey=corganic-bedding
It actually reminded me of Sue the Napkin when I saw it. I’ll be taking it to Lowe’s in the next few days to scout out a paint color – I’m thinking a complementary shade of blue. So excited!
YoungHouseLove says
Ooh I love it!
xo,
s
Kristi says
Much better!
Cair says
Nice! Thanks for reminding us that one can always go back and re-DIY something.
Callie says
Ahh. Love. I’m learning that part of doing house project is being patient and being willing to go back and tweak – totally worth it!