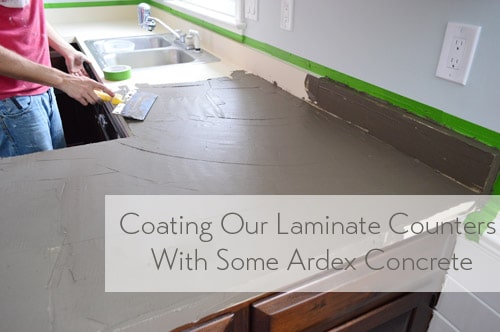
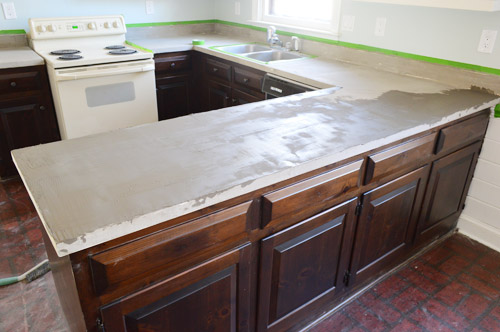
So we did it. We concrete’d our kitchen’s laminate counters. Sherry shared this quick peek at our first coat in Friday’s post, and we’re back with the final results, the details of how we got there, and an in-action video to hopefully help explain the process.
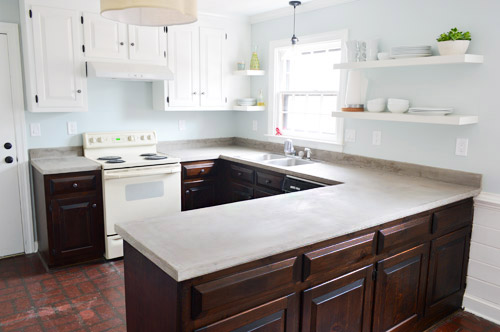
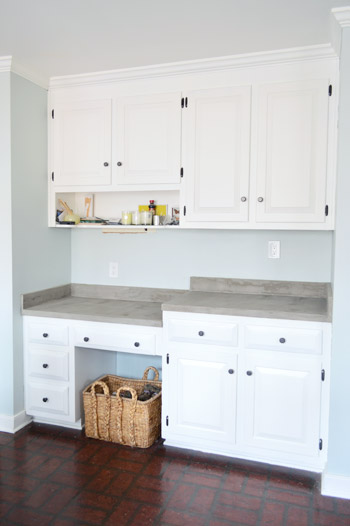
We’re really happy with how they turned out. Pictures don’t do it justice, but the whole room feels a lot more updated and less laminate-y. It’s giving off kind of a stark/cold vibe in these photos, but after we add some colorful window treatments, stuff on the shelves/counters, and remedy that bad faux brick flooring (and that almond stove) we think it’ll feel like a whole new room.
I’m not going to sugar coat it, though. It was a lot of work. And a lot of dust.
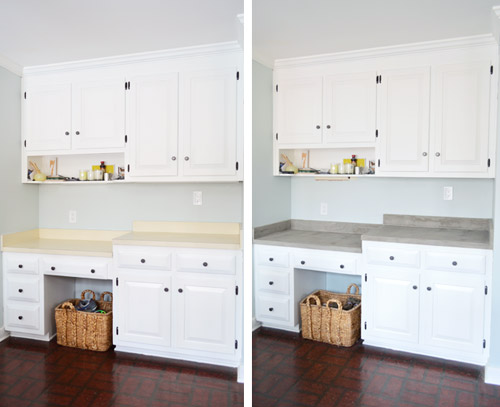
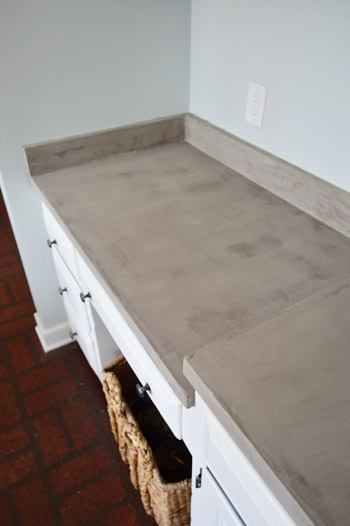
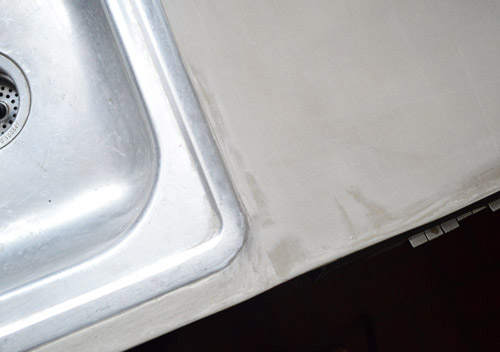
Here’s a reminder of what the counters looked like before. We had creamy-yellow laminate (with the occasional burn mark or scratch). In addition to the main kitchen area, we also gave the concrete treatment to the nearby nook by the eat-in part of the kitchen. We haven’t sealed the counters yet (we haven’t been able to track down either of the two products that our research points to using), so the color will probably get a bit deeper after that step.
We did this using Ardex Feather Finish, which we’ve been really interested in trying since seeing a few other attempts like these from Kara Paslay, Little Green Notebook, Sarah’s Big Idea, and A Beautiful Mess. Somewhere between all of their pretty pictures and the low price tag for Ardex ($19 per bag) I had assumed this would be a quick and easy task. Oh silly me…

Maybe it was because we’re first timers, or maybe it was because our work area was especially large (we were dealing with 45 square feet of counters thanks to the U-shaped area in the cooking zone and the nook area by the table), but it turned out to be a tiring and messy job that spanned across five days. It wasn’t very complicated or difficult, just more labor and time intensive than we realized we were getting ourselves into. So let’s dive into the process. Forgive our photos for not being chronological. We took a bunch throughout our four rounds of applying/sanding the Ardex and I’m just using the ones that are most helpful. Let’s begin with supplies!
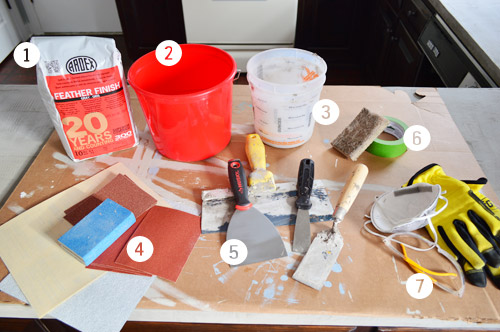
- Ardex Feather Finish, obviously. It’s not easy to come by, but you can hunt for a local distributor on their site or just follow this affiliate link to get it on Amazon. We ended up using 2.5 bags, though I think we applied it a bit thicker than necessary.
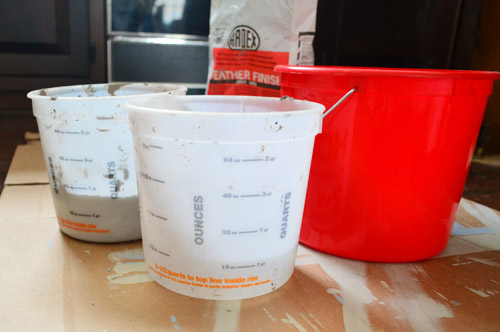
- Mixing buckets: We used one of these small red buckets for mixing our Ardex (it mixes with water). We made pretty small batches, so this was a great size.
- Measuring buckets: We used these (one for water, one for Ardex powder) to make sure we were mixing the right ratio in our red bucket.
- Sandpaper: A variety of grits – both high and low, as well as a sanding block for easy gripping. We used mostly 60, 120, and 220 grit.
- Spreading tools: We used the flat trowel (on right) for mixing in the bucket, then used the other three for spreading. The big 10″ drywall knife was good for big flat areas, the 4″ putty knife was great for backsplash and edges, while the small guy helped us get into tight spots, like around the sink.
- Stuff for keeping walls clean: We kept a sponge and paper towels on hand to clean up any drips or splatters on the wall. We also taped off some areas too (more on that later).
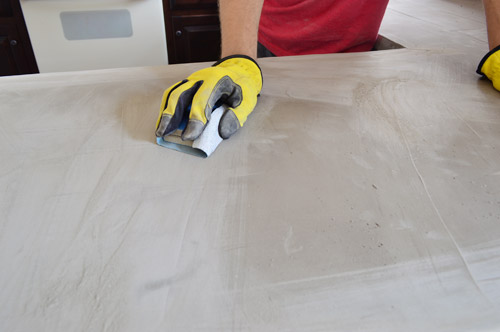
- Protective gear: During the sanding process the glasses and dust mask helped keep stuff out of our faces (Sherry preferred our heavy duty respirator) while the gloves were great for keeping our fingers from getting crazy raw.
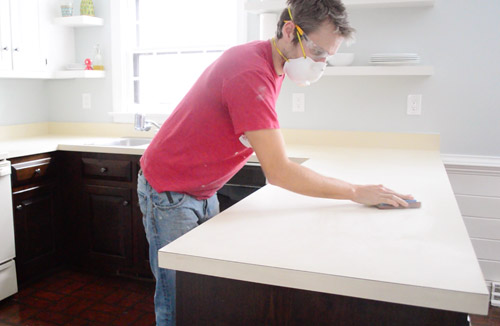
Speaking of sanding… the first step was to rough up the existing counters with some high grit sandpaper. This was before we realized our fingers would be taking a beating from all of the sandpaper gripping. We wised up and added gloves and used nice big sanding blocks wrapped in high grit paper about ten minutes into it. It went much easier after that.
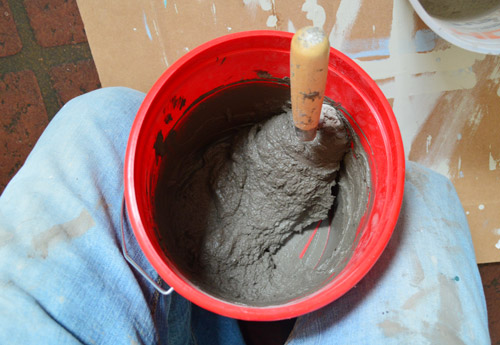
The Ardex bag suggests a mixture of 2-parts powder to 1-part water, but we found that balance to be a little bit on the thick side – making it hard to spread and what we believe led to our first layer being, well, on the thick side too. So we erred on the side of a bit more water from that point on.
Like grout or thinset, the goal seems to be a toothpaste-like consistency. Thick enough that it doesn’t run or drip off your blade, but thin enough to spread easily. If you’re mixing larger batches it suggests a paddle mixer, but we did just fine by hand (Sherry took a turn mixing things too and didn’t have any issues doing it by hand). Since it starts to harden within about 15-20 minutes, we never wanted to mix up too much at once anyway.
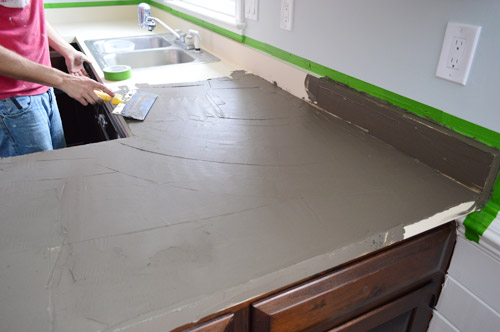
Spreading it on the flat surfaces was kinda fun, in a weird way. It was like icing a giant cake and using a big 10″ blade made it pretty fast to get the big areas covered. The backsplash was another story, but we’ll get to that in a second.
Here’s a quick video Sherry took of me applying the third coat, since we thought it’d helpful for you to see the stuff in action. I’m not claiming my technique to be great or anything, but we did find we got a bit better each round (Sherry also thought we got better at sanding/smoothing each layer as we went). Which is good news because your first couple of layers will get covered up anyways – so they’re kind of like low-risk practice rounds.
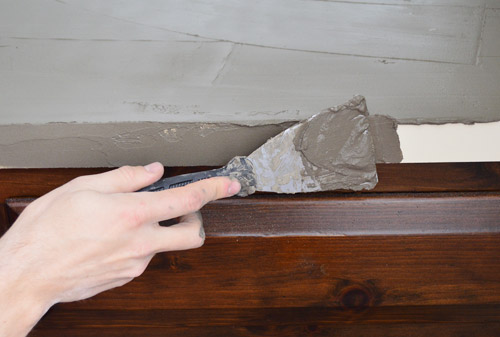
When it came to doing the sides, we switched to a smaller putty knife. We usually did these after we had applied most of our mixture to the top, that way what was left in the bucket had set a bit more and was less likely to slide off the vertical surface.
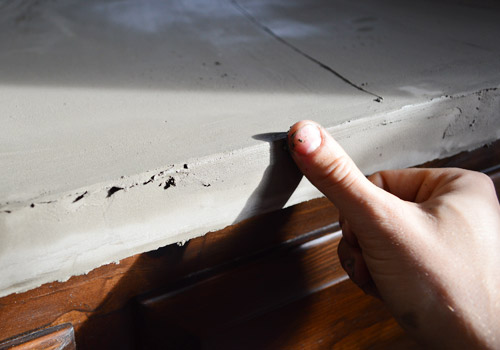
At first we found the edges to be challenging since it was easy for stuff to build up there. What we realized a couple of rounds in was that after about 20 minutes the Ardex had hardened to an almost clay-like consistency, and Sherry or I could come back and smooth the edges with a damp finger. My favorite part was sneaking up behind Sherry all Ghost-style to smooth them from behind her back. Who says there’s no romance in DIY?
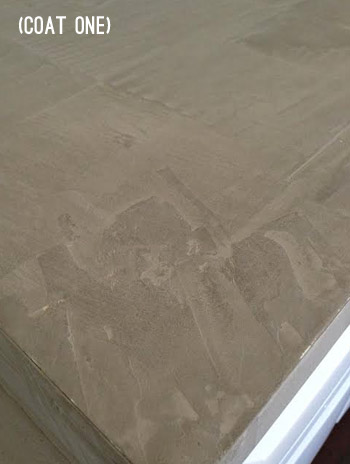
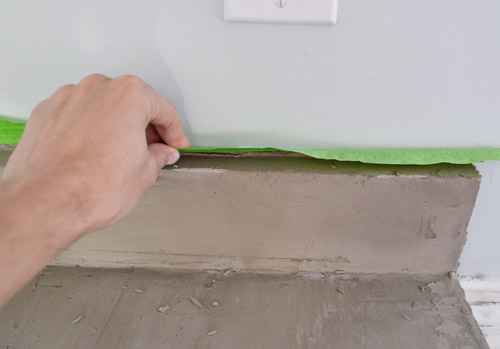
Here’s our first round after it dried. You can see Sherry taped off the wall to protect it when I lamented how much was getting on them as I went. In hindsight we’re still unsure whether that ended up being a smart decision. It certainly made us less paranoid about being messy as we went, but removal was a bit of a pain and not perfect since we were essentially concrete-ing the tape to the wall in a few spots.
We decided to ditch the tape after our second round of counter smoothing, so we slowly worked our way around the room peeling it off (we feared that too much concrete build-up would trap the tape in place forever). One thing that we found during this process was that pulling it down from the top (rather than ripping it to the side like we do after painting) did a better job of getting a clean edge and not just tearing the tape. But we did have to chisel it free in a few areas… so I’m not sure if it was a time saver in the end.
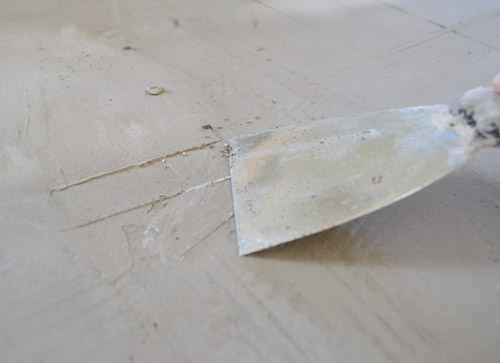
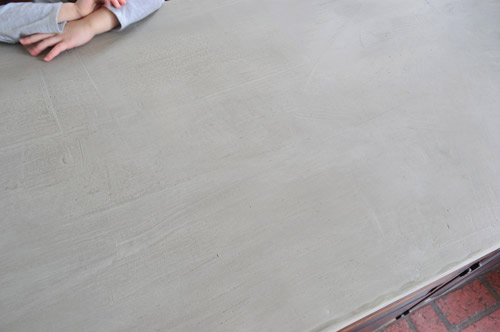
Things looked pretty rough after our first round (well, after every round actually). But that’s where the fun mess begins: the sanding step. Here’s where you smooth out any rough spots or ridges so that the next layer can go on evenly and ultimately get you to a flat, smooth finish.
After letting the surface dry overnight, first Sherry would go across the top with a putty knife and scrape off any obvious ridges that were left by the drywall knife during the Ardex application. Even though it had hardened, it wasn’t tough to do. Blobs and ridges just popped right off as she scraped back and forth over them.
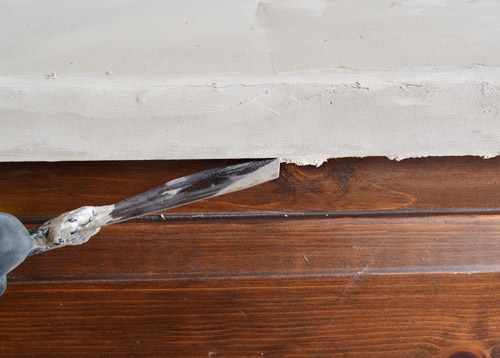
The most satisfying thing was cleaning off the bottom edge. Sherry realized we could just run our smaller putty knife along those and sheer off any irregularities, which left us with an awesomely crisp line on the bottom. Best part of this project by far. Could’ve done it all day.
That step was quickly followed by our least favorite part: sanding, sanding, and more sanding. We chose to do it all by hand, since we feared that our power sander would just sand everything down to the laminate again (or leave rough ridges or marks as it traveled around the counter). Plus, with all of the tight spots like the backsplash and around the sink, we figured it would be easier to maneuver by hand.
We used a sanding block (for easy grip) wrapped in fresh sandpaper each time. For sanding every layer except for the last one we used a really rough 60-grit paper to make smoothing ridges and rough spots easy, but after the last coat of Ardex (we did four coats) was all smoothed on and dry, we switched to 220-grit paper to make sure we didn’t leave big/rough scratches in that top coat of concrete.
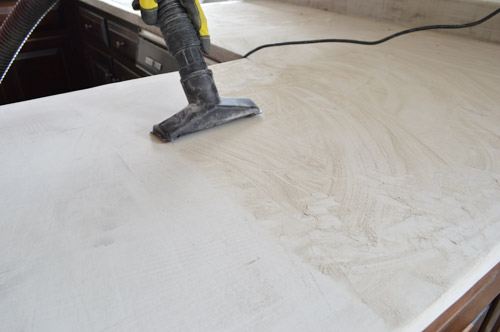
Sherry also realized that it was helpful for us to pause while sanding each section to vacuum off the excess dust as we went (thanks shop vac!). This was especially helpful because sometimes the dust would disguise an area that needed a bit more sanding. Plus, it just helped for sanity reasons, since we felt like we were keeping the mess more contained that way.
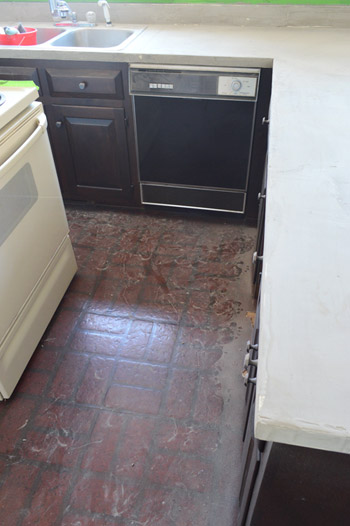
Speaking of which, the mess was the biggest surprise to us. Despite reading other people’s experiences with it (and obviously, we knew sanding was involved), I don’t think either of us had mentally prepared for the fact that there’d be a fine gray build-up of powder EVERYWHERE. And since the kitchen is such a central and highly traffic area of our house, keeping it clean ended up being a big time suck (after each round we would sweep, then vacuum, and then mop the floors to be sure nobody tracked anything throughout the house when they passed through over the five days that we worked on it).
After our first coat, we noticed the laminate was peeking through in a few spots after our initial sanding step – mostly on edges where it’s really easy to scrape everything off if you’re not careful. But that’s one reason you do multiple coats, so we weren’t too panicked.
Here you can see a second coat beginning to get applied over the first. Note the difference in color between the wet Ardex vs. the lighter stuff (that’s how it dries). We actually think once we seal it, it’ll get closer to the wet color though, so that should be interesting to see.
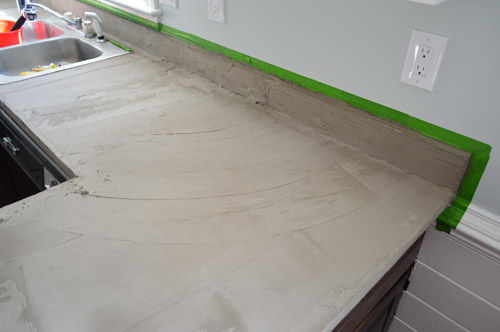
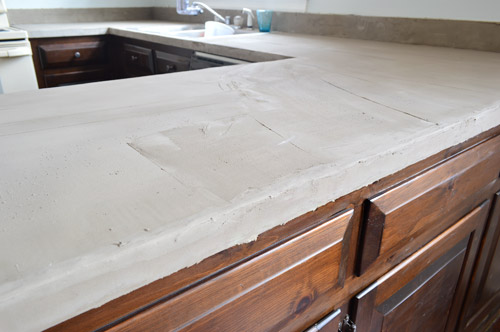
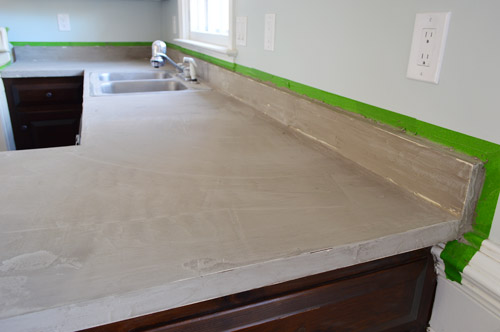
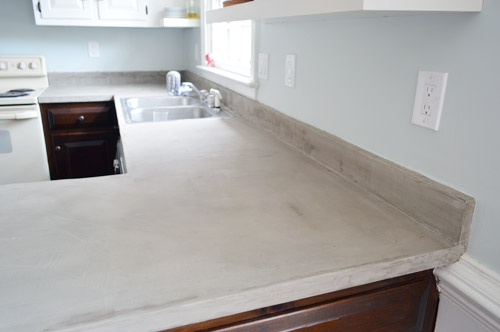
Here’s a shot of our final counters (well, pre-sealing). You can see it’s still not perfect, which everyone notes is one of the charms of this Ardex technique. You get that sort of imperfect, industrial look, but it definitely feels more solid & stone-like (as opposed to plastic-y like laminate).
I’ll admit that I had to come around to the idea of appreciating the flaws of the finish. Sherry was immediately charmed by it, but the perfectionist in me resented the fact that this type of project doesn’t yield perfectly uniform results. I think once we seal it I’ll appreciate it even more (that will darken it a little and remove the chalky finish in favor of a more polished look) so I’m really looking forward to that.
By far the hardest area to get smooth was the backsplash, just because it was a small area that was difficult to reach and seemingly made up entirely of edges and corners. So both applying the Ardex and sanding it was challenging and required a bit of body contorting on my part (lucky Sherry was too pregnant to reach it in most areas thanks to her belly being in the way, which had me slightly envious by the end of this process).
Another tough spot was around the sink. If this were our “forever” counter, I would’ve gone through the trouble of removing the sink, but we’ve got some old copper pipes that are pretty much corroded together down there (which would mean bringing in a plumber to switch this out). So we opted to save that for Phase 2 of our kitchen update and just taped / sanded around it. The results were actually better than I expected.
Challenges and flaws aside, we’re happy with the overall improvement to the space. It feels good to rid the kitchen of another old yellowed surface and make the room feel a bit more updated. Just cover the floor with your hand and squint – ok?
And although the time that we spent on this update was longer than we envisioned (probably around 15 hours spread across five days, including prep and clean-up) the cost was still pretty fantastic. The three bags of Ardex (again, we only needed 2.5 to do four coats) cost $57 in total – and we probably spent another $20 in buckets and sandpaper. So for 45 square feet of countertops, we paid just $1.71 per square foot to update it – which is pretty hard to beat.
That doesn’t include the sealer though, which is next on our list. We’ve read a ton of sealer reviews since it seems that the wrong sealer can cause more scratches, stains, and even issues like bubbling down the line – so we want to get it right. The two most highly recommended products seem to be Ardex Clear Concrete Guard High Performance Sealer and GST International Satin Seal Water Based Acrylic Sealer. Does anyone out there have a preference between the two? We can’t find either of them locally so we’re going to have to order one of them online and wait for it to come, but we’ll definitely share what we end up going with, how it goes on, and what it does to change this finish – as well as updating you guys on how these counters end up wearing for us over time.
Update: You can check out what we used to seal them here, and read an update on how they’re holding up here.
Psst – Wanna know where we got something in our house or what paint colors we used? Just click on this button:


haverwench says
I’m wondering whether this stuff would work on our counters. They’re laminate too, but the really old kind with metal strips to hold it in place along the walls. This has made other refinishing methods, like the “Make it Stone” painting kits, not an option for us. Do you think it would be possible to apply this concrete stuff right over top of the metal strips, or would we have to remove them and then find some other way to secure the laminate in place before applying it?
YoungHouseLove says
I’m not sure about those metal strips, but I would think anything you can cover and let it set on and then seal it should be ok. Anyone ever tried that?
xo
s
Jill says
I think concrete WITH the metal strips might be a really neat look!
haverwench says
Not with these…they’re really rusty and icky looking. I could try cleaning them, but I’d really rather not have them at all; they trap dirt and make it much harder to clean the counters.
BungalowTwenty says
We live with concrete countertops that we poured ourselves a year ago. We love them but I will say one thing that I wish someone told me long ago –
Be very careful with high acid foods on your countertops. ie- vinegar, wine, lemons, oranges, etc if you don’t wipe up right away you will start to see the acid start to etch into the countertops and its a pain to repair. We found that using caroba wax (its actually car wax) that is food safe helped block some of this damage from happening.
I hope this is helpful for those considering concrete countertops. Here is more info on pouring concrete countertops the long way :) http://www.bungalowtwenty.com/2013/05/concrete-countertops-our-rewarding.html
YoungHouseLove says
Love those tips! Thanks so much!
xo
s
liz says
I used the Miracle Sealants 511 PT SG 511 Impregnator Penetrating Sealer on my Ardex counters and it seemed to work pretty well. I did three coats. If water gets on it, it leaves a mark for a few minutes but then fades. I am pretty quick to wipe it up. The concrete looks exactly the same before & after the sealer, so if you’re aiming for it to be darker or shinier, avoid this one. They sell it at Home Depot and Amazon. Good luck!
YoungHouseLove says
Thanks Liz!
xo
s
Randi says
This looks AMAZING! I can’t believe what a difference this inexpensive upgrade makes. After saving our pennies, my husband and I recently splurged on new, grey quartz coutertops for our kitchen. I love the look of the grey coutertop with our white cabinets. Now we just have to get our simple white subway tile backsplash up!
As you consider Phase 2 options, I do encourage you to look at quartz. Since we went with a less marbley(is that a word?!?!) looking quartz, the price was WAY better. (We spent $58 a square foot compared to pricier options that look like expensive granite). And I actually found like that I like the clean, less busy stone WAY more.
Awesome upgrade – thanks for sharing! This makes me want to attempt this on our dingy brown laminate countertop in the master bathroom…
YoungHouseLove says
Someone else said quartz has been amazing for them as well, so we’d love to look into that down the line!
xo
s
Cristina Richard says
These look amazing! I was so excited to see the results after the sneak peak on Friday. I’ve been thinking about trying this for a while in my kitchen, but the only challenge is I have butcher block counters, not laminate. They are really old and beyond real revival–plus don’t match the rest of the apartment. Any thoughts on whether this would work on top of butcher block? Thanks!
YoungHouseLove says
Anyone ever tried it on butcher block? Maybe call or contact Ardex to see if they recommend it for that application?
xo
s
Krissy says
I was just reading about concrete counters on Houzz. They look amazing when they are sealed!
http://www.houzz.com/ideabooks/24729397?utm_source=Houzz&utm_campaign=u461&utm_medium=email&utm_content=gallery7
YoungHouseLove says
SO PRETTY! Can’t wait to seal ours!
xo
s
Kirstin says
I love the look of these countertops!! We almost did thus in our kitchen but I decided to wait and see how yours turned out. My concern was that some people have posted that in a kitchen setting these tend to stain, especially from oil. This may have been just a case of the unhappy few being more vocal because I know some people love them. Please keep us updated on how they hold up over time and if you have any issues after sealing. Thanks for letting us benefit from your experience :)
YoungHouseLove says
Will do!
xo
s
Sarah says
Looks great! Yeah, I guess I never mentioned the mess…but our kitchen was still a construction zone when we did our counters, so the dust was just par for the course.
We used the GST sealer, with wax on top of it. Can’t wait to see what you decide to go with. And thanks so much for the shout out!
-Sarah
YoungHouseLove says
Of course Sarah! Your tutorial was so helpful!
xo
s
Sarah says
One more thought: after it’s sealed, are you going to caulk around the sink too? Is there a gap between the sink and the Ardex? We didn’t have our sink installed when we did our counters, so I never thought about that, either.
YoungHouseLove says
There’s no gap there so I’m not sure we’ll caulk. It’s hard to see in the pic, but it’s just sort of a ridge where the cement buts up against the sink, so as long as we seal it well we hope it’ll be ok. Do you worry it’ll bubble or something around there without caulk? Maybe just a clear silicone lip would be smart?
xo
s
Sarah says
Yeah…I mean, a little clear silicone wouldn’t really affect the appearance and costs almost nothing, so I’d say it’s worth it. Might not be necessary, but at least it’s cheap insurance.
YoungHouseLove says
Thanks Sarah! I’m with you! Better safe than sorry.
xo
s
Randi says
Do you think this would work with laminate countertops that have the rounded edge? Would love to do this in a rental property we have.
YoungHouseLove says
Yes, I think so! A few others asked this so if you scroll back in the comments you can find more info :)
xo
s
Patti says
I think they came out great! Once the sealer is on you’ll probably love it even more. I give you guys so much credit for taking on this project. What a job!
Ashe says
This is amazing! I had no idea that this was even an option. Our laminate is really old and starting to come unglued around the sink and I would worry that it would pop up and break the concrete surface. Is the concrete layer thick enough that this probably won’t happen? Do you think the product would work as well if I peeled the laminate off and concreted (word?) over the wood base?
Thanks! It looks fantastic!
YoungHouseLove says
Hmm, I would say that this skim coat is only as strong as its foundation, so if the laminate is peeling/popping the concrete could too. I would try gluing it all in down with heavy duty adhesive, and then sanding and Ardexing over it. You could also peel the laminate all off and try to make some sort of wood base (or use what’s there) although I’m not sure if it’ll be smooth enough or solid enough under that.
xo
s
Tiffany says
Have you considered painting your lowers white? I think it might look more cohesive if they were white. The brown/gray mix is just not doing it for me personally but, maybe it looks different in person.
YoungHouseLove says
Thanks Tiffany! A few others have asked the same thing, so you’re not alone. We think we’ll seal the counters first (since it’ll darken them) and then judge how we like everything – especially after bringing in some counter/shelf stuff, and maybe even window treatments. The reason we liked the idea of wood lowers was to balance warm & cool (blue walls and concrete counters could feel cold, but the wood table and twine chandelier in the eat-in area look really nice with the wood lowers). We’ll have to share some wider pics and see if sealing things changes anything!
xo
s
Becki @ The Uncomon Common Law says
Holy crap this looks AMAZING!!!
Lyndsey says
I love the look of these concrete countertops, but was unsure about doing it in a kitchen as i couldn’t find a definitive answer on if they’re food safe. I’m sure you guys did your research…so can you share if they’re food safe?
YoungHouseLove says
One of the two sealers we’re debating (the Ardex brand one) says it’s safe for occasional food contact or something sort of half-enthusiastic (haha) but we use cutting boards for everything from apples to meat, etc – so since we’re not rolling dough out on the counters or anything I think we should be ok. They do sell super food-friendly ones but the reviews on them are a bit shaky, so I think sticking to our cutting board method will be the better choice in the name of them holding up. Will keep you posted though!
xo
s
Jessica says
We had concrete in our first house and the counters were left unsealed because some of the sealants are so toxic/off-gasing…or at least that’s what our contractor felt. We would use olive oil on them one a month as a natural sealer. It worked really well …we were in that house for 3+ years and it worked awesome. We’d rub it in. Let it sit overnight and then wipe off the excess in the morning. Thought I’d throw that option out there.
YoungHouseLove says
Wow, thanks Jessica! Has anyone used that on concrete?
xo
s
Jessica says
sorry last tidbit. We also liked it because it didn’t have that ‘wet’ look all the time that some concrete counters have depending on the sealant. Ours looked richer and warmer the week or so after the ‘olive oil’ treatment but overall it didn’t look slick ever. We were big fans.
Jessica :)
Lisa says
I have been reading a lot of forums lately and I read that olive oil can turn rancid and that it shouldn’t be used on countertops… this was in regards to butcher block so I’m not sure if the same applies but just wanted to throw that out there in case it wasn’t mentioned :) I’m no scientist though so I’m not sure how much truth there is to that.
YoungHouseLove says
So interesting! Thanks for the tip!
xo
s
Carla says
I want to love the concrete counters, but to me it just looks like concrete-covered laminate. They require far too much care and work. Also, what if you need to replace the sink or want an overhang on the counter top for bar stools, or custom rounded corners on the ends?
Personally, I would rather save the money and time, not to mention the materials that will end up in a landfill someday, and invest in something classy and special as an investment in your beautiful home. With white cabinets the cement will look better, but I don’t at all peg you guys as cement lovers.
I did enjoy watching the video and hearing those squishy cement sounds, and I’ve definitely been curious about cement counters in a kitchen. So thanks for the nice tutorial.
Megan says
They chose this option because it was a phase one deal. When they mentioned it last week I got excited and looked up other tutorials for this technique and a few if them mentioned taking the sink out and using the Ardex underneath where the lip would go, and then using clear silicone to seal it up once the sink got dropped back in! If you wanted an overhang or rounded corners, you’d do that to the base first and then Ardex over top. Some of the pictures are less than great, but it’s really hard to take good photos of chalky surfaces, especially when contrasted with shiny/glossy finished. But I think it’s a great and inexpensive upgrade for the phase one goal!
Jill says
I would NEVER have the guts to dump concrete on my counters and have confidence it would turn out well. Props to you and your cajones and mad skillz.
Carla says
I meant to add to my comment that the sealer will darken them, as I think you or someone else mentioned, and it should also add a bit of a sheen. Just a touch of a sheen will make them look much better, as will a slightly deepened color. I do look forward to seeing them once they’re sealed. You definitely keep me in engaged and always excited for updates. :o)
Katy says
Have you guys considered using concrete stain? I’ve seen a few blog posts that combined ardex, white concrete stain, and streaks of gray & tan stain to look like marble. I’ve been dying to see a tutorial on that.
YoungHouseLove says
We preferred the raw look of the concrete, knowing it’ll darken up when we seal it, but we have seen some awesome tutorials with stain (the one from Sarah’s Big Idea used dark stain for an almost black granite look)
xo
s
Lou says
Noooot really a fan. But it is cool that you like it (or sort of like it, John) and also cool that you got to try something different and very DIY in phase 1. Also it’s helpful to your readers. I read the LGN post with the same product and yours was definitely a bigger space and a more difficult application. Now they have more to go on if they want to try it themselves. But personally, I don’t know. Something about the stained lowers and the concrete maybe? I agree with others, I think it looked better with the all-white by the desk area. Or maybe even black or dark blue on the lowers? I’m all about creative juxtapositions, but stained-sorta-rustic-country meets cold-gray-industrial-concrete just doesn’t sing to me.
Julie says
I agree with you, Lou. It still looks like laminate, just gray dirty laminate now. Even with the sealant, you didn’t change the lines of the countertop, and it sings laminate counter shape. Hoping the sealant goes well and the counters hold up.
Deena says
Wow, looks great! My husband and I did a lot of research during our kitchen remodel since we wanted concrete countertops. We ended up going with a matte/ “suede” finish granite, but we definitely paid for it in cost!
One bit of advice I would throw out there (though you have probably already thought about this) is the look of the finish that you want. Some of the sealers give it a really shiny finish (especially when you are doing an overlay on top of an old counter). If you want a matte finish, choose your sealer very carefully!
YoungHouseLove says
Thanks so much Deena!
xo
s
Jen says
Great timing! We were just researching this project for our own kitchen as a temporary improvement. Did you ever consider peeling off the laminate and using the Ardex on the underlying particleboard? We wonder if this would yield an even stronger adhesion. Good work as usual!
YoungHouseLove says
We didn’t even think about that, just because ours was in nice solid shape (no flaking or bubbling) and the tutorials we had seen were almost all done using existing laminate counters without any peeling, so we went for it.
xo
s
Jen MC says
I love your blog, and the ideas you guys come up with. My husband and I are most likely going to be buying a fixer-upper in the next year and I have been bookmarking a lot of your work for ideas that we might be able to use.
I am curious on this project how level your countertops are now? Did you check with a level between coats?
Also did you consider removing the backsplash portion and just doing the countertops?
They look great and cannot wait to see how they look after you seal them!
YoungHouseLove says
The biggest surprise about this method is how super thin the coats were. We estimate that we built up the entire counter about 1/2 of a centimeter with 4 coats. You can see in the video that it’s really just a skim coat and then you sand it down, so it doesn’t really have enough concrete pooling in any areas to get unlevel or built up a lot. I just laid a level on the counter and it’s flat (no high points or valleys – it really is just a super thin coating, sort of like speading butter vs. spreading icing (it’s a lot thinner than icing would be after the sanding). As for the backsplash, I wish we could have popped that off like we usually do, it was just installed behind the counters in the kitchen instead of on top of them, so removing them would leave a gap around the whole room behind the counters since they’re not set to the wall.
xo
s
Cindy says
I caught a “that’s what he said” moment in the video, but I’m a little embarrassed to mention it…but oh well, here goes. “Mine’s a 10 inch but I would prefer a 12 inch”. OMG! I died laughing! It doesn’t get more X rated than that on YHL! :) p.s. I love the counters!
YoungHouseLove says
I just read that to John and he turned about 50 shades of red.
xo
s
Shauna says
I’m dying for y’all to update the floor in there!!
keri says
Right now, I’m not a fan. But it’s not my kitchen. Counter tops receive a lot of abuse and I would be really worried about water around the sink getting under the concrete and bubbling. I would have went with a more expensive, yet cheaper alternative. IKEA butcher block or a newer laminate that’s not yellow. Or tile on clearance since this isn’t your forever counter. Curious to see what it looks sealed.
Kim says
Looks great! I did this to the counter in my kids’ bathroom and it has worn very well (after 8 months, no problems!) I used the GST satin sealer and its been great… I think they looked even better after sealing too.
YoungHouseLove says
Love hearing that Kim!
xo
s
jen says
I Love the way this looks. We have a horrendous tile counter top. Guessing we couldn’t apply this right on the tile, but I wonder if we ripped the tile off and applied this to whatever is underneath (Plywood?) if it could work?
YoungHouseLove says
We have seen people use wood bases with theirs so I think that could work!
xo
s
Lilly says
So pretty! Way to go. I am looking at the Ardex and did you see it in any other colors or is it grey all the way? I think a rust would look interesting with a Mexican tile backsplash.
YoungHouseLove says
You can add stain to tint it if you want!
xo
s
Brandyn says
YAY! I’ve been wanting to try this and I love your tutorials so I’m glad you tackled it first.
I would love your recommendation about the order of a couple steps. I have laminate counters and the same laminate as a backsplash all the way up to the cabinets (yuck). I’m planning to put in a tile back spash. Should I pull off the laminate backsplash and tile before doing the concrete? Or concrete then backsplash? Or pull off the backsplash laminate, concrete, then tile backsplash.
YoungHouseLove says
I would definitely remove what you’ll be removing first (ex: pull off that laminate) and then do the concrete so it’s not stuck against something you later want to remove. Good luck!
xo
s
Kevin says
This was a really fun read and a great idea. I didn’t know you could do this, though reading that it was a polymer modified cement, it totally makes sense. Kudos on the idea and the presentation. Makes me wish we had junky ole laminate instead of ugly ole granite.
An idea / question : how do you think this material would hold up to a wet sand between coats? Might keep down some of the dust. Totally spitballing here, though. I’ve never actually done a wet sand (never had the need). Obviously, there would be other cleanup issues, but it might keep the mess more centralized.
Anyway, thanks for another great read and great idea!
YoungHouseLove says
I worry a wet sand would make it chunk off too much and take away from the smooth finish. Anyone ever try wet sanding their Ardex?
xo
s
Maggie Brown says
We did concrete ourselves in our home – the dust is what I remember. Great job!
Sava says
As soon as I saw Jenny do this, I knew I wanted to try it in our kitchen. I haven’t done it yet, but it is good to know how messy it is. Good luck!
Thisnomad says
We also did Ardec counters over laminate, just 3 weeks before my baby was due. My pregnant belly kept me from reaching the deep counters, too! I hope you have good luck with sealers. We tried a Home Depot brand, which stained horribly. Then I resanded and applied a top coat and tried a Lowes brand. More horrible staining and everything sticks, so the sealer has come off in multiple places. What once looked amazing now looks horrible and dirty all the time. I just ordered the GST version, and am not looking forward to redoing a third time. But I hope this one works! I hope your experience is much better!
Thisnomad says
Oh, and seal them quickly! Even water made marks on mine.
YoungHouseLove says
Thanks so much for the tips!
xo
s
Kelsey says
LOOOOVE! I’ve actually been looking into Ardex to cover *gulp* 1200 sqft of terrazzo flooring!
YoungHouseLove says
Ooh, good luck Kelsey!
xo
s
Kristin says
This is amazing! I can’t wait to try it on our ugly laminate countertops at our cottage. Ardex doesn’t seem to be available in Canada, but I did some online research and Henry’s Feather Finish looks to be the same product — it even says “Engineered with Ardex Technology” on the bag. It sells for $16.97 for a 7 lb. bag at Home Depot in Ottawa, Ontario.
YoungHouseLove says
So funny! Glad there’s something similar up there!
xo
s
Beth says
I like the gray and the white together. Nice job. I’ll be curious to hear how much you like it a year from now.
Jess says
Such a neat idea! You guys are so creative and resourceful as usual! :)
SJ says
I can definitely appreciate the amount of work, and the finished product but it doesn’t look very cohesive with the rest of the kitchen. I don’t think it looks, “cold” though, so that’s something!
Meleah says
Looks great! I read Kara’s blog too and I love the blue bathroom she did using the concrete finish. I am just not that brave. I may have to try the counters though. My hubby plans on replacing them anyway, so it’s really a no lose situation.
Larissa says
I’m really glad you guys posted this tutorial. I was debating whether to do this technique to my currently lime green (!) laminate counter, but after seeing your after photos, I’m going to have to go a different route. I have traditional cabinets like you, and I just think the industrial look of the counters clashes with the cabinets too much. It would drive me crazy! I also can’t get over the imperfections–I think they would work in something like a laundry room, ala Green Notebook, but would bug me in a kitchen i spend so much time with. Anyway, glad yo’ure happy with them–to each their own I guess.
Roxanne says
I’ve been dying to try this in our current house but have a couple of questions.
Do you think the look would be the same on laminate countertops that have rounded edges? I can’t decide if they will look silly or not.
Also, would this work in a bathroom? We have countertops/sinks that are one single piece of laminate. I wasn’t sure if it would hold up in a sink.
Thanks! And yours look great!
YoungHouseLove says
I think it should work on bathrooms (since it works around kitchen sinks and laundry rooms with sinks). And if you let it set up, those curved counters should work well and hopefully not slip off. Just seal it really well!
xo
s
JoAnne says
Great job! The counters look amazing!
Kristen says
We DIY’ed our concrete countertops (although we did the whole hog route of solid surface.) We used the Buddy Rhodes satin acrylic sealer with great results. You can see how we applied it here: http://www.storefrontlife.com/concrete-countertops-finishing-touches/ and you can see our finished counters here http://www.storefrontlife.com/concrete-countertops-the-reveal/ good luck on your sealing!
YoungHouseLove says
Thanks so much!
xo
s
Christie Thompson says
It looks lovely guys! I’m curious if you know about the strength of the concrete? For instance, my boyfriend brews beer and often handles large & heavy 5 gallon carboys full of liquid. I wonder if something like that might run the risk of cracking the surface?
Either way, it’s awesome to learn about so many affordable ways to modernize kitchens!
YoungHouseLove says
Has anyone done it with that much weight pressure on it? Not sure how it would hold up. In the video you can see John banging the counter with the spackle knife to knock cement off and it doesn’t crack from that or anything.
xo
s
Kristen says
By “a quick video Sherry took of me” you mean a quick video we recorded with a tripod right? Because geez, that is some damn steady handwork if that is held by a human hand! Also Sherry deserves a thousand brownie points for being able to stay quiet for 4 full minutes if this was indeed filmed by her. I certainly couldn’t help myself from adding comments here and there! haha
YoungHouseLove says
Oh yes, I used a tripod to record him. I have the shakiest hands ever. I also resisted the urge to direct him or hit it with my belly. Haha!
xo
s
Rachel K. says
Wow, what a project!! You described it so well I feel like I was there breathing in that dust, lol. That is a very cool and inexpensive update, especially for people like you who are eventually going to do something “bigger” but don’t want to live with the kitchen as-is until that point.
Can’t wait to see what it looks like with the sealant!
Susan Z.F. says
What a great DIY project for your phase I kitchen update. Looks nice!
I was at my local Target store in Merrifield VA on Saturday and was so happy to see your full product line on display! Everything looked awesome. Not only do I love the product but I was especially enamored with your packaging which was fun and very YHL-y. Great job!
YoungHouseLove says
Oh my gosh that’s so crazy it was out already! I would have passed out if I saw it!
xo
s
Ricki @ The Questionable Homesteader says
I love the counters and can’t wait to see them with the sealer on them, really hope that they darken up a little (mostly because I want to do some in my place, only I need a darker grey and don’t want to buy colorant).
Really like & appreciate the suggestion to mix in small batches due to the fast drying time, and am wondering what the powder to water ratio ended up being? I like even more the fact that you are able to smooth out some of the bumps with your fingers after application, before the solid dry.
And as I have a very open concept living area (think a square with the living room, entryway, dining room turned office/craft room, and kitchen in their respective corners) I would definitely be cleaning the dust after each sanding just so I could live in the house.
I can’t get over how quick and clean those bottom edges came with the small scraper/putty knife.
I know you sanded by hand between each layer, but if you had it to do again, would you use the orbital sander (like E suggested) on the first 3 layers, and hand sand on the 4th to preserve the texture, or would you stick to the hand sanding? I only ask because although I really like the smooth finish the orbital sander gives, I think I might like the texture from the hand sanding more… that being said, I’m not a big fan of actually hand sanding myself (I’m a little lazy when it comes to hand sanding) and think the orbital sander might work with my personal level of effort…
Really looking forward to seeing the finished result with the sealer, and hearing which sealer you ended up using was.
Thanks so much for sharing, and the great tutorial
YoungHouseLove says
The ratio was about 60% mix and 40% water (they recommended two parts mix, one part water, but we added a little more water). As for the electric sander, since people like Kara don’t use one we would follow her example and just do it by hand (she’s an Ardex pro, and it would be such a bummer to undo a coat since you wait so long for it to dry).
xo
s