I was lying in bed thinking about what random lessons we’ve learned in over nearly seven years of homeownership and DIY, and I realized it might make a good post. Shoulda woulda coulda – ya know? Here’s what I came up with (which is by no means all-inclusive, but hopefully will help someone else out there who’s just learning as they go like we’re apt to do). Who’s ready for number one? Ok, since I can’t actually hear you guys (but clearly you’re all screaming “we are!”), I’ll continue.
1. It’s not always best to blindly follow one sentence tips in home improvement magazines without knowing if they’ll work for your system/house. For example, we read somewhere that shoving a piece of insulation up your not-in-use chimney was a great way to save energy since you won’t be losing heat or cool air through the chimney. So we did it, just shoved in some insulation (warning: if you are eating or afraid of bugs, don’t read this tip).
A few weeks later after a lot of rain while John was away on a business trip I was walking into the kitchen, past the fireplace without my contacts in. And I saw what could best be described as a bunch of white pieces of rice on the floor. So I knelt down to look a little closer and they were… maggots. Crawling out of the fireplace.

Probably fifty or more of them. Thankfully I’m not too squeamish (although I did take a moment to resent John for missing this debacle entirely by being gone on business) so I used a paper towel to gather them all up and fling them outside. Then I shined a light up the chimney only to realize that somehow the chimney cap must have leaked and the moist insulation was the perfect place for a fly to lay her eggs, which had hatched and were now in their larvae stage.
How did I know they were flies? Because apparently I missed a few of them and a few days later flies were all over the house. Thankfully I could solve the problem by removing that nasty piece of insulation, resolving to get the chimney cap looked at (we later resealed it with some silicone caulk) and reminding myself that perhaps every one-sentence tip in a magazine isn’t a blanket this-is-definitely-best-for-your-house rule.
2. Don’t decorate around a stump. Just pay to get it ground instead of sinking money into trying to make it look like a pretty planter. Although I’m sure some folks could totally pull it off, we couldn’t. We thought we could, so we attempted to make a little octagonal planting bed with some wood on top of the stump but it always looked like a tree stump in the corner of our driveway with a weird wood planting bed on it. So when we later decided to get our pebble driveway paved for our backyard wedding, we jumped at the chance to finally get that stump ground once and for all so we could reclaim that corner of the driveway and no longer look at our mutton-dressed-as-lamb stump.
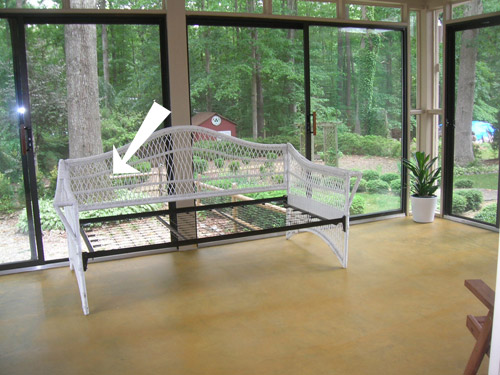
Note: here’s where I’d put a picture of the hideous octagonal planter that we built on top of our giant 3′ wide stump, but the thing was so ugly we never snapped a picture. But you can see the tree that we had to remove (it was dead when we bought the house) which left the stump in the background of this picture of the sunroom:
I think this is probably a wider concept, actually. For example, if you have an ugly obstacle (gross wallpaper you haven’t gotten around to removing), don’t try to pick art, drapes, and accessories in that color palette to try to make the ugly thing work if you don’t even like said ugly thing. If at all possible, just save up money (or wait to have some spare time) and remove it if you can. Then you can spend money and energy towards creating a room/feature that you love instead of spending money and sweat to try to disguise something that makes you twitch whenever you see it.
3. Plant things a safe distance from your house’s foundation. Some things we dug in at first were borderline too close, so we learned that even though planting a dwarf tree four feet from the house feels oddly far, from the street it looks just fine and it’s much better for the foundation (and the tree itself since it gets more sun and rain than it would if it was half-tucked under the eave of the house).

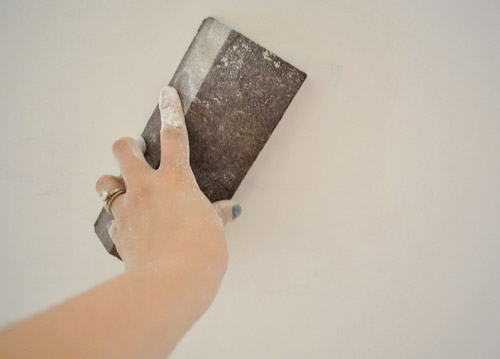
4. Spackle and drywall mud need to be smooth before you prime or paint. Primer and paint actually will enhance any irregularities, so they won’t hide any sins at all. And once those things are painted if they’re not smooth, you can no longer just easily sand them to make them smooth (paint is really hard to sand and get the same smooth look as caulk or putty or drywall mud before the paint is applied).
So when in doubt, we like to spackle and sand and spackle and sand – at least two rounds just to make sure we fill everything in that needs to be flush and sand everything down that needs to be smooth. The instinct is to hurry up and get done as quickly as possible, so you really have to fight yourself to make sure you sand things well so they’re nice and smooth (in the end it’ll save you lots of time since going back and trying to fix things after they’re painted over is a royal pain in the behind).
5. Your first idea isn’t always your best idea. Take our first house’s kitchen for example. For a while we were planning to just get new cabinets and put them in the same configuration as the old ones. But after a while of thinking and rethinking and brainstorming we came up with removing the door to the old dining room, making that a third bedroom (it already had a closet), moving the dining area off of another kitchen doorway in our extra-long-never-used living room, and making a completely functional and much more beautiful u-shaped kitchen instead of the old i-shaped counter that used to be there (we gained at least three times the storage and counter surface along with making our house more valuable since we added a bedroom).
Similarly, in our current house we initially wanted to add an island to the kitchen. And then we considered a banquet.
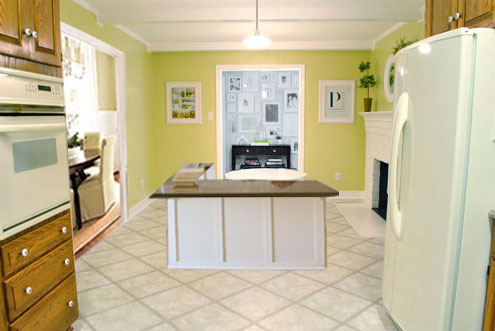
It took us a while to get to the peninsula idea, which we definitely think was the right way to go.
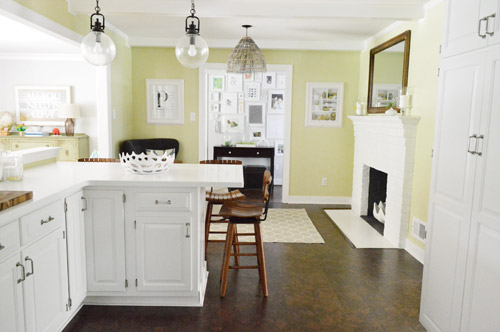
So try not to rush into anything major without really thinking and rethinking everything. We find that living in a house for a while to get a feel for it can give you major layout-change and floor-plan ideas that you never could have come up with if you renovated off the bat.
And there you have it. Five things we learned the hard way. Well, I guess the last one wasn’t something we learned the hard way because we rethought things enough to narrowly miss creating a similarly small and cramped kitchen in our first house and a room with an oddly placed island or banquette in our current house. But it’s still definitely a lesson we learned along the way. What have you guys learned the hard way? Share and share alike.
Update – Wanna know where we got something in our house or what paint colors we used? Just click on this button:


Sassy Apple says
Don’t spend a lot of money on something bold and trendy, like a sofa covered with cabbage roses. Something that catches your eye for a minute in a glossy magazine can be hard to live with for 10+ years. Do expensive, hard to re-do items in neutral tones and individualize with bold paint or trendy accessories. That way you can change the look of your room easily and fairly inexpensively.
Elly says
Soooo, any tips for what to do if you sanded, spackled, primed and painted but can still see irregularities in the paint? We should have given it a second coat of spackle and sanding, but we didn’t, and now I desperately want to fix it …!
YoungHouseLove says
Oh yes, you have to start over again. Sand the heck out of it, spackle again, sand a ton again, and then try to prime/paint again.
xo
s
Sara says
1. Don’t start digging a giant hole in your yard for a garden when you think maybe you just want to do a raised bed box instead. Oy.
2. Your spackle tip is great! We were not patient spacklers and our house shows for it. When it’s repainted (professionally–we’re terrible painters. Hate it. It’s not worth it to us.) hopefully the pros can fix it. There was a shower bar in our master bath above our shower that has glass doors. The previous owners left the three little holes on each side where the bar was and when we tried to fix it; it looks awful. Oh and they also hung a medicine cabinet over a huge hole in the wall. That was a big surprise!
ACS says
Reading everyone’s comments makes me feel a whole lot better (and less guilty) after recently buying a couch that I talked myself into because it was (relatively) cheap and looked *kind of* like the one I really wanted; I figured, after it was delivered, that I would learn to like it because I would think about all the money I saved every time I looked at it. Well, no surprise: that still hasn’t happened, and now that I’ve had it for a month, I’m trying to sell it on craigslist so that I can buy the one I actually want. So in the end, I’ll not only be paying more for the couch I wanted in the beginning, but will also be taking a loss from having to sell the couch I DID buy at a discount (because who wants to pay full price for a couch off of craigslist? Nobody, that’s who). Blah. I just bought a new place and wanted to rush to have it done – like so many of your commenters – and ended up making some crummy design choices in the process. I keep telling myself that “you can’t take it [i.e. money] with you,” but that doesn’t help all that much every time I drop a couple of hundred dollars on another mistake. Ah, well. Lessons learned!
Brynn says
This is a very good lesson. I too just bought a place and am in a rush, but you make a very good point, as YHL has too. Thanks for sharing!
Elaine K says
I know you what you mean about things happening when your husband is out of town. A tree fell on our bathroom during Tropical Storm Floyd while my husband was in Palo Alto. Fortunately I was in the tub of the other bathroom with my two little kids with a crib mattress on top of us when the tree hit.
meganleiann says
This is little: but I keep buying CFLs and then hating the light. I’ve probably spent a hundred bucks or so looking for the right one to go all energy efficient and I’m never happy. Do you have any tips for bulbs that have nice light?
YoungHouseLove says
Oh yes, we like “warm light” CFLs (the daylight and cool light ones look so purple/blue to us, so we like the warm glow of the warmer ones). Hope it helps!
xo
s
Heather says
LEDs are the way to go. CFLs have the same migraine-inducing quality that regular fluorescents do. I hate them. Every time I see CFLs I want to smash them.
Angela says
I bought CFL bulbs and was just so unhappy with them! Some of them can’t be dimmed, some of them need time to warm-up so can’t be used in cold places (like the garage), and then there are those concerns about rashes and migraines… Not to mention the danger of having them break and needing to be disposed of properly because of the mercury content.
I second Heather on the LED bulb. I bought this Phillips LED and can’t be happier: http://www.homedepot.ca/product/125w-led-a-dimmable-soft-white/926038#BVRRWidgetID. It’s replaced my “normal” 60W bulbs. I know it’s a little pricey at first but it gives the perfect light and they last so long! I also tried this one, but found that it was pink until it warmed up and turned into a soft white: http://www.homedepot.ca/product/9w-led-a-dimmable-soft-white/926037.
YoungHouseLove says
Great tips Angela!
xo
s
Lizette says
This is a random comment, but I’ve really missed seeing pictures of your kitchen! I was like, “Aaah. There it is!”
Crystal Cole says
I don’t know why but looking at pics of your old house makes me miss it a little. WEIRD.
Joe says
Yeah, I wonder what your old house looks like now. Have you gone back to see what changes the new owner made?
YoungHouseLove says
I wish! We left the ball in their court so we’ll have to see if we ever get to come over and check things out!
xo
s
Helene says
“if you are eating or afraid of bugs, don’t read this tip”
Embarrassed to say I had to read this several times before I realized that you did not mean “eating bugs.”
YoungHouseLove says
Ha! That too.
-John
Gilit says
Haha! Amazing
Kate says
Lesson learned after having the worst real estate agent in all of history: NEVER EVER buy without an inspection clause, no matter how competitive the market is. Ouch.
Erin Port says
Do not spray paint on a windy day on your driveway (oops I have learned this lesson not once but twice) and thank goodness my oh so loving hubby didn’t say a word about our 2 new lovely art installations on our driveway…you would think I would learn to get a bigger box to spray on and that I would do it on a nice calm day in an area of our yard no one can see…. :)
YoungHouseLove says
Haha, good lesson!
xo
s
Amelia says
Here is our stump decorating story. We bought a house in a neighborhood that had a tornado go through 3 years prior. The tornado took out a tree in the front yard that was similar to yours with hostas and tulips around it. It also took out the chimney. So logically, the previous owners cut down the stump and put the old chimney on top of it. Beautiful, a chimney in the front yard surrounded by tulips! (We removed it 6 weeks after we moved in)
YoungHouseLove says
Holy cow, no way!
xo
s
Caitlin @ Desert Domicile says
Great tips! I’ve learned that I’m incapable of finding a stud in my wall no matter how many gadgets I buy or how many times I pound on the wall. It’s a miracle that anything is still hanging haha
Amy @ Woodlawn Lane says
Gross gross gross about the maggots! I am super squeamish about those things…I left a bag of garbage in the garage once because it was raining when I needed to change the kitchen garbage out, and forgot about it…a couple weeks (!!) later, I lifted it up and found a sight similar to what you described! ICK.
Gilit says
Love it! I was literally just talking to my husband about what our mistakes along the way have been and what we’ve learned from them. My biggest lesson is: don’t rush into buying a piece of furniture just because it’s beautiful and on sale!
I always appreciate your honesty and openness
Gilit
anna see says
Great tips! Even though I sometimes resent waiting to do projects, it’s usually a good idea.
Miriam says
#1 lesson I learned the hard way: spring for the fancy paint. For our bedroom we had a Benjamin Moore color matched to a cheaper brand of paint, and ended up needing twice as many coats! Cost us the same amount of money and way more time than using the right stuff.
Anika says
EWWWW tip number 1!! These are good reminders, especially about not making something work that you hate. It’s a little bit harder in a rental, but still worth thinking about (ie I don’t want to collect a bunch of accessories in a color I don’t really like just because they match the carpet of a room I’m renting for now.) Thanks for sharing – it’s always really encouraging to know that even you guys struggle with some of this stuff from time to time. If you think of any more helpful suggestions/lessons I wouldn’t mind a part two!
Maria says
I wish my husband and I had not bought so much cheap, blah furniture and would have lived with less until we could afford nicer things. Now we have an Ikea showroom living room and will need to spend even more money to replace the items. Keeping our fingers crossed that someone out there (on Craigslist) wants an entire Ikea Lack collection! I think somewhat goes with number 2 though :)
Val says
Don’t attempt a suicide run to the IKEA that’s three hours away on New Year’s Day while you are hung over. Even though I had carefully looked up the dimensions of all the items we were buying and I knew that it would all fit in the Honda Element, we were in no condidtion to play IKEA tetris. We stood around the loading zone for about half an hour, then gave up and returned everything. Drove home in three hours of silent shame. Went back the next weekend and bought all of it again, loaded up in 15 minutes, no problems.
You could also file this under, “Accept that you are not 21 anymore.”
Jennifer says
This wins for funniest comment.
Brenda says
This story is an amazing mix of Oh, no! and Hahahaha!
Kelly says
The previous owners of our house tried the insulation up the fireplace trick. We were not planning on using the fireplace, so we left it there and also learned it did not work so well. One mild winter evening our second year in the house, I’m sitting on the couch and out of the corner of my eye see a bat swooping around the dining room! Either a piece got loose or the bat just made his way through the insulation. One bat tube extraction + proper chimney cap + a just in case steel plate = no more bats!
YoungHouseLove says
Holy cow, no way!
xo,
s
jeannette says
i think i love these essays in DIY philosophy almost as much as the rilly rilly detailed itty bitty step by step bigarse project ones (how do you move a mountain? one teaspoon at a time).
the one about spending time and money trying to hide something hideous is a hard, hard lesson. it clicked for me when somebody trying to take care of their ancestors’ castle (!!!!!) said, get your infrastructure first. the next two generations can play with wallpaper.
thx as always for the inspi.
Angela says
I agree! I come here for the DIY philosophy as much as I do for the DIY how-to tutorials. I enjoy the thought process just as much as the physical process!
YoungHouseLove says
Aw thanks guys!
xo
s
Amber at Love, Laugh, Live Well says
Points 3, 4 and 5 are all ones that we have lived and learned along the way. I think that this is a great post for first time home-buyers and renovators!
Amanda A says
I bought and moved in to my house end of September. It’s been a major learning experiene. I’ve learned that even if someone has a good reputation, they’ll happily over charge you if they can get away with it. buying furniture online because it’s on a massive discount, isn’t a smart thing. For when it arrives it’s uglier and not even close to as comfortable as described. And it would cost too much to send back. I learned that I hate painting. That I”m not a do it yourself kind of gal.
Elizabeth says
Oh Sherry, I feel ya on the maggot thing. When I was in college living with a house full of girls, things got messy and we definitely ran into a few maggots! EW!
Dana J says
So, if theoretically, you happen to have made mistake #4, how exactly do you fix that? (In theory.)
;)
Dana J says
Oh wait, I saw you already answered someone a few comments up! My “friend” who made this mistake will thank you!
YoungHouseLove says
Haha, good luck Dana!
xo
s
YoungHouseLove says
Haha, just sand the heck out of it (sand off the paint, get back to the spackle and drywall and sand it as smooth as possible, spackle again if you need to, sand again, etc – keep sanding and spackling until it’s super smooth and finally ready for primer/paint!
xo
s
Andrea says
I’d add another, kind of a corollary to #5: sometimes the constraints that lure you away from your first idea can help focus the mind (and the project).
We’re renovating two bathrooms right now, and if I had my druthers, we’d do old-fashioned hex tile on the floors, black quartz or granite countertops, subways on the shower stall. But here in the southwest, *everybody* does stone-look tile, sayeth my tile-selling lady. And it’s cheaper than the stuff I like, and we are trying to flip this house.
So we’re now doing a running bond of porcelain “travertine” on the floor of both bathrooms. We found inexpensive granite remnants and tiles for the countertops. We’re using simple black and white field tile, in 13×13 and 4×4, interspersed with it all for backsplashes, shower and tub walls, etc. It’ll be pretty, clean, and modern; it’ll fit with our architecturally nondescript 1980s ranch just fine; and it’s about 180 degrees away from what I thought I wanted to do. But now I’m kind of excited about it.
So, initially we were irritated that what we wanted was outside our budget. Now I’m kind of relieved that the budget limited my choices, and I think the enforced choices are going to be better ones, in the end. (But I’ll report back when it’s done; cross your fingers for us!)
YoungHouseLove says
Sounds awesome. Fingers crossed!!
xo
s
Michelle @ AM Dolce Vita says
Very good tips,Sherry! I can especially relate to the “the first idea isn’t always the best idea” one. For us the biggest (and probably the most costly) mistake we’ve made with our house was to buy and install all the lighting fixtures as soon as we moved in. I thought I got a pretty good deal by buying them all at the same time from one lighting store, but big mistake! I ended up changing most of the lighting fixtures as we renovate and redecorate room by room throughout the house. The lesson learnt is that the lighting fixture is something that can bring a room together, which means it probably should be one of the last pieces to go in any room you decorate. It’s much easier to choose a chandelier that works with the ambience of a room then design the rest of the room to work with the chandelier.
Adria says
Oh, I’ve definitely decorated around a “stump”. When we bought our house, it had a red dining room. It was actually a lovely shade of red, so I decided to keep it… but not only did I keep it, I decided to tie red into my living room decor. It doesn’t look awful by any means – it’s just dark and not my style at all!
I finally got the guts to paint that room… I have primer in hand and just need to buy the paint (I’m thinking Benjamin Moore Wedgewood Gray). I’m nervous but excited to finally bring ME into our primary living space!
Parke says
Thanks for all the tips!! So helpful as always.
Anyway – this just came to me. Have y’all ever thought about make the kitchen ceiling beams into a coffered ceiling? If I remember correctly y’all mentioned doing that in the living room. I know y’all like to keep some things similar between rooms so it might be a good thing to consider!
YoungHouseLove says
Oh yeah, the odd thing about the kitchen beams is that they’re not spaced out evenly, so it could never make even squares or rectangles (there are 3 beams on one side of the room and only one on the other- so odd!). We think the less attention we draw to them, the better ;)
xo
s
Jennifer says
How much does it cost to get stumps ground out? We have I think 5 in our yard, and they are HUGE!
YoungHouseLove says
Hmm, I don’t remember but it wasn’t too bad. Maybe $40 each if you get a bunch (and more if you just get one or two)? It was around 6.5 years ago so I could be off!
xo
s
sarah says
thank you for this post. working on fixing up our first house still for 5 years. still learning too! i would like to add to #3 to not plant/let things grow near fences and property lines!! thanks to our neighbors we have a tree growing in our fence! :p
keisha says
I learned the hard way that sanding in between coats of stain and / or polycrylic doesn’t have to be the rule (at least for me in a particular project). And right now, I’m living with paint color in the dining room that was gorgeous in the can but completely wrong for our home. BAH!
keisha says
OT: I accidentally found out I am getting a copy of your book for Christmas! It was delivered while my husband was out of town, and for whatever reason, the box (from Amazon) actually had a label on the outside that said “Young House Love”, ha! I’ve never gotten a box from Amazon that had the contents stated on the outside! :-)
YoungHouseLove says
No way! That’s pretty funny! Sorry the surprise was thwarted!
xo
s
Megan @ Two Live Colorfully says
These are really great tips! Especially about the one liners in magazines and other decorating sources. I’m usually someone that gets really excited about projects and tries to rush through it. I just want to get to the final product!!! So, I’ve had a few lessons on really thinking things through and taking the time to do ALL the steps. :)
adrienne says
ermahgerd the maggots… i had to stop reading that one for a little bit. i could have definitely cursed john if i were you, just because he didn’t have to deal with it. you’re so lucky you’re not squeamish.
KarenH. says
Plaster walls are great, but pray you don’t have any wallpaper, because trying to remove the wallpaper with steam, or the clever fabric softener/water trick can lead to an entire room’s paint failing.
Old plaster walls took months to cure after installation, and homeowners back then ,just as now, didn’t want to wait a year before decorating their new home. So they painted with calcimine paint. Which is basically a colored chalk wash. Then they usually painted over that (when the walls were cured) with oil based paints. Filled with lead. Come the 21st century and we want all that flowery wallpaper border from the 80s gone, and out comes the fabric softener spray to loosen the wall paper. And since it’s 60 years old, not that strpng to begin with, the calcimine paint (upon which ALL the other paint is sitting) fails. In a spectacular way. In huge, lead-filled strips.
Save yourself. Hire a professional to skim coat the whole wall (even the wallpaper) prime with a primer developed especially for calcimine paints. Believe me, it will save you trying to find a dump that will accept garbage bags filled. with lead paint.
YoungHouseLove says
Eeks, that sounds like a nightmare!
xo
s
Leah says
oh, God. I might have the same issue :-( We have walls where people painted over wallpaper, and now the wallpaper is peeling off. The house is from the 1890s. We did a lead paint check (thanks, Sherry, for teaching me about home test kits!) and discovered no lead paint on the walls but definitely lead paint on the windowsills. Even though the kit said no lead on the walls, I am petrified that we will end up with lead anyway as this wallpaper peels off. fingers crossed that the 1950s-1970s homeowners just wallpapered.
Ariane says
It’s funny because I was mentally running a list of things I learnt the hard way the other day (when I was sanding drywall mud) and thought it would be a great post on my own blog :) … I came up with :
– always protect your floors – it’s easier to lay newspaper than to scrub
– be generous with your prepping/sanding time. It always shows once it’s painted !
– don’t buy accessories until you’re done with a room (or you’ll be stuck with a light that doesn’t work with the space, after all)
– don’t buy a lot of material/paint unless you need to use them right away. It takes a lot of otherwise useful storage space – and some products have a use-by date
– don’t underestimate the time things will take to be done – it costs a lot of frustration
Another topic that would be interesting to explore is the “comfort zone” – about one’s skills or decorating tastes, when to stay in the comfort zone, when to go a little further … I’ll think of it next time a sand my drywall mud :) Take care !
YoungHouseLove says
Hah, love it all! Such a good brain dump!
xo
s
Sarah says
Amen on patching/prepping walls properly! This is a random question, but do you know what brand Gee the giraffe is or where he came from? We just adopted two month old twins. I want to keep Christmas simple and just give them a soft stuffed animal each but all the ones I’ve found so far are either way too big for babies or very stiff and non-cuddly.
YoungHouseLove says
He’s Jellycat! So he is for sale on amazon.com and stuff (although we got him from a local store in Huntington, West Virginia while visiting John’s granny). Hope it helps! And congrats on the twins!!
xo
s
Beccas says
Love the tips! I just heard #2 on property brothers (I could watch that show for hours) when the home owners had picked a backsplash to go with their ugly cabinets, instead of replacing the cabinets.
One project I wish I had given a little more thought to is reupholstering parsons chairs. I bought cheap ones on Craigslist and they had fabric on the legs which I intended to remove. It has been super hard removing the staples from the pine wood. The wood is cheaper bc they were origanally covered with fabric which makes it hard not to damage when yanking out heavy duty staples.
I’m still gonna continue working on them, but know it would’ ve been a much easier project had I not been so eager to jump on a cheap Craigslist buy.
Leslie R. says
We’ve been redoing ‘wrecks’ for 30 years and have made our share of mistakes. Some easy fixes, some not so easy fixes.
We also have a maggot-to-flies story involving a dead possum in the wall. I was not grossed out at all by your sad tale. It’s just part of the the whole house in transition thing.
Born and Raised RVA says
I have a feva’. And the only cure for this feva’ is more cow bell. A big, beautiful, oil rubbed bronze or DIY sprayed ORB cow bell.
Bee Tea Dubs, if you guys haven’t seen it, you must YouTube “The Walken Dead.”
Born and Raised RVA says
Totally placed this comment on the wrong thread. My bad.
YoungHouseLove says
Haha, no worries!
xo
s
Liz O says
I have learned never wait for your husband to do something taht you can do yourself, then it’ll never get done! It might not apply to every marriage though!
Patti says
Hi! Just wanted to let you guys know that your book was mentioned on the LearnVest website’s article “Gifts for the Creative Types.”
The link is here: http://www.learnvest.com/2012/12/budget-friendly-gifts-for-your-artistic-creative-friend/
Yay!
YoungHouseLove says
No way! Thanks for the heads up!
xo
s
Jen says
An excellent post. Good read and good for the ego of those of us who have been sucked into a “great idea”! Shortcuts aren’t always shortcuts, they’re disasters waiting to happen.
Paige @ Little Nostalgia says
Uuuuuugh, I hear you with the spackle and sand thing. I’ve patched huge nail holes in several rooms of our new house, and every. single. time. I think it’s smooth enough to paint. But it’s not. Fail! So now I’m waiting for the craziness of the holidays to die down so I can bust out my sander and fix it all.
Elizabeth@ Food Ramblings says
great tips– thanks! and yuck to maggots or any bugs crawling in your house!
Leah says
In the house I lived in as a teen, there were some stumps the previous owners had not removed. My parents were cheap, so my brothers and I got to remove the stumps. We used axes and random tools to get out what we could, and then we actually burned the rest of the stump out. Not really recommended, but it was fun!
Sheila says
“Don’t decorate around a stump” is a fabulous catch phrase to illustrate that broader concept you alluded to. I’ve never had to deal with an actual physical tree stump but sure enough, there are “stumps” scattered all over my house! This is one I need to remember!
emilymarion says
NUMBER 4. UGH.
My husband already had a house when we first met & like most single, 20-something bachelors he was blind to some of the previous owners “creativity.”
Imagine 2 huge, skinny, maroon rectangles to the left and right of the wall, trimmed in gold molding, that was repainted black against a tan wall.
Not my style.
One day while he was at work, I couldn’t stare at it anymore and ripped off the molding that had been GLUED to the wall. Huge chunks of drywall came off. It was a mess. I spackled and sanded and spackled and sanded FOR DAYS. I finally added texture and repainted (impatient.) You can still see faint, spackled rectangles. I turned that wall into the picture collage wall. It’s still noticeable to me. I wish I’d spent a few extra days sanding and spackling. I actually may try sanding it down again and starting all over from scratch.
Or not.