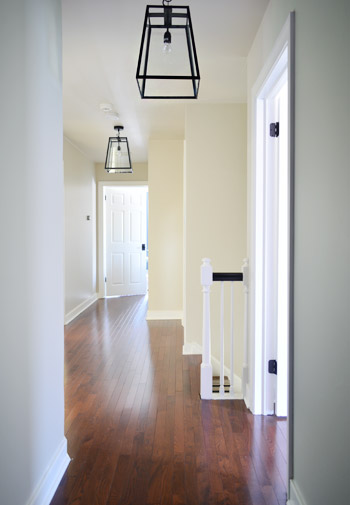
From moment one of seeing this house, something about the view of a series of three lights all in a row(ish) in the upstairs hallway made us inexplicably excited. Just call it “the tri-light zone” effect. We just knew that arrangement had serious potential. You know, once we looked past the old carpeting and the blue trim.
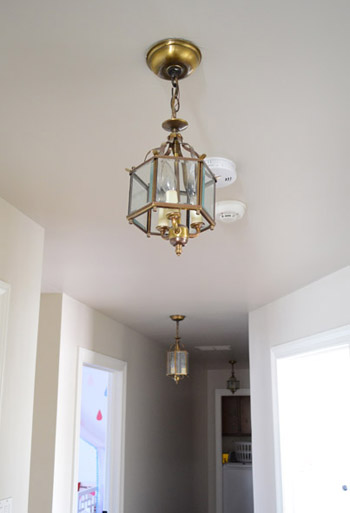
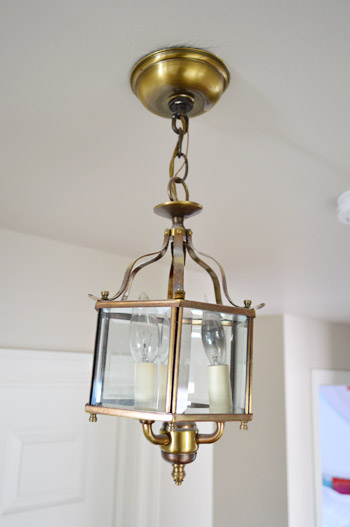
The existing lights were a little undersized for us (pictures don’t do it justice, but this is a 33 foot long hallway!), so although we considered spray painting them another color (oil-rubbed bronze? red? navy?), I worried it’d make them look a bit more gothic cathedral than we wanted. Plus, all three of them were crooked, one of them had a broken stem, and the middle one was actually bigger than the other two.
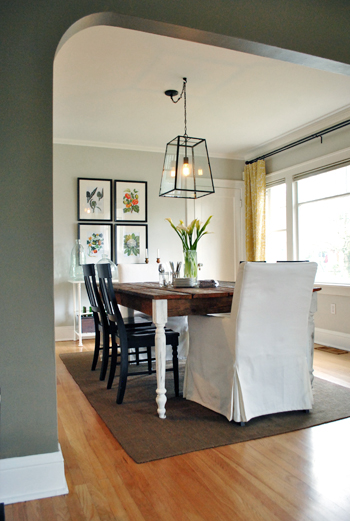
I’ve had these fixtures mentally bookmarked for years. Ever since we saw them in a House Crashing that we did in Portland, OR in 2012 I’ve wanted to work them into our home somehow. I like that they’re a mix of classic and modern, and that their dark finish offers some nice contrast but isn’t too heavy looking thanks to all the glass. The good news is that Sherry was with me (we don’t always agree on lights, so sometimes finding something we both like takes a while). The only issue was that the $250 price tag was a bit much for us since we’d need to buy three of them.
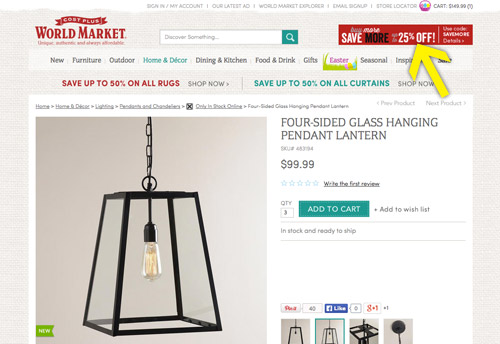
We hoped to find something similar at a local lighting outlet that we frequent (and even checked craigslist and the ReStore occasionally) but coming by three identical fixtures was tough. Then Sherry got an email alert about a World Market sale (25% off orders over $150) which lead her to these puppies – and we realized that after the sale they’d be $75 each, which means we could buy all three for less than the price of our single inspiration fixture!
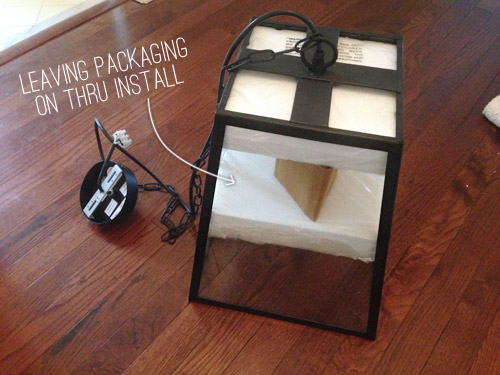
Normally I wouldn’t take you through the installation process again, since I feel like I’ve done lots of posts like these – but I actually picked up a couple of tricks (albeit small ones) from observing the electrician work his magic at the showhouse. Trick #1 being leave the protective packaging on during installation. I guess I’ve always been so eager to unveil our new purchases that the first thing I usually did was strip away all of the plastic, cardboard and styrofoam. But I had a “well duh!” moment watching the electrician leave it all on (well, whatever didn’t interfere with installing it) to help prevent any damage while he worked. Of course he took it off before firing up the power and adding a bulb, but just hanging them with the added protection felt a lot better than rushing to strip it before manhandling things into place.
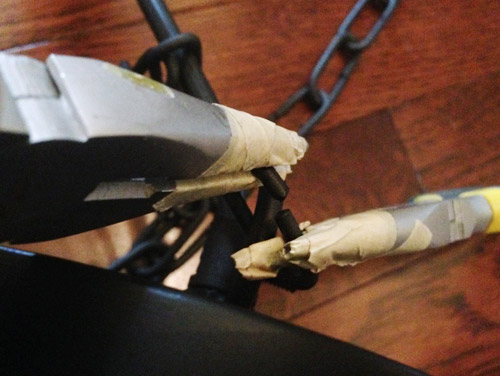
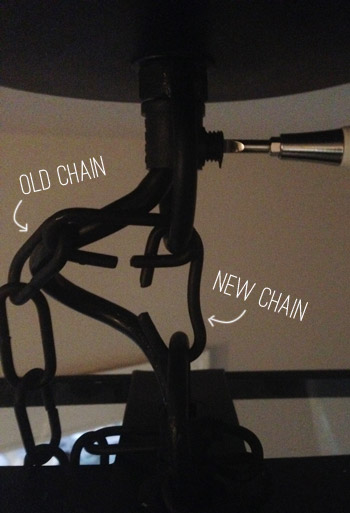
Obviously I would’ve loved to let these babies hang down on their chains a bit, but our 8ft ceilings weren’t gonna let it happen. So we had to shorten the chain by prying the links open with two pairs of pliers, the tips of which I wrapped in masking tape to keep them from scratching the finish off.
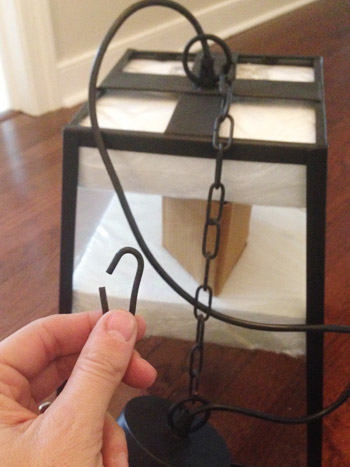
The previous lighting had been a bit low for my 6-foot self (well, the middle one outside of Clara’s room was – since that lantern was inexplicably larger than the other two), so we decided to hang the new lights by just one chain link – which would put them all a couple inches higher than that old middle light (it hung about 75″ from the ground). So even though these are larger scale fixtures, the bottom of each lantern ended up being 77″ from the floor after installation.
But back to the single link method. I kept one link handy, but left a longer string on the fixture for the time being. More on that in a minute.
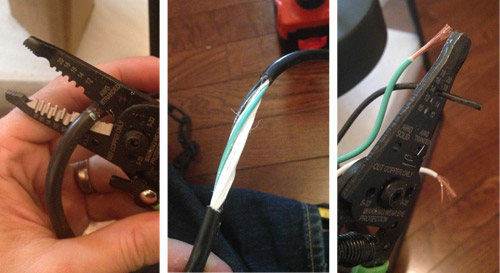
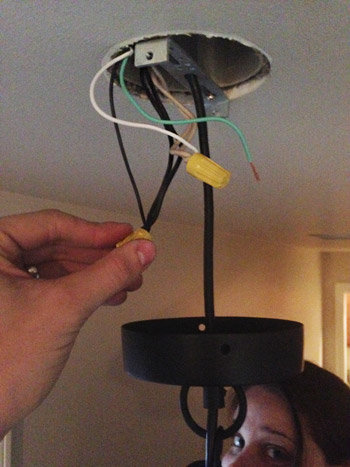
In addition to shortening the chain, I had to shorten the cord. So using my wire cutters I cut open the wire cover, pulled it off, and then stripped the ends of the white, black, and green wires.
With Sherry supporting the fixture, I connected the wires to the matching ones in the ceiling. Sorry for the grainy pic, but we had the power off so lighting was limited up there.
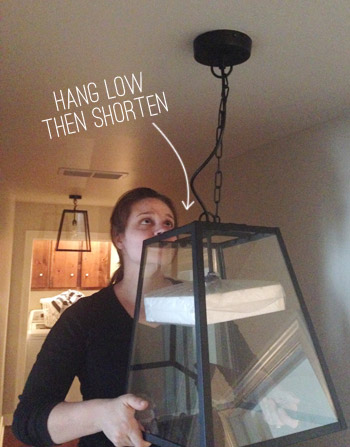
The second trick I picked up was to hang the fixture low and then raise it to your final desired height. With most light fixtures it’s much easier to raise them (by removing chain or feeding more wire into the ceiling) than to make them lower, especially if you’ve already cut your wire. So not only is this an easier way to get your perfect height, in our case it made installation much easier because Sherry didn’t have to hold the light as high and I wasn’t wiring in such a cramped space between the fixture and the ceiling.
Once everything was secured, I swapped out the long chain for the my single link and pushed the excess wire up into the canopy. You can see my screwdriver tightening the screw that pinches the wire in place.
It still took a fair amount of time to get all three installed. Maybe 3 hours? I always have a tough time guessing since I’m slowed down by photo taking and, in this case, fielding showhouse calls. But in the end we love the result.
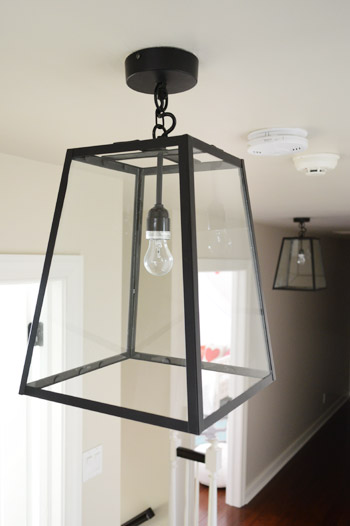
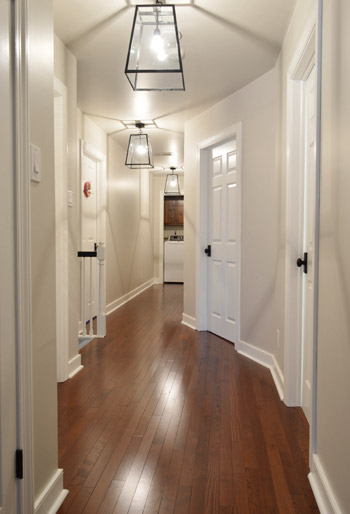
Just like the light in our foyer downstairs, we really like the high contrast look that these add. Even the way they tie into the dark door hinges, doorknobs, and the stained stair rail and runner that lead downstairs seems to make things feel more deliberate. They’re a bit oversized for the space, which may bother some folks – but it’s kinda what I dig most about them.
Adding some substantial wainscoting, interesting art, and other hallway updates should definitely bring more balance. So here’s our remaining to-do list:
- Reinstall & maybe modify the doors in front of the laundry area
- Add crown molding (not looking forward to those angles!)
- Add some nice thick wainscoting (it’ll bring more substance to the bottom half of the hallway)
- Get some art going on
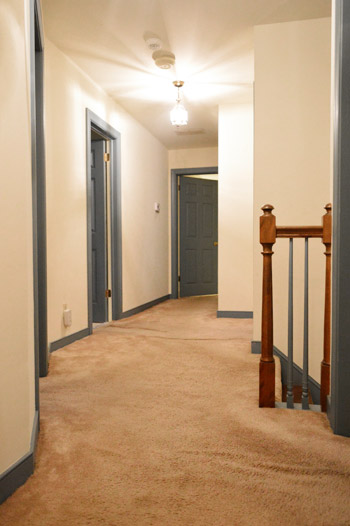
Just for fun, here’s a hallway before shot for comparison.
In the function column, I feared that it might be a little darker (going from three 3-bulb fixtures to three single bulbs), but these take a higher wattage (60 instead of 40) and somehow the glass seems to reflect so much that it actually feels brighter. Could also be that half of the old bulbs were burned out too, so there’s that.
Here’s how things look with the clear bulbs that came with the fixtures when they’re on. They throw some angular shadows on the ceiling, but if we want less of that look we can switch them out for frosted bulbs (eventually we’d love to get LEDs in every fixture).
UPDATE! We’ve finally transitioned our entire house to LED lights (they save tons of energy & money, and they’re a lazy person’s best friend because you never have to change them). For anyone wondering, these are our favorite interior LEDs. Their glow is warm & natural (not weird/blue like some of the others we’ve tried) and they use around 90% less energy.
*This post contains affiliate links

Travis says
What’s your favorite chandelier for a super tall entryway that has stairs on one side? We’re struggling with what to replace the contractor grade flush mount light with.
YoungHouseLove says
I would just check out local lighting shops and sites like Joss & Main and World Market and Pier 1 and Ballard Designs and see what grabs you. There are so many cool chandeliers these days (I love anything capiz, white twiggy chandeliers are amazing too, etc).
xo
s
Erica Baker says
Wow! What a difference!! I love the lights. Isn’t World Market the best? I feel a little bad because I often feel that are directly ripping off some of my favorite stores and making exact replicas of their products (Anthropologie, Restoration Hardware, etc). But World Market does it more in my price range :)
Annie T says
Wow. Wow. Wow. (bow wow wow?)
It really takes a lot of work to get to this point, doesn’t it? But man, it looks great. I love the dark railing with the lights and the hinges and door knobs. Has a very classic modern feeling and it’s something you can live with for a long time.
It seems like the truth of updating a new/old house is that it simply takes a lot of work. It’s really easy to think “I want orb matching door knobs”. It’s then a ton of work to change then all out – especially with the unexpected things that always come up.
If I’ve learned one thing following your blog it’s that the decorating part – color, pattern, texture and personal touches – is the icing on the cake. You really have to embrace the unglamorous background stuff too.
Sorry…I had an extra cup of coffee.
I really love the lights!!!
xo
Annie
Stardancer says
Oooh, me likey. They do look a little stark at the moment, but even so I love the clean angles. I guess that because they’re clear glass, they look large but not bulky, if that makes sense. And of course they’ll look really great once the wainscoting and art are up!
JenC says
Love the new lights! Funny enough I finished reading this update & clicked over to check out Decor Steals & they have cool bulbs on there today. Not sure how energy efficient or how bright they are, but they look cool!
YoungHouseLove says
So funny! Thanks for the tip!
xo
s
Erin B says
These look sooo good! Fresh but also classic and colonial!
Katja @ Shift Ctrl Art says
These are just perfect for the space and I love the shadows they throw out when they are lit.
I have been catching up on our hallway too, specifically how we tore down our old stair case and put in a new one. Our rough stair guy was so awesome, he knocked that out in a single day. I was so impressed.
Connie S. says
Love the lights. LOVE the price!
natasha {schue love} says
I thin it makes the hallway look much wider with all of that great light! Amazing update! Love those fixtures!
Erin says
These are beautiful! I love them!
Audrey says
I’ve been able to switch almost all of our lights to LEDs. I didn’t realize how much brighter they were!!!
YoungHouseLove says
That’s awesome! Do you have a certain brand/warmth you like?
xo
s
Cathy C. says
GE Reveal LED bulbs are awesome. Currently only available in “60 watt” in the store, I did finally manage to find some “40 watt” on amazon. I am just like John from your description, I can’t stand when the bulbs are too yellow, but I can’t stand when they are too blue either.
With all of the lightbulb questions, you might need a lightbulb post!
DontBlameTheKids says
I love those, and they look fantastic in your hallway. I am looking for light fixtures, and was super excited about these until I realized how HUGE they are! Perfect for your hall, but alas, not so perfect for my small space. I need that design, but half the size!
YoungHouseLove says
I think Ballard might sell a smaller size if that helps!
xo
s
Katie says
They are so cute. I’m a frosted bulb kind of girl, I’ve never been a fan of bright lights, my mom says since birth! That being said, every last inch of this hallway is adorbs!
Amanda says
Ok, the tip about the masking tape on the pliers? Genius! A must have trick for lovers of ORB.
I love that someone wanted a picture of John under the lights. Too funny. They vision John having to bob and weave between lanterns every time he heads down the hall?
The hallway is beautiful, totally inspired me to gussy up my mine.
Kate F. says
We’re working on our hallway as well. We installed the smaller Ballard Designs version of this light in the entry way over a year ago and I love it. Now we are working on a chair rail and detail + frame wall. I keep looking back at your old board and batten and frame wall posts for tips and inspo!
Natalie says
I LOOOVE the lights!! This might be my favorite upgrade so far in the new house! You guys always give me so many ideas that my husband actually said yesterday… why don’t we just build a new house and you just start completely over??And he was serious! Hahaha! Love our current rancher though, so I am going to just keep changing one thing at a time :)
YoungHouseLove says
You’re so sweet Natalie! Best of luck with everything! One change at a time really can do a ton over time.
xo
s
Ashley@AttemptsAtDomestication says
Definitely love the contrast and how they tie in the hardware! They are a little big for me, but they do look cool!
Lisa says
I love those lights and think one would be perfect for my foyer! Unfortunately, I have 20′ ceilings and lights with really long chains are hard to find. Would this light work? Any suggestions on where to search? Thanks!
YoungHouseLove says
Ooh that’s a toughie! I don’t think these came with enough chain for that scenario. Anyone know of a place that sells extra chain for super tall ceilings? I think Shades of Light has a number you can call to ask for additional wire/chain in those scenarios. Good luck!
xo
s
Leslie says
Looks great! Do you have any plans for the walls? Artwork? Any unique effects?
YoungHouseLove says
We have a little bulleted list in this post with our vague plans (we think wainscoting and art hanging above that – maybe a gallery, or a collection of large-ish frames). Will keep you posted for sure!
xo
s
Amy says
hahaha Tri-Light Zone. Love it! Even though it’s overhead light I started hearing Age of Aquarius (Let the Sunshine In) in my head. I’m a sucker for good lighting. :)
Deanna Hart says
Can’t wait to see it with the wainscoting! Love those lights. We have two that need to be replaced and these are going to the top of the list design wise.
Stephanie says
LOVE LOVE LOVE!!!! Those look awesome! Might have to buy some for my house now!
Dona says
I love your new lights. I think they are just what you needed in that area…. they are substantial without being too visually heavy. Excellent choice.
I am in the middle of blogging my front hall makeover on my website http://www.singlemomthriving.com One of the first changes I made was the lighting (post: Craving Light) and the blog will feature a new lighting addition in this same area in the next week or so.
Always inspired by your blog. ~ Dona
YoungHouseLove says
Good luck with everything Dona!
xo
s
Megan says
Looks GREAT! I have to agree, the contrast is my favorite part. I saw in the comments John has plenty of clearance underneath… that is always my fear with 8ft ceilings. I have wanted to update our entryway flushmount forever but am afraid it will be more distracting in the middle of the room. I love the story yours tell grouped together! Quick question, beyond LEDs, what is your go-to open fixture lightbulb? I’ve tried everything, and still can’t get it right – vintage seems to dim and globes too stark (even soft white).
YoungHouseLove says
We like warm white bulbs in general since the daylight ones feel a little blue to us. So for CFLs, regular bulbs, and LEDs we tend to lean towards that descriptor.
xo
s
Melanie says
I have loved this site for a few years now! We just went through buying a new home, and while looking at the various homes I kept thinking “What would YHL do with this space?”
Anyway, do the folks that used to own your homes before you ever contact you after seeing your work and say why didn’t I think of that or how is that even my old house?
Keep up the amazingness! You guys make me green with inspiration!
YoungHouseLove says
We have heard from the original owners children (even one of their grandkids!) and it has been amazing! We’d love to write a post about it (they’re getting back to us with some old pics) like we did when we heard from the original owners of our first house.
xo
s
Julie says
I’m curious what the “right” way to install crown molding is on a hallway like yours (and ours) because the ceiling over the stairs eventually angles downward to the first floor. Are you supposed to crown through that and into the room below? In which case, you’re totally committed to most of the rest of the house by that point. I feel like it’s weird to stop the molding at the stairs, though. I’m curious to see what you do!
YoungHouseLove says
Hmm, that’s hard to picture. Our ceiling stays flat and just goes out in a rectangle where the stairs are, so we’d keep the crown going around that. Hard to explain, but here’s a pic from an old post: http://images.younghouselove.com.s3.amazonaws.com/2013/11/painted-stair-walls2.jpg
xo
s
Julie says
Ah, so your stairs aren’t like ours after all. I guess I’d have to do more research if it becomes a project we decide to tackle. Thanks for the reply!
Kathy says
Absolutely fabulous!
Elizabeth says
Wow! It’s amazing what a simple thing like changing light fixtures does to a space. We have 8 ft ceilings in our halls too and I never thought of hanging lights like this. Now I’m rethinking things! I have to say its so fun to see what you guys are doing to that old house! I’m loving watching you turn it into your HOME and getting so many fun ideas for my old house! Thanks so much for the daily dose of inspiration!
Jen V says
LOVE the new lights!!!
Brooke says
They look great! And are now on sale for $79.99 online too!
rachel says
So how does the size of the canopy on the new ones compare to the ones you replaced? I can’t see any contrasting paint where you cut in, so I can’t tell. Do the new ones have a larger diameter, or did you end up having to touch up with ceiling paint?
YoungHouseLove says
The canopy seemed to be a smidge wider/thicker than the old ones so we didn’t break out the paint. That seems to happen with most things, like outlet covers too – they’re a little bit bigger, maybe because designers want to save you trouble? Or it’s just the supersize everything phenomenon (like drink cups at fast food restaurants, haha).
xo
s
paige @ LPD says
Love those lights! They really brighten up the space.
Right now I’m waiting on some seedlings to grow for my vegetable garden! I’m so excited for harvest, even though it’s gonna be a lot of work in the meantime. Oh and I re-caulked the tub but that’s neither fun nor that interesting.
And a camera question because I’m a nosy little photographer? Are you guys still using your DSLR, some of these photos look a lot lower quality than I remember your post photos being? Not complaining, just curious! ;)
YoungHouseLove says
We still mainly use our DSLR (Nikon D3200), but John called out those grainy photos in the post since he hates them (the power was off for some of the install pics so we didn’t have enough light for better pics).
xo
s
paige @ LPD says
thanks for answering! You should try bouncing a flash off the ceiling next time and you’ll get better light. Thanks again.
YoungHouseLove says
Thanks so much Paige! That’s an awesome tip. We’re so scared of flash, but we need to get over it. Haha!
xo
s
paige @ LPD says
No problem! Flash is really easy once you figure out that direct flash is pretty much evil. Diffuse and bounce are the only way to go!
Marianne in Mo. says
Big thumbs up from me, I LOVE these fixtures!
Erin @ The Impatient Gardener says
Wow, what a difference! Looks great. Isn’t nice to have jobs like that checked off the list?
We redid our very short (maybe 6 feet long?) hallway this winter and even though it was a small space it was a HUGE project. We painted the wood ceilings, replaced the ugly light (what is it with hallways and ugly lights?), smoothed the horrific wall texture and painted it all. Imagine my surprise at realizing that one 6-foot long hallway could have FIVE doors?
Anyway, lots of work, but so worth it. http://www.theimpatientgardener.com/2014/02/smooth-operator.html
YoungHouseLove says
So awesome Erin!
xo
s
Mary Kaye says
Super nice! I love those. Thanks for sharing where you got them and the deal you found! I appreciate that so much!
Stacy says
I think in a shorter hallway this light would be too big, but for the length of yours I think the scale of these is perfect! And I really love the shadows they cast on the walls.
Tracy Cotter says
I am dying to replace some light fixtures at our house, but the house is from 1910, so I’m afraid to try. I know a lot of the wiring, has been updated, but having no experience with this sort of thing, do you think I stand a chance if I follow your guidelines (and shut off the power before attempting, of course).
YoungHouseLove says
I would definitely turn off the power to the whole house and watch a few youtube.com videos to get your bearings. There are some great tutorials by certified electricians that can be helpful for first timers!
xo
s
Gretchen@Boxy Colonial says
ooh, love those! great deal, too. I have two brass boob lights in my upstairs hallway that are itching to be replaced. and, yeah, seems like a low priority until you think about how everyone in the house walks by them multiple times a day! making them pretty would pay off….
Rachel G. says
Totally random comment, but the title of today’s daily email from Fab.com is “Enter the Tri-Light Zone”. That’s some crazy twilight zone stuff going on there.
We actually installed a ceiling light in our bedroom last night, and I wish I had read your post first. We cut our wire super short, thinking we would flush-mount the light, even though it came with chain and extra long wire. After we got it up, we decided it would look cool swagged so it hung over the bed (rather than centered in the room). But since we cut so much of the wire, I’m not sure it would work now. Boo.
Anyways, thanks as always for the great tips.
YoungHouseLove says
No WAY. That’s both hilarious and spooky!
xo
s
Jessica says
This is completely inspiring me to rethink our upper landing/hall. I was worried about painting it because it connects to the downstairs in some ways, but it would be SO much brighter with a fresh coat of paint, some wainscotting and a new light fixture.
JC says
FYI, they are now on sale for 79.99 each. I know because you inspired me for to buy them for my very long (tall) hallway. Thank you so much!
YoungHouseLove says
So glad!
xo
s
Amy C. says
Speaking from experience, just don’t let a group of 9 year old boys have a light saber
fight in the hall way:) With two older boys, we had to do flush mount lighting in certain spaces. Boys sometimes don’t notice pretty light fixture locations until its too late and they are broke. Lessons learned.
I do love the fixtures.
YoungHouseLove says
Haha, thanks Amy! Good tip!
xo
s
nadya says
John and Sherry that just looks fantastic! I love the oversized look. It gives the hall a more dramatic look.
Danielle Purtle says
Wow wow wow! Loooovvee them (Oprah voice)! Lots of exciting posts lately! Have ya’ll made any final decisions regarding the dining room built ins?! I am patiently waiting for that room to turn into the beauty it is meant to be! :)
YoungHouseLove says
Oh man, I can’t wait to paint the blue trim in that room! Soon I hope. I think the office (walls/ceilings) is next in the paint line.
xo
s
Lauren says
So, you and Fab.com must be on the same wave length today, as I just opened an e-mail from them with the subject “Tri-light Zone” like, 2 minutes before I saw your post. So weird! (Love the fixtures btw! World Market is the best for sales.)
YoungHouseLove says
Someone else said that! So funny!
xo
s
Aubrey says
Love the lights! In a crazy coincidence Fab’s email for today’s sales is titled “Enter The Tri Light Zone”. What are the chances?!? Great minds think alike!
YoungHouseLove says
Isn’t that funny?
xo
s
Samantha @ Fabulous Fabris says
Looks great! Much better than those old fixtures.
Kacy Paide says
I LOVE these. Lately I’ve been obsessed with the style of Alys Beach on the panhandle in FL. You must look it up on Pinterest. It’s a Mediterranean/Bermuda inspired beach community that is straight out of a whitewashed mod Euro fantasy. These lamps are exactly that look. Well done! I want to copy this in my foyer.
YoungHouseLove says
Sounds awesome!
xo
s
LMN says
normally these would not be my jam, but i LOVE the contrast with your hallway. awesome.
Susan in MD says
I also like that these lights make the smoke detector look smaller and less noticeable than the old lights. It seemed, based on the old lights size, that the smoke detector stuck out like a sore thumb. But now, I can hardly tell it’s there!