Yes, this is a post about how to run dryer duct work and reroute HVAC vents. Why would I make a horribly punny reference to a 22-year-old Disney hockey movie if it weren’t? But first, some background. By the time Monday’s post was going up, David the framer was here putting the finishing touches on our new laundry room by adding that fourth and final wall (the one that will have the door that leads to the hallway).
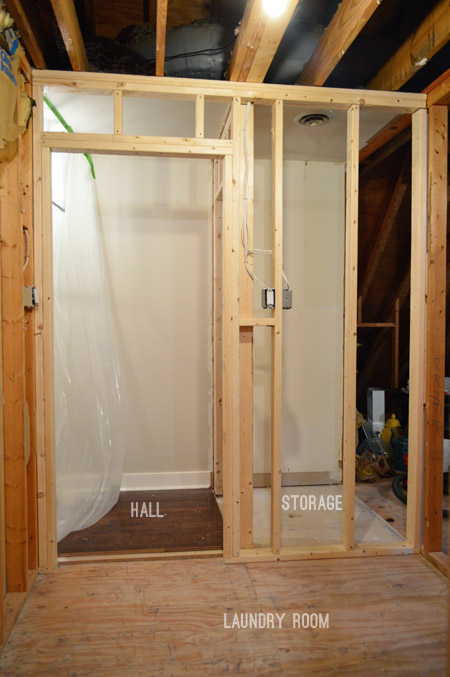
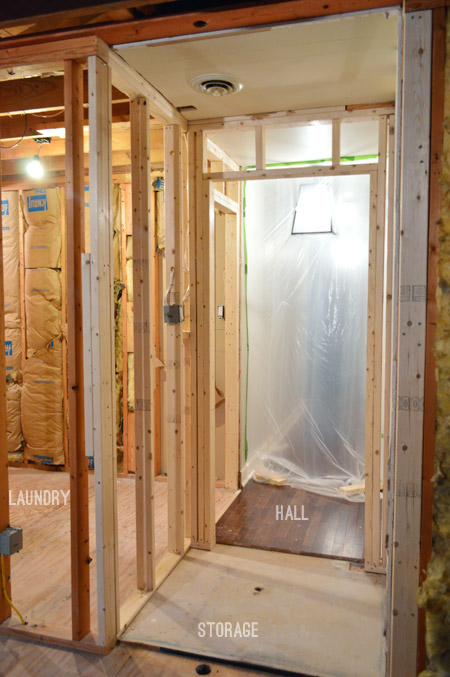
He also added the wall that will eventually house the frosted door to the current storage / future TV room. I took the picture from this side to get around that lovely plastic sheet, which helps us keep some of the attic heat at bay.
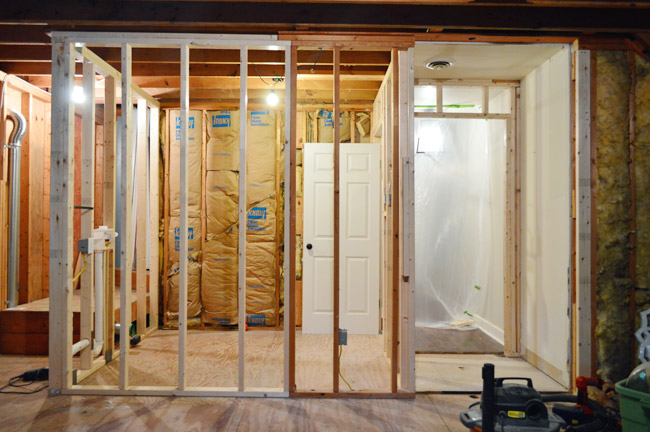
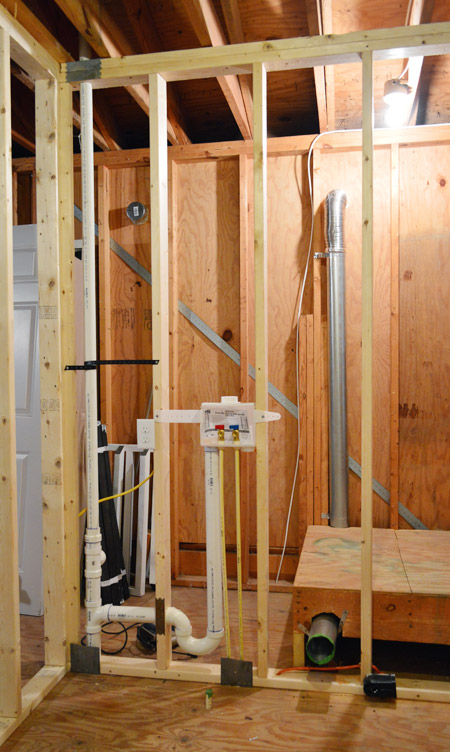
Here’s a full shot of the completed framing. I propped up the door just to give everyone an idea of how much it will swing into the room (it’s 8′ deep, so there’s plenty of room for that door to swing without interfering with our washer/dryer/cabinetry).
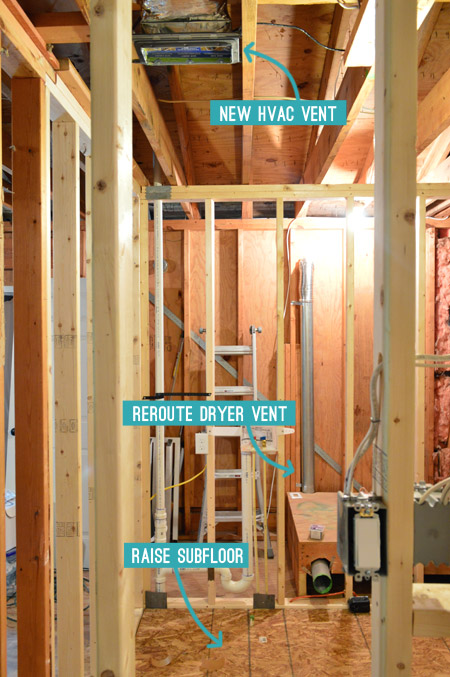
But this post isn’t really about framing, it’s about some of those little annoying tasks that you sometimes forget about in all of the excitement of a big project. Annoying, but no less important. So here are the three items we checked off our list before drywall could begin. They’re not the most exciting, but I hate to skip over them for anyone else facing similar projects… so prepare yourself for lots of photos coming your way.
Let’s start with the new dryer vent. I read that for proper function (i.e. getting clothes dry and not starting lint fires) a dryer vent pipe should be no longer than 25 feet and for every 90-degree turn, you should subtract 5 feet from your length. Here’s what our old set-up looked like, which I think was about 10 feet too long or had about 3 too many turns in it.
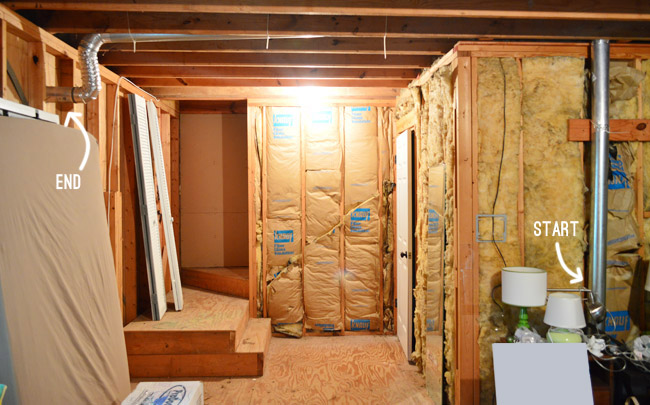
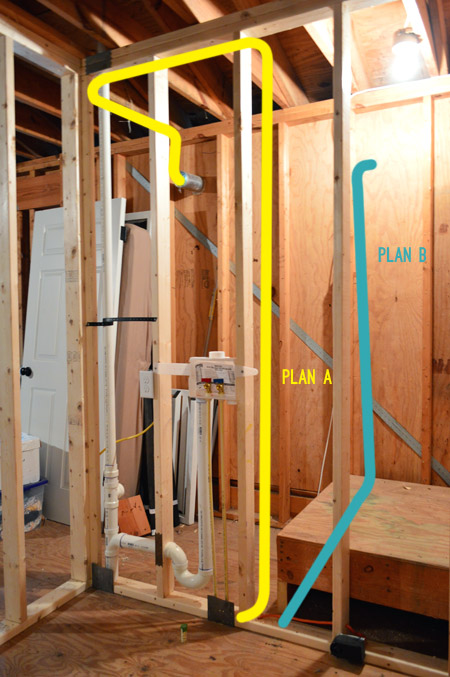
The good news is that by putting our dyer on the back wall of the new room, we were much closer to the exterior wall. But when we initially mapped out where the new vent could go (Plan A) it wasn’t faring much better. To keep the pipes up and out of the way, it took nearly as many turns and almost as much length. Boo. So we found a new path (Plan B) that was MUCH better and shorter by going under the attic steps… only it involved cutting a new hole in the exterior wall. That doesn’t top my list of fun activities, but it had to be done. And I’ll explain later why we chose to still take it up the wall rather than exiting the house under the stairs.
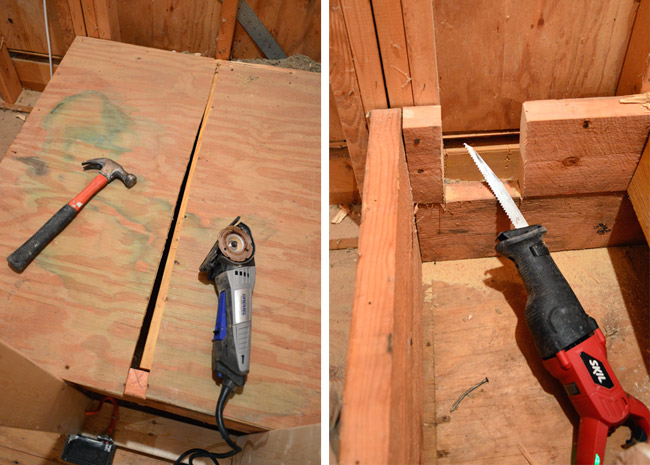
To start, I needed to make a path under the step for the 4″ vent pipe to go. I used my Dremel Sawmax to cut the plywood top along the step joist so that I could easily reattach it later. Then I used a reciprocating saw to cut a 4″ wide section out of the 2×6″ for the vent to rest in.
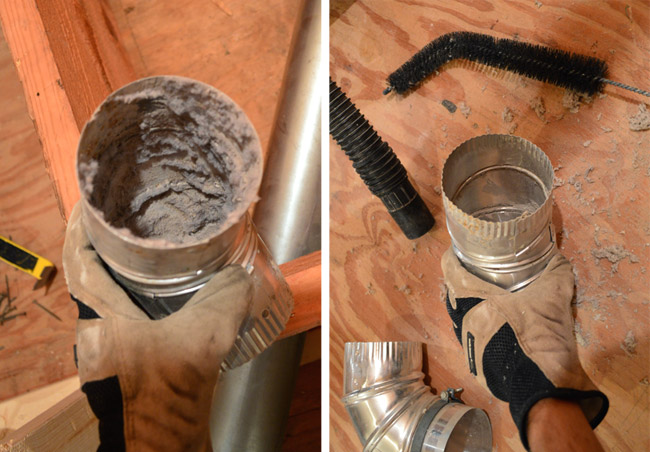
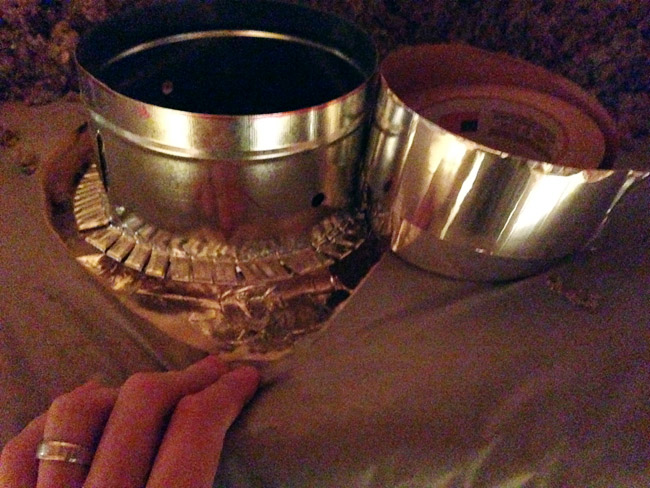
I was planning on reusing the existing metal vent pipes since they were in good enough condition and I had a lot of pieces to choose from. All they needed was a good cleaning first, which I did by taking them all apart and using a long bristled brush to scrape them clean along with my Shop Vac.
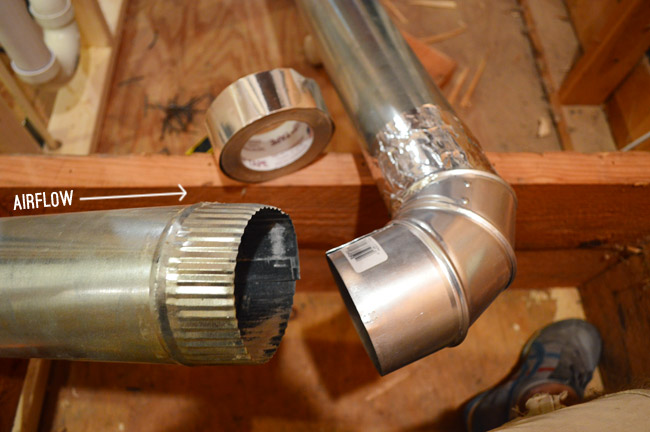
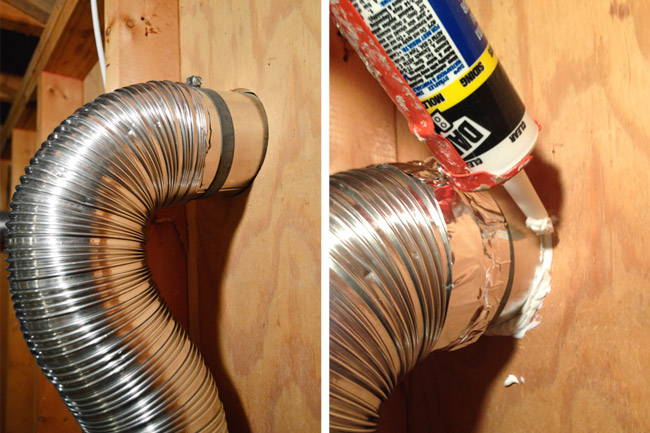
Then I started piecing them back together. Pipes like these have a crimped end that makes them easier to fit together. I read once that you want your crimped ends facing the same direction of the airflow so that air doesn’t escape around the crimping. Once fitted together, I sealed everything with metal-faced duct tape (note: not duck tape!).
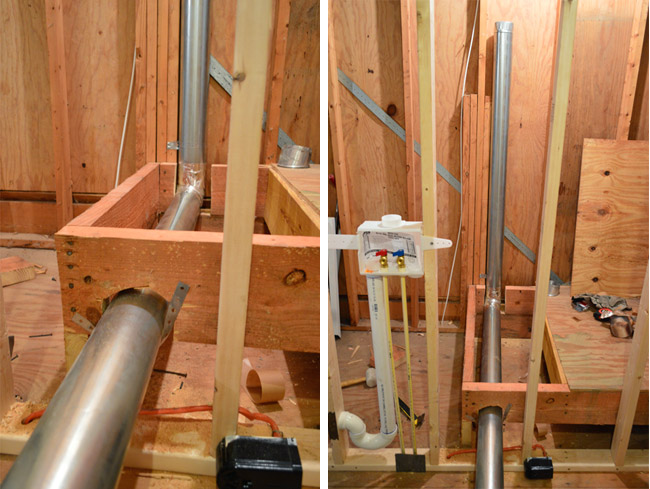
Once I had all of my pipes fitted together, I started to position them to run them under the stairs and up the back/exterior wall. You can see that I made an opening in the side of the step for the duct to pass through there, and I held everything in place with some steel hanger straps.
That bottom pipe extended way too far into the room, so I cut it down using my metal snips. I left it a little long so that I can cut it to its final size once the room is more finished. The green painters tape is just so we don’t cut ourselves on the raw edge while working.

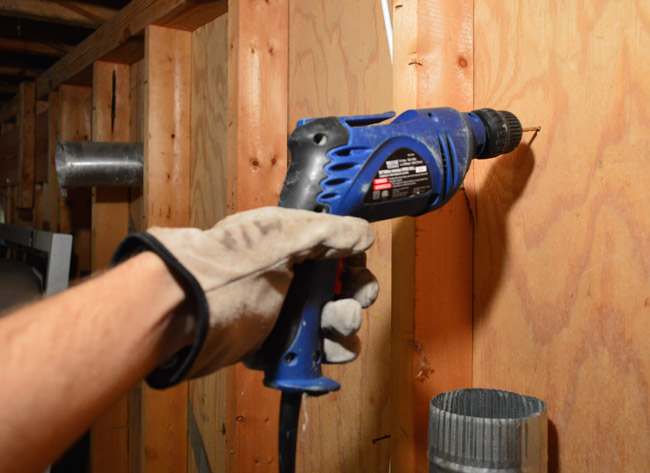
Next up was putting the new hole in the exterior wall. Fun. I started off by drilling a pilot hole from the inside to mark roughly where the new vent hole needed to go. This was mainly to make sure I placed the hole directly above the pipe that I just installed.
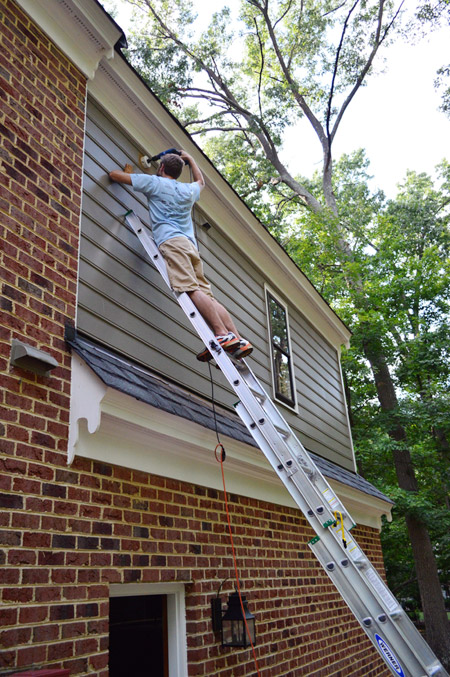
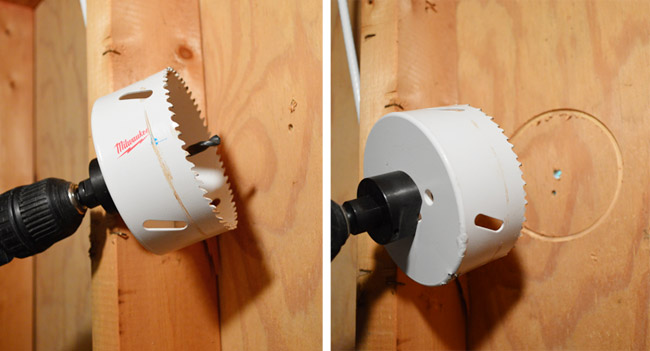
Then I headed outside to start making the big hole in the siding. More fun. Especially the ladder part. Yay. Anyways… I did this using a 4 1/8″ hole saw (which you’ll see closer in a moment). I wanted to start from the outside to make sure I was placing it in the middle of a siding board (and not awkwardly spanning two of them). The pilot hole I made from the inside helped me make sure I was drilling in the right spot.
Outside I only made it through the hardboard siding (not the plywood beneath it). I didn’t want to spend any more time up on that ladder than I had to, so I came back inside to do the rest. The 4 1/8″ hole saw bit made a fresh pilot hole for me to follow so I could be sure everything lined up.
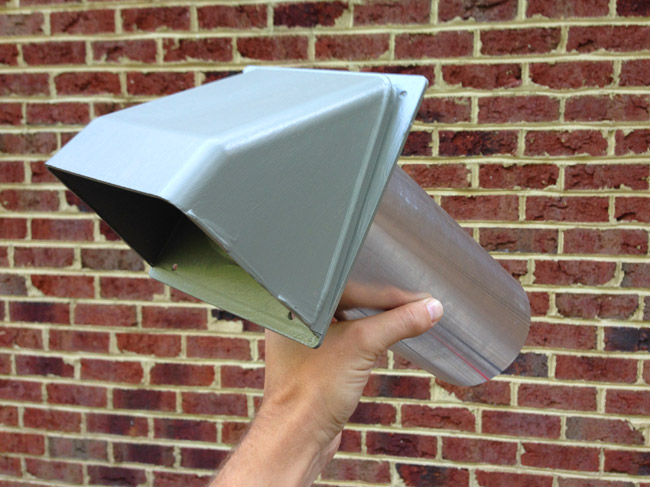
With the hole cut all the way through, I could install the new dryer vent on the outside. I bought one that resembled the original one, since they’ll both be living up there until we go through the trouble of removing the old one and patching the siding (we’ve just capped and sealed it from the inside for now). Oh and Sherry painted the new one to match the siding before I installed it so there’d be less work to do up on the ladder.
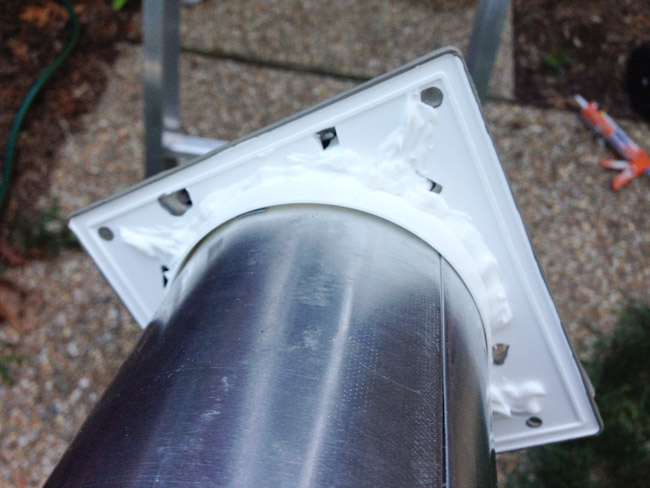
Before climbing up I put a ring of silicone caulk around the back of it, that way it’d have a nice weather tight seal from the get -go.
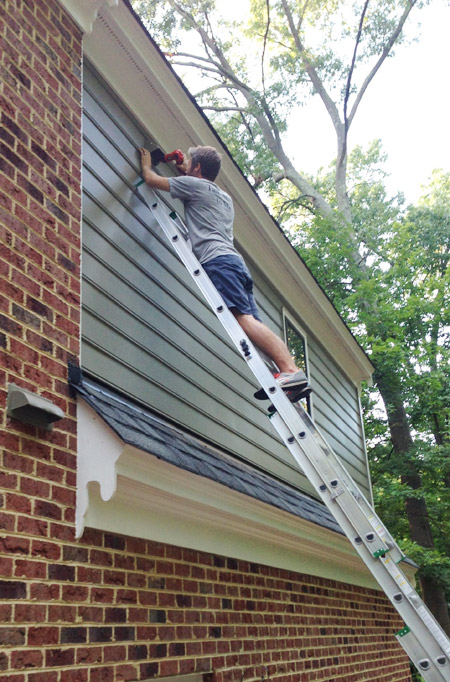
It took a bit of finagling to get it in (the 4 1/8″ hole took some sanding down to get the 4″ pipe through) but eventually it was in and I could screw it to the siding for a nice firm hold. And this photo shows why we chose to put the new vent as high as we did, rather than exiting the house under the attic stairs. That would’ve put the vent barely above that bit of roof below, meaning lint would’ve built up on the shingles. So because we had to take it higher no matter what, we figured we’d put it in line with the old vent, just so things would line up (and not look all diagonally janky until we patch that one down the line).
Back inside I trimmed off a bit of the vent pipe that stuck into the room and connected a semi-rigid vent pipe to it, complete with more metal faced duct tape and another ring of silicone caulk.
Then I just had to reattach the section of the stair that I had cut off and we were back in business. Well, I guess we need the dryer installed to truly be back in business – but you know what I mean.
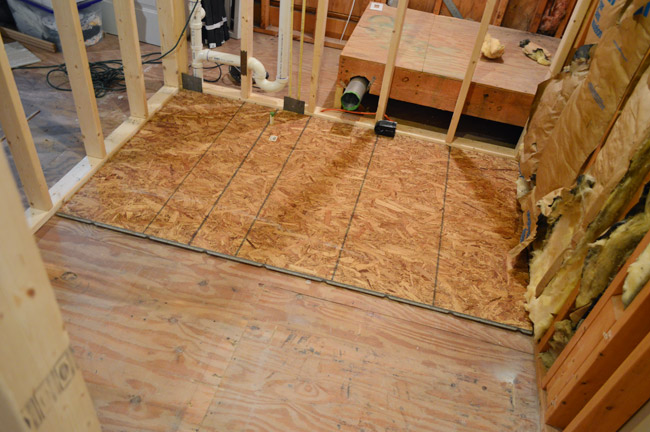
We’ll take a brief interlude from duct talk to address the floor for a second, which you’ll notice is quite a bit lower in the new laundry room at the moment. We want the tile that’s going in there to be as flush with the hardwoods as possible, so we needed to build up the subfloor a bit.
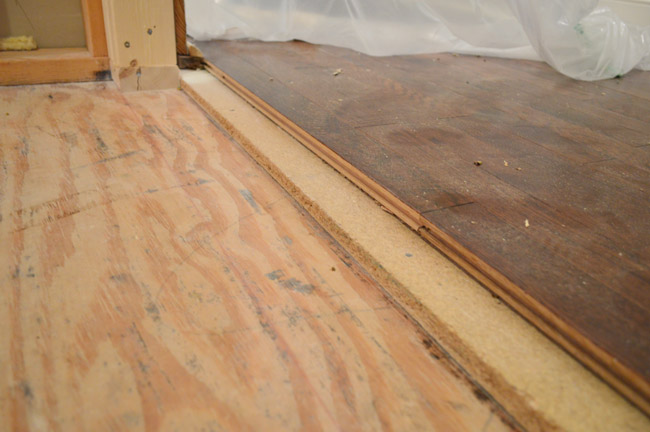
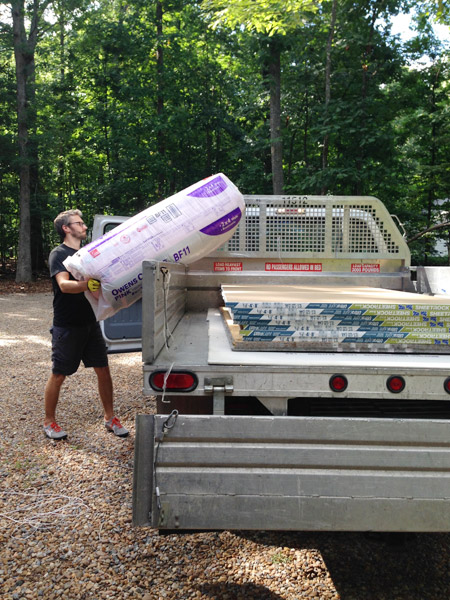
I did some math and figured I’d need a 3/4″ layer of subfloor, a 1/2″ concrete backer board (for tiling on), plus the height of the tile & thinset to get myself flush with the hardwood floor. Since I wasn’t going to fit two 4 x 8′ pieces of subfloor in our car, I took this as my cue to rent the $19 Home Depot truck and get lots of my big materials – including all the drywall and insulation.
The 4 x 8′ pieces of 1/2″ OSB subfloor took a bit of trimming with my circular saw before bringing them up to the room, but all things considered it wasn’t too hard to get the two sheets to fit nicely, and then I glued and screwed them down (gluing can help cut down on any creakiness down the line). Here’s the first one going down.
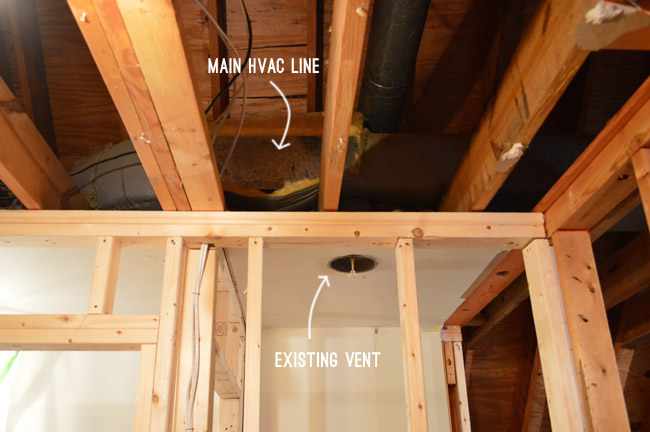
Now let’s get back to ducts. This time we’re talking about the HVAC variety, since this new laundry room has zero heating or cooling coming its way… despite the main trunk line being so close (and the old laundry nook having its own dedicated vent).
I’m certainly not a pro in this department and I had a bit of trouble finding help online in this arena – but eventually this series had enough explanation and photos to give me the confidence to tackle it. Also, I noticed that Home Depot sold this “Add A Vent” kit – complete with materials, a tool list, and instructions. Perhaps this would be less scary than I expected?
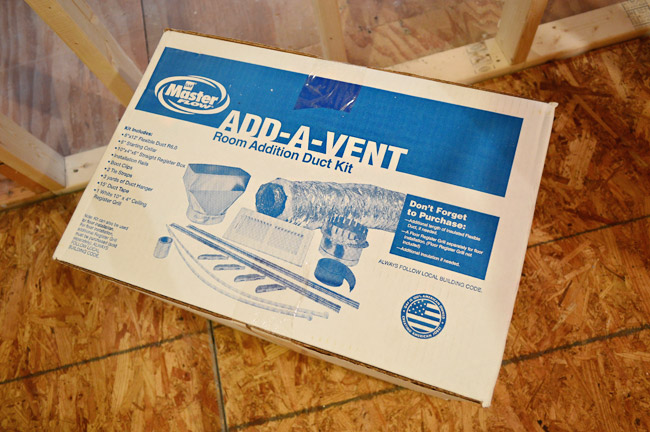
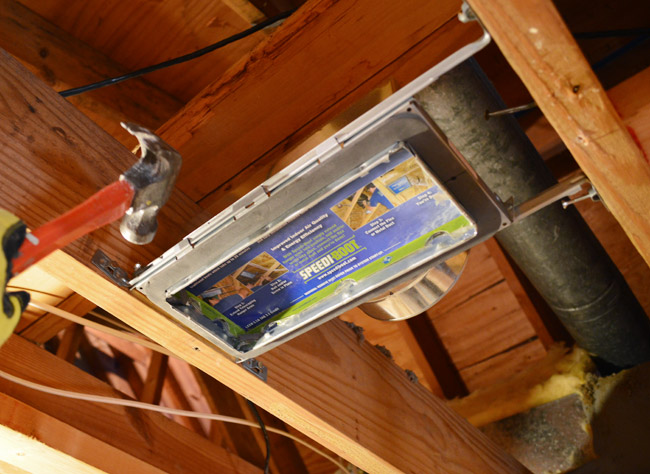
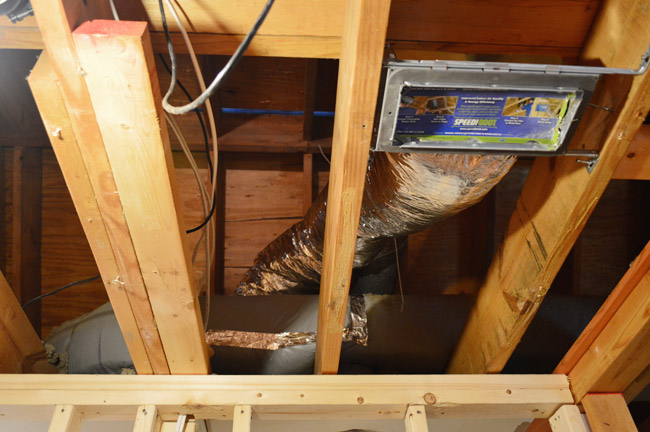
Buuuuut… I didn’t actually use the Add-A-Vent box. After purchasing it (it was $67) I realized I already owned some of the items that were included, and that I could buy the others for about $54 instead. One of those items being this “Speedi-Boot” that makes nailing in the new ceiling vent between two joists really easy. So I just returned the boxed set and used my a-la-cart purchases (but wanted to call out that kit here in case it helps someone else who might not have some of the supplies I already did).
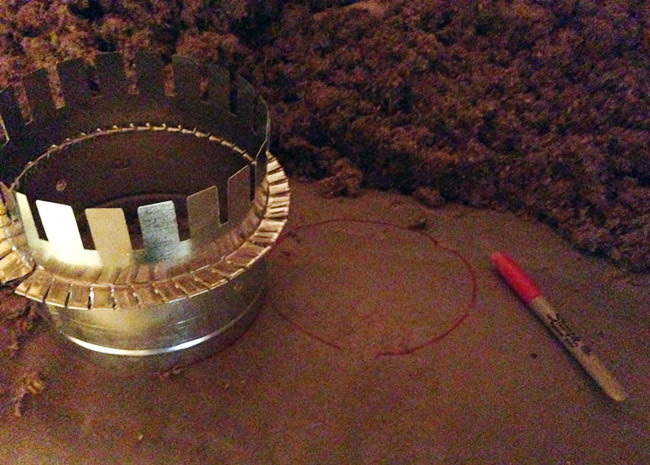
The part where I got nervous was cutting into my main HVAC trunk duct. But with some guidance from this post, I traced out where I wanted my new collar to attach…
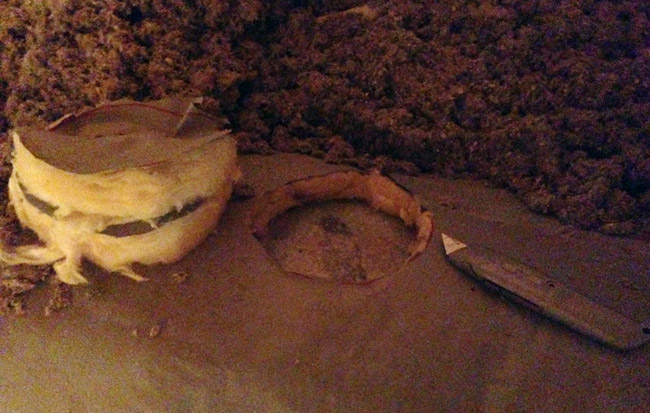
…and used a utility knife to cut out the insulation, exposing the metal vent beneath.
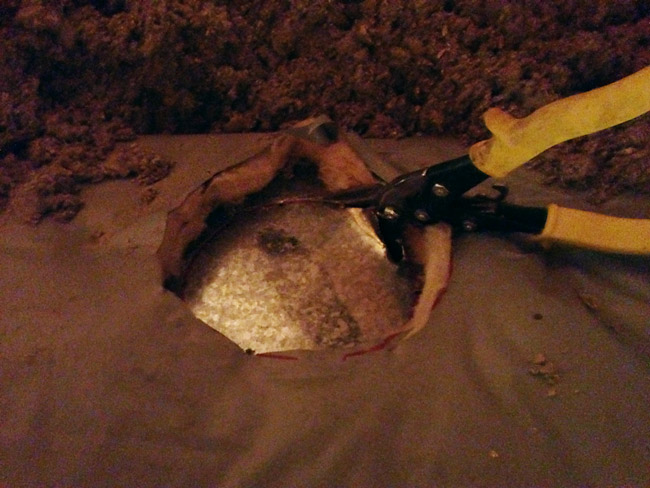
The tutorial I was following didn’t really help me when it came to cutting the hole in the metal, but this video did. Basically I hammered a flathead screwdriver in to puncture it, then used my metal cutters to go around the circle. There are probably better snips for cutting holes than mine, but they did the trick well enough.
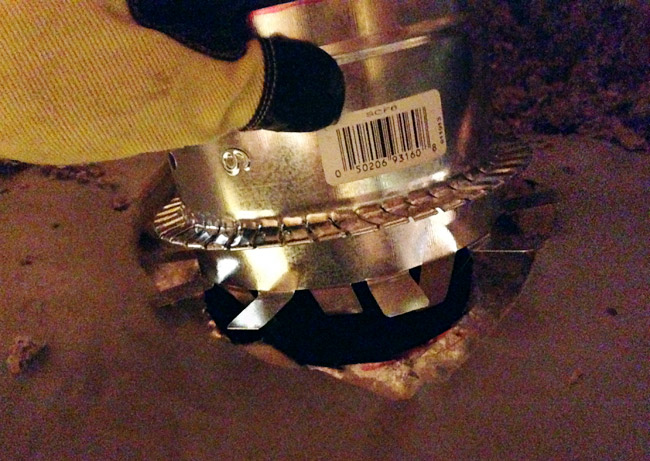
The collar has a ring of tabs on it, half of which I bent outward (to rest on the outside of the vent) while bending the others inward (to go into the hole). Once I placed it in the hole, I reached through the top of the collar and bent the inward tabs the other way so they held snugly against the inside of the vent.
Then I pressed some foil duct tape firmly around the whole thing to create a tight seal.
Next up was attaching the insulated flexible duct that would connect the collar to the ceiling vent. It’s pretty easy to cut to length using a utility knife, but you will need wire cutters to get through the inner wire coil. I held it in place with a zip tie, followed by more duct tape.
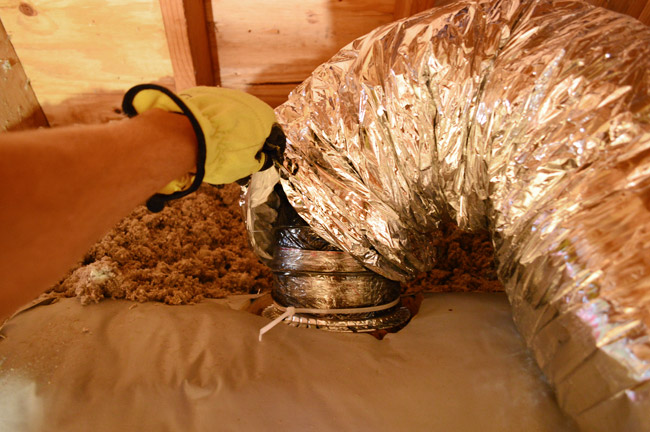
I used more zip ties to hang the flexible duct from the ceiling a bit so that it didn’t have any kinks or anything, since I didn’t want anything that might restrict airflow.
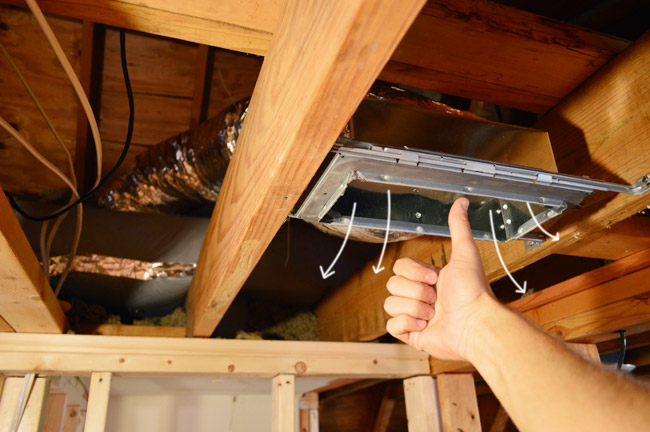
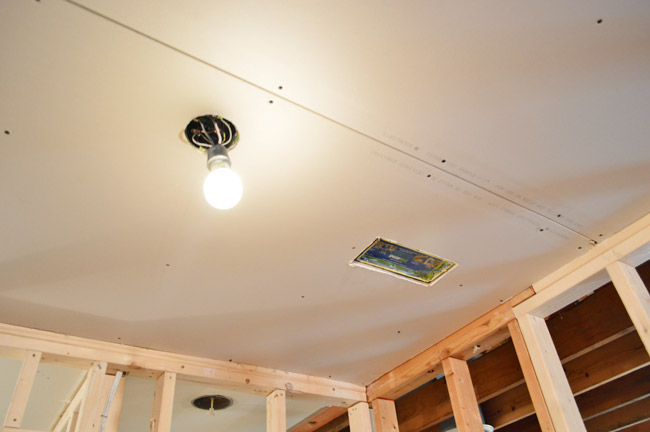
I’m gonna leave that cardboard “dust shield” (their words, not mine) in the ceiling vent until we’re ready to heat and cool this room, but I did quickly kick on the A/C just to make sure it worked. And in case you can’t tell by my thumbs up or cartoon air arrows, it did!
I realize that wasn’t the most fun post in the world, but I’m very glad to have gotten that stuff out of the way so this room can start to come together in more significant ways… like drywalling, which we have already started! It’s actually starting to look like a room in here.
But I’ll share all the drywall-hanging details when it’s done, which will hopefully be by Monday if all goes well. We’ve got book photoshoots today and tomorrow so we’re forced to switch our brains off Laundry Room Mode until Saturday, but at least we were able to get some laundry done at my parents house yesterday so we won’t be stinky for the photographer.

Kristi says
I have to say, I’m impressed. I’ve followed your blog for quite sometime. When my husband and I first bought our home (12 years ago) I remember him being timid tackling a project like this. Now, no hesitations. I see the same with John and the progression of projects you guys are willing to take on.
Thanks for being fearless! You guys rock!
Catherine says
This is awesome. Why am I so excited about ductwork?
Does your vent have a screen or something on the outside. In our last house we had long ductwork and a bird went in and died inside. Poor bird and it smelled sooooo awful. We couldn’t figure out where it was coming from but when a plumber came over he was able to identify it was not from the plumbing but from the ductwork. So he fished out the poor dead thing and installed a screen :(
PS LOVE the mighty ducks. That reference made my day!
YoungHouseLove says
Oh no! Thanks so much for the tip!
xo
s
Laura says
That was 22 years ago?? Dang, I really AM getting old.
Chase says
You guys always make it look so easy! Can’t wait to see the finished product.
maggie says
This is such an informative post! You make everything look so easy-peasy which it surely isn’t. I do have one dumb question that occurred to me while reading this. If your dryer vent is under a stair step and behind a wall how will you ever clean it out? I have major laundry room envy now!
YoungHouseLove says
That attic step will probably never get finished so we can always pop it off again to clean it. They also sell kits that slip deeply through vents to clean them if they’re behind a wall, so we could take that for a spin too.
xo
s
Amanda B. says
Here’s a link to an easy lint-remover kit. It connects to your vacuum and has a long brush, so you don’t have to completely disassemble your ducts. (Full disclosure, my husband works for this company which is how I know about it, but I have used this kit myself and it’s really easy!) http://shop.flylady.net/p/(DLK)
YoungHouseLove says
Thanks!
xo
s
Annie says
Didn’t the drilling feel kinda cool?! I had to drill a hole in my exterior wall last spring in order to ground the gas line coming to my house. It only involved a quarter-inch hole, and zero ladders, but I still felt pretty powerful drilling a hole all the way through an exterior wall!
Also, you may have done this and just didn’t include it in the post, but it would be good to put a screen or something over the exterior dryer vent. I have a friend with a bird nest inside her dryer vent pipe because the screen came off! Made for some lovely bird chirping noises in the wall!
YoungHouseLove says
Thanks Annie! And I’m proud that you felt cool drilling into the house. The entire time I was gripping the ladder like a spider monkey (I really was convinced I was going to go flying off).
-John
Barbara says
Looking good. Though I thought I remember being told elsewhere that duct tape is actually not good for ductwork….
YoungHouseLove says
Oh yes, we used metal duct tape (meant for ducts), not grocery store duct/duck tape (that doesn’t hold up as well).
xo
s
Kelly McK says
J&S-
LOVING this reno from you guys- especially all of the detail! You two are such an inspiration for forging the DIY trail on something you’ve never tackled before! Love the thoroughness of your posts and all the helpful advice. Best of luck for the remainder of the reno!
Molly says
At least in turns of Virginia summers y’all have lucked out for doing this project!
YoungHouseLove says
Amen! So grateful!
xo
s
Laura says
I am so so happy to see these posts re-occurring. I started reading your blog because you made me feel that I could do this sort of DIY myself. I took on so many projects because of you, I’m glad to see DIY back in the lifestyle/craft mix. I know things have been busy for you what with the show house and Teddy, but its nice to see you getting back on the bangwagon. You’ve taught me a lot in this post about things I’d probably just hire out so thanks!
river1 says
looking good
in addition to the water pan/drain under the washer have you considered adding an item like this
http://www.watts.com/pages/learnAbout/intelliflow.asp
i’m a paranoid about water damage
later jim
YoungHouseLove says
Those sound awesome!
xo
s
Vicki says
Totally agree–would love to have them in my laundry rooms–but my husband isn’t co convinced…
Kim says
After you are doing all this stuff by yourself, it makes me think maybe I can fix a few tiles in my kitchen all by myself.
theresa says
Oh my goodness so much work! Awesome job. :D
Kim says
Also… does this mean that my kids won’t understand why Anaheim has the Ducks (hockey) or the Angels? (Angels in the Outfield.)
YoungHouseLove says
Ha!
xo
s
Kelley says
This might be a dumb question, but how did you “cap” the old dryer vent? Do they sell caps for this purpose? We inherited an old not-in-use dryer vent and the previous tenants simply placed a rag in it to cap it off!! It is certainly an eyesore – from the inside and outside of the house! I’ll definitely be interested to see how you completely remove it and repair the siding. Thanks!
YoungHouseLove says
Yes, they sell caps to fit the ends of a vent (they come in a few different sizes since done vents are wider than others). Got ours at Home Depot.
-John
aurelie says
super informative – thanks guys! it made me wonder though, do you ever secretly (or not so secretly) just want to do a project and not take a million pictures while doing it? of course, we all appreciate that you do :-)
YoungHouseLove says
I think it’s second nature at this point!
-John
Yoyo says
Your ladder angle makes me nervous.
Stay safe up there dude!
Diana says
This is the part of projects I despise and always seem to drag on. Good job for making it seem not that painful!
Patrick says
Looks great. While you have the room torn apart, you may think about a floor drain for the second floor washer. This is an added cost you hope to never need; but boy is it worth it if you do.
YoungHouseLove says
Got one put in by the plumbers! Totally worth the peace of mind!
-John
Hallie says
Another note to say thanks for the detailed info here! It might not be as “fun” but it’s so informative. Thanks for taking the time to write it all out.
Jill P. says
Do you have a go-to online resource for project how-to’s? Or do you just Google? You say that you “read” how to do things, and I’d love to know where you’re reading. :)
YoungHouseLove says
We try to google and read up on contractor message boards, sites like DIY.com, and we watch YouTube videos for tips from specialists too.
-John
Lynette says
I noticed the insulation in the wall behind the new laundry room door (when open), and hope you plan an leaving it. I’d also suggest adding insulation to all of the other walls too. It does wonders for sound reduction. Best thing we did when we built our house!
Love your blog and the variety of posts.
YoungHouseLove says
Yes insulation is a must! Will detail how we add it as we go.
xo
s
Julianne says
Helpful post, thank you! Definitely makes me feel confident that this is something we can tackle at our next place.
JennyTD says
I know you said it wasn’t the most exciting post, but I really enjoyed it! I’m learning so much from you both!
I just found out about your blog earlier this year (in fact, I hadn’t really done much blog-reading before YHL), and seeing y’all tackle so much on your own has really inspired me to get my hands dirty and do some DIY work of my own. My husband and I are currently looking for our first home, and after seeing all that you’ve done, I’m not scared by a home that needs a little love. In fact, I’d prefer it!
You’ve definitely made a follower out of me. Thank you for sharing so much of what you’ve learned, and, well, for being so awesome! :)
YoungHouseLove says
Thanks Jenny!
-John
Ashley says
Thanks for another post that is so informative! While I admit I skim some of the actual “how to do” parts, I like seeing it and knowing when in the future I’m doing this kind of project that I can always check y’all’s website first for easy super detailed how-to.
Also- on the door- swing doors are absolutely the way to go for laundry rooms! Good choice!
In the architectural office I work in we always use swing doors instead of pockets for laundry rooms- pocket doors are much more difficult to open when your hands are full of laundry baskets. I actually even prefer using lever handles so you can open them with your butt/hip.
*If you’re purchasing a new door- consider solid core for sound dampening, you may also want to consider a 1 hour fire door.
Also if your hallway smoke detector is on the other end (there should be a smoke detector in every sleeping room and hallway so it’s inside and outside of bedroom doors, as well as one downstairs) you may want to add one outside of the laundry room.
Thanks as always for great posts!
YoungHouseLove says
Thanks Ashley!
-John
Marci says
This is one blog I do skim through the comments because readers like Ashley have such good advice. Thanks!
Colleen says
Thanks for the nitty gritty post! One question – wouldn’t flipping in the external end cap of the vent to point up negate the lint on the shingles problem? Then lint would blow upward instead of directly on to the shingles. I realize this is a moot point now but just curious….
YoungHouseLove says
Never even considered that! I think the vent is designed to be pointed down (there’s an inside flap that’s hinged at the top that opens with air pressure, so I believe the flap wouldn’t function upside down since it would constantly be open instead of flapping open as necessary).
-John
Kelly says
Yeah, for anyone else considering doing that, you can’t flip it over. The hood and flap are both oriented to keep out rain, debris, and to some extent critters, none of which would work upside down.
Evie says
Hi guys. Moving along great with this! I’m excited to see Monday’s post!
Could you please tell me what kind of glue [and how much] you used to attach the sub floor sheets to the plywood? And how far apart to put the screws!? Thanks.
YoungHouseLove says
There’s subfloor adhesive at Home Depot that comes in a caulk tube. As for the screws, I did them about every 16-20″.
-John
Ava says
Very happy to see this post. I have a dryer vent that needs to be extended from the crawl space to the exterior of the house, and I’ll be tackling it this fall. I read your description of your version of that task with rapt attention. :)
Adrienne says
Hey great post, love to see a little HVAC (I’m an Energy Engineer who works for an HVAC company). As an FYI to your readers, it is important to make sure that your current Unit has the capacity to add additional load before you complete a project like this. You don’t want to be stealing too much air from one space and putting it in another. Also insulate, insulate, insulate!! You guys are great, can’t wait to see the final product.
YoungHouseLove says
Thanks Adrienne! Great tips!
xo
s
Alyssa says
So I know you moved the washer and dryer into your bedroom, so swanky;) but where are you doing all your laundry these days??
YoungHouseLove says
Thank goodness for John’s parents! We jut borrowed their washer and dryer to do a big batch of laundry.
xo
s
Steph says
A random question that shows I read your blog in way too much detail: are you planning to change out the door knob to the now laundry room? I remember you put a plate-less one on the former storage room door, but wondered if you will be changing it now that the door is more visible from the hallway.
YoungHouseLove says
I think we have an extra we could use!
xo
s
Lynette says
I noticed the insulation in the wall behind the new laundry room door ( when open ), and hope you are planning on leaving it. I would suggest adding it to the other walls too. It does an amazing job of reducing noise between rooms. Best thing we did when building was to specify insulation in all walls.
I love your blog and the nice variety of topics. It’s very interesting yo me to see what a difference some changes can make! Great job!
YoungHouseLove says
Oh yes, insulation is definitely the plan! Will share those details as we drywall/add it.
xo
s
See Emily Shop says
Wow- John the wonder husband!
Alix says
Oh man, John, I think I’ve re-read this post 4 times already! #dweeb
I love it. Seriously, thanks for taking the time to explain all of this in detail. I was hooked! It’s funny, as I was reading I was kinda tucking away the bits you were saying until you got to the flexible ductwork; the only thing I’ve done with that is make robot arms and legs for a diaper box robot for a baby shower. But I was thinking, “Yep, he’s right, you do need wire cutters for the coil…” So, thanks for being so informative and fun, and bridging that gap between people who know stuff about ducts (not me) and people who know stuff about diaper robots (me). I love me some YHL.
YoungHouseLove says
Robot arms for the win. I love it.
– John
Erin says
I think this is a great post. I don’t need it right now, but sometime I might, and I’ll be glad it’s there. And I just have so much respect for how carefully and clearly you all lay out information. It’s not easy to make it look easy, and you guys do a great job.
In reference to an earlier comment… I’m a working mom with a toddler and a baby. I don’t have time for DIY, so those posts aren’t really what bring me to your blog. I come to your blog because you guys are amazing at what you do and come across as real, good people whose adventures I totally want to cheer on – even when they involve ductwork ;) So yeah, to each his/her own.
And by the way, we’re moving into a new house next week, and I’m been LIVING on your site trying to pick paint colors. So thank you!!!
YoungHouseLove says
Thanks Erin! Good luck!
xo
s
Sarah S. says
I am so glad you posted about that new vent! My husband and I have been talking about adding one in our boys room. It has three outside walls and two large windows and it gets so hot in there in the summer and so cold in the winter. Quotes from heat/air companies are SO expensive. I think we just needed to see a ‘real’ person give it a go to give us the confidence to try this ourselves. Thank you!!
julie g says
Love seeing the progress! I’m always amazed as to how far you guys come and with some patience, we can also learn how to do these things!
On a random note, I was watching the TV classic, Cheers. The two main characters bought a house with light blue trim! It totally made me think of you guys!
Keep up the great work!
YoungHouseLove says
So funny!
xo
s
Jen C says
I second the commenter earlier that said you should put some sort of screen on the outside part of the dryer vent. One morning I woke up to my 3 year old telling me there is a bird in the dryer. I didn’t believe her until I heard it myself. It was chirping and flapping around like crazy. I called multiple companies to figure out who could come get it out of that vent pipe. They all insisted that it was echoing in the pipe and was probably close to outside. It really was caught all the way up against the dryer in that flexible pipe between the wall and the dryer. Thankfully the dryer vent cleaning guys that came out got it into a pillow case and took it outside. The bird even flew back into the pipe after it was outside (not even kidding), but it flew out fairly quickly. The vent had a flap type cover on it, but I could see a hole in it from the ground (it’s above the garage). They had pecked a hole through the plastic. They installed a very nice new one with 2 layers this time. I was scared of my dryer for a week after that.
YoungHouseLove says
Oh my gosh!
xo
s
SarahN says
Wow, this is a lot of work – see we have dryers in Australia, but they are seldom ducted. We don’t usually use them as much, as we’re a country of hanging things outdoors. I’m sort of thankful – all that duct stuff seems tricky!
Liz says
I can’t wait to see how the new laundry room turns out! Very exciting! Also, this post was very informative!
Sara says
Sherry,
You are so lucky that you have a very handy husband! Just last night mine took out the clippers to trim some weeds,which he NEVER does,and accidentally clipped an air conditioner wire. Handy, not so much. Be thankful your is handy!
YoungHouseLove says
On no! We have our fair share of DIY mishaps too! So thankful John got through this unscathed, along with the air conditioner!
xo
s
Kelly says
This post makes me glad that you’re doing the DIY and I’m just reading about it! What a project! Good for you guys, can’t wait to see the results! I like getting my DIY gratification secondarily through you!!
karen says
think about adding a transom above the door in the hallway!
YoungHouseLove says
That would be awesome!
xo
s
Nancy K says
I was reading through all the post just to see if someone suggested this idea. I’m glad to see that Karen is of a like mind … I can totally see a transom window to that future room.
Sarah says
Excellent work!
Just wondering, once the laundry room is dry walled, will you still be able to access the dryer hose from the attic to clean out lint build up? Or do you have a creative strategy for tackling that fun chore? :)
Thanks!
YoungHouseLove says
They sell long brushes that extend into the dryer vent from the wall that it comes out, so we could give that a try. We aren’t planning to finish that step or drywall the attic stairs I don’t think, so we’ll most likely have the same access to it that we have now.
xo
s
georgia says
I’m super impressed with the amount of details that you put into these posts. Like you said, John, it’s hard to find in depth tutorials online sometimes. We are thinking of moving our laundry at some point down the line (it’s a nook in our lounge room at the moment with curtains – no room even for folding doors) and it’s good to see what goes on underneath everything. Ours is an OLD house with some questionable DIY, so seeing it done properly and in detail helps me both plan ahead and see what maybe needs to be fixed. Thanks so much for taking the time.
Kelly says
Wow, coming right along. Very technical post, but it’s necessary and a delight to read. You guys always inspire me. Thanks! Can’t wait to see it finished! I long for a real laundry room area someday. Right now I have to wheel my little apartment washing machine over to the kitchen sink to hook it up Then move it back to the closet to use the kitchen afterward. So, it’s easy to slack off on laundry.
Louise says
I love how much roooom there is behind that open door! I love functional laundry rooms. Love is not even enough, I lust for them! Impressive work on that hvac. Ladder work, I am not a big fan either. Next house I have promised myself to get movable scaffolding the first thing I do, and a carport-like tentstructure for storing garbage, tools and materials in an efficient manner. A little workshop.
Isra says
I dont think I’ve ever been this excited for a laundry room before. Honestly, I cant wait!
You guys are doing a great job!:)
cindi carlson says
I love the idea of the laundry on that floor! I am obsessed with pocket doors, another way to save space. Just my thought. thanks for sharing your talents
Sassafras says
Dear Spider Monkey,
Nothing like a new baby in the house to move a laundry reno on it’s way. Super fast going guys!!! …and everything looks great! So impressive.
Sherry, be good to this man. There are many hubs who can’t or won’t or won’t let someone else do it either. So proud your Mommas must be!!! On the edge of my seat holding my breath for the end results.
YoungHouseLove says
Aw thanks! I love my spider monkey man. My chest swells up when I think about how far he has come. And I truly am SO grateful he made it up (and down) that ladder. It was HIGH!
xo
s