Ok I’m back with part two of the madness that is Me vs. Rocker. But remember my disclaimer from yesterday’s post that this entire process was much like when aliens took over my body and I made a quilt for Clara, which is to say: I went rogue. I took in all the advice from you guys along with some google tips and some suggestions from a reupholstering-fiend friend of mine… and just played it by ear and did what seemed to work as I went along. I mean, it’s not a family heirloom, it’s a $25 craigslist find. But enough chatter, heeeeere we go.
Although there was a sneak peek pic of the almost-finished product at the end of the last post, we were actually here when it came to the play-by-play:
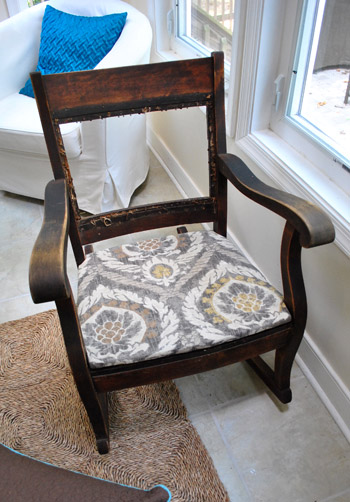
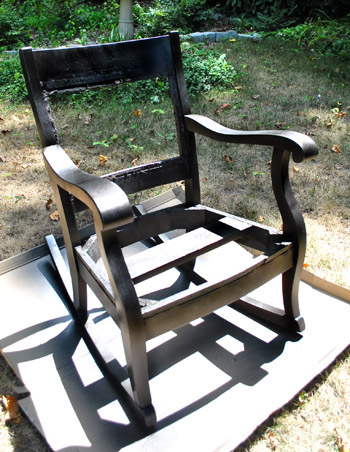
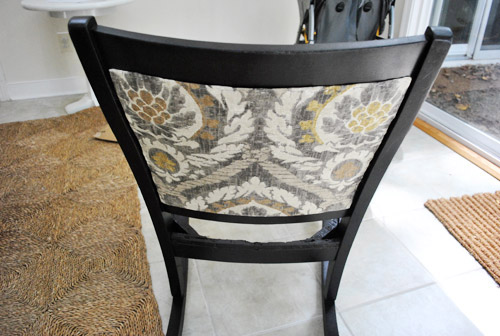
No wait, we had finished that seat and were here after redoing the frame:
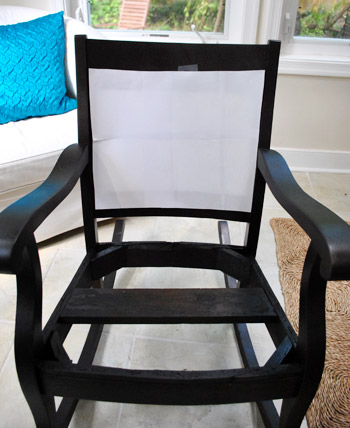
Finishing the seat upholstery and the frame meant I could no longer avoid the most intimidating part of this project: that opening at the top part of the chair that would have to look finished from both sides. And yes, I was skeered. But after reading through a ton of recommendations on this original how-do-I-do-it post from nine months ago (and chatting to a reupholstering-fiend friend of mine) I opted to use one of the more surprising yet most commonly recommended methods: heavy duty cardboard. Doesn’t that sound like a terrible idea? I know, it sounds completely wrong. Like bad dollhouse furniture that would be uncomfortable and make weird cardboard sounds when you lean back on it. But I guess a lot of upholstery experts use it and my friend had gorgeously redone an entire dining set with double-sided upholstery just like my rocker using that method. So I went for it. And in the words of Madonna: I’m not sorry (it’s huuuuman naaaature). It actually worked out awesomely. Let’s get into it, shall we?
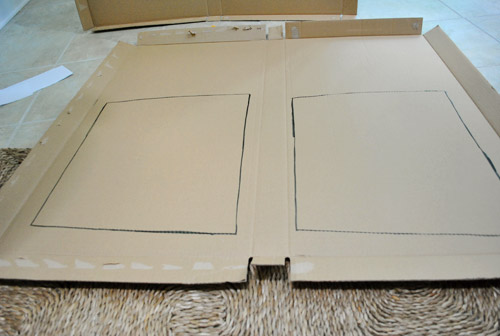
First I used four pieces of cardstock to make a template for the opening (to see just how wide and long it needed to be to cover some of the gross hole-riddled parts of the frame that the original upholstery had once obscured):
Then I placed that template on the back side of the chair to be sure another upholstered panel of that exact size would work nicely in the back (and cover all the rough areas of the frame that aren’t meant to be seen back there). It worked in the back too, so I laid my handy little cardstock template down on some heavy duty cardboard (leftover from our Ikea file cabinet packaging) and traced the shape of the template onto the cardboard.
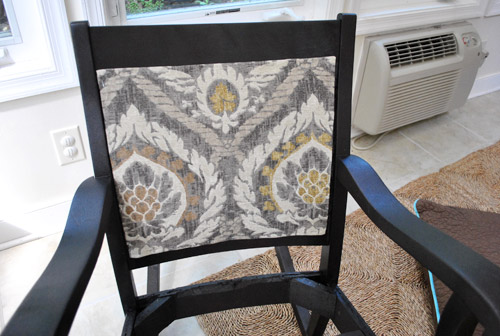
Next I cut each cardboard panel out and used more extra-loft batting and fabric, which I secured from behind to upholster it just like I did to the seat in the first part of this tutorial. Oh and you’ll notice I did my best to center the fabric again and pull it nice and taut around the back perimeter. This time I just used one layer of batting underneath it (instead of five like the seat) since people don’t sit on the chair back (they just lean on it). I don’t mind all wood rockers like this, so I wasn’t looking for a ton of top-of-your-back plushness anyway. I just wanted the batting and fabric to give the heavy duty cardboard even more strength and durability. It was actually surprisingly legit looking when I was done. And since I worried that staples would poke through the front of my fabric from behind as I secured the batting and fabric, I used duct tape to hold it in place from behind instead – just until I could staple through everything to attach the panel to the chair (which I knew would hold a lot more firmly over time than tape). I don’t think anyone would have guessed it was cardboard and duct tape under there from the front. And the great thing about it was that it wasn’t completely unbendable…
… but once it was stapled (with my regular old staple gun) to the chair about a quarter of an inch from the edge (through the panel and into the frame) it was completely unbendable and appropriately strong.
I don’t think a kid could stab an umbrella through it actually. It’s that strong. See, it gets really nice and rigid once the outside is reinforced with all of those staples around the chair’s wooden frame. And it was nice that it wasn’t completely rigid (aka: unbendable) before the stapling step because if I used anything more unbendy (like a piece of metal flashing) I worried it would have been really hard to attach. Why? Well, whatever I chose for the panel had to have some flex so it could follow the slight curve of the frame without buckling or folding. In short: cardboard sounds crazy, but the thick stuff that’s reinforced with batting and fabric = smooth and completely professional looking. I don’t think anyone could thump their hand against it (hard, it can take it) and guess that it was cardboard. And it’s completely comfortable to lean on, rock in, etc.
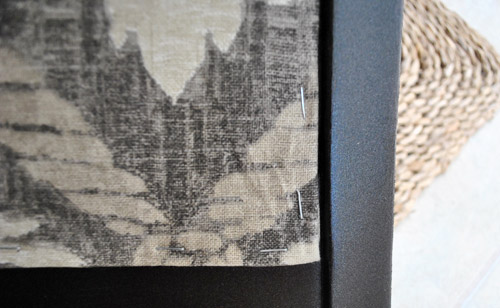
But just stapling the panel around the exterior left me with this dilemma: ugly little visible staples around the perimeter. At first I thought I’d find some sort of trim or burlap ribbon to glue over it (they sell upholstery glue meant for adding trim like that) but the more I looked at options, the more I didn’t like the idea of adding more contrasting fabric or trim. Nothing seemed to go with my base fabric, and I didn’t want it to look cheap or peel off due to constant use (we work our furniture hard in this house).
So I did what any novice chair upholstering gal would do, and completely ignored the problem for the time being. Instead I just moved on to making the second panel for the back (again using the one layer of batting + one layer of taut fabric method to cover the panel – secured from the back with duct tape and then stapled to the chair frame to hold everything in place for the long haul).
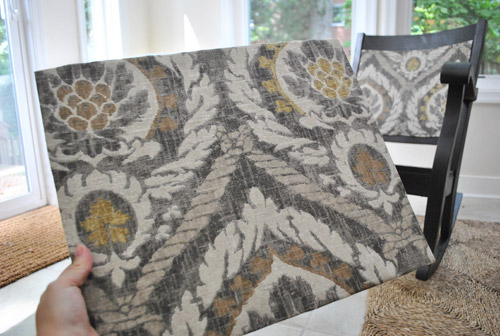
Here’s a better shot where you can see how the frame curves a bit, so creating a panel that’s not too rigid to follow that curve was key.
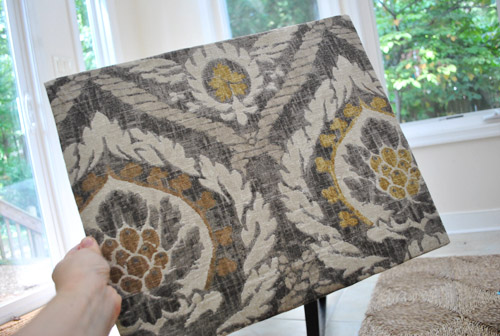
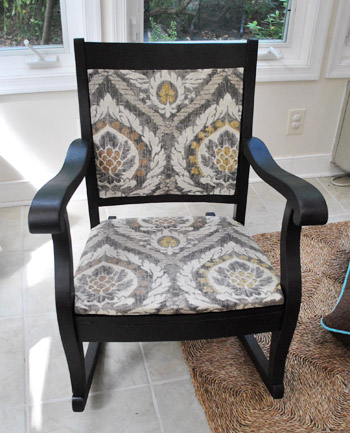
From afar she was looking miiightly fine (this is actually the sneak peek pic I included in yesterday’s post)…
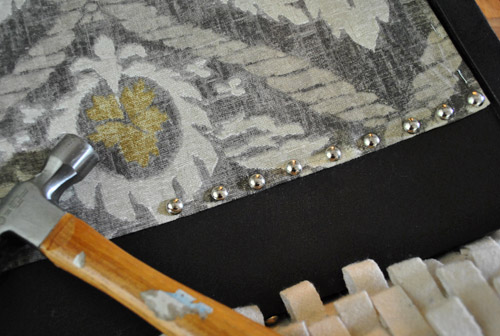
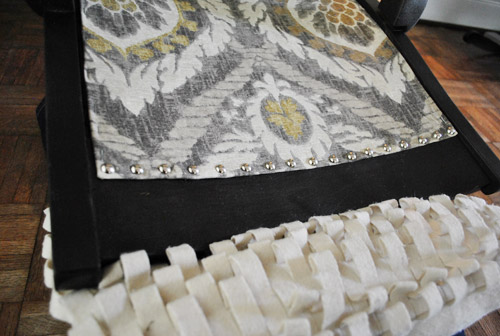
… but up close there was still the visible staple issue around the edge of each panel. So I decided after looking at all of my trimming options at JoAnn that maybe it was a job for nail heads (sold in packs of 24 for $1.50 each). After all I love the gorgeous detailing they can add to things (our living room ottoman has them going on, and I am totally picking up what it’s putting down). So I very slowly pried out the staples as I added nail heads down the line instead (the staples could be easily popped out with a flat head screwdriver, and then I just used a small hammer to bang in my nail heads, which basically look like heavy duty thumb tacks).
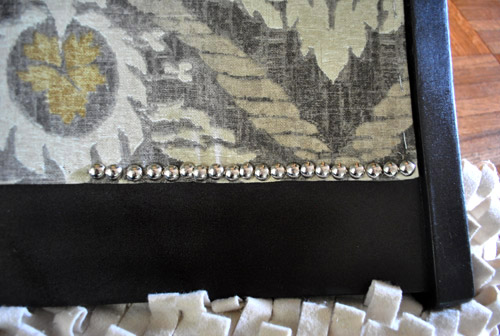
But after a whole bunch of chihuahua-scaring hammering, I stepped back and hated the lumpy bumpy result. They were just far too ganked up on each other and no matter how hard I tried to hammer them in straight, there was a slight wiggled effect and it just wasn’t working for me. I had looked for one of those long rows of nail heads that they sell pre-lined-up on a spool (which probably would have been a lot easier) but I couldn’t find them at JoAnn (hence purchasing individual nail heads instead). But it was definitely time to figure something else out. So I decided to try to space my nail heads a little further out (sort of the same distance as my staples) instead of trying to make a long dense line…
It was soooo much better. I could breathe again. If one was slightly higher or lower than another one it was a lot less obvious this way. And it felt more airy and not as on-top-of-itself crowded.
Oh and just to be clear, I would remove each staple with the flat head screwdriver as I went along and replace it with a nail head. So it wouldn’t be smart to remove all of your staples at once or nothing would hold your panel in place on the chair. Moving around the chair and popping one staple out and one nail head in did the trick. And using a small piece of paper or cardboard as a spacer between the nail heads can help you keep them nice and equidistant. Booyah, Dad. I just used equidistant on the ol’ blog (he’s a math teacher, so that should thrill him to no end).
Oh and see that ruffled cream thing at the bottom of the pic above and below? That’s just a pillow from the sofa because I was banging the chair pretty hard, so I didn’t want it rubbing against the floor with every hit. Poor pillow. I’m happy to say that he made it through. And here’s what I had going on after doing three out of four sides of the front panel:

Not bad, right? It was nice because it made the whole chair feel kind of special and expensive in a way that I feared glued cording or trim couldn’t. But I’m not gonna lie. This is the hardest step by far, physically. You get sweaty and gross from all that extra-hard hammering and it’s just downright tiring. It’s also super frustrating every once in a while when your nail head inexplicably bends as you hammer it in, which means it is rendered completely useless (and results in a bunch of annoying waste in the end). Just look at this pile of “brokens”:
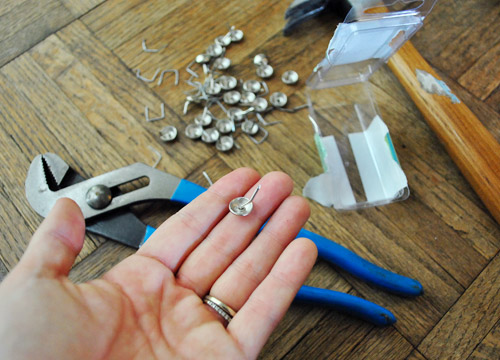
I even tried to straighten them with a pliers in the hopes of reusing them, but once they’re bent they’re just too compromised to go in straight and look right (and often just break entirely). Bummer.
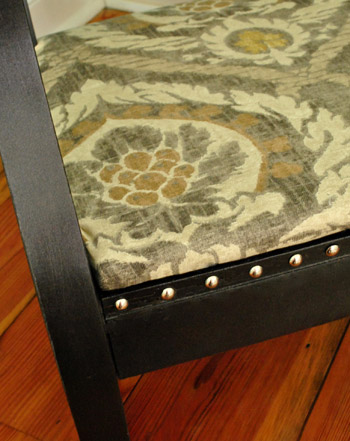
But in the end (after about an hour and a half spent studding the front panel) I loved the look so much that I even added studs along the wood trim part under the seat on the sides and front. Just to add some balance and bring some of that detailing to the bottom of the rocker along with the top panels. It’s hard to tell in the pics, but the studding on the upper panel of upholstery is nice and shiny, so adding some shine along the wooden bottom edge of the chair made it feel more not-top-heavy, so it’s more balanced looking in person.
Secret: I haven’t nail-headed the back panel yet, so I have a bit more hammering to do. Maybe next week when my arms recover. Hah. For now I’ll just keep my chair facing forward and nobody will be the wiser. Except for the fact that I just told everyone. Because I’m smooth like that.
Either way, from the front and the side… I think I’m in love:
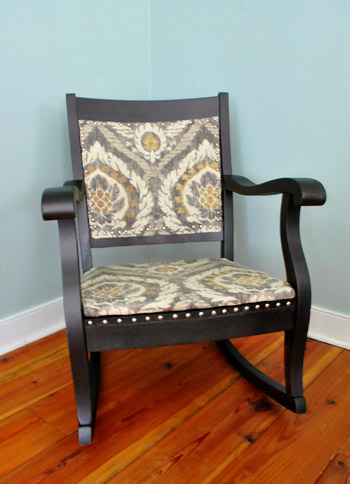

Isn’t she sexy? Wait, I mean he. The studs and the curves give me mixed signals. Speaking of the studs, for some reason the nail head row on the bottom (that wraps around the wood rail under the seat) reads as a little “medieval” in these pics, but I promise it’s not at all reminiscent of Knights Of The Round Table in person, I think the camera just caught them differently than they read in real life.
But back to those nail heads, my advice to you would be this: buy waaaaay more boxes of nail heads than you think you’ll need. They’re only $1.50 a box (at least at our JoAnn) and you can always use coupons on top of that. It’s just waaay more annoying to run out of them and have to treck back out to the store all sweaty and frustrated than to have extra boxes that you can return at the end if you don’t need them. To give you an idea of how many boxes I went through, I actually needed five of them (due to all the annoying bent ones that messed with my mojo). I probably could have done it in three if none of them inexplicably bent on me.
To celebrate fiiiinally finishing (well being 95% done, since I still have to stud the back panel) I decided to have a pillow fashion show. Because I’m weird like that. Here’s Mr Dapper himself, rocking (har-har) a random green HomeGoods pillow that I have in my embarrassingly extensive pillow collection:
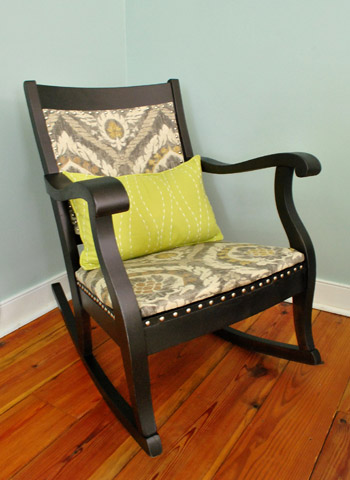
And here he is with a little Anthropologie-ish spin thanks to a fun patterned yellow pillow going on (originally from Target, borrowed from the guest room):
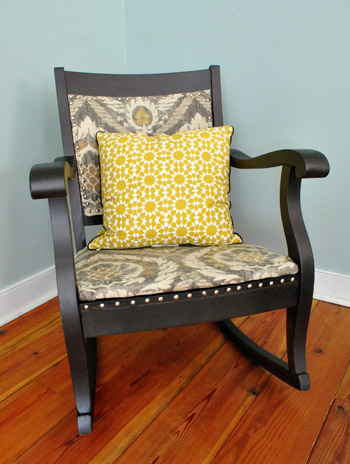
Today he’s “wearing” the little green pillow in the corner of our bedroom, but the patterned yellow one was fun for a hot minute too. We’re thinking our rocker might eventually end up in the office, which would be really nice since we spend lots of Clara-reading time in there (and decided our big green sofa doesn’t really work with the floor plan that we’re working towards). We’ll definitely share some pics when we pin down a permanent home for the guy.
And just for kicks, here’s a look back at our $25 craigslist rocker before I worked up the took-nine-months-to-cultivate energy to get ‘er done. Ah memories.

You’ve come a long way Rocky. Here’s the budget breakdown:
- Rocker (from craigslist): $25
- Extra-loft batting (from JoAnn): $6 (with 50% off coupon)
- Staple gun: $0 (already owned – but it’ll run you $19-ish bucks from Home Depot if you need one)
- Oil-rubbed bronze spray paint (from Home Depot): $7
- Heavy duty cardboard: $0 (leftover from our Ikea file cabinet packaging)
- Kravet fabric (found as a clearance remnant at JoAnn): $4 (for two yards)
- Nail heads (from JoAnn): $6 (they were $1.50 a box & I needed 5 boxes, but used 2 coupons)
- Total: $48
Possibly the most exciting thing? We just learned that Ballard Designs is selling the same exact Kravet fabric that we found as a clearance remnant at JoAnn for $4 (for two yards) for a whopping $32 a yard (which adds up to $64 for two)! So the fabric that we used on our project alone could have cost more than our entire $48 rocker makeover. Definitely makes the whole roller-coaster upholstery adventure feel like time and money well spent. Although I’m still mad that some of my nail heads bent so I had to buy a few extra packs. Oh well, there’s no crying in baseball upholstery.
So there you have it. A what-worked-for-me rundown with 44 photos between the this post and part one (hence the two part split). As for how it feels to rock in that guy, in a word: niiiiiice. It’s all very comfy and smooth (with nice rock-ability going on). And best of all, there’s not an inkling of “is this thing made of cardboard?”- for which I’m eternally grateful. Has anyone else out there tried the cardboard panel trick for chair backing (or some other upholstery task)? Is anyone bravely embarking on an even more involved chair makeover (the idea of a wingback makes me shake in my boots)? Good luck and godspeed!
Psst- We announced this weeks giveaway winners. Click here to see if you’re one of them.

Sharee A says
FABO! I’m in the middle of re-doing a bucket cane chair myself. Only have the frame sprayed & glossed so far. Tonight, disassembling the seat cushion & back fabric to use as my template for the new material. Just taking my time…
Amy G. says
Way to go! That was a challenging project with a little one around. I love it. I also like it without any pillows… they are all distracting from the beautiful wood lines and the subtle fabric you chose. Great job!
E.Lefebvre says
Please, please, please, pick the yellow pillow! Your “Anthropologie” look had me at hello! Great job!!! This is BY FAR my favorite re-purposed, re-painted piece of furniture you’ve done.
Sarah says
I love that you used one can of ORB where as I would have gone through 2.5-3 cans and it STILL wouldn’t look as even and smooth.
Can you make a video of “one, thin and even layer”? haha… but really, can you?
YoungHouseLove says
Challenge accepted! I’ll try to remember to capture it on the flip cam next time!
xo,
s
mandy madison says
sexy :)
Robin O says
Amazing!! It looks fabulous! I totally inspired to hit up Craigslist and find a beat up chair to try this out myself. :)
Jen says
Good find with the fabric! The same fabric is on the cover of the Ballard Designs catalog that came in the mail today! Sweeeet!
Maureen says
In love with this! How amazing does it feel to have totally, one-of-a-kind furniture? I love that you guys customize, customize, customize (and recycle/reuse). So admirable.
Amanda says
Great job on the rocker!
I love the sisal/seagrass rug, may I ask where you found yours?
YoungHouseLove says
That was from World Market a while back. Hope it helps!
xo,
s
Elizabeth says
Wow, the chair looks amazing!!! Truly an inspiration.
Jasmine says
WOW!!!!!!!!!!!!!!!!!!!!! Way to recognize the great bones on this chair! The transformation is really amazing! Awww… you guys are so smart and creative :D
Kiran @ KiranTarun.com says
That rocker seriously ROCKS now!! I love how you’ve add the tack and gave it a ROCK n ROLL’ish look :D
wanderingairstream says
ok.. it’s official, you’ve inspired me to take on a big rocker challenge of my own, i have an amazing vintage rocker that needs lots and LOTS! (; of tlc.. just to start. the hubby kept saying get rid of it.. to which i of course said no way! when we get the house rebuilt and it comes out of storage i’m going to summon your diy rocker energy for ours.. we’ll see how it goes (;
Sandra says
I love it best when you can’t tell if a piece of furniture is a he or a she. I really like what you did! I’m already anxiously awaiting the durability updated on the ORB!
Kai says
Love the chair upholstery and the nailheads, but I’m a sucker for real, aged wood so it made me a little sad to see it painted.
Butttt what I really want to know (since I’m struggling with my own pillow addiction) is whether you buy pillows that are already stuffed or buy pillow covers and inserts (which seem to be so expensive, but then you have the option of washing the cover)?
YoungHouseLove says
It just depends what I find, haha. Ikea sells a lot of cheap pillow covers that I fall for, and Marshall’s & TJ Maxx & HomeGoods (and Target) have great inexpensive pillows (and also sometimes sell covers that call my name).
xo,
s
woacf says
I have a chair that I have put off finishing as well. I think you just inspired me with this post. Do you have anymore furniture refinishing projects on your to-do list?
YoungHouseLove says
We definitely have more furnishings on our wish list (many of which we hope to find secondhand and restore or build from scratch). Like a big entryway console or buffet for the living room, a media cabinet for the living room, and a large armoire or cabinet for the bedroom nook to the left of the bed, just to name a few.
xo,
s
Joy says
WOW. This is such a beautiful transformation. I love that you were able to not only make the wonky nailheads work for you, but turned them into an incredibly eye-catching feature. The photos do not read as medieval–they read as gorgeous.
Well done, $her-dog!
Sheila Zeller says
I love the way you tackle projects – you totally inspire me! Your chair looks absolutely fab!!! Great fabric, and what an awesome idea with the nail head! Rock on ;-)
PS – do you sand between coats with ORB? And if so, do you use steel wool?
YoungHouseLove says
Nope, I don’t (since I mist it on so thinly) but sanding can’t hurt if you have a hard time applying really thin and even coats. Hope it helps!
xo,
s
Melinda says
Oh, this is one of my fave posts now! I just revamped a chest of drawers into a changing table for our Nursery and jumped at the chance to use nail heads. I have wanted them on a piece of furniture for so long, so the baby will be rocking it! I used nail heads to fasten fabric (with batting underneath) to the top of the changing table so as not to have to paint it.
I am certainly not feeling complete with my use of nail heads though, and need to nail head some more!
Cyn says
HOLY WOW! So you spray painted the chair. Talk to me more about this. I have an old Target microwave cart that I am itching to paint and make into a bar cart. But the thought of painting it…oy. Spray painting though sounds intriguing. Do you guys think it would work?
YoungHouseLove says
It definitely could! I would sand it to rough it up and use either spray primer like Kilz and spray paint (or spray paint with built-in primer like ORB). Thin and even coats are key!
xo,
s
jeannette says
this is the kind of thing that’s really inspiring — when you just step off the edge into the abyss. it looks beautiful, go you!
Jennifer says
Sherry, the chair looks amazing! I am uber-jealous and hope that I can learn to do this too.
Brittany says
Have you seen the cover of the new Ballard Design catalog??!!! It is an ORB chair being recovered in the same fabric you used! I had deja vu when I checked the mail!
YoungHouseLove says
Isn’t that so crazy?? What are the odds?
xo,
s
joyjoy says
You totally had me fooled with your almost-finished shot yesterday. I couldn’t see the staples at all! Your nail-head details turned out so beautiful.
anglophile.ash says
I will be getting (early-attic) my dad’s recliner from the early 60’s. It was reupholstered about 20 years ago, from rusty orange that had gone fuzzy in the seat, to baby blue/white. That will really not fit in with my gold/green/burgundy/lavender color scheme, so I’m going to learn how to DIY reupholster over the winter, probably to a nice rich burgundy. :)
Stephanie N says
Very pretty!
Ann Marie says
Sherry, you’re a rock (har-har) star! You did a phenomenal job! I think a celebratory glass of wine is in order…while rocking in the rocker, of course.
YoungHouseLove says
Haha, that sounds good to me.
xo,
s
traci says
When you did the nail head trim on the wood part did you hammer that in as well or glue them on? I assume hammer, but were the nail heads easy to be hammered in or did many of them break?
I want to find a craigs list chair now :) Great Job!!!
YoungHouseLove says
I hammered them in. In both instances they were going into wood (just through the cardboard panel and into it on top) so it held them nice and firmly. As for if they broke, a few bent as I went (see the pic with the bent ones?) but it wasn’t too bad. Hope it helps!
xo,
s
Charlotte | Living Well on the Cheap says
Girl! That is amazing! I’m trying to work up the courage to reupholster a pair of wing chairs I got from craigslist almost two years ago!
Rae Ann says
The hardest part about reupholstering wing backs is getting up the nerve to start. Once you have waded in, it isn’t hard. Tedious, but not hard. I used cardboard from frozen pizza boxes to make crisp seams along the top edge of the back and under the arms. Worked like a charm!
Nevin says
It turned out beautiful! I also have in my garage an old avocado upholstered chair that is in desperate need of help. I am signing up to take a beginner’s upholstering class offered through the Adult Education Center in Henrico County. I can’t wait to transform it! Thanks for showing us how to tackle a double sided chair – I must go find one now!
Bethany says
This chair looks AMAZING! You did an awesome job. I love it with the yellow pillow best. They look like they belong together like long lost cuddle buddies! They need each other.
Great job!
Rhiannon says
This is one of my most favorite projects you’ve done! It looks fabulous, the nail heads totally make it! I wish I could abduct Mr. Rocker and put him in my house!
ashlee says
….i can’t get over the ORB. it is officially my life mission to find some.
in terms of white spray paint, would you recommend glossy finish or a flat/matte finish for picture frames?
YoungHouseLove says
I would go with semi-gloss I think. Not too shiny, but not too flat. Good luck!
xo,
s
Emily L. says
Oh, this is a cool post – especially for me since my mom and I do custom sewing for homes and I literally pound nailheads into cornice-style window treatments or headboards for hours at a time. If you plan to add nailhead to a few other things, you should consider buying a tack hammer with a rubber tip. If you have one, then if a tack is hammered in a little off, it’s not hard to just pound it back in the right direction, and you don’t have to take it out. On another note,someone pinned this picture (to Pinterest) from Better Homes and Gardens and I thought of you guys with your mirror covering the window. I didn’t know if what you have is a permanent solution or if you’re going to remodel the whole bathroom at some point, but it’s a nice idea, nonetheless.
http://www.bhg.com/bathroom/photo-gallery/bathroom-cabinet-ideas/#page=19
YoungHouseLove says
Thanks so much for the tack hammer tip! And as for the link- so cool!
xo,
s
Kelly Carlson says
I’m inspired! So, so appreciate your candor with the frustrating part of the experience. What an amazing makeover-well worth it!
Sayward says
I was wondering where you guys found the large woven planter in your bedroom. I’m in the market!
YoungHouseLove says
Hmm, large woven planter? Am I being crazy? We have a shiny brown ceramic one in there from HomeGoods, is that the one you mean?
xo,
s
Sayward says
yep, it looked like a woven basket to my weak eyes :)
Thanks! I’ll keep hunting.
YoungHouseLove says
Good luck! Target and Pottery Barn have lots of baskets that might work with a cheap Ikea planter slipped inside to catch water.
xo,
s
JoDi says
Wow, that came out awesome! That’s a great fabric. Who knew ORB spray paint was so versatile?!?
Joanna May says
I had the same experience with nailhead trim when I reupholstered a $20 thrift store chair, except I stuck it out with the nailheads right next to each other. So frustrating! I tried guides, used a rubber mallet, and did everything the interwebs told me to, and it’s still rather wavy. I like your spacing better. I currently have an old rocker in the garage with some torn caning in need of a redo like this. http://joannamay.org/homelife/2011/05/22/adventures-upholstery
Rachel Dowd says
One of the best rocking chair before and afters I’ve ever seen! And I’m sort of way jealous over your fabric deal. :) Love it.
Amy @ Elephant Eats says
I love before and afters! (which your website has a lot of…hence the reason I love your website!) You did a completely awesome job. I love the nail-head studs. Beatiful!!
Nancy says
I haven’t read the comments so maybe someone has mentioned this, but years ago my mom did some upholstery and used one of these upholstery hammers with no only a smaller head but a magnet to hold the tack. And they don’t appear to be all that expensive.
http://www.amazon.com/s/?ie=UTF8&keywords=upholstery+hammer&tag=googhydr-20&index=aps&hvadid=7216014329&ref=pd_sl_7gl3wj4c09_e
YoungHouseLove says
Thanks so much for the tip!!
xo,
s
Amy @ this DIY life says
Ideas to stay motivated on a project? I pinned something on Pinterest a while back thinking it would be an easy project. Find a chair, paint it some awesome color that would make my husband say “really?” and hang it from a tree in our backyard. For the last 3 weeks I’ve been hung up (pardon the pun) on the hanging it from a tree part. I thought it would be easy to just throw a rope over the tree limb but research showed that it’s bad for the tree to do that. Enter the three day fiasco trying to do it right. Yesterday I was almost at the end of my rope (wow, this story is full of puns) and so the chair sits on our porch with a big pile of rope on it taunting me as I write this comment. How do you keep yourself motivated on a project when you really just want to put it aside until next year?
YoungHouseLove says
I think we’ve learned that sometimes you need to step away and take a break. And other times if you do that you might never start up again. So it’s a fine line to walk (we usually keep at something until we have hit a wall and don’t know how to proceed, but if we find research or tips to get us by we’ll keep trying). I know it’s incredibly hard sometimes and you want to cry or punch something, but as corny as it sounds: in the end you’ll get there. And it’s all worth it in the end. Good luck!
xo,
s
Chrystal says
Wow, it looks amazing! I have a small wing back-ish chair I got for $5 off craigslist that is still sitting in storage a year later. You inspire me to get hopping! And I love your fabric! I got curtains for our living/dining area last summer and love love them, for $15 a panel. Large grey/yellow waverly pattern. This year ran across the same fabric for $45 a yard at Joannes! Holy moly who pays that?? Thanks for your site. I am addicted!
Lucia says
I attended a “Street of Dreams” event where you walk through fancy newly-built houses that display the latest design trends, etc, and I found your chairs! One house had two wing-backed chairs with the same material! I also saw adorable honeycomb-type vases that I bet you’d love.
I’ll email you the pics!
I think I like your chair better, though! :)
YoungHouseLove says
That’s so funny! I’d love to see the pics!
xo,
s
gamze says
Ok this should make you smile. I saw the same fabric (which is so awesome) in the new ballard designs catalog for..wait for it….$32 a yard!
YoungHouseLove says
Isn’t that funny? What are the odds?!
xo,
s
alg says
Ees gaw-juss, dahlink! (What’s with me & the weird accents lately?!?)
And thanks for the ORB-location tip. I spend half my life at the depot — how’d I miss it? Gonna try it on our kitchen hardware :)
And btw… after listening to your recent radio interview, I have no earthly idea how you two keep up with yourselves!!! A coupla dynamos is what y’all are!
YoungHouseLove says
Aw you’re sweet Alg! Thanks for listening to that long-arse interview. Haha.
xo,
s
Trude says
Congratulations, it looks awesome! I seriously love that fabric. That chair will wind up being in your family for years, I’m sure. :)
Cassandra says
We are using the same upholstery nails for an ottoman we are making and they are driving me crazy!! The only reason it isn’t finished is because of these darn things. Every morning I try to finish and bend a bunch and give up. Blah. But I did find them at Walmart for 97 cents for 30… helps slightly with the frustration of bending them.
YoungHouseLove says
Some folks gave some tips about using a rubber mallet which might not bend them as much. Hope it helps! I totally feel your pain!
xo,
s
Brandan WH says
Just got the catolog in the mail yesterday and I thought “that pattern looks familiar”! Great job on the chair. You would never know it was the same one.