Ok I’m back with part two of the madness that is Me vs. Rocker. But remember my disclaimer from yesterday’s post that this entire process was much like when aliens took over my body and I made a quilt for Clara, which is to say: I went rogue. I took in all the advice from you guys along with some google tips and some suggestions from a reupholstering-fiend friend of mine… and just played it by ear and did what seemed to work as I went along. I mean, it’s not a family heirloom, it’s a $25 craigslist find. But enough chatter, heeeeere we go.
Although there was a sneak peek pic of the almost-finished product at the end of the last post, we were actually here when it came to the play-by-play:
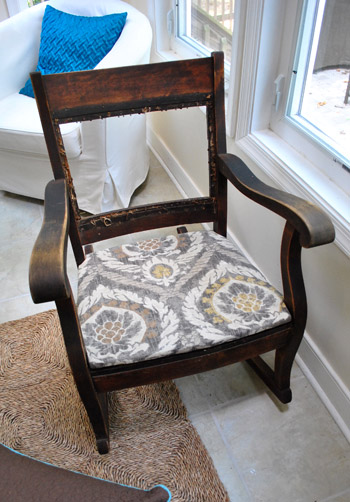
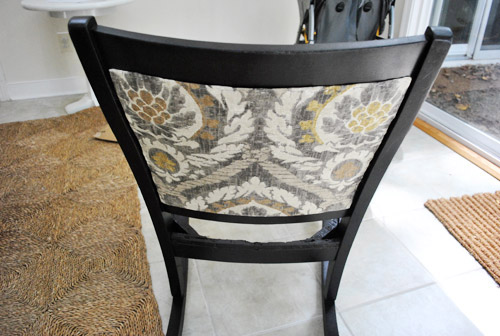
No wait, we had finished that seat and were here after redoing the frame:
Finishing the seat upholstery and the frame meant I could no longer avoid the most intimidating part of this project: that opening at the top part of the chair that would have to look finished from both sides. And yes, I was skeered. But after reading through a ton of recommendations on this original how-do-I-do-it post from nine months ago (and chatting to a reupholstering-fiend friend of mine) I opted to use one of the more surprising yet most commonly recommended methods: heavy duty cardboard. Doesn’t that sound like a terrible idea? I know, it sounds completely wrong. Like bad dollhouse furniture that would be uncomfortable and make weird cardboard sounds when you lean back on it. But I guess a lot of upholstery experts use it and my friend had gorgeously redone an entire dining set with double-sided upholstery just like my rocker using that method. So I went for it. And in the words of Madonna: I’m not sorry (it’s huuuuman naaaature). It actually worked out awesomely. Let’s get into it, shall we?
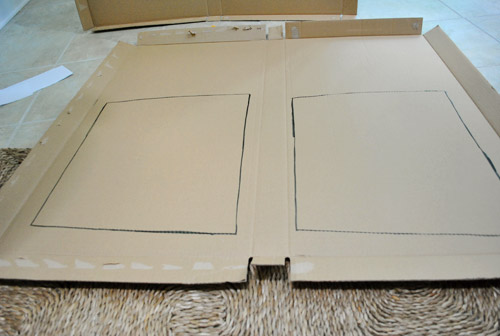
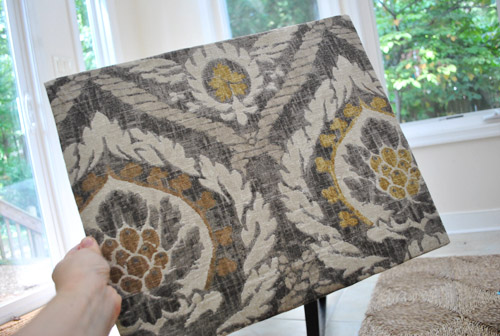
First I used four pieces of cardstock to make a template for the opening (to see just how wide and long it needed to be to cover some of the gross hole-riddled parts of the frame that the original upholstery had once obscured):
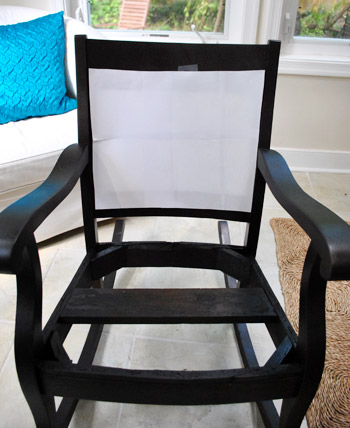
Then I placed that template on the back side of the chair to be sure another upholstered panel of that exact size would work nicely in the back (and cover all the rough areas of the frame that aren’t meant to be seen back there). It worked in the back too, so I laid my handy little cardstock template down on some heavy duty cardboard (leftover from our Ikea file cabinet packaging) and traced the shape of the template onto the cardboard.
Next I cut each cardboard panel out and used more extra-loft batting and fabric, which I secured from behind to upholster it just like I did to the seat in the first part of this tutorial. Oh and you’ll notice I did my best to center the fabric again and pull it nice and taut around the back perimeter. This time I just used one layer of batting underneath it (instead of five like the seat) since people don’t sit on the chair back (they just lean on it). I don’t mind all wood rockers like this, so I wasn’t looking for a ton of top-of-your-back plushness anyway. I just wanted the batting and fabric to give the heavy duty cardboard even more strength and durability. It was actually surprisingly legit looking when I was done. And since I worried that staples would poke through the front of my fabric from behind as I secured the batting and fabric, I used duct tape to hold it in place from behind instead – just until I could staple through everything to attach the panel to the chair (which I knew would hold a lot more firmly over time than tape). I don’t think anyone would have guessed it was cardboard and duct tape under there from the front. And the great thing about it was that it wasn’t completely unbendable…
… but once it was stapled (with my regular old staple gun) to the chair about a quarter of an inch from the edge (through the panel and into the frame) it was completely unbendable and appropriately strong.
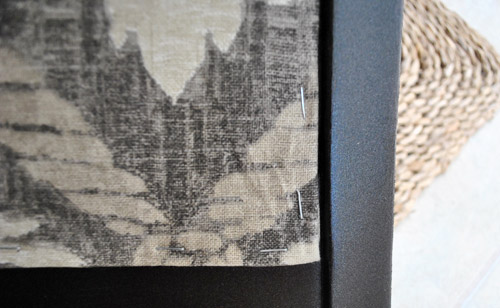
I don’t think a kid could stab an umbrella through it actually. It’s that strong. See, it gets really nice and rigid once the outside is reinforced with all of those staples around the chair’s wooden frame. And it was nice that it wasn’t completely rigid (aka: unbendable) before the stapling step because if I used anything more unbendy (like a piece of metal flashing) I worried it would have been really hard to attach. Why? Well, whatever I chose for the panel had to have some flex so it could follow the slight curve of the frame without buckling or folding. In short: cardboard sounds crazy, but the thick stuff that’s reinforced with batting and fabric = smooth and completely professional looking. I don’t think anyone could thump their hand against it (hard, it can take it) and guess that it was cardboard. And it’s completely comfortable to lean on, rock in, etc.
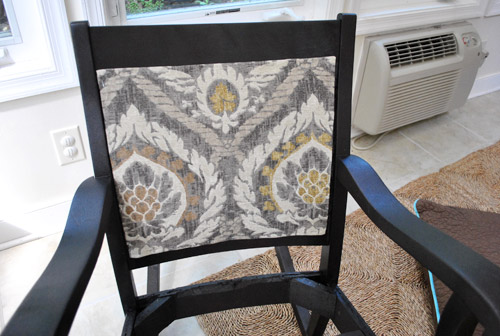
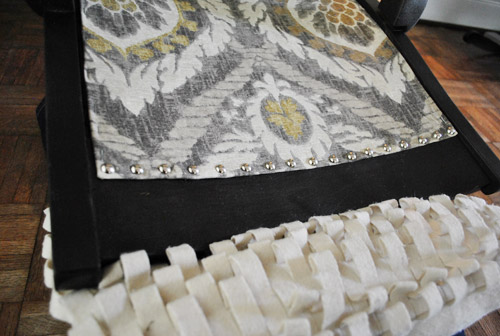
But just stapling the panel around the exterior left me with this dilemma: ugly little visible staples around the perimeter. At first I thought I’d find some sort of trim or burlap ribbon to glue over it (they sell upholstery glue meant for adding trim like that) but the more I looked at options, the more I didn’t like the idea of adding more contrasting fabric or trim. Nothing seemed to go with my base fabric, and I didn’t want it to look cheap or peel off due to constant use (we work our furniture hard in this house).
So I did what any novice chair upholstering gal would do, and completely ignored the problem for the time being. Instead I just moved on to making the second panel for the back (again using the one layer of batting + one layer of taut fabric method to cover the panel – secured from the back with duct tape and then stapled to the chair frame to hold everything in place for the long haul).
Here’s a better shot where you can see how the frame curves a bit, so creating a panel that’s not too rigid to follow that curve was key.
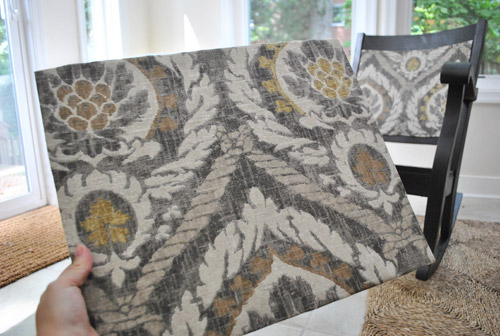
From afar she was looking miiightly fine (this is actually the sneak peek pic I included in yesterday’s post)…
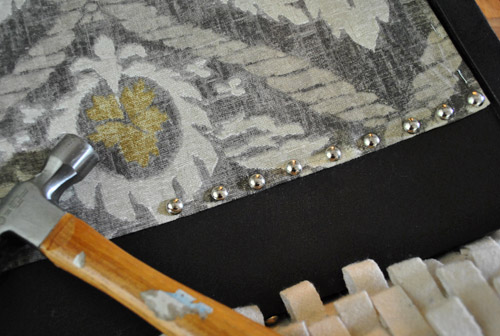
… but up close there was still the visible staple issue around the edge of each panel. So I decided after looking at all of my trimming options at JoAnn that maybe it was a job for nail heads (sold in packs of 24 for $1.50 each). After all I love the gorgeous detailing they can add to things (our living room ottoman has them going on, and I am totally picking up what it’s putting down). So I very slowly pried out the staples as I added nail heads down the line instead (the staples could be easily popped out with a flat head screwdriver, and then I just used a small hammer to bang in my nail heads, which basically look like heavy duty thumb tacks).
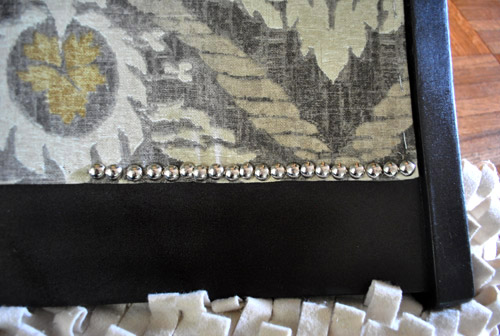
But after a whole bunch of chihuahua-scaring hammering, I stepped back and hated the lumpy bumpy result. They were just far too ganked up on each other and no matter how hard I tried to hammer them in straight, there was a slight wiggled effect and it just wasn’t working for me. I had looked for one of those long rows of nail heads that they sell pre-lined-up on a spool (which probably would have been a lot easier) but I couldn’t find them at JoAnn (hence purchasing individual nail heads instead). But it was definitely time to figure something else out. So I decided to try to space my nail heads a little further out (sort of the same distance as my staples) instead of trying to make a long dense line…
It was soooo much better. I could breathe again. If one was slightly higher or lower than another one it was a lot less obvious this way. And it felt more airy and not as on-top-of-itself crowded.
Oh and just to be clear, I would remove each staple with the flat head screwdriver as I went along and replace it with a nail head. So it wouldn’t be smart to remove all of your staples at once or nothing would hold your panel in place on the chair. Moving around the chair and popping one staple out and one nail head in did the trick. And using a small piece of paper or cardboard as a spacer between the nail heads can help you keep them nice and equidistant. Booyah, Dad. I just used equidistant on the ol’ blog (he’s a math teacher, so that should thrill him to no end).
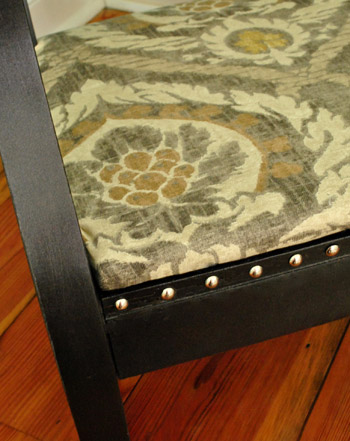
Oh and see that ruffled cream thing at the bottom of the pic above and below? That’s just a pillow from the sofa because I was banging the chair pretty hard, so I didn’t want it rubbing against the floor with every hit. Poor pillow. I’m happy to say that he made it through. And here’s what I had going on after doing three out of four sides of the front panel:

Not bad, right? It was nice because it made the whole chair feel kind of special and expensive in a way that I feared glued cording or trim couldn’t. But I’m not gonna lie. This is the hardest step by far, physically. You get sweaty and gross from all that extra-hard hammering and it’s just downright tiring. It’s also super frustrating every once in a while when your nail head inexplicably bends as you hammer it in, which means it is rendered completely useless (and results in a bunch of annoying waste in the end). Just look at this pile of “brokens”:
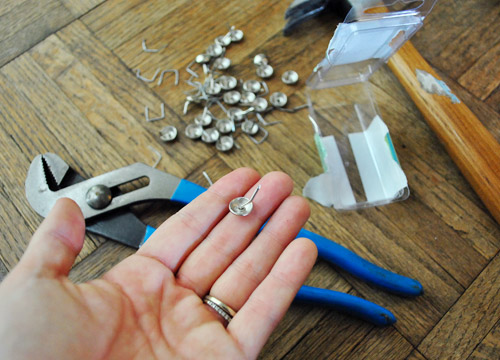
I even tried to straighten them with a pliers in the hopes of reusing them, but once they’re bent they’re just too compromised to go in straight and look right (and often just break entirely). Bummer.
But in the end (after about an hour and a half spent studding the front panel) I loved the look so much that I even added studs along the wood trim part under the seat on the sides and front. Just to add some balance and bring some of that detailing to the bottom of the rocker along with the top panels. It’s hard to tell in the pics, but the studding on the upper panel of upholstery is nice and shiny, so adding some shine along the wooden bottom edge of the chair made it feel more not-top-heavy, so it’s more balanced looking in person.
Secret: I haven’t nail-headed the back panel yet, so I have a bit more hammering to do. Maybe next week when my arms recover. Hah. For now I’ll just keep my chair facing forward and nobody will be the wiser. Except for the fact that I just told everyone. Because I’m smooth like that.
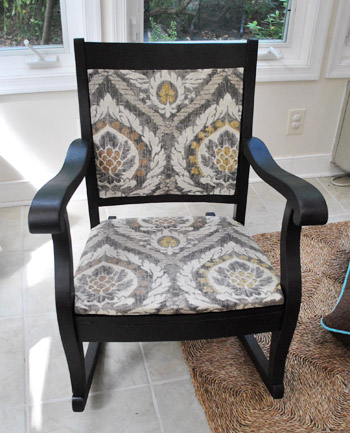
Either way, from the front and the side… I think I’m in love:
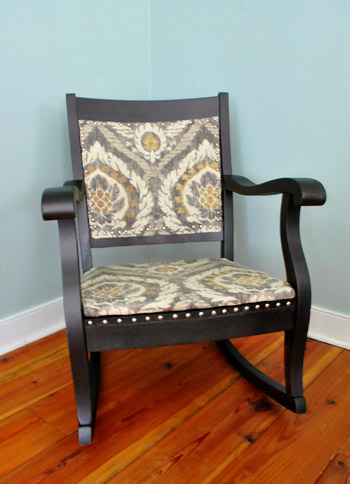

Isn’t she sexy? Wait, I mean he. The studs and the curves give me mixed signals. Speaking of the studs, for some reason the nail head row on the bottom (that wraps around the wood rail under the seat) reads as a little “medieval” in these pics, but I promise it’s not at all reminiscent of Knights Of The Round Table in person, I think the camera just caught them differently than they read in real life.
But back to those nail heads, my advice to you would be this: buy waaaaay more boxes of nail heads than you think you’ll need. They’re only $1.50 a box (at least at our JoAnn) and you can always use coupons on top of that. It’s just waaay more annoying to run out of them and have to treck back out to the store all sweaty and frustrated than to have extra boxes that you can return at the end if you don’t need them. To give you an idea of how many boxes I went through, I actually needed five of them (due to all the annoying bent ones that messed with my mojo). I probably could have done it in three if none of them inexplicably bent on me.
To celebrate fiiiinally finishing (well being 95% done, since I still have to stud the back panel) I decided to have a pillow fashion show. Because I’m weird like that. Here’s Mr Dapper himself, rocking (har-har) a random green HomeGoods pillow that I have in my embarrassingly extensive pillow collection:
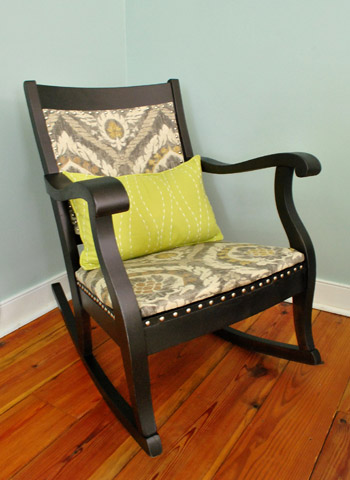
And here he is with a little Anthropologie-ish spin thanks to a fun patterned yellow pillow going on (originally from Target, borrowed from the guest room):
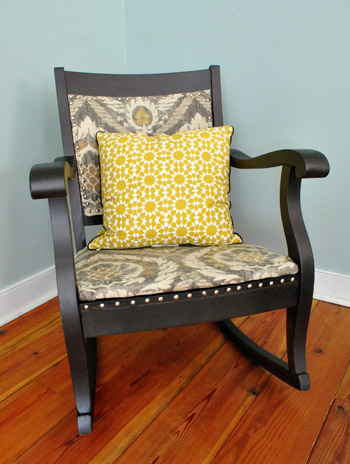
Today he’s “wearing” the little green pillow in the corner of our bedroom, but the patterned yellow one was fun for a hot minute too. We’re thinking our rocker might eventually end up in the office, which would be really nice since we spend lots of Clara-reading time in there (and decided our big green sofa doesn’t really work with the floor plan that we’re working towards). We’ll definitely share some pics when we pin down a permanent home for the guy.
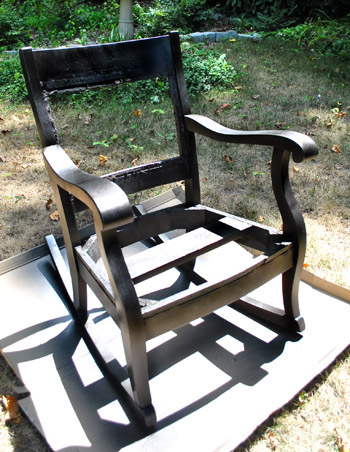
And just for kicks, here’s a look back at our $25 craigslist rocker before I worked up the took-nine-months-to-cultivate energy to get ‘er done. Ah memories.

You’ve come a long way Rocky. Here’s the budget breakdown:
- Rocker (from craigslist): $25
- Extra-loft batting (from JoAnn): $6 (with 50% off coupon)
- Staple gun: $0 (already owned – but it’ll run you $19-ish bucks from Home Depot if you need one)
- Oil-rubbed bronze spray paint (from Home Depot): $7
- Heavy duty cardboard: $0 (leftover from our Ikea file cabinet packaging)
- Kravet fabric (found as a clearance remnant at JoAnn): $4 (for two yards)
- Nail heads (from JoAnn): $6 (they were $1.50 a box & I needed 5 boxes, but used 2 coupons)
- Total: $48
Possibly the most exciting thing? We just learned that Ballard Designs is selling the same exact Kravet fabric that we found as a clearance remnant at JoAnn for $4 (for two yards) for a whopping $32 a yard (which adds up to $64 for two)! So the fabric that we used on our project alone could have cost more than our entire $48 rocker makeover. Definitely makes the whole roller-coaster upholstery adventure feel like time and money well spent. Although I’m still mad that some of my nail heads bent so I had to buy a few extra packs. Oh well, there’s no crying in baseball upholstery.
So there you have it. A what-worked-for-me rundown with 44 photos between the this post and part one (hence the two part split). As for how it feels to rock in that guy, in a word: niiiiiice. It’s all very comfy and smooth (with nice rock-ability going on). And best of all, there’s not an inkling of “is this thing made of cardboard?”- for which I’m eternally grateful. Has anyone else out there tried the cardboard panel trick for chair backing (or some other upholstery task)? Is anyone bravely embarking on an even more involved chair makeover (the idea of a wingback makes me shake in my boots)? Good luck and godspeed!
Psst- We announced this weeks giveaway winners. Click here to see if you’re one of them.

RC says
Do you feel the nail heads against your legs (from the bottom front of the chair) or when leaning back? I’m worried it would feel bumpy with nail heads…
YoungHouseLove says
Nope, when you rock you don’t really curve your legs back against the chair (it’s sort of like sitting in a desk chair, how your legs are at right angles with the floor, but the backs of your knees aren’t hitting the back of the chair) and when you lean back since they’re sunk into the fabric they’re not detectable. Hope that makes sense! Very comfy indeed!
xo,
s
Sharon says
The rocker looks AMAZING. I love the ORB finish and the fabric is to die for. I’m sounding like Rachel Zoe—
I D I E !!!!!!!!
You did a great job and maybe, just maybe I’m going to try to spruce something up in my own house. Even if I have only half of your success it will be great.
Kit Lang says
Your new rocking chair is full of awesome-ness. I’m completely impressed and now want to run out and buy my own craigslist rocker. Except not. Something else I can paint and re-upholster then. :)
Patti says
I love it! This gives me confidence that I can do this to a chair I have that’s been laying around (for a lot longer than 9 months lol). Your commenters always have useful information too.
YoungHouseLove says
Aren’t our commenters the best?! Love you guys!
xo,
s
Lauren says
One of the best projects you’ve done (in my humble opinion). She/he looks AMAZING! Bravo.
jess says
Looks great, congrats on the accomplishment! I am so obsessed with anything that has nailheads! So fabulous!
Nicole says
I love love love this chair! I have been wanting a rocking chair for a while and can not find one. I am going to look on craigslist and see what I can find. You have inspired me to not give up on my rocking chair dream!
Pamela says
This rocking chair looks amazing! I love the fabric that you selected and how you lined up the seat with the back perfectly. Your blog is so inspirational to me! Thanks for all the great idea’s.
P.S. I am in love with oil-rubbed bronze too!
Andrea says
can i be the charter member of “team yellow pillow”. maybe its a little large-ish for practical purposes, but gray and yellow is so in right now and it does give off a very anthro vibe. maybe that makes me a sucker for trends, but sometimes i can’t help it!
erin says
it looks great! love the fabric!!
i recently started my first reupholstery project (besides just a seat cushion) and i went with the super-easy-good-for-first-timers antique loveseat. with a striped fabric.
in other words, it’s possible i’m in WAY over my head. but so far it’s been fun!
http://oliveourhouse.blogspot.com/search/label/The%20Loveseat
(i’m adding nail heads too! but i cheated with the kind that’s connected and more of a trim.)
YoungHouseLove says
You go girl!
xo,
s
Krystle @ ColorTransformedFamily says
I think the nail heads make the chair. Especially after you took every other one out. Great job!
miriam says
Love you, love the chair, but those nailheads are making me throw up a little in my mouth.
Allison @ House of Hepworths says
Seriously, you are so talented. It looks amazing. The nailhead really ads so much. Nice addition to your home.
xoxo
Allison @ House of Hepworths
katalina says
Love the nail heads…and the lines of the chairbrought out by your
orb-greatness
I have a cool full of personality curved arm sofa that has been re-purposed into a scratching post and was thinking maybe I could recover it in sisal rope and then cover his tall sisal scratching post in the sofa fabric!
Lena says
Maybe the chair is a drag queen? I think it kind of fits, not only because of the mixed signals, but also a rocking chair is kind of a entertaining piece of funiture and drag queens are queens of entertaining.
KathyG says
Yikes…Irene is looking scary, you ever been through a Hurricane before? I have in Houston, not much fun.
YoungHouseLove says
Scared! Still hoping it curves back out to sea…
xo,
s
Lindsay says
I was just worrying about you guys, keep us posted if you can!
YoungHouseLove says
Will do! I’m still just hoping it won’t hit us (sometimes the weather guys freak us out and nothing happens). But of course we should start preparing!
xo,
s
Andrea says
Looks great Sherry! Well done. FYI, I’m sure you know this, but don’t be tempted to use cardboard for the seat. Many cheap folding chairs are made this way. When I was visiting my mom in the hospital last year I put my knee straight through one while kneeling on it! Tres embarrassing!
YoungHouseLove says
Oh yeah- I don’t think that would go over well! Haha. So sorry about the knee embarrassment. Haha.
xo,
s
Shannon says
LOVE it! Great job! (Thanks for the little Tom Hanks quote thrown in. . . we whip that one out all the time and it never fails to make me giggle)
Cara D says
It looks great! I am trying to decide between nail heads adn double welting for my rocker right now. There is a local upholstery shop that will sew up the double welting for me for a good price. I have a ‘Mr. Dapper” pillow as well as his older brothers.
Alex says
(unrelated, although that chair it lookin goooood)
have you seen this? – same fabric as your curtains? neato.
Alex says
and by “this”, i mean this:http://www.urbanoutfitters.com/urban/catalog/productdetail.jsp?itemdescription=true&itemCount=80&startValue=1&selectedProductColor=&sortby=&id=17995671&parentid=A_FURN_FURNITURE&sortProperties=+subCategoryPosition,+product.marketingPriority&navCount=10&navAction=jump&color=&pushId=A_FURN_FURNITURE&popId=APARTMENT&prepushId=&selectedProductSize=
holy long link.
YoungHouseLove says
Isn’t that so funny?! What a small world.
xo,
s
Jenny K says
So cool! How are you going to keep the chair from scratching your wood floors? I have a rocking chair that I don’t want to put on a rug…
YoungHouseLove says
I sanded the curved legs before spraying it so it rocks nice and smoothly- no scratching on our wood floors after lots of storytime! Whew.
xo,
s
Stephanie Handy says
Isn’t it crazy how well cardboard works for this stuff? For the armchair I’m reupholstering I was surprising to find that the bases for both the wings (it’s a wingback) and the actual chair sides were just bits of thin cardboard stapled in place!
YoungHouseLove says
That’s so funny! I love that it’s a chair upholstery secret.
xo,
s
Andrea says
“but once they’re bent they’re just too compromised to go in straight and look right (and often just break entirely). Bummer.”
That’s what she said.
Andrea says
It looks awesome, by the way. Total inspiration to finish my dining room chairs (that I ripped half of the upholstery off of, then abandoned.)
YoungHouseLove says
Haha, bummer indeed.
xo,
s
Sara says
I would NEVER had thought about cardboard! Amazing! Thank you so much for the inspiration. Now I don’t feel scared of getting me a chair-project myself. Thank you!
Wrenaria says
Looks great! I love it with the yellow pillow best. Pretty, pretty.
RVA Born and Raised says
I want to join in on the gushing about your amazing job on that chair! I look forward to doing some projects with the ORB spray paint in the not to distant future.
Just wondering what you guys are doing to prepare for the hurricane. I do you and John plan on posting about your preperations? I can just picture a stack of lawn furniture and plants in the corner of your living room with Burger looking at it like “What the heck?”
YoungHouseLove says
I think we’re going to just bring in our lawn furniture and put it in the sunroom and cross our fingers that we won’t get as smacked as they think!
xo,
s
Taryn says
I think this may be my favorite project of yours so far! I am in LOVE!
sally says
Next time you might look for nailhead trim. It has fake nail heads in a line (so no wobbly lines) with a real nail every so many nails.
YoungHouseLove says
Love that idea! I’ll have to try them next time.
xo,
s
Dani says
Ooooh, I really like how the nail heads set the fabric off so well. I am about to recover a brand new Rowe chair that I got at Habitat for $35 – it has rolled arms and I have no idea how I am going to figure them out!
Haley says
Love the transformation! That rocker has such beautiful lines and the nailheads really bring it out but talk about a pain. I used those little guys to frame a couple doors in my old bedroom and my fingers were throbbing afterward since I had to hold each nail and then hammer. The doors look great in all there soft leather and nailhead trim though.
By the way, I plan on stopping by Ikea this weekend and wondered if you found any websites that may have Ikea coupons. Can’t hurt to try.
YoungHouseLove says
Hmm, I don’t know of any. Anyone have any ideas for Haley?
xo,
s
Patti says
I’m not sure about coupons, but I know Ikea has two big sales a year, one in January and one in the summer (that’s how it is here in NY anyway). Also, if you’ve never checked out their clearance section, it’s really worth taking a look. You can get some great buys.
debbie c says
Oh I lurve it! Especially with those shiny nailheads! It looks nice with that yellow Anthro-ish pillow. Great job!
Polina says
Wow that chair is like a baby, 9 months of waiting plus 6 hours of labor :-)
Beautiful job! The fact that the fabric costs a fortune at Ballards is just an icing on the cake!
YoungHouseLove says
Haha- just like a baby.
xo,
s
Jenna says
I am in awe. That looks seriously dope! You’re a rockstar. Err…a rockerstar, I guess? ;-)
Jen says
Oh my goodness I’m in love!! That looks beautiful! I just redid my dining room chairs but your rocking chair was a ton more work and looks a ton cuter. Lovely work!!!
Colleen P. says
I have NEVER before heard of the cardboard trick and I really wish I had! I reupholstered a sofa once and it would have come in handy because I was never really happy with how the back turned out. Not to worry though, I have one of those gigantic squishy chairs that needs a new look and I’m READY!
I used so much recycled stuff to do that sofa. My DH worked in an office that shipped a lot of delicate equipment and I had access to all kinds of foam and packing materials, in addition to some random household supplies that got repurposed. I used old cotton cord (put into a lingerie bag and bleached in the washer-formerly used to tie down loads in the back of the truck) as filler for my piping, smallish bubble wrap to cushion the wood frame, a picture frame hanger to secure a broken part of the frame while the wood glue dried, egg crate foam turned inward to make squared arms into rounded ones-oh I know there was more but it was over a decade ago. If I recall correctly I think I redid the couch (with stupid-cheap-sale denim from JoAnn firefly frenzy sale) for less than $100, and that’s including replacing some of the springs for the sofa bed part. I eventually sold it to someone for $100, and the sofa had been given to use anyway, so we broke even.
So as you can see-I like the way you guys roll! LOL! It’s wonderful to see people getting creative and resourceful and getting use out of old things that, like your rocker, are still sturdy and useful, and just need some love.
Amanda Wells says
Love, love it! And I love when you go rogue. I recently recovered my dining chairs and did nailhead trim. A nightmare. Complete and utter nightmare. But I do love the way it looks. Love the rocker!
http://www.amandadovewells.com/?page_id=45
Jessie says
Looks great! Thought you should know I got the Ballard catalog in the mail today, has a chair mid-upholster with the same fabric on the cover! What a fun coinkydink!
YoungHouseLove says
Isn’t that so funny? I love that it’s getting upholstered. Hilarious!
xo,
s
Lindsay says
Ok, that is not a fun coinkydink, that makes me think that you are a designer for that catalog secretly. How does THAT happen?!?!?!
YoungHouseLove says
Haha, I wish! I think I’d be entitled to a big ol Ballard discount. Haha.
xo,
s
Jenna says
great job sherry! your hard work definitely paid off! i can understand being intimidated by this project, but it looks awesome!
LARY says
Wow! It looks gorgeous! Incredible what a pack of nail heads can do to the look and style.
Emily says
Funny you should mention, I actually am working on a wingback chair! Totally rogue too :) I’m on the home stretch! I’ll send pics when I’m done.
Emily F. says
beautiful! I seriously need to start checking the furniture section of craigslist again…
Pam says
Gorgeous! Great job, Sherry!
Emma says
Well done sister! Such a smart move to use the upholstery tacks. Maybe you would have had better luck with the tacks if you’d used an upholstery tack hammer (close to a ball peen hammer – http://www.diyupholsterysupply.com/upholstery-tack-hammers.html). I’m trying to reupholster my own CL chair but so far, I’ve chosen to READ about it and suggest websites to other people (e.g., you) but not actually DO it. However, you’ve inspired me!
YoungHouseLove says
Love the link! Great tip!
xo,
s
carolinaheartstrings says
Great job. The upholstery brads did the trick!
Nora says
I think you should rub (weather? scuff? distress?) those edges a bit to make it look worn. It looks so much richer in the photos where it isn’t a uniform shade of brown.
Lisa in Seattle says
OK, that’s going to be my new yardstick to measure against: “Hmmm… seems sturdy enough, but could a kid stab an umbrella through it?”
It turned out so beautifully. Love it with that yellow pillow, but maybe if it were more of a lumbar pillow? Sort of an ascot for his sophisticated ensemble.
Sarah says
Love the chair! What a difference. :) Just a little tip, as someone who has used nail heads before for a chair project, once in a while, make sure they have wiggled their way loose. A couple months ago, I noticed my pug was chewing on something. When I pried her mouth open, there was one of my nail heads that had gotten loose!
YoungHouseLove says
Thanks so much for the tip! With the baby and the dog around I made sure they were all in there super firmly (can’t be removed without some sort of strong tool) but I love the reminder to check them over time to be sure they stay that secure!
xo,
s
Lisa says
I think it is overdone with the throw pillow. It makes the chair look cheap. Remove it and enjoy the elegant lines of the chair.
Carly says
The Inglorious Dastard.
…I love this. You did a ridiculous job. I love it when you have a plan and then it looks bad — because sometimes when you have to improvise and be creative you end up with something way cooler!
-Carly @ Createlive
Jess says
I scrolled through the comments, and didn’t see this question so I hope I’m not duplicating it! I am so curious where that gorgeous blue pillow poking out is from! The chair is absolutely gorgeous- amazing job. The nail heads did it for me. I also find it hard to believe thats ORB spray paint- looks so much like stained wood!
YoungHouseLove says
Oh that blue pillow in the background is from HomeGoods! $12!
xo,
s