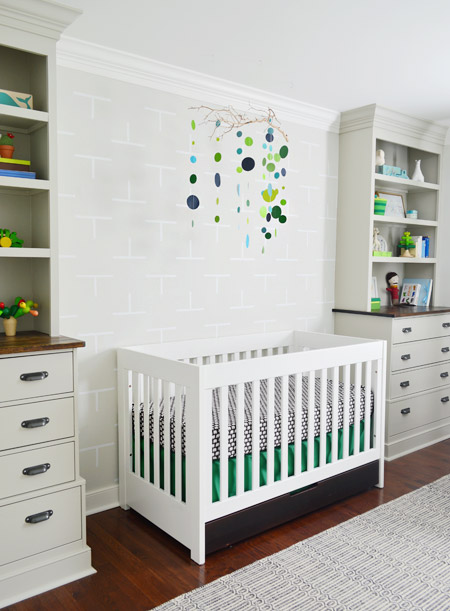
If Teddy ever forgets what letter his name starts with, he now has a whole wall to remind him. That’s right, it’s always “T” time in there. Har-har.

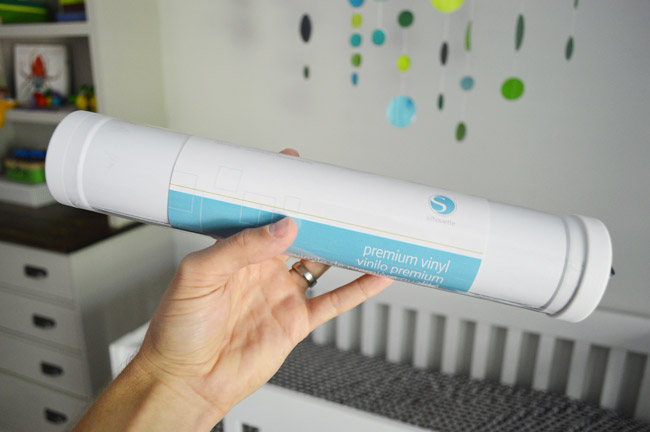
As we mentioned a few weeks ago, Sherry and I settled on a plan for a subtle accent pattern on the wall between the built-ins. Our original plan was to paint the Ts, like Sherry did for Clara’s raindrops. But after some of you suggested things like vinyl decals in the comments, we decided to give that a whirl instead. Vinyl has become a pretty mainstream option these days, especially for kids’ rooms. It’s removable and affordable, so we see the appeal. This tube – which is meant for Silhouette craft cutters – was $5 from JoAnn with a coupon. We don’t own a craft cutter, but that didn’t stop us from cutting simple line shapes by hand.
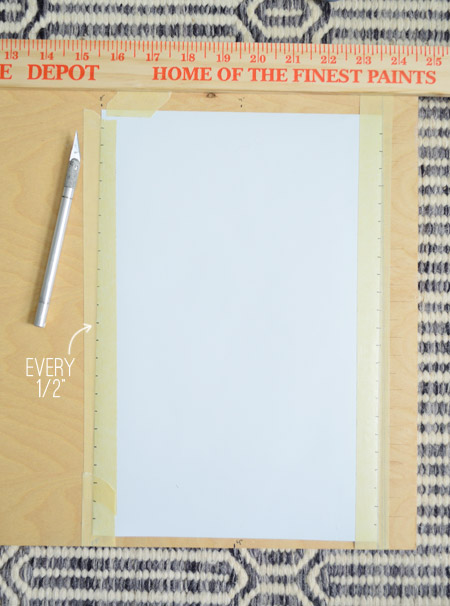
First we had to determine the size of our Ts. The wall space was around 88″ wide, so I figured some multiple of 4″ would make life easiest. But I mocked up two sizes with printer paper cut into 1/2″ strips – just to be sure that we both liked the 8 x 4″ version because it looked right (and not just because the math worked out). Thankfully we did.

With the size selected, next we had to lock down the arrangement. I cut out a few paper templates, taped them up, and we moved them around until we liked the layout. Happily, the pattern that we liked could easily fit into 4″ increments.
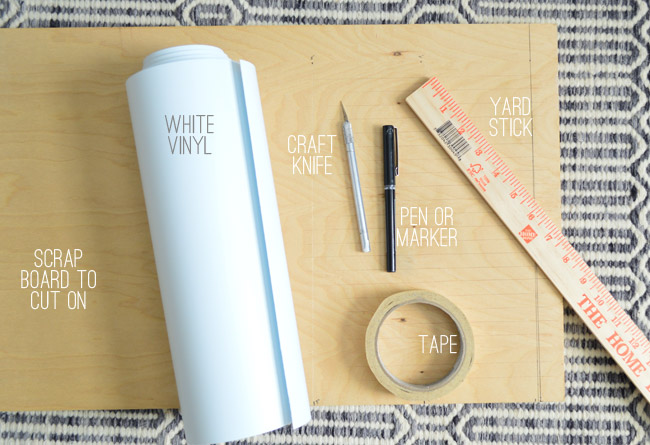
The next step was cutting a bunch of 1/2″ vinyl strips: some 8″ long, some 4″ long. I’m sure this would’ve been faster if we owned a craft cutting machine, but it wasn’t too hard to execute by hand. Here were our materials:
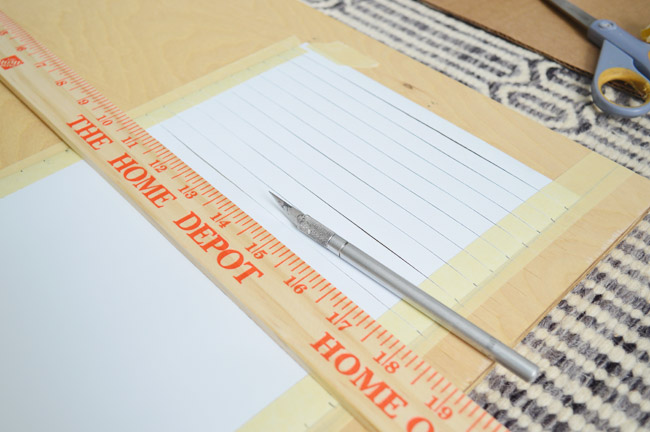
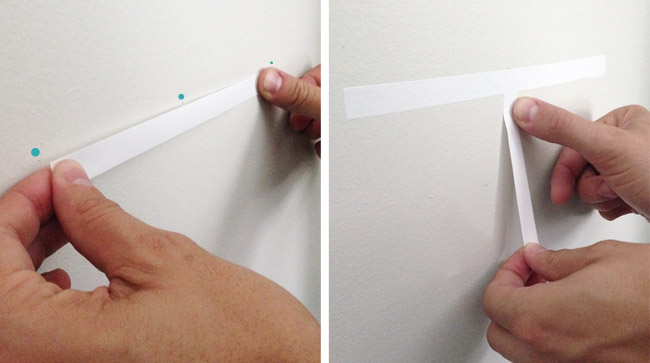
I started by making a simple guide on my board (three small pen dots on the wood at the zero inch, four inch, and eight inch spots). That way once the vinyl was rolled out, I could easily slice off an 8″ section.
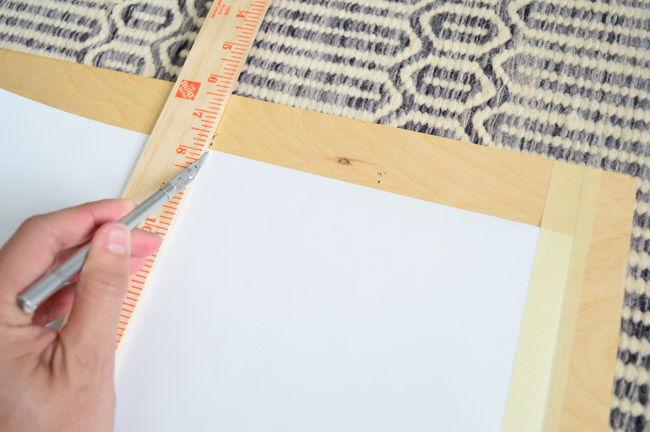
With a 8″ section of vinyl cut and taped down on both sides, I used the ruler to tick off 1/2″ marks on both sides of the sheet.
Then I lined up the ruler to each set of marks and sliced through the vinyl (it took 2 passes – one to get through the vinyl, and one to get through the backing). Then I just moved down the sheet until the entire thing had been carefully shredded into 1/2″ strips. Making 4″ long strips meant following the same steps, and ending with one last cut down the center. I needed about 70 in total. It wasn’t particularly difficult work (sort of that auto-pilot, get-in-the-zone stuff).
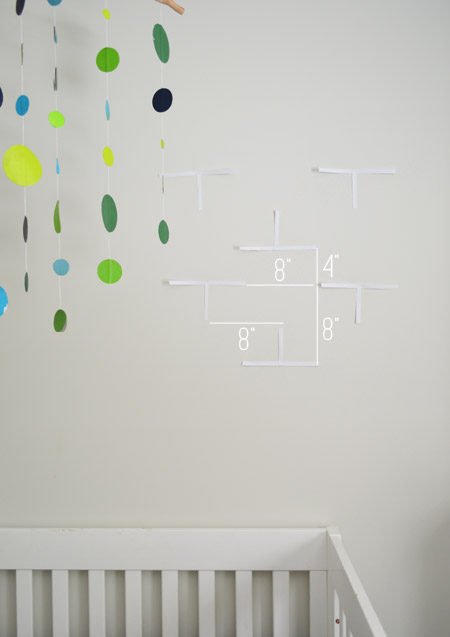
Applying the decals to the wall was also pretty simple and repetitive. Since we were basically creating a giant grid on the wall, I knew that keeping things level and equally spaced was key. So I started at the top middle of the wall and worked in small sections, making pencil marks with a level and yard stick.
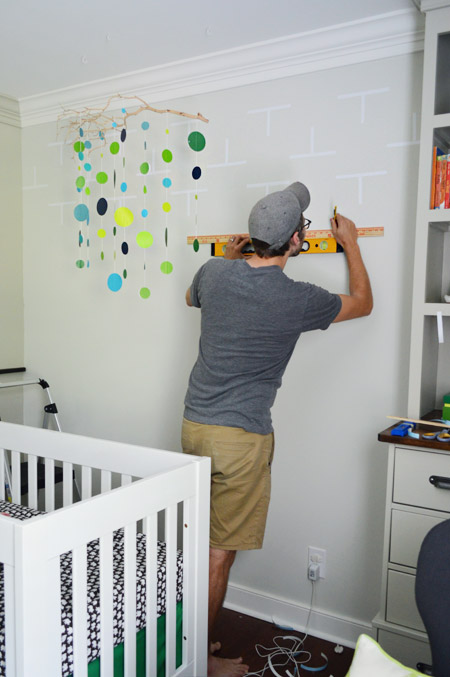
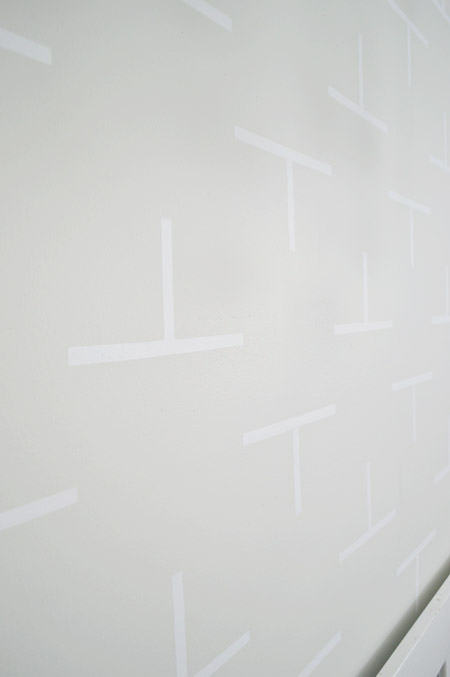
How I measured & marked the wall may be TMI for most people since it’s really specific to the shape/size of the decal you’re applying, but if anyone’s looking to recreate this look exactly, here’s the rundown. With my yard stick held vertically (and checked with a level) I marked the vertical spacing of each row – as seen below in the RED dots. Next I held the yard stick horizontally on each mark (again, checked by a level) and marked the middle and both ends of each T – as seen below in the BLUE dots. It sounds a lot more complicated than it was.
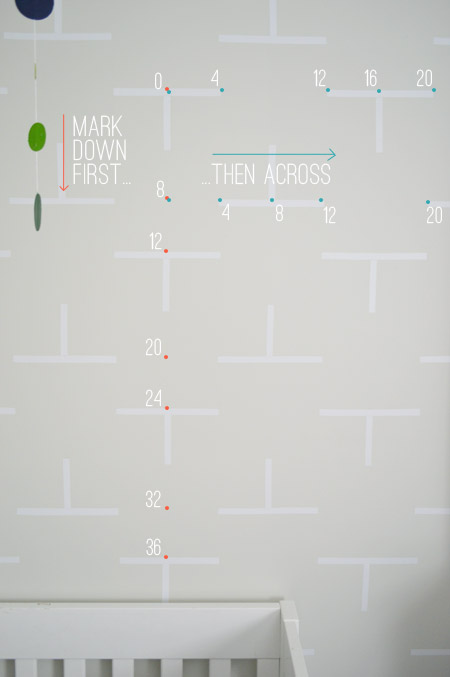
Then I used those marks to place the vinyl strips. You can sort of see my light pencil marks below, but I’ve added blue dots to help you see how they guided my placement of the 8″ strips. Once the long strip was placed, I used my center mark to add the 4″ vertical strip. I just eyeballed these since it was pretty easy to make such a short strip look vertical.
The vinyl was really easy to work with, so I’m glad we made that choice. It held tight to the wall with just a quick smooth of the finger and so far nothing has peeled up on its own (I started the project before Memorial Day and worked through last week, so some of the first strips have been up for almost two weeks). And just for kicks, I tried removing one to see what happened. It took a decent amount of work to get my nail under the edge enough to peel it off, and a decent amount of pressure to yank it off, but once I did it came off without damaging the wall. Initially when we considered vinyl vs. painting for the Ts, we worried Teddy might be able to peel them off when he’s older/more mobile, but I doubt Clara could remove one.
It was our first time working with self adhesive vinyl and I’m impressed with how crisp and grid-like the design turned out (something I’m not sure we could’ve achieved with paint alone). It’s nice to have some subtle pattern and interest between the built-ins. And the $5 price tag is pretty nice too.
We didn’t extend the T’s behind his crib, just because we thought the lines would look busy with all of the crib slats. But I did save some extra strips to add once he moves to a twin bed (we also have about a quarter of the vinyl roll left for backup). But let’s not jump that far to the future yet, okay? This kid is already 12 pounds. They really do grow up too fast.
I like that if we ever tire of it (or if Teddy requests something else down the line), we can just remove it and move on. Although it does make my geeky heart swell a bit to imagine what Teddy will see in the pattern besides his first initial. A bunch of squares for hanging his drawings? A bunch of cliffs for careening toy cars? A giant Plinko board?
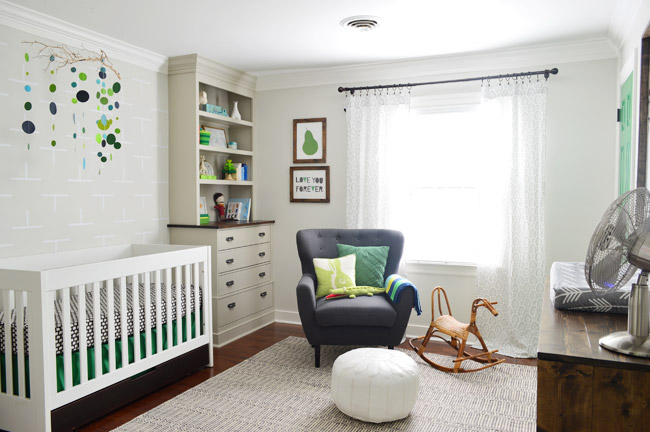
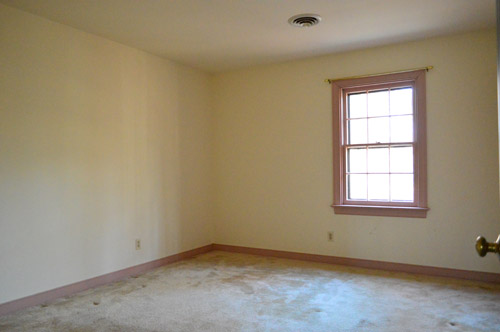
Other than needing a light fixture overhead, I think we’re done in here for now. And you know we love a good before and after, so here’s a reminder of the carpeted pink-trimmed room we started with:
Did you guys finish up any projects this weekend? Or do anything outdoorsy? We squeezed in a few long walks and even slipped through a street festival on Sunday. Teddy loved the candied bacon on a stick.
Note: I spared you all from like two dozen T-puns that I was thisclose to unleashing throughout this post. Like how I think the wall fits Teddy to a T. And how I hope he thinks it’s T-rrific. And how I didn’t need a TI-82 to calculate the placement of my decals. Remember those?
Psst- Wanna know where we got something in our house or what paint color we used? Just click on this button:


1008 Hollywalk Park says
That must have taken you ages. Well done – it looks great.
Rosie S says
Gah….I think I remember the TI-1!!!! Can I be THAT old!??! Anyway….looks great!
Madeline @ Create Bake Celebrate says
I love this space! It is so happy & so easy to grow into!
Thanks to you guys, I got a garden hose pot this weekend: http://www.createbakecelebrate.com/2014/06/corralling-hose.html
I never knew these things existed before- so much better than those big hose reels!
YoungHouseLove says
So glad!
xo
s
Cat @ MaryMarthaMama says
I like it! They kind of look like geometric dragonflies. Good choice on the vinyl too. I painted a tree in my son’s nursery 3 years ago we moved the furniture around a little recently and it doesn’t fit quite as well any more. I kind of wish I had just bought a tree decal that I could have moved. Oh well, live and learn!
Jenna says
Looks amazing!!
Anele @ Success Along the Weigh says
Such a cute design and I commend you for going old school with it. I don’t have fancy cutter machines either and there’s just something about putting my sophomore year print shop techniques to use that is satisfying. Once again, I bow to your patience with all that measuring. I’d be a twitching mess! ;)
Dana Sheridan says
I’m curious to know if you plan to install blackout shades?
YoungHouseLove says
So far the light blocking faux wood blinds that we have in there seem to be doing the trick.
xo
s
Krita says
Genius! You two never cease to amaze me with your creative, affordable and easy to execute ideas. We are in the process of designing our new build and I will be pulling lots of inspiration from your blog and book.
http://mymaritimelife.blogspot.ca/2014/06/major-news-alert.html
Amy J says
It is the perfect subtle kick! I love it.
Mary Beth says
Holy smokes that was a lot of work… looks really good though, you guys. It’s nice because it doesn’t compete with the mobile.
Good job!
MB
http://www.hystericallyeverafter.com
Mary | Lemon Grove Blog says
So fun!! I love how subtle it is, while still providing some interest on the wall. It’s really a beautiful nursery – love to see the contrast next to the before shot!
Crystal says
I love how sublte it is – looks awesome!
Katie R says
I’m kind of surprised that you passed on the subtlety/subtle T pun!
Meg Saunders says
Night and Day!!!!! That’s some mad crazy talent!!! :)
Tammy says
That looks awesome! I love how it adds that extra texture to the focal wall. Mind you it looks complicated! You guys never cease to amaze me!
Jess @ Little House. Big Heart. says
It looks great! I wonder how the vinyl would perform on a textured wall? I imagine we’d have a hard time smoothing the air bubbles out.
I’m curious, have you used a laser level? Would it have helped with this? I’m noodling gifts for the hub’s birthday.
YoungHouseLove says
I think on a softly textured wall it might just look like textured Ts to go along with the wall (they’d have a rough surface but I think they’d stick) but if it was really high-relief texture it might look spiky and bubbled. Has anyone tried it? Any advice for Jess? As for a laser level, John is obsessed with his. He didn’t use it for this, but we use that thing all the time. I think it’s a really good gift idea!
xo
s
Victoria says
We had orange peel textured walls at our old house and I was able to adhere vinyl decals to it pretty easily. You do have to go back over the vinyl with your fingers and kind of push it into the texture, but it stays on! I used both a vinyl decal I purchased from a store and one that I cut myself using the Silhouette vinyl they use here. :)
beth says
We have orange peel textured walls and we can’t use vinyl. Just not enough surface for sticking too. I did do vinyl flowers on my daughter’s dresser so I was able to add interest that way. :)
Lisa E says
I agree with Victoria. I’ve used them on textured walls. You do have to take just a bit more time and work them in the slight crevices with your finger. It’s totally doable!
Jennifer says
I’ve done a lot of vinyl work on textured walls. It’ll work but takes a little more time -pushing it into the texture like Victoria shared. One other tip I can offer is to heat the vinyl after it’s put up on the wall – the heat helps it stick better, gets any air bubbles out, etc.
Jennifer says
Forgot to mention I use a blow dryer to heat the vinyl up once it’s on the wall.
Tori H says
Does it show up a little more contrasted in person than in the pics, or is it really a subtle color difference that takes a bit to notice? I like it, but maybe would prefer something less discrete.
YoungHouseLove says
I think the photos are pretty true to life, so when you walk into the room the bigger and bolder things are noticed first (the green closet door, the built-ins, the colorful mobile) and it’s one of those secondary details you see next. Using white decals on a darker wall would give you more contrast though. Or you could use colorful vinyl too!
xo
s
Allyn says
Ooooh. We live in a rental and I always forget about decals, or think of them just in the realm of a giant butterfly on the wall (in which case I’ll pass…). Love this idea though!
Isabel says
So simple and cute and I love how mathematically-inclined you are John! I am the same way and my husband just tunes out completely but my desire for symmetry knows no bounds! Your post last week of the guest room inspired me to finally paint ours this weekend. My mom coming in T-minus 3 days helped too (no T pun intended!) The color I picked was inspired by your show house (BM Light Daffodil, a lighter version of Hibiscus from the girl room) and I’m loving the result.
YoungHouseLove says
Ha! I love a good T pun. And congrats on the guest room progress!
xo
s
Stephanie says
I’m kind of disappointed you DIDN’T include the T puns. It looks really cute though. Defintely adds just a little interest.
I planted flowers and herbs this weekend because I apparently think I’m an adult now. Hopefully I don’t kill them. I’m considering setting an alarm on my phone to remind me to water them.
Julie says
Love the idea! Although am I the only one that is picturing your little T picking off those vinyl lines as soon as he stands up in the crib? If he’s too quiet in there, check on him! He may have redesigned that wall. :)
Jenn says
Haha. Glad to hear Teddy loved the Candied Bacon on a stick! :-P
Those look great. :-D
YoungHouseLove says
Oh yes, he said he really liked the smoky aftertaste and enjoyed the subtle notes of cinnamon.
xo
s
Carrie Harris says
What a great added detail to the room, but the best part about the post…the TI-82 part! I remember it and the many, many hours spent battling with it…math’s not my thing!
Lindsay says
Hi John and Sherry,
Ooh, Teddy’s room is looking lovely, soft and layered and nothing is jarring.
I’m sure you’ve answered this in reader questions previously, but I can’t find it in looking back – what colour did you paint the walls in here please? We desperately need a lighter colour in our kitchen and living room other than the current hideous ochre that the prior owner painted and that delicious light grey-green looks as if it would beat the current cave feeling that ochre is inducing..
Thanks!
YoungHouseLove says
The walls are Going To The Chapel by Ben Moore.
xo
s
Amy K says
Love this! What happened to the green curtains? I do love the new ones, so soft and airy and summery!
YoungHouseLove says
Thanks Amy! Here’s that post for ya (a green door beat them out): https://www.younghouselove.com/door-decisions-art-updates-and-one-big-belly/
xo
s
Emily-Jane @ Not A House, But A Home says
I love that you made a custom decal! It looks great! I actually thought it was wallpaper when I saw the first photo. Great job :)
TC says
It looks great, if a little subtle for my taste, I’d use that great green you have for an accent. A word of caution, as little one grows he is likely to pick at and peel off the vinyl decals, which could cause a choking hazard.
YoungHouseLove says
Thanks TC! We worried about that too at first (John talked about it in the post :)
xo
s
Jessie says
I’m a math teacher and TI-82 are so ten years ago. The latest and greatest is the TI-84 with color, it’s amazing. :)
YoungHouseLove says
Ooh. That sounds intriguing…
-John
Marie says
Your $5 project looks like a million! The before and after shots never cease to amaze me. I’m so glad you swapped out the green window treatments for the white. It’s a beautiful room that Teddy will love for years to come!
Kathleen says
Wonderful job! I just love the decals!
Quick unrelated question: Did you guys stain the drawer on the crib? We are planning on purchasing that crib but I am not loving the amber wood color. However, yours looks great. We are refinishing an old hutch for the nursery and are thinking of staining the drawer to match it. Easy enough, right?
YoungHouseLove says
Yes! We used two coats of satin PolyShades gel stain (in Tudor).
xo
s
Emily says
The TI-82 was the graphing calculator that I needed for exactly one college class. I borrowed it from my boyfriend for the semester but could not input things quickly b/c I was struggling to learn how to work it. So before an exam, he would put in all the formulas I needed so I could easily pull them up. The thing I could do, was pull up the random games he had on it and played that during class. I think that’s where the idea of smart phones came from!
YoungHouseLove says
So funny!
xo
s
Laura @ Rather Square says
Great job! I wouldn’t have thought of vinyl decals, but what a quick, inexpensive and nice-looking solution.
Nita E. says
Oooh, I have a TI-82 & 83. #nerdalert
And great job, the wall looks T-lightful!
Jen says
This is ADORABLE! And, if you ever wanted to add some color, you could always use the “T” as stencil and paint the wall a color (dark green??) and then peel off the vinyl! How fun!
Pamela says
I know those Silhouette cutting machines can be expensive (but, oh the possibilities). Your “use what you’ve got” cutting solution is great. I’ve never worked with that vinyl. Do you think that a quilter could use a rotary cutter, self healing mat, and transparent ruler with success?
YoungHouseLove says
That sounds like it would work!
-John
Beatiz says
The room looks fanstastic! What color are the built ins?
YoungHouseLove says
Thanks! Senora Gray by Ben Moore.
xo
s
Lindsay @ The Newlywed Notebook says
Wow! This looks awesome! I’m shocked you were able to get it laid out perfectly. I used this stuff to cut out little decals to put on the window of our back door to give us a little more privacy, but even some of those are a little wonky, at that was about a tenth of this size!
This weekend my husband and I put up backsplash tile in our kitchen. It took about 10 hours Saturday and 7 hours Sunday and a few too many “drinks” to count, but hey, it’s finally done!
Molly says
Oh man I love this! So simple but different!
Lauren says
Let’s all agree that the world needs more John puns. Please. Puns make the world go round.
Love those decals too :) Practically perfect in every way.
Amy says
Y’all can seriously do no wrong! Love every detail and idea! Might have to try the easy wall art for my son’s nursery. I like that it’s something my 2 year old daughter can help with.
JenWoodhouse.com says
You guys are so creative, I love it! Just FYI for any future vinyl projects: Silhouette brand vinyl is not as good as Oracal 631 – and you can buy the Oracal vinyl for about $1.50/yard. Thanks for sharing!
YoungHouseLove says
So good to know! Thanks Jen!
xo
s
Keeley says
I love how this room turned out! The Ts are subtle and a great alternative to wallpaper, which I worried would be a bit busy.
I love that his room is fit for a kid, but it’s not babyish. You continue to inspire me to work on our son’s room. We never finished his nursery in our first home and as he nears his second birthday (after a year in our new home) we still haven’t finalized his room. I’m inspired to get it done this summer!
Shondra says
I’m sure you’ve already said this somewhere before, but where is that chair from? I’m looking for a chair for my daughter’s room and that one would be perfect!
YoungHouseLove says
It’s from Joss & Main a few years back.
xo
s
Molly says
It looks so great! One tip for other readers: I used vinyl decals a couple of times in my old home without any issue. In my new home, I’ve tried them a couple of times (from different companies) and there is something about our paint that doesn’t allow some varieties to stick. It’s bizarre! We have normal flat walls painted with normal Behr eggshell paint. Recent decals from Land of Nod worked just fine in one room, while other decals (and 3M command strips) won’t stick in a few other rooms. I even emailed the Etsy shop owner and she said she has heard of it just a handful of times from other customers. So – a long way of saying, before you do all the measuring and cutting, use a little test strip of vinyl to make sure it sticks!
YoungHouseLove says
So strange! Great tip!
xo
s
Alice says
Is there any chance he can pull them off and eat them? I’m just worried a bit.
YoungHouseLove says
Thanks Alice! We worried about that too at first (John talked about it in the post :)
xo
s
Jennie says
We have some vinyl decals on our daughter’s accent wall (some larger, some smaller), and I have been pleasantly surprised by how durable they are. She is three, and she would have to work mightily to get them off the wall. As it is, she attempted to pick at the edges, but when they didn’t budge after all her efforts, she lost interest. She is a tenacious child in all respects, for what it’s worth. So, I wouldn’t worry TOO much about Teddy having a nosh on vinyl anytime soon!
YoungHouseLove says
So glad to hear that!
xo
s
Brooke says
I have a question unrelated to this post other than the fact that one of the final nursery pics reminded me of it…
We also have the Angelcare monitor and once I added a fan into our baby’s room this spring I noticed that it is enough motion to keep the sensor going even when our little one isn’t in her crib. I have the fan across the room like you all do in this pic of Teddy’s nursery but it still keeps the sensor from going off…have you noticed this to be an issue for you? Have you found a trick to avoid it?
Thanks!
YoungHouseLove says
We just noticed that at the beach this weekend (an overhead fan vibrated so much it made the monitor register movement without Teddy in there). Our table fan at home doesn’t do that, but to fix the problem at the beach we just turned the fan down a level. You can also adjust the sensitivity on the monitor I think (turning it down might make it stop picking up the fan but still pick up the baby’s movements). Good luck!
xo
s
Emily, Our house now a home says
I love this, I have not been familiar with the vinyl decals. I definitely learned something new today. I love the green and blue combo in the room. It is very boy but still so fresh and different. I was going to ask about the chair but just noticed the comment before mine. It is a great chair. I found one similar but it is an old chair that I get to reupholster, both excited and terrified to do it. A already done chair is so tempting….
Luanne says
Looks like you’ve Tee’d up a great room! ;)
YoungHouseLove says
Ha!
xo
s
Nancy says
I love this room for Teddy. What a transformation from the before picture. Great job.
Lelia Logan says
I really like the nursery. You have added so many sweet and thoughtful touches. I was wondering where you bought the chrome/metal looking fan that is in the nursery?. I love the retro look of it. Thank you for all your inspiration.
YoungHouseLove says
That’s from Bed Bath & Beyond a few years back. It’s by Hunter.
xo
s