I’m so excited about this next post. It’s my favorite transformation to date and the ironic part is that I’m about to reveal our brand spankin’ new laundry nook and I’m not even the one who does the laundry (it’s the twenty first century, people!).
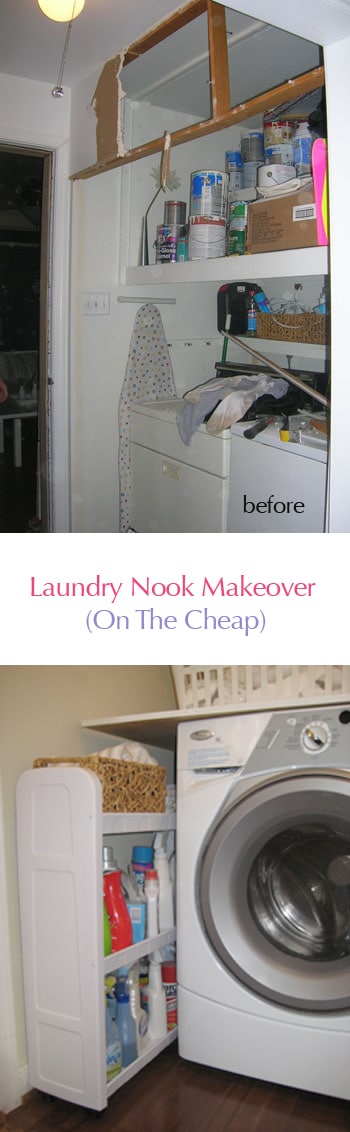
The fact that we cobbled this new laundry area together on a budget just makes my chest puff up with pride. It has worked wonders on updating our house and laundry has never been more fun for my hubby (sorry babe, your love of doing laundry is now public knowledge).
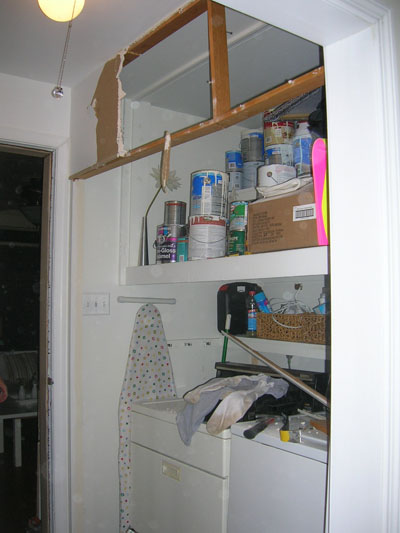
Yup, this is what it looked like as we knocked out those bi-fold doors (see how close the wall was to the sunroom door- it robbed us of so much hall space!)
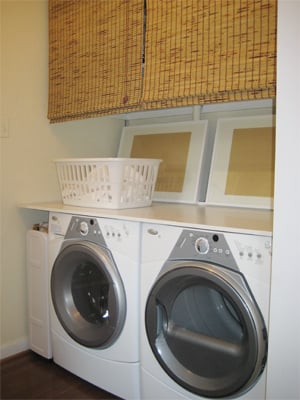
And here’s a shot of our beautiful new laundry nook:
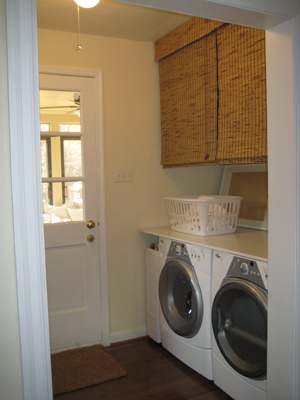
Basically three affordable elements were all it took to completely make this space over:
- a piece of plywood
- two large frames
- two sets of bamboo blinds
That’s it! We made the counter ourselves from a piece of plywood that we painted and polyurethaned, we leaned two big frames from Ikea (showcasing some cheap wrapping paper, which always makes for cheap art) against the back wall to cover the ugly plugs and pipes, and we hung some Wal-Mart blinds to cover the cluttered storage shelf above:
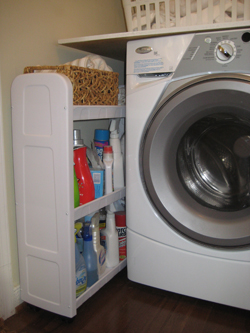
Plus we got a rolling storage caddy from Target (for under twenty bucks) which fits perfectly beside our washer and dryer and holds all of our cleaning supplies:
Life is good in our little laundry nook. And we’d love to hear about how you’ve organized everything from your laundry room to your attic- we have about 20 other corners, closets, and crevices that could benefit from a little organization so let us know what works for you.

...love Maegan says
FABULOUS! I just redid our laundry room and used a spring rod/curtain hooks and pillow cases to hide the plug/wires/etc. Wanting top for mine as well …I love you idea.
Here’s ours: http://www.lovemaegan.com/2010/06/project-laundry-room-complete-for-now.html
lizkayl says
Where is the lint trap on your dryer located?
I’m always inspired by the look of a counter over the washer/dryer, but our lint trapper is on the upper right corner of the dryer and we’d never be able to clean it if we put a counter there.
(p.s. My husband does the washing and drying, too)
YoungHouseLove says
The lint trap that we empty every time we do laundry is actually within the dryer (so we just open the door to access it) but we also clean the back dryer vent every once in a while by pulling it out. Hope it helps!
xo,
s
Chris says
Your laundry is very inspiring! We have a very small laundry closet that we too are going to be opening up, taking the doorframe out of and cutting back the 4 inches of wall that currently exist. Our question, when you took your doorframe out, it must have looked very rough, what did you do in order to make it look like a finished wall? A very newbie question I know!
Thanks so much and you’ve really done a fabulous job, thanks for sharing!
YoungHouseLove says
Hey Chris,
We actually had the help of a contractor since it was one of our very early projects, but we’re sure if you google around for “how to frame a doorway” or “how to expand a door opening” there should be some good tutorials since we haven’t tackled that subject yet. It’s pretty much a mixture of using wood beams to frame out the new shape and finishing them off with drywall, strips of metal for the corners, and drywall mud. Hope it helps!
xo,
s
Terri says
Did you use the same process for painting the plywood as you do a piece of wood furniture?? I have a cheap-o plywood/composite bookcase I was just going to chunk but if it can be saved I would love to re-use it. Let me know.
Thanks!
YoungHouseLove says
Yup, we just primed (oil-based) and painted (latex, semi-gloss) that raw plywood shelf and then used water based Polycrilic (in the light blue can) to seal it. Worked like a charm!
xo,
s
Katie says
Kind of random, but we’ve had our front-loaders for a year now, and our washer is getting really icky and musty smelling. You’ve done so many posts on green cleaning I was wondering if you’ve experienced that problem with your washer and if you’ve come up with an eco solution to clean it. I hate to use bleach! Thanks :)
YoungHouseLove says
Hey Katie,
We actually have heard of that happening but have yet to experience it. Sometimes we toss a load of laundry in with 1.5 cups of vinegar- maybe that helps? Also we leave the washer door open after use for a bit- just to air things out.
xo,
s
margie says
Hey yhl, I am in the market for a new washer and dryer and I am considering a whirlpool. I have read some reviews and they aren’t looking so good. could you tell me how yours had been? have you had any problems with it?
Thanks so much!!
Margie
YoungHouseLove says
We have loved ours. No complaints at all!
xo,
s
fd says
bah! I have laundry caddy envy! I’ve looked high and low for one in our little city in northern France. Am considering trying to make one at this point. Its the perfect solution for our storage issues, so thanks for the inspiration!
Krista says
Thanks for the inspiration! I ended up buying Roman shades to cover the open display of chemicals in my laundry room. That little splash of color is great and adds quite a lot to a little tidy room.
Stacey says
I hope this makes you giggle! I adore this makeover and have taken similar steps to implement it in our laundry (which is little more than a tall, narrow, deep, waste-of-space corner in our kitchen). First; I found some cute, laundry-appropriate wrapping paper to inspire the project. We measured up for shelves and off we went to Builder’s Express to equip ourselves with timber, sand paper, wood primer, eggshell enamel paint, new paint brushes and rollers, etc. The only single piece of timber large enough to accommodate the dimensions of our shelves (we were not about to start screwing smaller pieces of wood together)was a board used by contractors to shore deep trench excavations! After returning on Monday (Builder’s don’t cut on Sundays) to purchase our two shelves and three MASSIVE offcuts we sanded, primed, sanded again (damn cheap wood!), primed again, and painted twice over a series of weekends (the only time we have for DIY). After our first shelf was completely dry we squeezed it (with millimetres to spare) into the space to form the counter top over our combo-washer/dryer. We stepped back to admire our handiwork AND. . . we have a beautifully painted offcut which is far too long to function effectively! I didn’t know whether to laugh or cry! It had occurred to me to remeasure the boards before painting but we were just so eager to get started on our first DIY project! Oh well; at least I’ve gained some wood painting experience! Maybe after a few more weekends (since I have other plans for the painted offcut and we’ll have to start the whole sand, prime, paint sequence again) we’ll be able to send you some before and after pics. In the meantime, my cute framed wrapping paper has been shoved down the side of the machine! What is it that John always says about measuring twice? Perhaps it should be “Measure thrice!”
YoungHouseLove says
Oh man- so sorry! But you’re right about gaining experience! And at least you can laugh about it… someday!
xo,
s
Stephanie says
So I know this is a way old post now, but I’m curious about how you cleaned your dryer vent in your old house. It sounds like our situation is similar to yours, our dryer is in the center of the house and has the vent run through the floor to the outside of the house, so around 18 feet. We just bought the house and are venturing into cleaning the vent for the first time and we’re curious about how you guys did it, or if you paid for professionals.
YoungHouseLove says
I vaguely remember buying this thing from Home Depot that has a super long arm that reaches far back into the tube and cleans it! Hope it helps.
xo,
s
Amanda Jones says
Thank you SO much for sharing all your ideas and photos! It makes the thought of tackling our own home projects FAR less frighhtening knowing someone else has “been there”!
Even my husband is hooked on reading the pages regarding DIY, projects, installs, and he’s so NOT that person…he’s very mich into “I know what I’m doing and I need NO advice! SO glad we found you..ha ha! YAY!
fran says
LOVE that your hubby loves doing the laundry. My husband enjoys it as well and I thought that I was alone in having a wonderfully strange anomaly of a husband. But I refuse to get in the way of his laundry destiny. I just stumbled upon your blog, you have a beautiful home (both of them). Looking forward to more “progress”! :)