Note: Our heads are still spinning from the terrible tragedy in Connecticut on Friday. We’re sending lots of love to everyone up there and holding Clara close. Our friend Roo, who has three small children and only lives a few towns away from Sandy Hook wrote a post about how we can help, so for anyone looking for ways to make a small difference, here’s that link.
Some brick-painting happened in the sunroom…

Which we don’t think will surprise/sadden nearly anyone on the interweb since we heard so many war cries of “paint that brick!” after sharing our last sunroom post…
We even got a bunch of more passionate and detailed pleas like: “I’m never one for painting brick but that’s such a weird shape that’s cut off at the top and doesn’t look good from the living room at all… so paint that brick!”
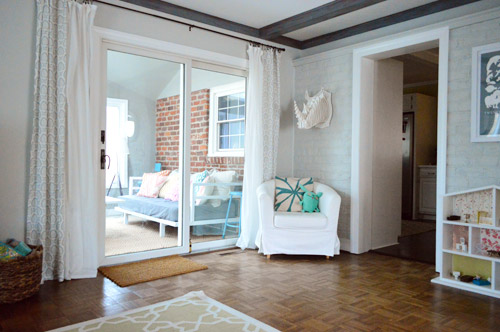
This used to be the view from the couch that I stared at every. single. night. for the last 2+ years, so… I was ready.
So after considering everything from whitewashing it to distressing it (which would make it more of an accent then just letting it fall back and blend in) it was time to PAINT! THAT! BRICK! Feel free to shout that a la Ty Pennington’s MOVE! THAT! BUS!
As predicted, it looks a lot better from the living room now. Whew.

Oh and this view demonstrates why we didn’t feel like drywalling over the brick in the sunroom to hide it, since:
- that’s a lot of work/dust (plus it wouldn’t match up perfectly with the drywalled lip above it anyway)
- there’s still painted brick in the adjoined living room anyway
- we actually love the texture of painted brick, which we had on two walls of our first house’s den
Holy cow, check out the dollhouse in the two pictures above. Not a thing has moved in the almost-a-week between this paint job and that last picture. But the floor mat near the slider along with Clara’s Uglydoll are nowhere to be seen. Better remind Clara that the dollhouse is still there (and it’s a better toy than moving the floor mat around, haha). She’s been pretty into playing in the sunroom now that it’s not full of hazards and old furniture anymore, so maybe that has been taking the focus away from her “furniture rearranging skills” (aka: the dresser-and-bed-switching/throwing/hiding Olympics that her dollhouse provides).
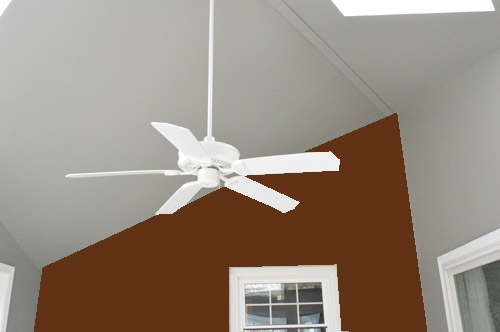
Oh and we got a few questions about why we didn’t just clad the whole wall in wood or make some sort of rustic accent on the triangle above the brick, but the major thing that we’re trying to downplay about this room are all the crazy angles. See how the ceiling slopes waaaay to the right on that wall?
Well if you turn around it slopes to the left. So yes, it’s basically a spaceship of a room with a diagonal peak in the ceiling that slopes from corner to corner. As in it looks like someone glued an angular and modern room onto a flat little brick house. So we want to downplay those zany angles and help everything flow so it feels like it belongs here with the rest of the house. Which is why a nice blanket of gray paint over all the walls and ceilings was the name of the game.
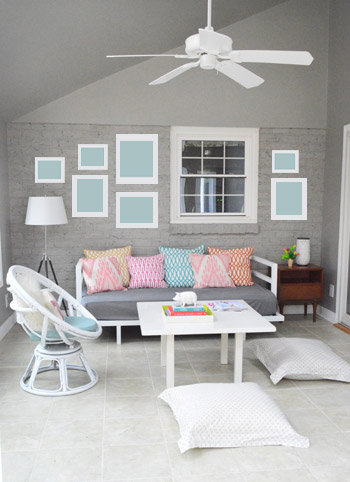
For all of you visual folks, this is what it would look like (per some bad photoshop) if we had accented it somehow – with wood, brick, etc. See how it would emphasize that weird slope? Which would totally fit into a super modern house with other slopes and lofted rooms (like Gloria and Jay’s house on Modern Family), but we just didn’t think it would go with the rest of our non-slanty-or-futuristic house.
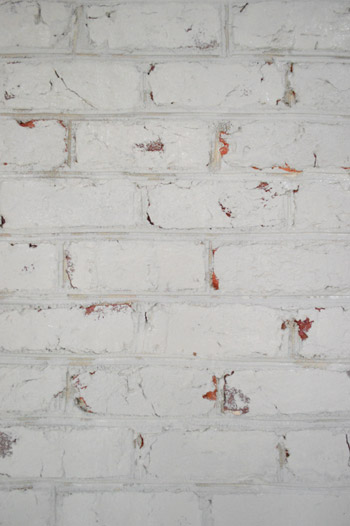
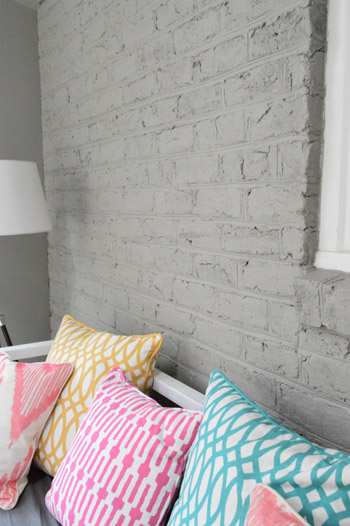
So grease paint was the word. And in some insane gift from the home improvement gods, it only took two coats (brick suuuuucks up paint, so we thought it would take four, which is our usual experience with it). We didn’t use any sort of primer – since we didn’t back when we painted the brick in our den and that worked out for us – and as usual I wielded the brush (for getting into all of those cracks – yeah, there were about a million).
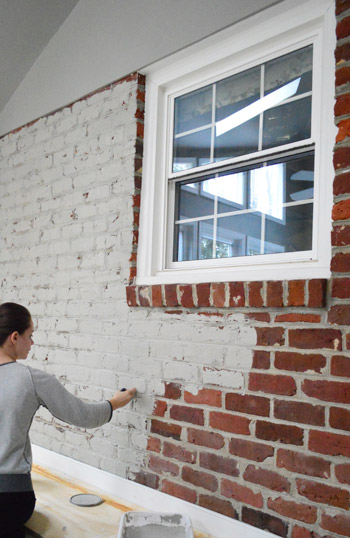
My name is Sherry and I paint cracks by the dozen. Meanwhile John rolled using a nappy roller, which helps to coat textured surfaces more than a super smooth one does.

We actually got nearly the whole thing done during a Clara nap, so you can go ahead and file this under “Christmas miracle.” And my hope for anyone else who is painting brick is that it’s as quick and painless as this job was. Even all that crack painting could have been muuuuch worse (painting every crack twice beats painting every crack four times, if you know what I mean).
Here’s what they looked like before I got to them with the brush, but after John rolled. They were sneaky little buggers.
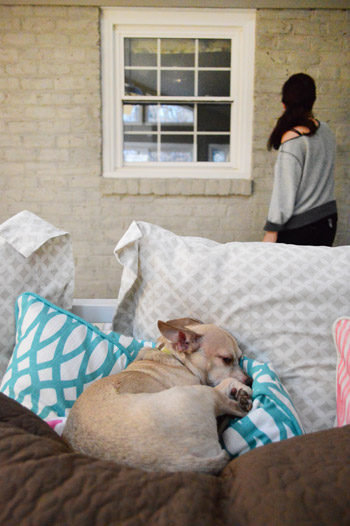
And just for fun, here’s what Burger does while we work away in the background (don’t mind my inside-out-sleepwear-as-painting-clothes). #hubbahubba
The good news is that the nice even coverage that we eventually accomplished made a huge difference. Now when you’re in the room it feels more cohesive and a lot less chopped up. And we think adding some nice art to that wall will further take the focus away from any difference between drywall and painted brick (our first house’s den had two walls of paneling and two walls of brick, but once it was all painted with furniture and art and curtains it was barely noticeable).
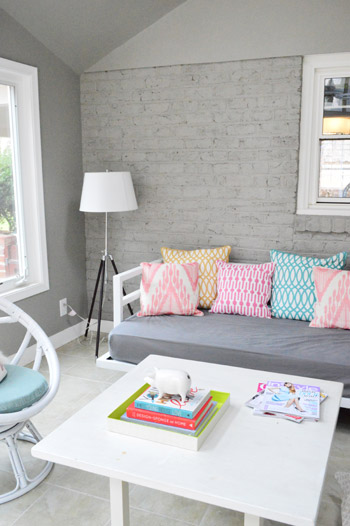
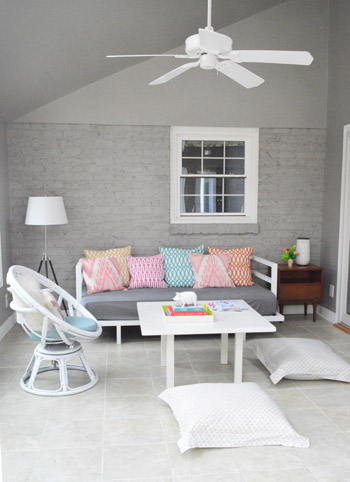
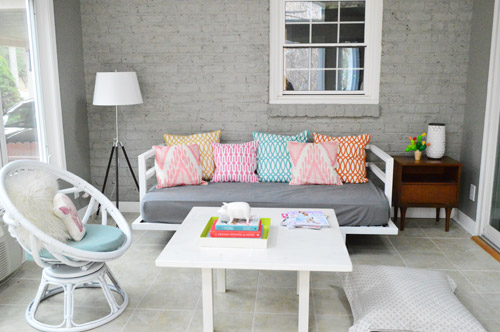
Just to save you some scrolling, here’s the full after of that wall again. It’s definitely a lot of gray, but we’re just getting started…
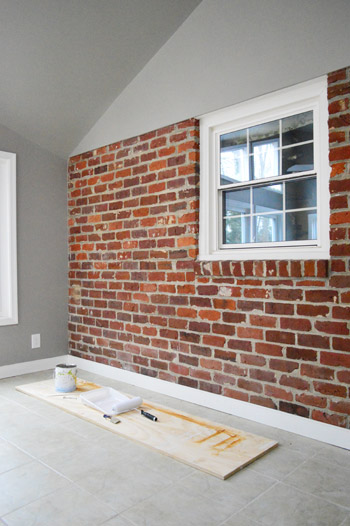
And here’s what it looked like before.
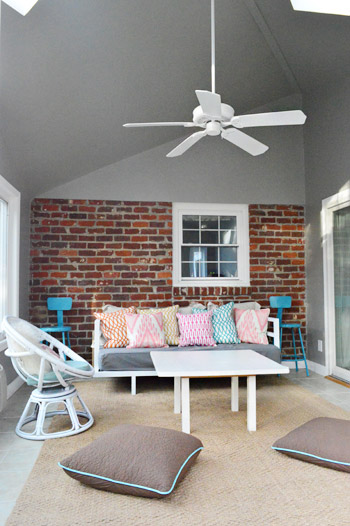
Why didn’t we do this sooner? Over two years of staring at a weird U-shaped brick blob in the next room is two years too long.
I can’t wait to hang some art on the brick wall to make that off-center window fit right in. Sing it with me: “white frames, white frames, whatcha gonna do? Whatcha gonna do when they come for you?” Thought you guys would like some Inner Circle on a Monday morning. No? How about some more bad photoshop then? And actually, I think we might work some wood frames/items into the mix too. Might be fun and eclectic.
But even without any frames, it’s a definite improvement just to have broken out some fresh paint. Basically blanketing this room in taupey-gray has done five things:
- it draws the eye out the windows to the pretty trees outside (the windows/view are definitely the stars of this room)
- it downplays all the crazy ceiling angles and the choppy-looking brick-cut-off conundrum by unifying everything
- it allows things like the colorful cushions on the daybed to stand out in a way that they couldn’t when they had to compete with the dark brick
- it makes the floor look a lot less yellowed and old (brings out the gray undertones instead of the yellow ones)
- it makes the white window trim and molding pop like crazy, so the room feels crisp and updated
Of course we still have a long way to go when it comes to the furniture arrangement. We’re just using things we already have in the meantime, but eventually I’m sure a lot of things will get moved/upgraded/painted/etc. And we still have to bring in a rug, art, and all that jazz. And don’t mind that sad wrinkly sheet on the daybed of those orange slabs of wood along each slider where it meets the floor. Let’s just say that a ton of things are just waiting to be “attended to.” But the middle makes no sense anyway! Haha. What did you guys do this weekend? Can you tell I’m all jittery and weird? We’re hosting Christmas dinner for the first time ever (for fifteen people – four of which are under the age of four!) so it should be a whole lotta crazy. As expected, I can’t wait. You know I love the crazy…
Psst- To see this little sunroom makeover from the beginning, click here to read about phase 1 (planning, furniture placement) and here for the details on phase 2 (painting the lofted room and ceiling).
Psssst- Speaking of paint, one of the most freeing things about writing our book was that it allowed us to chose paint colors that don’t necessarily have to fit right into our house, so we’re over here chatting about stretching our color comfort zone.

Gina says
LOOKS SOOOOOOOOO MUCH BETTER!!!! Really nice, softer, beautiful!
Brandi from Bloomington says
Loooorve it. The white really pops against the grey. You have inspired me to paint my boys’ room grey.
Rachel says
It looks amazing! Those white frames are going to be great hanging up on it.
Sara says
looks awesome!
Patti says
Do you keep your sliders closed most of the time?
YoungHouseLove says
Yup, it’s not heated and cooled like the rest of our house so for energy reasons we keep them closed unless we’re in there when we turn on the window unit to warm it up or cool it off.
xo
s
"Lucy" says
I think I prefer the exposed brick “after” as opposed to a wall treatment. Your room now looks preppy vintage.
Great job!
"Lucy" says
Strike the last comment, more like preppy retro vintage. Anyways…
"Lucy" says
Or, maybe preppy mod. Ha! I’m seriously out of here now.
YoungHouseLove says
Hahah!
xo
s
Jessie says
I love exposed brick, but the paint looks amazing! I can’t believe the difference. The room looks so pulled together now. I can’t wait to see what you do next!
Jeanna says
YAHOO!!!!! Enough said :)
Nicole @ Liberty Belles says
looks AWESOME! even better than I’d expected, and I was expected quite a lot of awesome :)
jordana says
Where are your pillow covers from? Loved them. Thanks! XOXO
YoungHouseLove says
Thanks! The pillows are from HomeGoods and Bed Bath & Beyond (all a while back). Hope it helps!
xo
s
Laura says
Ahh… looks so great! What a difference a can of paint can make. :)
Reyna says
I absolutely love what you two are accomplishing in your home! I love that you are not afraid of color and making bold statements with furniture and light fixtures. I’m an interior design student, so naturally when I found your blog last week, I was instantly addicted. Keep up the good work! You guys inspire me to no end!
YoungHouseLove says
Aw thanks so much Reyna, you’re so kind!
xo
s
Anna says
Thanks so much for posting the link to find ways to help Newtown. I was sitting around all weekend, feeling helpless and wishing there was a way I could help from out here on the West Coast. That link helped me feel like I could do something. Thanks.
YoungHouseLove says
Of course Anna! Thanks for lending a hand! I’m sure so many people up there are appreciating everyone’s kindness right now.
xo
s
Sarah says
Love the room!
Just curious…. seems like you’re struggling quite a bit to make the day bed work. Are you maybe better off without it?
YoungHouseLove says
We’re just getting started in here, so any of the furniture could go/change/evolve! We do love to work with what we have and the daybed is hugely functional as well as meaningful (it was a wedding gift) so I think we can make it work. We just painted the walls, so we have a lot more on the agenda ;)
xo
s
Shay says
Looking Good!
Kay says
You guys are bringing me around to the neutral (or less colorful) wall. That first picture with the pillows is just fantastic.
Pam the Goatherd says
Oh, that looks so much better!!!! The grey cohesiveness is soothing, where the red/brown brick was jarring.
I would vote for one huge, bright colorful piece of art for that wall to balance the window instead of a bunch of smaller frames. Or, if you want to do the frame thing do the same arrangement that you have in the living room behind the Karl the Couch using white frames and some bold artwork. That would balance the window and mimic the window panes.
YoungHouseLove says
Definitely another fun option!
xo
s
Jill says
I agree with you and everyone who says this looks way better and is much more cohesive. The only thing is that I miss the warmth that the brick’s original color brought to the room. You now have only cool colors in the room, and it’s all very chilly-looking with the hyper-modern angles and the tile (always chilly to the touch, and this this tile is a chilly-looking color too).
Are there any thoughts towards bringing in the design equivalent of a steaming hot bowl of mashed potatoes, bunny slippers, and striped fleece pajamas?
YoungHouseLove says
Oh yes, we’re just getting started! All we did was paint the walls and plop down furniture we already have – so of course adding warmer tones and textures with art and bringing in the rug and other furnishings and accessories should make all the difference!
xo
s
Anne G. says
Looks great! Makes me want to see a big fat Christmas wreath left of the window! Decking the halls one brick at a time.
YoungHouseLove says
Festive!
xo
s
Andrea T says
Wow, it looks so much better. Normally I’m for keeping the brick, but you truly had no choice since the brick on the other side of the sliding door was painted. Now it looks more continuous and together. Am curious to see how this room emerges from the middle.
Emily says
Looooove the painted brick. Shades of gray are my favorite color to decorate a room with for some reason (I intentionally did NOT put 50 at the beginning of that sentence ;))So, needless to say, I’m in love. And SO glad you mentioned the off-centered window.. I just wanted to reach through the computer and center it, but I think the way you have the frames photoshopped in looks great!!
YoungHouseLove says
Hah! Love the absence of 50! Haha.
xo
s
Tiffany H. says
I love it!! What a difference paint makes. That and a little staging. There’s only one small detail that keeps bothering me. The coffee table. Don’t get me wrong, the shape and color are PERFECT, but something about the height of the table feels awkward. Like the legs are too long. Have you thought about lopping off a few inches from the legs?
YoungHouseLove says
Oh yes, as we mentioned at the bottom of the post, that’s just furniture from our old house plopped down in place – nothing is for keeps and we’re sure a lot will evolve! Trimming those legs down is definitely a possibility!
xo
s
Todd says
Taking the frames up onto the triangle of drywall above the brick could look cool…and maybe help visually blend the drywall section with the brick- just a thought.
YoungHouseLove says
Always another possibility!
xo
s
Mandolyn says
LOVE LOVE LOVE this! It looks amazing and I can’t wait to see more as you guys progress.
Angela says
I think it looks great! I love watching your ideas unfold.
Alexandra says
I ALWAYS love reading your blog, because it’s interesting, it’s encouraging me to change things I don’t like, and because you are lovely and hilarious people.
But I have to admit, so far nothing had me laugh as hard as “painting every crack twice beats painting every crack four times, if you know what I mean”.
Yes, I am a 13 year old boy in the body of a *coughcough” year old woman. :D
YoungHouseLove says
Haha, aren’t we all!
xo
s
Juliet says
I love it when you ask “Why didn’t we do this sooner?, like you haven’t had other stuff (child, book, projects, etc.) going on. You so crazy!
But it does makes a big difference and looks terrific!
YoungHouseLove says
Hah, thanks Juliet! It’s just funny what you prioritize and what you put off forever and a day!
xo
s
Sarah S says
Two things:
1. I absolutely love the wall, it makes the room so cozy!
2. The UPS man just showed up at my door with boxes that I thought were gifts for my husband that I was supposed to hide from him … but WHOOPS – it was actually your book, an xmas gift for me from my inlaws!!! Couldn’t stop myself from reading it after I saw what was in the box. Absolutely love it so far!
YoungHouseLove says
Wahoooooooooo! So glad!
xo
s
Heather says
After painting so much brick, on top of all the other rooms and furniture, etc, have you guys thought of investing in a sprayer? I rolled one coat of BM kendall grey on a brick wall in our kitchen and sprung for a sprayer for coat number two! One coat took almost a whole gallon of paint! I found that using a roller smoothed out a lot of the texture in the brick, which was what I originally loved about it!
Either way the painted brick looks awesome!
YoungHouseLove says
You know, I know a few people who have sprayers and after hearing about how much of a pain it is to tape everything off (all the windows, trim, molding, the floor, etc!) and clean the thing (apparently it’s not as simple as washing a brush) we’re actually very happy to just keep rolling/cutting in with brushes and rollers. Who knows when we’ll change our minds though! Haha!
xo
s
Carol H. says
It might just be blog traffic over-load but the first link to Roo’s didn’t work. (I have to say I smiled at Roo’s 404 error wording).
YoungHouseLove says
Oh no! We just tried the link and it went through! Hope it was only a momentary glitch!
xo
s
Natalie says
Holy cow, it looks AMAZING!!!
I love how it instantly feels like a different room!
And I am art/picture-frame obsessed, but I think you should leave it art-free for awhile! It’s just so crisp, yet inviting – very “West Elm”! Nicely done, you two! :)
YoungHouseLove says
Aw thanks Natalie!
xo
s
Krystle @ Color Transformed Family says
I love all the gray and that you were able to tackle it in one “Clara Naptime”. You mentioned wondering why it took you over two years to get around to this and I couldn’t help but laugh. It took so long because you have been so busy completely over hauling the rest of the house. It looks great and will make the perfect entertainment house for your Christmas party. I hope it goes well. Maybe Young. LIfe. Love can give us a post about it.
YoungHouseLove says
Haha, we will definitely be posting about our first Christmas dinner ever as the hosts. Should be crazy and hilarious… here’s hoping nothing catches on fire!
xo
s
Kate says
I like it, but think I’ll love it more once it’s broken up a bit more like you’re planning to do!
This weekend I was in my own little frantic bit of nursery readying – washed and organized baby clothes/linens, put up curtains and a couple shelves. I’m still in the “the middle doesn’t make sense” stage in the nursery and just hoping that things come together in the end! Putting up the curtains and shelves has helped a bit, except now the other walls look so bare… the waiting in the middle part is so hard when you’re not super sure about your vision!
YoungHouseLove says
Oh yes, it’s all going to be gorgeous! When you hang things on the wall it really starts to come together. So exciting! Good luck Kate!
xo
s
Colleen Irby says
LOVE it. Just keep secretly hoping to see the custom silhouette pillow we made you “show up” one day. :)
YoungHouseLove says
Aw you’re so sweet, we love it so much!!
xo
s
mp says
Love it!
Natalie says
Looks fantastic, such a great grey!
Megan @ Two Live Colorfully says
Yayay! The painted brick looks amazing!!
And I’m dying over those pillows! I love the colors and pattern mix!
Jan says
So much better!
Rachel says
absolutely LOVE the bright pillows in front of the grey wall! I liked them before you painted the wall, but they just pop in front of that grey. I will definitely have to hunt around for some similar pillows.
BRIER says
Oh. I love this with all my heart.
It. Looks. Awesome.
…now to find ME some bricks to paint…
Bonnie @ the pin junkie says
Love it! This room is really starting to come together!
Jenna Sue says
So much better, guys! Love the gray with the pillow color palette. Can’t wait to see what you do with the art! ;)
Megan says
LOVE it!!! I want to touch it. Does that sound bad? The first picture is gorgeous next to all those pretty pillows. I can totally see some great art, white frames, and pictures up there.
Nicky at Not My Mother says
Love it! Is it just the picture or are there sort of spots where the paint hasn’t gone on the brick? It might just be the shadows of the brick texture but it gives it a lovely “shagged out”/vintage look, which IMHO is much cooler than perfectly painted brick!
YoungHouseLove says
Oh yes, I think it’s just a monitor/photo issue (in person it’s all fully covered, just to remove that red undertone) but there are cracks and craggy areas in the brick that still feel shabby and stuff, which is nice. Adds texture!
xo
s
Diane says
Perfect! It so “belongs” to the rest of the house now. I love that these things still make you so excited. I’m many, many more years into my home and I still get giddy over the little things.
(Glad to see Burger making his usual fine contribution to the project.)
Erica says
LOVE IT! I love grey! And I’m usually anti painting brick, but I am definitely on board with you guys painting that. I can’t see any other way around it! Looks great!
Tirsa says
Great progress in this room. Can’t wait to see it finished. Interesting how the sun room color looks pretty much like the living room color. I guess when you picture them together. I guess it’s because of the sunlight.
YoungHouseLove says
Yes, I think since it’s through glass and there’s all that light in that pic it looks similar, but in person when you’re in the sunroom it looks dark and crisp next to the white trim. Yumm.
xo
s
Kelly says
Looks AWESOME! Such a big impact for such a little price. SO why am I so afraid of paint???